Spring Boot 源码分析——自动配置
- 本篇以解决三个问题达到理解Spring Boot源码的目的
问题1. Spring Boot 如何巧妙的做到开箱即用,自动配置的?
Spring Boot提供了很多”开箱即用“的依赖模块,都是以spring-boot-starter-xx作为命名的。例如,之前提到的 spring-boot-starter-redis、spring-boot-starter-data-mongodb、spring-boot-starter-data-elasticsearch 等。
Spring Boot 的开箱即用是一个很棒的设计,给开发者带来很大的便利。开发者只要在 Maven 的 pom 文件中添加相关依赖后,Spring Boot 就会针对这个应用自动创建和注入需要的 Spring Bean 到上下文中。
那么,Spring Boot 如何巧妙的做到开箱即用,自动配置的呢?
现在,我们通过源码深入分析下 Spring Boot 的实现原理吧。
自动注入的核心在于 spring-boot-autoconfigure.jar 这个类库。在分析之前,我们先来看几个文件
@Configuration
@ConditionalOnClass({ JedisConnection.class, RedisOperations.class, Jedis.class })
@EnableConfigurationProperties
public class RedisAutoConfiguration {... }
@Configuration
@ConditionalOnClass({ Mongo.class, MongoRepository.class })
@ConditionalOnMissingBean({ MongoRepositoryFactoryBean.class,
   MongoRepositoryConfigurationExtension.class })
@ConditionalOnProperty(prefix = "spring.data.mongodb.repositories",
   name = "enabled", havingValue = "true", matchIfMissing = true)
@Import(MongoRepositoriesAutoConfigureRegistrar.class)
@AutoConfigureAfter(MongoDataAutoConfiguration.class)
public class MongoRepositoriesAutoConfiguration {... }
@Configuration
@ConditionalOnClass({ Client.class, TransportClientFactoryBean.class,
    NodeClientFactoryBean.class })
@EnableConfigurationProperties(ElasticsearchProperties.class)
public class ElasticsearchAutoConfiguration implements DisposableBean {... }
上面三个源码分别对应Redis、MongoDB、ElasticSearch。通过对比,我们会发现它们都有一个特点,都存在 @ConditionalOnClass 注解。这个注解就是问题的关键所在。
@ConditionalOnClass 是什么作用呢?我们先来大概理解下面的代码。

源码中的方法主要是是将 @ConditionalOnClass 的参数中对应的类进行查询和匹配。
那么,查询的目的是什么呢?查询的目的在于, @ConditionalOnClass 参数中对应的类在 classpath 目录下存在时,才会去解析对应的配置类,否则不解析该注解修饰的配置类。
因此,Spring Boot 的开箱即用的实现原理,就很好简单,用一句话就可以概括了。
Spring Boot 内部提供了很多自动化配置的类,例如,RedisAutoConfiguration 、MongoRepositoriesAutoConfiguration 、ElasticsearchAutoConfiguration , 这些自动化配置的类会判断 classpath 中是否存在自己需要的那个类,如果存在则会自动配置相关的配置,否则就不会自动配置,因此,开发者在 Maven 的 pom 文件中添加相关依赖后,这些依赖就会下载很多 jar 包到 classpath 中,有了这些 lib 就会触发自动化配置,所以,我们就能很便捷地使用对于的模块功能了。
问题2. EnableAutoConfiguration 帮助我们做了什么?
我们以 FreeMarker 的自动配置为例,重点讲解工作原理与加载过程。因为 FreeMarker 相对而言比较简单,Spring Boot 源码中只有三个类,所以作为案例相对而言比较好理解。
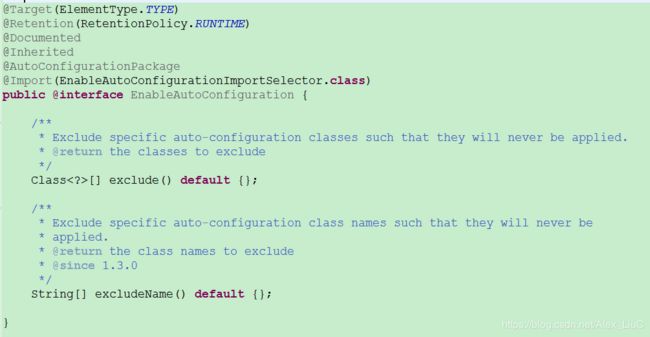
@EnableAutoConfiguration 的源码

这里,关键在于 @Import 注解导入的 EnableAutoConfigurationImportSelector 类中最为关键的是 getCandidateConfigurations 方法中通过 SpringFactoriesLoader.loadFactoryNames 扫描 spring.factories 文件。

现在,我们在来看下 SpringFactoriesLoader 源码。

所以 spring.factories 文件是相当重要,Spring Boot 通过扫描这个文件中的内容,判断有哪些自动配置。以 FreeMarker 为例,我们来看下它在该文件中是如何配置的。

所以,Spring Boot 通过扫描 spring.factories 文件中的 EnableAutoConfiguration 参数中有哪些自动配置并进行加载。
配置参数类 – FreeMarkerProperties
这里的配置参数,可以通过application.properties 中直接设置。我们发现,它的前缀必须是 spring.freemarker。

自动配置类 – FreeMarkerAutoConfiguration,自动加载了FreeMarkerProperties

Spring Boot 内部提供了很多自动化配置的类,例如,RedisAutoConfiguration 、MongoRepositoriesAutoConfiguration 、ElasticsearchAutoConfiguration , 这些自动化配置的类会判断 classpath 中是否存在自己需要的那个类,如果存在则会自动配置相关的配置,否则就不会自动配置,因此,开发者在 Maven 的 pom 文件中添加相关依赖后,这些依赖就会下载很多 jar 包到 classpath 中,有了这些 lib 就会触发自动化配置,所以,我们就能很便捷地使用对于的模块功能了。
此外,还有一个主要的注解是 @EnableConfigurationProperties ,主要用来加载我们上面提到的配置参数类。
第一注解是,@ConditionalOnMissingBean(name = “freeMarkerViewResolver”),指定当容器没有指定Bean的情况下的处理。
第二注解是,@ConditionalOnProperty,指定的属性是否有指定的值的处理,换句话说,如果在application.properties 没有配置,默认为 true,即条件符合。
问题3. 开发中如何实现私有的自动配置模块?
1. 先创建一个Maven项目,我来手动配置下 POM 文件。
<project xmlns="http://maven.apache.org/POM/4.0.0" xmlns:xsi="http://www.w3.org/2001/XMLSchema-instance"
    xsi:schemaLocation="http://maven.apache.org/POM/4.0.0 http://maven.apache.org/xsd/maven-4.0.0.xsd">
    <modelVersion>4.0.0</modelVersion>
    <parent>
        <groupId>org.springframework.boot</groupId>
        <artifactId>spring-boot-starter-parent</artifactId>
        <version>1.3.3.RELEASE</version>
     </parent>
    <groupId>com.lianggzone.demo</groupId>
    <artifactId>springboot-action-autoconfig</artifactId>
    <version>0.1</version>
    <packaging>jar</packaging>
    <name>springboot-action-autoconfig</name>
    <dependencies>
        <dependency>
            <groupId>org.springframework.boot</groupId>
            <artifactId>spring-boot-autoconfigure</artifactId>
        </dependency>
    </dependencies>
    <build>
        <plugins>
            <plugin>
                <groupId>org.springframework.boot</groupId>
                <artifactId>spring-boot-maven-plugin</artifactId>
            </plugin>
        </plugins>
    </build>
</project>
2. 参数的配置 - 属性参数类
首先,我们定义一个自定义前缀,叫做 custom 吧。之前说到,这里的配置参数,可以通过 application.properties 中直接设置。那么,我们创建一个作者的字段,设置默认值为 LiangGzone。
@ConfigurationProperties(prefix = "custom")
public class AuthorProperties {
    public static final String DEFAULT_AUTHOR = "LiangGzone";
    public String author = DEFAULT_AUTHOR;
    public String getAuthor() {
        return author;
    }
    public void setAuthor(String author) {
        this.author = author;
    }
}
3. 在 application.properties 中配置
#custom
custom.author = XXX
4. 编写对应的服务类,它的主要用途就是赋值。
public class AuthorServer {
    public String author;
    public String getAuthor() {
        return author;
    }
    public void setAuthor(String author) {
        this.author = author;
    }
}
5. 自动配置的核心 - 自动配置类
@ConditionalOnClass,参数中对应的类在 classpath 目录下存在时,才会去解析对应的配置类。因此,我们需要配置 AuthorServer 。
@EnableConfigurationProperties, 用来加载配置参数,所以它应该就是属性参数类 AuthorProperties。
@Configuration
@ConditionalOnClass({ AuthorServer.class })
@EnableConfigurationProperties(AuthorProperties.class)
public class AuthorAutoConfiguration {
    @Resource
    private AuthorProperties authorProperties;
    @Bean
    @ConditionalOnMissingBean(AuthorServer.class)
    @ConditionalOnProperty(name = "custom.author.enabled", matchIfMissing = true)
    public AuthorServer authorResolver() {
        AuthorServer authorServer = new AuthorServer();
        authorServer.setAuthor(authorProperties.getAuthor());
        return authorServer;
    }
}
authorResolver方法的作用,即 AuthorProperties 的参数赋值到AuthorServer 中。
6. spring.factories配置
我们需要实现自定义自动装配,就需要自定义 spring.factories 参数。所以,我们需要在 src/main/resources/ META-INF/spring.factories 中配置信息,值得注意的是,这个文件要自己创建。
# CUSTOM
org.springframework.boot.autoconfigure.EnableAutoConfiguration=\
com.lianggzone.springboot.autoconfig.author.AuthorAutoConfiguration
7. 功能打包与配置依赖
好了,我们已经实现了一个简单的自动配置功能。那么,我们需要将这个项目打成 jar 包部署在我们的本地或者私服上。然后,就可以用了。
我们在另外一个项目中,配置 Maven 依赖。
<dependency>
    <groupId>com.lianggzone.demo</groupId>
    <artifactId>springboot-action-autoconfig</artifactId>
    <version>0.1</version>
</dependency>
8. 测试
@RestController
@EnableAutoConfiguration
public class AuthorAutoConfigDemo {

    @Resource
    private AuthorServer authorServer;

    @RequestMapping("/custom/author")
    String home() {
        return "发布者:"+ authorServer.getAuthor();
    }
}
运行起来,我们看下打印的发布者信息是什么?
我们在 application.properties 中配置一个信息。
#custom
custom.author = XXX
http://blog.720ui.com/2017/springboot_source_autoconfigure_custom/
