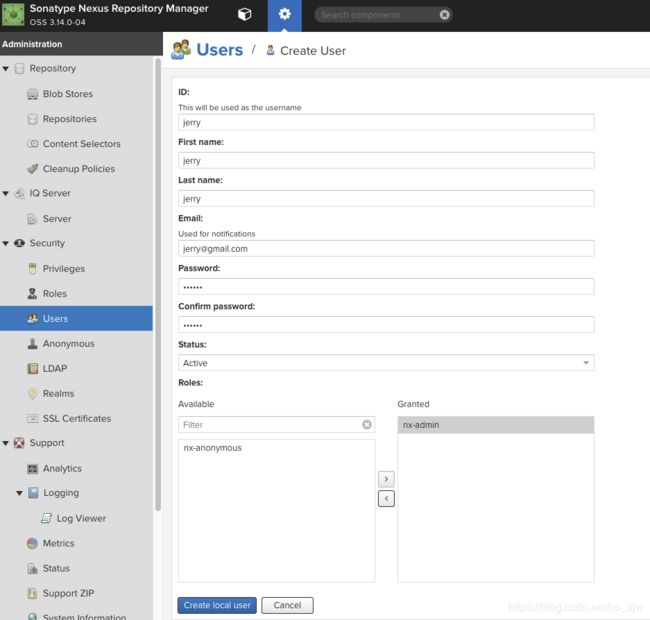
- 1分钟解决 -bash: mvn: command not found,在Centos 7中安装Maven
Energet!c
开发语言
1分钟解决-bash:mvn:commandnotfound,在Centos7中安装Maven检查Java环境1下载Maven2解压Maven3配置环境变量4验证安装5常见问题与注意事项6总结检查Java环境Maven依赖Java环境,请确保系统已经安装了Java并配置了环境变量。可以通过以下命令检查:java-version如果未安装,请先安装Java。1下载Maven从官网下载:前往Apach
- spring如何整合druid连接池?
惜.己
springspringjunit数据库javaidea后端xml
目录spring整合druid连接池1.新建maven项目2.新建mavenModule3.导入相关依赖4.配置log4j2.xml5.配置druid.xml1)xml中如何引入properties2)下面是配置文件6.准备jdbc.propertiesJDBC配置项解释7.配置druid8.测试spring整合druid连接池1.新建maven项目打开IDE(比如IntelliJIDEA,Ecl
- maven-assembly-plugin 打包实例
带着二娃去遛弯
1.先在pom.xml文件中添加assembly打包插件org.apache.maven.pluginsmaven-assembly-plugin2.6assembly/assembly.xmlmake-assemblypackagesingle说明:1.需要修改的可能就是descriptors标签下面的打包配置文件目录,指定assembly.xml的路径.2.可以添加多个打包配置文件,进行多种形
- Sentinel实时监控不展示问题
朱杰jjj
sentinelsentinel
问题官方插件Endpoint支持,可以实时统计出SpringBoot的健康状况和请求的调用信息在使用Endpoint特性之前需要在Maven中添加spring-boot-starter-actuator依赖,并在配置中允许Endpoints的访问。SpringBoot1.x中添加配置management.security.enabled=false。暴露的endpoint路径为/sentinelS
- 上传文件到钉盘流程详解
jspyth
开发场景案例分析开发语言java后端
文章目录前言准备工作实现过程Maven依赖封装一个工具类获取文件上传信息unionId获取钉盘目录spaceId创建上传到钉盘前言 本文详解如何通过钉钉的API实现上传文件到钉盘目录,代码通过JAVA实现。准备工作1、在钉钉开发者后台创建一个钉钉企业内部应用;2、创建并保存好应用的appKey和appSecret,后面用于获取调用API的请求token;3、应用中配置好所需权限:企业存储文件上传
- 【免费】springboot项目申报管理系统|毕业设计|Javaweb项目
计算机学姐来啦
springbootssmjavaspringboot课程设计后端毕设毕业设计java-ee
收藏点赞不迷路关注作者有好处编号:springboot375springboot项目申报管理系统开发语言:Java数据库:MySQL技术:Spring+SpringMVC+MyBatis工具:IDEA/Ecilpse、Navicat、Maven1.万字文档展示(部分)2.系统图片展示第5章系统详细设计5.1管理员功能模块的实现5.1.1项目列表如图5.1显示的就是项目列表页面,此页面提供给管理员的
- 史上最全的maven的pom.xml文件详解
Meta999
Maven
注:详解文件中,用红色进行标注的是平常项目中常用的配置节点。要详细学习!转载的,太经典了、、、、欢迎收藏xxxxxxxxxxxx4.0.0xxxxxxjar1.0-SNAPSHOTxxx-mavenhttp://maven.apache.orgAmavenprojecttostudymaven.jirahttp://jira.baidu.com/
[email protected]
- Mybatis实现员工管理系统
wu1113_
mybatisjavamaven
文章目录1.案例需求2.编程思路3.案例源码4.小结1.案例需求在上次做的父子模块的maven以及Ajax实现人工管理系统的基础上使用Mybatis实现员工管理系统的增删改查,具体运行效果如下:2.编程思路Mybatis框架的一般执行流程:创建MyBatis配置文件mybatis-config.xml在里面加载数据源、事务等,管理映射文件创建需要的映射文件mapper.xml,用于映射表中列和实体
- idea右侧工具栏找不到maven窗口
足球数据分析
intellij-idea
idea没有识别到是maven项目处理方案:右键pom.xml文件,点击"addasmavenproject"
- [附源码]SSM计算机毕业设计游戏账号交易平台JAVA
计算机程序源码
java游戏mysql
项目运行环境配置:Jdk1.8+Tomcat7.0+Mysql+HBuilderX(Webstorm也行)+Eclispe(IntelliJIDEA,Eclispe,MyEclispe,Sts都支持)。项目技术:SSM+mybatis+Maven+Vue等等组成,B/S模式+Maven管理等等。环境需要1.运行环境:最好是javajdk1.8,我们在这个平台上运行的。其他版本理论上也可以。2.ID
- Python+Django毕业设计校园易购二手交易平台(程序+LW+部署)
Python、JAVA毕设程序源码
课程设计javamysql
项目运行环境配置:Jdk1.8+Tomcat7.0+Mysql+HBuilderX(Webstorm也行)+Eclispe(IntelliJIDEA,Eclispe,MyEclispe,Sts都支持)。项目技术:SSM+mybatis+Maven+Vue等等组成,B/S模式+Maven管理等等。环境需要1.运行环境:最好是javajdk1.8,我们在这个平台上运行的。其他版本理论上也可以。2.ID
- Hadoop windows intelij 跑 MR WordCount
piziyang12138
一、软件环境我使用的软件版本如下:IntellijIdea2017.1Maven3.3.9Hadoop分布式环境二、创建maven工程打开Idea,file->new->Project,左侧面板选择maven工程。(如果只跑MapReduce创建java工程即可,不用勾选Creatfromarchetype,如果想创建web工程或者使用骨架可以勾选)image.png设置GroupId和Artif
- Failure to find (pom/jar) in http://xxx.com was cached in the local repository
@Young Cheung
jarjava
maven项目reimport正常,但是package就报错Failuretofind(pom/jar)inhttp://xxx.comwascachedinthelocalrepository到本地仓库将报错的jar包拷贝的任意目录下,在该目录下执行mvninstall:install-file-DgroupId=com.aliyun.oss-DartifactId=aliyun-sdk-oss
- Spring Data JPA
kjcoder
SpringDataJPA后端
JPA概述JPA的全称是JavaPersistenceAPI,即Java持久化API,是SUN公司推出的一套基于ORM的规范,内部是由一系列的接口和抽象类构成。JPA规范不干活,真正干活的是依托与它的实现方式(例:hibernate)。搭建环境(需求:保存客户)1.创建maven工程导入坐标org.hibernatehibernate-entitymanager2.需要配置jpa的核心配置文件*位
- 搭建第一个SpringDataJPA工程
码来码去(未来可期)
JavaWebjava
第一步:创建maven工程,导入maven坐标使用SpringDataJPA,需要整合Spring与SpringDataJPA,并且需要提供JPA的服务提供者hibernate,所以需要导入spring相关坐标,hibernate坐标,数据库驱动坐标等4.2.4.RELEASE5.0.7.Final1.6.61.2.120.9.1.25.1.6junitjunit4.9testorg.aspect
- 测者的测试技术手册:Junit执行单元测试用例成功,mvn test却失败的问题和解决方法
Criss陈磊
今天遇见了一个奇怪的问题,在IDE中rununittest,全部cases都成功了,但是后来通过mvntest运行case确保错了。在寻求原因的同时也找到了对应的解决方法。RunUnitTest和Maventest的区别差异1:在IDE中通过选中单元测试路径,点击右键选择runtest和点击maven中的test是有区别的。在Maven执行测试的过程中,是不允许测试cases访问其他项目的测试类和
- spring boot--在spring security下使用h2
黑夜_蚊香
配置maven依赖org.springframework.bootspring-boot-starter-parent2.2.0.RELEASEorg.springframework.bootspring-boot-starter-weborg.springframework.bootspring-boot-starter-securitycom.h2databaseh2runtimeWebSec
- springboot宠物咖啡馆平台的设计与实现
然然学长
springboot宠物java后端intellij-idea开发语言
运行环境环境说明:开发语言:java框架:springboot,vueJDK版本:JDK1.8数据库:mysql5.7+(推荐5.7,8.0也可以)数据库工具:Navicat11+开发软件:idea/eclipse(推荐idea)Maven包:Maven3.3.9+系统详细实现管理员模块的实现用户信息管理基于SpringBoot的宠物咖啡馆平台的设计与实现的系统管理员可以管理用户,可以对用户信息添
- 大二上学期详细学习计划
学会沉淀。
学习
本学习完成目标:项目:书籍:《mysql必知必会》《java核心技术卷》(暂时)加强JavaSE的学习,掌握Java核心Mysql+sql(把牛客上的那50道sql语句题写完)git+maven完成springboot项目(跟着黑马敲)对于每天的Java学习进行记录算法:刷题(多去刷cf上的题,每周15道)针对最近比赛薄弱的地方加强练习(图论,字符串,动态规划,搜索)cf先上1400,牛客和atc
- springboot自动装配和统一配置分析
DEARM LINER
springbootjava后端
提示:文章写完后,目录可以自动生成,如何生成可参考右边的帮助文档文章目录前言spring项目搭建1、idea创建maven项目,pom文件引入springboot依赖2、创建启动类1、自动装配1.1、@SpringBootApplication1.2、SpringApplication.run()2、统一配置管理1、SpringApplication.run(),找到相关的配置文件,加入解析到到e
- MyBatis Plus 实战详解
Aries263
redis分布式数据库
一、引言MyBatisPlus(简称MP)是MyBatis的增强工具,旨在简化开发、提高效率。它保留了MyBatis的强大功能,并在其基础上进行了扩展和优化,提供了强大的CRUD操作、配置选项、条件构造器等功能。本文将详细介绍MyBatisPlus的安装、配置、基本操作以及分页和条件查询的使用。二、安装与配置1.添加依赖首先,在Maven项目的pom.xml中添加MyBatisPlus的依赖。以下
- DSL
Davisxy
kotlinDSLKotlinokhttp
转载:摘抄自《Kotlin极简教程》-陈光剑DSL是什么DSL(Domain-SpecificLanguage,领域特定语言)指的是专注于特定问题领域的计算机语言(领域专用语言)。不同于通用的计算机语言(GPL),领域特定语言只用在某些特定的领域。比如用来显示网页的HTML语言,以及Emacs所使用的EmacLISP语言等。更加典型的例子是Gradle,它基于Ant和Maven,使用基于Groov
- 怎么修改mvn的java版本
勤奋的小王同学~
问题解决方案合集java开发语言
在maven所在目录下的bin目录中找到mvn.cmd文件,选中这个文件后,鼠标右键选择编辑。在第一行添加java对应版本号的jre的路径再次重新查看cmd下的指定的mvn-version的java版本
- java实现将数据生成图表至excel导出
AdoredU
1.目的根据已有数据,手动(java后台)生成图表至excel并导出。用于后台查询到数据后直接创建图表,可以代替直接使用图表信息字符串。2.说明使用jfree图表绘制类库绘制图表,并生成到本地或读取至输出流用于在excel中生成;使用poi操作excel;3.使用jar包使用maven管理jar包,主要包含poi和jfree:3.11org.apache.poipoi${poi-version}o
- 基于java+SpringBoot+Vue的小徐影城管理系统设计与实现
paterWang
Java精品毕设实战计算机毕业设计Javajavaspringbootvue.js
开发语言:Java数据库:MySQL技术:SpringBoot+MyBatis工具:IDEA/Ecilpse、Navicat、Maven系统简介小徐影城管理系统是一款基于Java、SpringBoot和Vue.js技术开发的影院管理系统,旨在为用户提供一个便捷、高效的在线购票和影院管理平台。系统通过B/S架构,实现了管理员和用户两端的功能操作,使得影院管理更加系统化、规范化。整体功能包含:电影信息
- maven的基本使用(IDEA)
枫叶_绒
mavenidea
1、使用maven构建一个项目(IDEA):普通项目1、找到并选maven,普通项目不用勾选红框2、直接点击下一步,填写GroupId,ArtifactId,Version自己定义3、点击完成,就创建成功了项目目录结构pom配置文件4.0.0com.liujiaweimymavendemo011.0-SNAPSHOT<maven.compiler.source&
- 计算机毕业设计 SSM高校网上报名系统 网上报名数据系统 会计网上报名系统Java
计算机程序老哥
作者主页:计算机毕业设计老哥有问题可以主页问我一、开发介绍1.1开发环境开发语言:Java数据库:MySQL系统架构:B/S后端:SSM(Spring+SpringMVC+Mybatis)前端:Vue工具:IDEA或者Eclipse,JDK1.8,Maven二、系统介绍2.1图片展示注册登录页面:登陆前端页面功能:首页、级别专业、系统论坛、系统公告、个人中心、后台管理、在线客服首页级别专业系统公告
- 编写单元测试
纣王家子迎新
java单元测试java学习JUnitMockito
编写单元测试是Java开发中一个非常重要的环节,它有助于确保代码的正确性和稳定性。JUnit在Java中,JUnit是最常用的单元测试框架之一。下面我将为你概述如何使用JUnit来编写单元测试。1.添加JUnit依赖首先,确保你的项目中已经添加了JUnit的依赖。如果你使用的是Maven项目,可以在pom.xml文件中添加如下依赖(以JUnit5为例):org.junit.jupiterjunit
- 彻底理解MyBatis的环境如何搭建(超详细)
努力编程的阿伟
mybatis
环境搭建步骤(烹饪过程)1.添加依赖准备食材当你准备做一顿大餐时,你首先需要列出所有必需的食材。在MyBatis的世界里,这些食材就是依赖库,你需要在你的pom.xml(食谱清单)中添加MyBatis及其数据库驱动的依赖,这样你的项目就有了所需的所有原料。当使用Maven时,可以在pom.xml文件中添加如下依赖:org.mybatismybatis版本号数据库驱动的groupId数据库驱动的ar
- seata基本使用,柚子快报邀请码778899
登录成功
把seata的使用在这里做了一个总结,希望能够帮助到大家。本案例在实施过程中,威哥力求简单明了,希望大家在学习过程中能够掌握其中的每个细节。好了,废话不多说,如果我们要学习seata,首先需要具备如下技术储备:数据库事务的基本知识;maven工具的使用;熟悉SpringCloudAlibaba技术栈;掌握SpringDataJPA简单使用;一.Seata基本概念1.seata是什么Seata是阿里
- 解读Servlet原理篇二---GenericServlet与HttpServlet
周凡杨
javaHttpServlet源理GenericService源码
在上一篇《解读Servlet原理篇一》中提到,要实现javax.servlet.Servlet接口(即写自己的Servlet应用),你可以写一个继承自javax.servlet.GenericServletr的generic Servlet ,也可以写一个继承自java.servlet.http.HttpServlet的HTTP Servlet(这就是为什么我们自定义的Servlet通常是exte
- MySQL性能优化
bijian1013
数据库mysql
性能优化是通过某些有效的方法来提高MySQL的运行速度,减少占用的磁盘空间。性能优化包含很多方面,例如优化查询速度,优化更新速度和优化MySQL服务器等。本文介绍方法的主要有:
a.优化查询
b.优化数据库结构
- ThreadPool定时重试
dai_lm
javaThreadPoolthreadtimertimertask
项目需要当某事件触发时,执行http请求任务,失败时需要有重试机制,并根据失败次数的增加,重试间隔也相应增加,任务可能并发。
由于是耗时任务,首先考虑的就是用线程来实现,并且为了节约资源,因而选择线程池。
为了解决不定间隔的重试,选择Timer和TimerTask来完成
package threadpool;
public class ThreadPoolTest {
- Oracle 查看数据库的连接情况
周凡杨
sqloracle 连接
首先要说的是,不同版本数据库提供的系统表会有不同,你可以根据数据字典查看该版本数据库所提供的表。
select * from dict where table_name like '%SESSION%';
就可以查出一些表,然后根据这些表就可以获得会话信息
select sid,serial#,status,username,schemaname,osuser,terminal,ma
- 类的继承
朱辉辉33
java
类的继承可以提高代码的重用行,减少冗余代码;还能提高代码的扩展性。Java继承的关键字是extends
格式:public class 类名(子类)extends 类名(父类){ }
子类可以继承到父类所有的属性和普通方法,但不能继承构造方法。且子类可以直接使用父类的public和
protected属性,但要使用private属性仍需通过调用。
子类的方法可以重写,但必须和父类的返回值类
- android 悬浮窗特效
肆无忌惮_
android
最近在开发项目的时候需要做一个悬浮层的动画,类似于支付宝掉钱动画。但是区别在于,需求是浮出一个窗口,之后边缩放边位移至屏幕右下角标签处。效果图如下:
一开始考虑用自定义View来做。后来发现开线程让其移动很卡,ListView+动画也没法精确定位到目标点。
后来想利用Dialog的dismiss动画来完成。
自定义一个Dialog后,在styl
- hadoop伪分布式搭建
林鹤霄
hadoop
要修改4个文件 1: vim hadoop-env.sh 第九行 2: vim core-site.xml <configuration> &n
- gdb调试命令
aigo
gdb
原文:http://blog.csdn.net/hanchaoman/article/details/5517362
一、GDB常用命令简介
r run 运行.程序还没有运行前使用 c cuntinue
- Socket编程的HelloWorld实例
alleni123
socket
public class Client
{
public static void main(String[] args)
{
Client c=new Client();
c.receiveMessage();
}
public void receiveMessage(){
Socket s=null;
BufferedRea
- 线程同步和异步
百合不是茶
线程同步异步
多线程和同步 : 如进程、线程同步,可理解为进程或线程A和B一块配合,A执行到一定程度时要依靠B的某个结果,于是停下来,示意B运行;B依言执行,再将结果给A;A再继续操作。 所谓同步,就是在发出一个功能调用时,在没有得到结果之前,该调用就不返回,同时其它线程也不能调用这个方法
多线程和异步:多线程可以做不同的事情,涉及到线程通知
&
- JSP中文乱码分析
bijian1013
javajsp中文乱码
在JSP的开发过程中,经常出现中文乱码的问题。
首先了解一下Java中文问题的由来:
Java的内核和class文件是基于unicode的,这使Java程序具有良好的跨平台性,但也带来了一些中文乱码问题的麻烦。原因主要有两方面,
- js实现页面跳转重定向的几种方式
bijian1013
JavaScript重定向
js实现页面跳转重定向有如下几种方式:
一.window.location.href
<script language="javascript"type="text/javascript">
window.location.href="http://www.baidu.c
- 【Struts2三】Struts2 Action转发类型
bit1129
struts2
在【Struts2一】 Struts Hello World http://bit1129.iteye.com/blog/2109365中配置了一个简单的Action,配置如下
<!DOCTYPE struts PUBLIC
"-//Apache Software Foundation//DTD Struts Configurat
- 【HBase十一】Java API操作HBase
bit1129
hbase
Admin类的主要方法注释:
1. 创建表
/**
* Creates a new table. Synchronous operation.
*
* @param desc table descriptor for table
* @throws IllegalArgumentException if the table name is res
- nginx gzip
ronin47
nginx gzip
Nginx GZip 压缩
Nginx GZip 模块文档详见:http://wiki.nginx.org/HttpGzipModule
常用配置片段如下:
gzip on; gzip_comp_level 2; # 压缩比例,比例越大,压缩时间越长。默认是1 gzip_types text/css text/javascript; # 哪些文件可以被压缩 gzip_disable &q
- java-7.微软亚院之编程判断俩个链表是否相交 给出俩个单向链表的头指针,比如 h1 , h2 ,判断这俩个链表是否相交
bylijinnan
java
public class LinkListTest {
/**
* we deal with two main missions:
*
* A.
* 1.we create two joined-List(both have no loop)
* 2.whether list1 and list2 join
* 3.print the join
- Spring源码学习-JdbcTemplate batchUpdate批量操作
bylijinnan
javaspring
Spring JdbcTemplate的batch操作最后还是利用了JDBC提供的方法,Spring只是做了一下改造和封装
JDBC的batch操作:
String sql = "INSERT INTO CUSTOMER " +
"(CUST_ID, NAME, AGE) VALUES (?, ?, ?)";
- [JWFD开源工作流]大规模拓扑矩阵存储结构最新进展
comsci
工作流
生成和创建类已经完成,构造一个100万个元素的矩阵模型,存储空间只有11M大,请大家参考我在博客园上面的文档"构造下一代工作流存储结构的尝试",更加相信的设计和代码将陆续推出.........
竞争对手的能力也很强.......,我相信..你们一定能够先于我们推出大规模拓扑扫描和分析系统的....
- base64编码和url编码
cuityang
base64url
import java.io.BufferedReader;
import java.io.IOException;
import java.io.InputStreamReader;
import java.io.PrintWriter;
import java.io.StringWriter;
import java.io.UnsupportedEncodingException;
- web应用集群Session保持
dalan_123
session
关于使用 memcached 或redis 存储 session ,以及使用 terracotta 服务器共享。建议使用 redis,不仅仅因为它可以将缓存的内容持久化,还因为它支持的单个对象比较大,而且数据类型丰富,不只是缓存 session,还可以做其他用途,一举几得啊。1、使用 filter 方法存储这种方法比较推荐,因为它的服务器使用范围比较多,不仅限于tomcat ,而且实现的原理比较简
- Yii 框架里数据库操作详解-[增加、查询、更新、删除的方法 'AR模式']
dcj3sjt126com
数据库
public function getMinLimit () { $sql = "..."; $result = yii::app()->db->createCo
- solr StatsComponent(聚合统计)
eksliang
solr聚合查询solr stats
StatsComponent
转载请出自出处:http://eksliang.iteye.com/blog/2169134
http://eksliang.iteye.com/ 一、概述
Solr可以利用StatsComponent 实现数据库的聚合统计查询,也就是min、max、avg、count、sum的功能
二、参数
- 百度一道面试题
greemranqq
位运算百度面试寻找奇数算法bitmap 算法
那天看朋友提了一个百度面试的题目:怎么找出{1,1,2,3,3,4,4,4,5,5,5,5} 找出出现次数为奇数的数字.
我这里复制的是原话,当然顺序是不一定的,很多拿到题目第一反应就是用map,当然可以解决,但是效率不高。
还有人觉得应该用算法xxx,我是没想到用啥算法好...!
还有觉得应该先排序...
还有觉
- Spring之在开发中使用SpringJDBC
ihuning
spring
在实际开发中使用SpringJDBC有两种方式:
1. 在Dao中添加属性JdbcTemplate并用Spring注入;
JdbcTemplate类被设计成为线程安全的,所以可以在IOC 容器中声明它的单个实例,并将这个实例注入到所有的 DAO 实例中。JdbcTemplate也利用了Java 1.5 的特定(自动装箱,泛型,可变长度
- JSON API 1.0 核心开发者自述 | 你所不知道的那些技术细节
justjavac
json
2013年5月,Yehuda Katz 完成了JSON API(英文,中文) 技术规范的初稿。事情就发生在 RailsConf 之后,在那次会议上他和 Steve Klabnik 就 JSON 雏形的技术细节相聊甚欢。在沟通单一 Rails 服务器库—— ActiveModel::Serializers 和单一 JavaScript 客户端库——&
- 网站项目建设流程概述
macroli
工作
一.概念
网站项目管理就是根据特定的规范、在预算范围内、按时完成的网站开发任务。
二.需求分析
项目立项
我们接到客户的业务咨询,经过双方不断的接洽和了解,并通过基本的可行性讨论够,初步达成制作协议,这时就需要将项目立项。较好的做法是成立一个专门的项目小组,小组成员包括:项目经理,网页设计,程序员,测试员,编辑/文档等必须人员。项目实行项目经理制。
客户的需求说明书
第一步是需
- AngularJs 三目运算 表达式判断
qiaolevip
每天进步一点点学习永无止境众观千象AngularJS
事件回顾:由于需要修改同一个模板,里面包含2个不同的内容,第一个里面使用的时间差和第二个里面名称不一样,其他过滤器,内容都大同小异。希望杜绝If这样比较傻的来判断if-show or not,继续追究其源码。
var b = "{{",
a = "}}";
this.startSymbol = function(a) {
- Spark算子:统计RDD分区中的元素及数量
superlxw1234
sparkspark算子Spark RDD分区元素
关键字:Spark算子、Spark RDD分区、Spark RDD分区元素数量
Spark RDD是被分区的,在生成RDD时候,一般可以指定分区的数量,如果不指定分区数量,当RDD从集合创建时候,则默认为该程序所分配到的资源的CPU核数,如果是从HDFS文件创建,默认为文件的Block数。
可以利用RDD的mapPartitionsWithInd
- Spring 3.2.x将于2016年12月31日停止支持
wiselyman
Spring 3
Spring 团队公布在2016年12月31日停止对Spring Framework 3.2.x(包含tomcat 6.x)的支持。在此之前spring团队将持续发布3.2.x的维护版本。
请大家及时准备及时升级到Spring
- fis纯前端解决方案fis-pure
zccst
JavaScript
作者:zccst
FIS通过插件扩展可以完美的支持模块化的前端开发方案,我们通过FIS的二次封装能力,封装了一个功能完备的纯前端模块化方案pure。
1,fis-pure的安装
$ fis install -g fis-pure
$ pure -v
0.1.4
2,下载demo到本地
git clone https://github.com/hefangshi/f