Spring Cloud 2.0 实战——Eureka(一.搭建服务注册中心)
根据《SpringCloud微服务实战》第三章,使用SpringBoot 2.0.1.RELEASE版本,对应的SpringCloud版本为Finchley.M7
构建服务注册中心
首先创建一个基本的SpringBoot工程,命名为eurekaserver,向pom文件中引入必要的依赖。
pom.xml
<project xmlns="http://maven.apache.org/POM/4.0.0" xmlns:xsi="http://www.w3.org/2001/XMLSchema-instance" xsi:schemaLocation="http://maven.apache.org/POM/4.0.0 http://maven.apache.org/xsd/maven-4.0.0.xsd">
    <modelVersion>4.0.0modelVersion>

    <groupId>eureka-servergroupId>
    <artifactId>eureka-serverartifactId>
    <version>1.0-SNAPSHOTversion>
    <parent>
        <groupId>org.springframework.bootgroupId>
        <artifactId>spring-boot-starter-parentartifactId>
        <version>2.0.1.RELEASEversion>
    parent>


    <dependencyManagement>
        <dependencies>
            <dependency>
                <groupId>org.springframework.cloudgroupId>
                <artifactId>spring-cloud-dependenciesartifactId>
                <version>Finchley.M7version>
                <type>pomtype>
                <scope>importscope>
            dependency>
        dependencies>
    dependencyManagement>
    <dependencies>

        <dependency>
            <groupId>org.springframework.cloudgroupId>
            <artifactId>spring-cloud-starter-netflix-eureka-serverartifactId>
        dependency>

        <dependency>
            <groupId>org.springframework.bootgroupId>
            <artifactId>spring-boot-starter-webartifactId>
        dependency>

        <dependency>
            <groupId>org.springframework.bootgroupId>
            <artifactId>spring-boot-starter-testartifactId>
        dependency>

        <dependency>
            <groupId>org.springframework.cloudgroupId>
            <artifactId>spring-cloud-starter-eurekaartifactId>
            <version>1.4.0.RELEASEversion>
        dependency>
        <dependency>
            <groupId>org.springframework.cloudgroupId>
            <artifactId>spring-cloud-config-serverartifactId>
            <version>1.4.3.RELEASEversion>
        dependency>
    dependencies>


    <repositories>
        <repository>
            <id>spring-milestonesid>
            <name>Spring Milestonesname>
            <url>https://repo.spring.io/libs-milestoneurl>
            <snapshots>
                <enabled>falseenabled>
            snapshots>
        repository>
    repositories>

    <build>
        <plugins>
            <plugin>
                <groupId>org.springframework.bootgroupId>
                <artifactId>spring-boot-maven-pluginartifactId>
            plugin>
        plugins>
    build>

project>
启动类EurekaApplication
在启动类上添加@EnableEurekaServer注解
import org.springframework.boot.SpringApplication;
import org.springframework.boot.autoconfigure.SpringBootApplication;
import org.springframework.cloud.netflix.eureka.server.EnableEurekaServer;

@SpringBootApplication
@EnableEurekaServer
public class EurekaApplication {
    public static void main(final String []args){
        SpringApplication.run(EurekaApplication.class,args);
    }
}
配置文件application.yaml
server:
  port: 8100
eureka:
  instance:
    hostname: server1
  client:
    serviceUrl:
          defaultZone: http://${eureka.instance.hostname}:${server.port}/eureka/
    register-with-eureka: false
    fetch-registry: false
因为后面还要做高可用注册中心,所以将端口设置为8100。
eureka.client.register-with-eureka:
因为该应用为注册中心,所以设置为false,代表不向注册中心注册自己。
eureka.client.fetch-registry:
同理,因为是注册中心,职责就是维护服务实力,并不需要去检索服务。所以也设置为false。
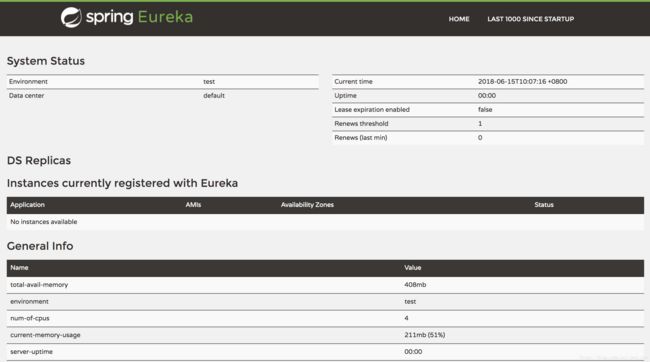
此时我们访问http://localhost:8100/就可以看到如下效果图。
此时Instances currently registered with Eureka是空的,证明没有任何服务注册到注册中心。
界面中的就是当前注册中心状态监控情况。可以自行翻译。
此时服务注册中心的搭建的完成了,下面我们将一个现有的SpringBoot应用加入到服务注册中心。
注册服务提供者
这里可以用既有的SpringBoot加入到到服务治理体系中。所以我直接用之前的项目,
当然也可以创建一个新的SpingBoot,我试过用SpringBoot 1.3.5.RELEASE+SpringCloud Brixton.RELEASE向上面的高版本server注册,成功,所以版本并不会影响向服务中心注册。
pom.xml
因为之前毕设的项目中引入了好多依赖,所以这只贴出必要的SpringCloud依赖
    <parent>
        <groupId>org.springframework.bootgroupId>
        <artifactId>spring-boot-starter-parentartifactId>
        <version>2.0.1.RELEASEversion>
    parent>


    <dependencyManagement>
        <dependencies>
            <dependency>
                <groupId>org.springframework.cloudgroupId>
                <artifactId>spring-cloud-dependenciesartifactId>
                <version>Finchley.M7version>
                <type>pomtype>
                <scope>importscope>
            dependency>
        dependencies>
    dependencyManagement>

    <dependencies>
        <dependency>
            <groupId>org.springframework.bootgroupId>
            <artifactId>spring-boot-starter-webartifactId>
        dependency>

        <dependency>
            <groupId>org.springframework.bootgroupId>
            <artifactId>spring-boot-starter-testartifactId>
            <scope>testscope>
        dependency>

        <dependency>
            <groupId>org.springframework.cloudgroupId>
            <artifactId>spring-cloud-starter-netflix-eureka-clientartifactId>
        dependency>
     dependencies>
添加HelloController类,通过注入DiscoberyClient对象,在日志中打印出服务的相关内容。
HelloController
import lombok.extern.slf4j.Slf4j;
import org.springframework.beans.factory.annotation.Autowired;
import org.springframework.cloud.client.ServiceInstance;
import org.springframework.cloud.client.discovery.DiscoveryClient;
import org.springframework.cloud.client.serviceregistry.Registration;
import org.springframework.web.bind.annotation.GetMapping;
import org.springframework.web.bind.annotation.RestController;

import java.util.List;

@Slf4j
@RestController
public class HelloController {
    @Autowired
    private Registration registration;// 服务注册
    @Autowired
    private DiscoveryClient client;

    @GetMapping(value = "/hello")
    public String index(){
        List instances = client.getInstances(registration.getServiceId());
        if (instances != null && instances.size() > 0) {
            log.info("/hello,host:" + instances.get(0).getHost()+", service_id:"+instances.get(0).getServiceId());
        }
        return "hello,provider";
    }
}
然后,在主类加上@EnableDiscoveryClient注解
启动类AirApplication
import org.springframework.boot.SpringApplication;
import org.springframework.boot.autoconfigure.SpringBootApplication;
import org.springframework.cloud.client.discovery.EnableDiscoveryClient;

@SpringBootApplication
@EnableDiscoveryClient
public class AirApplication{
    public  static void main(String[] args){
        SpringApplication.run(AirApplication.class,args);
    }
}
最后我们需要在配置文件中添加配置信息spring.application.name属性来为服务命名,比如:eureka-client-consumer。再通过eureka.client.service-url.defaultZone属性来制定服务注中心的地址,这里我们指定为之前构建的服务注册中心地址。
application.yaml
server:
  port: 8000
spring:
    application:
        name: eureka-client-consumer
eureka:
  client:
    service-url:
           defaultZone: http://localhost:8100/eureka
下面我们就分别启动服务注册中心,以及服务提供者。我们可以看到服务提供者的控制台中,当Tomcat启动之后,com.netflix.discovery.DiscoveryClient对象打印来该服务注册信息,表示服务注册成功。

同时我们访问Eureka的信息面板,可以在Instances currently registered with Eureka找到服务的注册信息。

我们接着访问http://localhost:8100/可以在控制台中获取以下信息:
![]()
这些输出内容就是之前在HelloController中注入的DIscoveryClient接口对象,从服务注册中心获取的服务相关信息。
此时我们就完成了一个服务注册中心,以及一个服务提供者。
