Spring Boot/Cloud
-
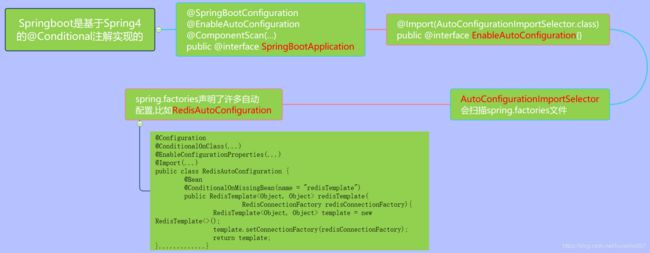
先认识@Conditional注解
-
Spring Boot 核心(一)
-
Spring Boot 核心(二)
-
学习 Spring Boot 知识看这一篇就够了
-
拜托!面试请不要再问我Spring Cloud底层原理!
-
纯洁的微笑 Spring Cloud 系列文章
-
下面总结Spring Cloud常用组件的使用.
1:服务治理Eureka:
服务端:添加@EnableEurekaServer注解,配置文件eureka.client.serviceUrl.defaultZone=http://localhost:${server.port}/eureka/
客户端:添加@EnableDiscoveryClient注解,配置文件eureka.client.serviceUrl.defaultZone=http://localhost:8000/eureka/2:客户端负载均衡Ribbon:
Step1:
 @Bean
 @LoadBalanced
RestTemplate restTemplate() {
 	return new RestTemplate();
 }
Step2:
@Autowired RestTemplate restTemplate; restTemplate.getForObject("http://spring-cloud-producer/hello?name="+name,String.class);3:服务容错保护Hystrix:
在ribbon使用断路器:
Step1:加@EnableHystrix注解开启Hystrix.@SpringBootApplication @EnableDiscoveryClient @EnableHystrix public class ServiceRibbonApplication { public static void main(String[] args) { SpringApplication.run(ServiceRibbonApplication.class, args); } @Bean @LoadBalanced RestTemplate restTemplate() {return new RestTemplate(); } }Step2:控制层或业务层添加@HystrixCommand注解并指定回调方法.
 @SpringBootApplication
 @Service
 public class HelloService {
 @Autowired
 RestTemplate restTemplate;
 @HystrixCommand(fallbackMethod = "hiError")
 public String hiService(String name) {
 return restTemplate.getForObject("http://SERVICE-HI/hi?name="+name,String.class);
 }
 public String hiError(String name) {
 return "hi,"+name+",sorry,error!";
 }
}
在Feign中使用断路器:
Step1:配置文件,Feign是自带断路器的,它没有默认打开。需要在配置文件中配置打开它,在配置文件加以下代码:
feign.hystrix.enabled=trueStep2:创建回调类
@Component
public class HelloRemoteHystrix implements HelloRemote{
@Override
public String hello(@RequestParam(value = "name") String name) {
 return "hello" +name+", this messge send failed ";
 }
}
Step3:添加fallback属性
@Component @FeignClient(name= "spring-cloud-producer",fallback = HelloRemoteHystrix.class) public interface HelloRemote { @RequestMapping(value = "/hello") public String hello(@RequestParam(value = "name") String name); }4:声明式服务调用Feign:
Step1:添加EnableFeignClients注解:
 @SpringBootApplication
 @EnableDiscoveryClient
 @EnableFeignClients
 public class ConsumerApplication {
  public static void main(String[] args) {/hello?name="+name,String.class);
  }
Step2:定义一个feign接口,通过@FeignClient(“服务名”),来指定调用哪个服务
 @FeignClient(name= "spring-cloud-producer")
   public interface HelloRemote {
  @RequestMapping(value = "/hello")
  public String hello(@RequestParam(value = "name") String name);
  }
Step3:调用
@RestController public class ConsumerController { HelloRemote HelloRemote; @RequestMapping("/hello/{name}") public String index(@PathVariable("name") String name){ return HelloRemote.hello(name); } }5:API网关服务Zuul:
请求路由:
Step1:创建应用主类,使用自EnableZuulProxy 注解开启Zuul的API网关服务功能@SpringBootApplication @EnableZuulProxy public class GatewayServiceZuulApplication { public static void main(String[] args) { SpringApplication.run(GatewayServiceZuulApplication.class, args); } }Step2:配置映射URL,通过简单的path与serviceld 的映射组合
zuul.routes.api-a.path=/api-a/** zuul.routes.api-a.serviceld=hello-service zuul.routes.api-b.path=/api- b/** zuul.routes.api-b.serviceld=feign-consumer校验过滤器:做一下权限验证,用法如下.
@Component
 public class MyFilter extends ZuulFilter{
 private static Logger log = LoggerFactory.getLogger(MyFilter.class);
 @Override
 public String filterType() {
 return "pre";
 }

 @Override
 public int filterOrder() {
 return 0;
 }

 @Override
 public boolean shouldFilter() {
 return true;
 }

 @Override
 public Object run() {
 RequestContext ctx = RequestContext.getCurrentContext();
 HttpServletRequest request = ctx.getRequest();
 log.info(String.format("%s >>> %s", request.getMethod(), request.getRequestURL().toString()));
 Object accessToken = request.getParameter("token");
 if(accessToken == null) {
     log.warn("token is empty");
     ctx.setSendZuulResponse(false);
     ctx.setResponseStatusCode(401);
     try {
         ctx.getResponse().getWriter().write("token is empty");
     }catch (Exception e){}

     return null;
 }
 log.info("ok");
 return null;
  }
 }
filterType:返回一个字符串代表过滤器的类型,在zuul中定义了四种不同生命周期的过滤器类型,具体如下:
pre:路由之前
routing:路由之时
post: 路由之后
error:发送错误调用
filterOrder:过滤的顺序
shouldFilter:这里可以写逻辑判断,是否要过滤,本文true,永远过滤。
run:过滤器的具体逻辑。可用很复杂,包括查sql,nosql去判断该请求到底有没有权限访问。熔断机制:当我们的后端服务出现异常的时候,我们不希望将异常抛出给最外层,期望服务可以自动进行一降级.用法如下:
 @Component
 public class ProducerFallback implements FallbackProvider {
 private final Logger logger = LoggerFactory.getLogger(FallbackProvider.class);
 //指定要处理的 service.
 @Override
 public String getRoute() { return "spring-cloud-producer";}public ClientHttpResponse fallbackResponse() {
 return new ClientHttpResponse() {
     @Override
     public HttpStatus getStatusCode() throws IOException {
         return HttpStatus.OK;
     }

     @Override
     public int getRawStatusCode() throws IOException {
         return 200;
     }

     @Override
     public String getStatusText() throws IOException {
         return "OK";
     }

     @Override
     public void close() {

     }

     @Override
     public InputStream getBody() throws IOException {
         return new ByteArrayInputStream("The service is unavailable.".getBytes());
     }

     @Override
     public HttpHeaders getHeaders() {
         HttpHeaders headers = new HttpHeaders();
         headers.setContentType(MediaType.APPLICATION_JSON);
         return headers;
     }
 };
  }
  @Override
 public ClientHttpResponse fallbackResponse(Throwable cause) {
 if (cause != null && cause.getCause() != null) {
     String reason = cause.getCause().getMessage();
     logger.info("Excption {}",reason);
 }
 return fallbackResponse();
  }
  }
当服务出现异常时,打印相关异常信息,并返回The service is unavailable,Zuul 目前只支持服务级别的熔断,不支持具体到某个URL进行熔断。
6:分布式配置中心Config:
Server端:
Step1:配置git信息:server.port=8001 spring.application.name=spring-cloud-config-server spring.cloud.config.server.git.uri=https://github.com/ityouknow/spring-cloud-starter/ # 配置git仓库的地址 spring.cloud.config.server.git.search-paths=config-repo # git仓库地址下的相对地址,可以配置多个,用,分割。 spring.cloud.config.server.git.username= # git仓库的账号 spring.cloud.config.server.git.password=Step2:启动类添加@EnableConfigServer,激活对配置中心的支持.
 @EnableConfigServer
 @SpringBootApplication
  public class ConfigServerApplication {
  public static void main(String[] args) {
  SpringApplication.run(ConfigServerApplication.class, args);
  }
  }
client 端:
使用@Value注解来获取server端参数的值.
如果git配置改变了,为了使各个微服务获得更新的指,有以下四种解决方案:1:重启应用;2:需要给加载变量的类上面加载@RefreshScope;3:github的webhook;4:Spring Cloud Bus.7:消息总线Bus:
8:分布式服务跟踪:Sleuth:
3:Spring Boot 面试题
4:Spring Cloud面试题
5:如果你想看更多
- Spring Boot 中文索引
- Spring Cloud 中文索引

