shiro入门实战笔记(11)--加密/解密
[本系列文章是博主的学习笔记,而非经典教程,特此说明]
在前面的文章中,我们在数据库中使用明文存储了用户名密码等敏感信息,这在我们开放的网络环境。一旦账号密码泄露,这对于客户的损失将是不可估量的。因此我们有必要来学习一下常用的安全性较好的加密/解密算法。另外,在下文中,我们仅仅举例如何使用加密解密,而不会探讨加密算法本身的设计与实现,感兴趣的读者请自行查阅相关资料。
准备工作:
a.操作系统:win7 x64
b.开发工具:myeclipse 2014,jdk1.7,maven3.3.3,mysql5.0,jsp基础
------------------------------------------------------------------------------------------------------------------------------------------------------
正文开始:
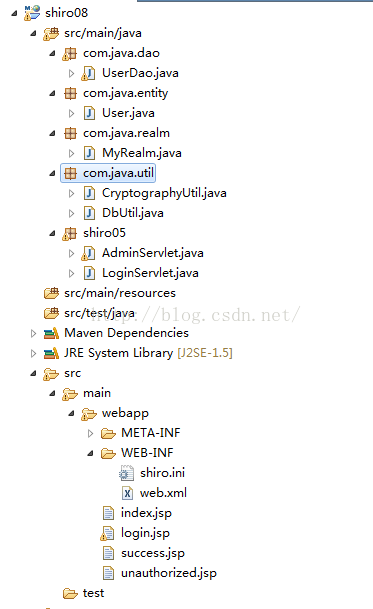
1.我们创建shiro08工程,我们可以直接从shiro07工程中复制过来,具体目录结构如下图所示:
2.创建CryptographyUtil.java文件,具体内容如下:(这里仅举例部分方法,更多内容请参考官方文档)
package com.java.util;

import org.apache.shiro.codec.Base64;
import org.apache.shiro.crypto.hash.Md5Hash;

/**
 * @author 作者 E-mail:
 * @version 创建时间:2016年2月16日上午9:58:01 类说明
 */
public class CryptographyUtil {

	public static String encBase64(String str) {
		return Base64.encodeToString(str.getBytes());
	}
	public static String decBase64(String str){
		return Base64.decodeToString(str);
	}
	public static String md5(String str,String salt){
		return new Md5Hash(str,salt).toString();
	}
	public static void main(String[] args) {
		String password="1234";
		System.out.println(CryptographyUtil.encBase64(password));
		System.out.println(CryptographyUtil.decBase64("MTIzNA=="));
		System.out.println(CryptographyUtil.md5(password, "java"));
	}
}
3.将数据库中的密码修改为md5加密之后的字符串。(假设salt为“java”,与下面代码保持一致即可)
4.修改LoginServlet.java文件中读取用户数据的方式,具体内容如下:
package shiro05;

import java.io.IOException;

import javax.servlet.ServletException;
import javax.servlet.http.HttpServlet;
import javax.servlet.http.HttpServletRequest;
import javax.servlet.http.HttpServletResponse;

import org.apache.shiro.SecurityUtils;
import org.apache.shiro.authc.AuthenticationException;
import org.apache.shiro.authc.UsernamePasswordToken;
import org.apache.shiro.session.Session;
import org.apache.shiro.subject.Subject;

import com.java.util.CryptographyUtil;

/**
 *@author 作者 E-mail:
 *@version 创建时间:2016年2月16日下午4:24:21
 *类说明
 */
public class LoginServlet extends HttpServlet{

	/**
	 *
	 */
	private static final long serialVersionUID = 1L;

	@Override
	protected void doGet(HttpServletRequest req, HttpServletResponse resp)
			throws ServletException, IOException {
		System.out.println("login doget");
		req.getRequestDispatcher("login.jsp").forward(req, resp);
	}

	@Override
	protected void doPost(HttpServletRequest req, HttpServletResponse resp)
			throws ServletException, IOException {
		System.out.println("login dopost");
		String username= req.getParameter("username");
		String password=req.getParameter("password");
		Subject sub = SecurityUtils.getSubject();
		System.out.println(CryptographyUtil.md5(password, "java"));
		UsernamePasswordToken token = new UsernamePasswordToken(username,CryptographyUtil.md5(password, "java"));
		try {
			sub.login(token);
			Session session = sub.getSession();
			System.out.println(session.getId());
			System.out.println(session.getHost());
			System.out.println(session.getTimeout());
			session.setAttribute("info", "session-info");
			resp.sendRedirect("success.jsp");
		} catch (AuthenticationException e) {
			// TODO Auto-generated catch block
			e.printStackTrace();
			req.setAttribute("errorInfo","用户名密码错误");
			req.getRequestDispatcher("login.jsp").forward(req, resp);
		}
	}
}
6.这里我们特别介绍一下AES对称加密算法的使用,具体使用方法如下:
	public static void main(String[] args) {
		AesCipherService aesCipherService = new AesCipherService();
		aesCipherService.setKeySize(128); //设置key长度
		Key key = aesCipherService.generateNewKey();
		String text = "helloworld";
		//加密
		String encText =
		aesCipherService.encrypt(text.getBytes(), key.getEncoded()).toHex();
		System.out.println("encText:"+encText);
		//解密
		String decText =
		new String(aesCipherService.decrypt(Hex.decode(encText), key.getEncoded()).getBytes());
		System.out.println("decText:"+decText);
	}
7.通用散列加密方法的使用,具体使用方法如下:
	public static void main(String[] args) {
		String str = "helloworld";
		String salt = "java";
		//注意加密算法的表示方法
		String simpleHash = new SimpleHash("MD5", str, salt).toString();
		System.out.println(simpleHash);
	}
8.随机数生成方法的使用,具体使用方法如下:
public static void main(String[] args) {
	SecureRandomNumberGenerator randomNumberGenerator = new SecureRandomNumberGenerator();
	randomNumberGenerator.setSeed("123".getBytes());
	String hex = randomNumberGenerator.nextBytes().toHex();
	System.out.println(hex);
}
9.shiro中默认提供的PasswordService,CredentialsMatcher配合使用。来提供加密密码和验证密码的服务。这里我们在上面工程的基础之上来演示,这个功能的实现:
a.复制shiro08工程,重命名为shiro09工程。基本目录结构不变。
b.修改配置文件为如下内容:注意其中的变化部分。
[main]
authc.loginUrl=/login
roles.unauthorizedUrl=/unauthorized.jsp
perms.unauthorizedUrl=/unauthorized.jsp


passwordService=org.apache.shiro.authc.credential.DefaultPasswordService
hashService=org.apache.shiro.crypto.hash.DefaultHashService
passwordService.hashService=$hashService
hashFormat=org.apache.shiro.crypto.hash.format.Shiro1CryptFormat
passwordService.hashFormat=$hashFormat
hashFormatFactory=org.apache.shiro.crypto.hash.format.DefaultHashFormatFactory
passwordService.hashFormatFactory=$hashFormatFactory
passwordMatcher=org.apache.shiro.authc.credential.PasswordMatcher
passwordMatcher.passwordService=$passwordService
myRealm=com.java.realm.MyRealm
myRealm.passwordService=$passwordService
myRealm.credentialsMatcher=$passwordMatcher
securityManager.realms=$myRealm

[urls]
/login=anon
/admin*/**=authc
/student=roles[teacher]
/teacher=perms["user:create"]
c.修改MyRealm.java文件,具体内容如下:
package com.java.realm;

import java.sql.Connection;

/**
 * @author 作者 E-mail:
 * @version 创建时间:2016年2月15日下午6:59:38 类说明
 */
public class MyRealm extends AuthorizingRealm {
	private UserDao userDao = new UserDao();
	private DbUtil dbUtil = new DbUtil();

	private PasswordService passwordService;

	public void setPasswordService(PasswordService passwordService) {
		this.passwordService = passwordService;
	}

	/*
	 * (non-Javadoc)
	 *
	 * @see 为当前用户授予角色与权限
	 */
	@Override
	protected AuthorizationInfo doGetAuthorizationInfo(
			PrincipalCollection principals) {
		String userName = (String) principals.getPrimaryPrincipal();
		SimpleAuthorizationInfo authorizationInfo = new SimpleAuthorizationInfo();
		Connection con = null;
		try {
			con = dbUtil.getCon();
			authorizationInfo.setRoles(userDao.getRoles(con, userName));
			authorizationInfo.setStringPermissions(userDao.getPermission(con,
					userName));
		} catch (Exception e) {

		}
		return authorizationInfo;
	}

	/*
	 * (non-Javadoc)
	 *
	 * @see 获取认证信息,验证当前登陆的用户
	 */
	@Override
	protected AuthenticationInfo doGetAuthenticationInfo(
			AuthenticationToken token) throws AuthenticationException {

		String userName = (String) token.getPrincipal();
		Connection con = null;
		try{
			con = dbUtil.getCon();
			User user = userDao.getByUserName(con, userName);
			if(user!=null){
				AuthenticationInfo authcInfo = new SimpleAuthenticationInfo(user.getUserName(),passwordService.encryptPassword(user.getPassword()),"xx");
				return authcInfo;
			}else{
				return null;
			}
		}catch(Exception e){

		}finally{
			try {
				dbUtil.closeCon(con);
			} catch (Exception e) {
				// TODO Auto-generated catch block
				e.printStackTrace();
			}
		}
		return null;
	}

}
最后,我们来解释一下上面的修改部分的含义:
步骤b中:
b1:passwordService使用DefaultPasswordService,如果有必要也可以自定义;
b2:hashService 定义散列密码使用的HashService,默认使用DefaultHashService(默认SHA-256 算法);
b3:hashFormat用于对散列出的值进行格式化,默认使用Shiro1CryptFormat,另外提供了Base64Format 和HexFormat,对于有salt 的密码请自定义实现ParsableHashFormat 然后把salt格式化到散列值中;
b4:hashFormatFactory用于根据散列值得到散列的密码和salt;因为如果使用如SHA 算法,那么会生成一个salt,此salt需要保存到散列后的值中以便之后与传入的密码比较时使用;默认使用DefaultHashFormatFactory;
b5:passwordMatcher使用PasswordMatcher,其是一个CredentialsMatcher实现;
b6:将credentialsMatcher赋值给myRealm,myRealm间接继承了AuthenticatingRealm,其在调用getAuthenticationInfo 方法获取到AuthenticationInfo 信息后, 会使用
credentialsMatcher 来验证凭据是否匹配,如果不匹配将抛出IncorrectCredentialsException异常。
步骤c中:
c1:添加PasswordService
c2:doGetAuthenticationInfo(...)方法中的身份验证SimpleAuthenticationInfo(,,)方法修改为解密密码的参数
最后,在这个小节中,博主对于此部分的认识与理解好不透彻。读者如有疑问希望能够共同探讨一番。
10.HashedCredentialsMatcher实现密码验证服务:Shiro 提供了CredentialsMatcher 的散列实现HashedCredentialsMatcher,和之前的PasswordMatcher不同的是,它只用于密码验证,且可以提供自己的盐,而不是随机生成盐,且生成密码散列值的算法需要自己写,因为能提供自己的盐。
a.生成密码散列值算法举例如下,加密方式为:md5(md5(密码+username+salt2))。注意:这里salt2是随机的,故每次结果都是不同的。
public static void main(String[] args) {

		String algorithmName = "md5";
		String username = "shiro10";
		String password = "1234";
		String salt1 = username;
		String salt2 = new SecureRandomNumberGenerator().nextBytes().toHex();
		int hashIterations = 2;
		SimpleHash hash = new SimpleHash(algorithmName, password, salt1 + salt2, hashIterations);
		System.out.println(hash.toHex());
}【这里,我们为了方便举例,部分变量我们直接固定,请读者们按照自己的需求选择不同存储方式。】
c.修改数据库中用户表中的某一条数据,按照上面我们所示的方法将加密的结果替换到表中的密码。或者创建一条新的数据。【在实际使用时,建议salt2单独保存,不要固定】
d.修改配置文件,具体内容如下:
[main]
authc.loginUrl=/login
roles.unauthorizedUrl=/unauthorized.jsp
perms.unauthorizedUrl=/unauthorized.jsp

credentialsMatcher=org.apache.shiro.authc.credential.HashedCredentialsMatcher
credentialsMatcher.hashAlgorithmName=md5
credentialsMatcher.hashIterations=2
credentialsMatcher.storedCredentialsHexEncoded=true

myRealm=com.java.realm.MyRealm
myRealm.credentialsMatcher=$credentialsMatcher
securityManager.realms=$myRealm

[urls]
/login=anon
/admin*/**=authc
/student=roles[teacher]
/teacher=perms["user:create"]package com.java.realm;
import java.sql.Connection;
/**
* @author 作者 E-mail:
* @version 创建时间:2016年2月15日下午6:59:38 类说明
*/
public class MyRealm extends AuthorizingRealm {
private UserDao userDao = new UserDao();
private DbUtil dbUtil = new DbUtil();
private PasswordService passwordService;
public void setPasswordService(PasswordService passwordService) {
this.passwordService = passwordService;
}
/*
* (non-Javadoc)
*
* @see 为当前用户授予角色与权限
*/
@Override
protected AuthorizationInfo doGetAuthorizationInfo(
PrincipalCollection principals) {
String userName = (String) principals.getPrimaryPrincipal();
SimpleAuthorizationInfo authorizationInfo = new SimpleAuthorizationInfo();
Connection con = null;
try {
con = dbUtil.getCon();
authorizationInfo.setRoles(userDao.getRoles(con, userName));
authorizationInfo.setStringPermissions(userDao.getPermission(con,
userName));
} catch (Exception e) {
}
return authorizationInfo;
}
/*
* (non-Javadoc)
*
* @see 获取认证信息,验证当前登陆的用户
*/
@Override
protected AuthenticationInfo doGetAuthenticationInfo(
AuthenticationToken token) throws AuthenticationException {
String userName = (String) token.getPrincipal();
Connection con = null;
try{
con = dbUtil.getCon();
User user = userDao.getByUserName(con, userName);
if(user!=null){
AuthenticationInfo authcInfo = new SimpleAuthenticationInfo(user.getUserName(),user.getPassword(),"xx");
((SimpleAuthenticationInfo) authcInfo).setCredentialsSalt(ByteSource.Util.bytes(user.getUserName()+"b50ce0e65c6d38ff3dda71c4a1ba218b")); //盐是用户名+加密密码
return authcInfo;
}else{
return null;
}
}catch(Exception e){
e.printStackTrace();
}finally{
try {
dbUtil.closeCon(con);
} catch (Exception e) {
// TODO Auto-generated catch block
e.printStackTrace();
}
}
return null;
}
}
f.启动tomcat。访问login页面输入用户名密码,查看运行结果。
最后我们来解释一下,上面修改部分的含义与所用:
在步骤d中:
d1:通过credentialsMatcher.hashAlgorithmName=md5 指定散列算法为md5,需要和生成密码时的一样;
d2:credentialsMatcher.hashIterations=2,散列迭代次数,需要和生成密码时的意义;
d3:credentialsMatcher.storedCredentialsHexEncoded=true表示是否存储散列后的密码为16 进制,需要和生成密码时的一样,默认是base64;
此处最需要注意的就是HashedCredentialsMatcher的算法需要和生成密码时的算法一样。另外HashedCredentialsMatcher 会自动根据AuthenticationInfo 的类型是否是
SaltedAuthenticationInfo来获取credentialsSalt盐。
11.最后,我们再来看一下日常中常用的对用户暴力破解用户名密码的限制
a.本例我们不用创建新的工程,直接在原有工程上修改即可。
b.修改配置文件为如下内容:
[main]
authc.loginUrl=/login
roles.unauthorizedUrl=/unauthorized.jsp
perms.unauthorizedUrl=/unauthorized.jsp

credentialsMatcher=com.java.util.LimitHashedCredentialsMatcher
credentialsMatcher.hashAlgorithmName=md5
credentialsMatcher.hashIterations=2
credentialsMatcher.storedCredentialsHexEncoded=true

myRealm=com.java.realm.MyRealm
myRealm.credentialsMatcher=$credentialsMatcher
securityManager.realms=$myRealm


[urls]
/login=anon
/admin*/**=authc
/student=roles[teacher]
/teacher=perms["user:create"]package com.java.util;
import net.sf.ehcache.CacheManager;
import net.sf.ehcache.Ehcache;
import net.sf.ehcache.Element;
import org.apache.shiro.authc.AuthenticationInfo;
import org.apache.shiro.authc.AuthenticationToken;
import org.apache.shiro.authc.ExcessiveAttemptsException;
import org.apache.shiro.authc.credential.HashedCredentialsMatcher;
import java.util.concurrent.atomic.AtomicInteger;
public class LimitHashedCredentialsMatcher extends
HashedCredentialsMatcher {
private Ehcache passwordRetryCache;
public LimitHashedCredentialsMatcher() {
CacheManager cacheManager = CacheManager.newInstance(CacheManager.class
.getClassLoader().getResource("ehcache.xml"));
passwordRetryCache = cacheManager.getCache("passwordRetryCache");
}
@Override
public boolean doCredentialsMatch(AuthenticationToken token,
AuthenticationInfo info) {
String username = (String) token.getPrincipal();
// retry count + 1
Element element = passwordRetryCache.get(username);
if (element == null) {
element = new Element(username, new AtomicInteger(0));
passwordRetryCache.put(element);
}
AtomicInteger retryCount = (AtomicInteger) element.getObjectValue();
if (retryCount.incrementAndGet() > 5) {
// if retry count > 5 throw
System.out.println("已经超过尝试次数");
throw new ExcessiveAttemptsException();
}
boolean matches = super.doCredentialsMatch(token, info);
if (matches) {
// clear retry count
passwordRetryCache.remove(username);
}
return matches;
}
}
d.保存,启动tomcat。在浏览器中访问login页面尝试输入错误的用户名,密码5次之后,观察控制台输出。
最后,我们来解释一下上面代码的所用:
在步骤b中:
我们修改credentialsMatcher的配置为我们的自定义的*Matcher。
在步骤b中:
逻辑为:如果用户名密码正确,那么清除cache中的计数记录,否则,cache中记录的尝试次数+1。如果超过了5次则抛出异常,表示已经超过了重试次数。
特别的,对于这部分的配置我们仅作为演示功能点使用,后续我们会结合Spring来介绍详细的配置
-------------------------------------------------------------------------------------------------------------------------------------
至此,shiro入门实战笔记(11)--加密/解密结束
备注:
前面的一系列文章,我们都在借助ini配置文件来使用shiro提供的功能,后面我们将会介绍与web的集成,敬请期待!
参考资料:
官方文档:http://shiro.apache.org/documentation.html
其他博文:http://jinnianshilongnian.iteye.com/blog/2018936


