深入理解Android消息机制,从源码解析Handler,Looper,MessageQueue
Android 规定不允许在子线程中更新UI,但是为了保证UI线程(也即主线程)的流畅性,通常一些耗时操作都是在子线程中进行,比如,IO操作,网络请求操作等,这就涉及到一个问题,如果子线程这些操作执行完,想要更新界面的控件显示该怎么办,显然不能直接在子线程操作,否则会抛出异常;为了解决这个问题,Android设计了一套异步消息机制,这包括Handler,Looper,MessageQueue。
1.Handler解析
下面我们先从Handler的使用一步步深入解析,抽丝剥茧;
Handler handler = new Handler(){
        @Override
        public void handleMessage(Message msg) {
           //更新UI操作
    mButton.setText(“hello,world”);
        }
    };
    @Override
    protected void onCreate(Bundle savedInstanceState) {
        super.onCreate(savedInstanceState);
        setContentView(R.layout.activity_main);
        new Thread(){
            @Override
            public void run() {
                handler.sendEmptyMessage(123);
            }
        }.start();
}
上面这段代码,相信大家也都很熟悉,通过调用handler.sendEmptyMessage(123);就从子线程切换到了UI线程,进而更新UI;那么这里面都发生了什么呢,我们接着看,点进sendEmptyMessage进去看一下,代码如下:
public final boolean sendEmptyMessage(int what)
    {
        return sendEmptyMessageDelayed(what, 0);
}
再接着点击sendEmptyMessageDelayed方法,代码如下:
public final boolean sendEmptyMessageDelayed(int what, long delayMillis) {
        Message msg = Message.obtain();
        msg.what = what;
        return sendMessageDelayed(msg, delayMillis);
    }
我们看到这个方法,创建了一个Message对象,用的是Message.obtain()方法,那为什么他不直接new一个Message对象呢,点进obtain()方法,我们看到,代码如下:
/** * Return a new Message instance from the global pool. Allows us to avoid allocating new objects in many cases. */
public static Message obtain() {
        synchronized (sPoolSync) {
            if (sPool != null) {
                Message m = sPool;
                sPool = m.next;
                m.next = null;
                m.flags = 0; // clear in-use flag
                sPoolSize--;
                return m;
            }
        }
        return new Message();
    }
从该方法的注释我们看到:这个方法从全局消息池里面取出一个Message对象给我们用,这样就避免再次创建Message对象,从而节省内存空间,当然如果消息池中没有message对象,他就会new一个新对象,这个就相当于的对象的复用。所以,我们创建Message的时候,最好也要用这种方法,而不是简单粗暴的new Message().
好,我们接着看sendEmptyMessageDelayed这个方法,这个方法创建好message对象之后,并给她的what字段赋值之后,调用了sendMessageDelayed(msg, delayMillis)方法,接着点进去看看,代码如下:
public final boolean sendMessageDelayed(Message msg, long delayMillis)
    {
        if (delayMillis < 0) {
            delayMillis = 0;
        }
        return sendMessageAtTime(msg, SystemClock.uptimeMillis() + delayMillis);
    }
首先判断延迟多少秒发送消息,然后又调用了sendMessageAtTime(msg, SystemClock.uptimeMillis() + delayMillis),层层调用啊,坚持住,不要晕,我们继续点进去看,代码如下:
public boolean sendMessageAtTime(Message msg, long uptimeMillis) {
        MessageQueue queue = mQueue;
        if (queue == null) {
            RuntimeException e = new RuntimeException(
                    this + " sendMessageAtTime() called with no mQueue");
            Log.w("Looper", e.getMessage(), e);
            return false;
        }
        return enqueueMessage(queue, msg, uptimeMillis);
    }
首先,获得一个MessageQueue对象,然后又调用了enqueueMessage(queue, msg, uptimeMillis)方法,接着点进去,
private boolean enqueueMessage(MessageQueue queue, Message msg, long uptimeMillis) {
        msg.target = this;
        if (mAsynchronous) {
            msg.setAsynchronous(true);
        }
        return queue.enqueueMessage(msg, uptimeMillis);
    }
首先给msg的target字段赋值为this,也就是我们的handler实例,然后调用queue.enqueueMessage(msg, uptimeMillis);将消息插入MessageQueue中,至此,handler的发送消息的工作终于结束,也即是顺利把消息投递到了MessageQueue中。
2.MessageQueue解析:
MessageQueue内部维护一个单链表,主要用来插入和读取Message操作(读取的同时伴随着删除)
首先我们看一下MessageQueue的enqueue方法:由于代码较长和复杂,我就不贴代码了,而且我们没有必要弄懂每一句代码,该方法的主要作用是将message插入到链表中,下面再看一下next()方法,也即是读取message,同样代码也补贴了,该方法是一个死循环方法,如果MessaQueue中没有消息,会阻塞在那里,如果有新消息来的话,会返回该消息,并讲它从链表中删除。
3.Looper解析
Looper扮演者 消息循环的角色,简单来说就是它会不停轮询MessageQueue中是否有消息,如果有就立即处理,没有就阻塞在那里;那looper是怎么和MessageQueue关联起来的呢,我们先来看一下Looper的构造函数:
private Looper(boolean quitAllowed) {
        mQueue = new MessageQueue(quitAllowed);
        mThread = Thread.currentThread();
    }
可以看到,MessageQueue对象正是Looper创建的,我们知道,Handler的工作需要Looper,没有looper的话,创建Handler的对象时就会报错,这一点我们从Handler的构造函数中也能看出来,代码如下:
public Handler(Callback callback, boolean async) {
     ….省略部分代码

        mLooper = Looper.myLooper();
        if (mLooper == null) {
            throw new RuntimeException(
                "Can't create handler inside thread that has not called Looper.prepare()");
        }
        mQueue = mLooper.mQueue;
        mCallback = callback;
        mAsynchronous = async;
    }
可以看到,如果looper为空,就会抛出异常;至此,有人要问了,我也没创建Looper对象啊,也能正常用handler啊,那是因为,在主线程中,Android已经帮我们创建好了,Android的入口程序是ActivityThread.java这个类,我们看一下他的主函数:
public static void main(String[] args) {
….//省略部分代码
5398
5399 Process.setArgV0("" );
5400
5401 Looper.prepareMainLooper();
5402
5403 ActivityThread thread = new ActivityThread();
5404 thread.attach(false);
5405
5406 if (sMainThreadHandler == null) {
5407 sMainThreadHandler = thread.getHandler();
5408 }
5409
5410 if (false) {
5411 Looper.myLooper().setMessageLogging(new
5412 LogPrinter(Log.DEBUG, "ActivityThread"));
5413 }
5414
5415 // End of event ActivityThreadMain.
5416 Trace.traceEnd(Trace.TRACE_TAG_ACTIVITY_MANAGER);
5417 Looper.loop();
5418
5419 throw new RuntimeException("Main thread loop unexpectedly exited");
5420 }
可以看到,Looper.prepareMainLooper();这句就已经创建了Looper,点进这个方法看看,我们看到,最终调用了prepare()这个方法,
我们看一下这个方法:
private static void prepare(boolean quitAllowed) {
        if (sThreadLocal.get() != null) {
            throw new RuntimeException("Only one Looper may be created per thread");
        }
        sThreadLocal.set(new Looper(quitAllowed));
}
这个方法里面,通过ThreadLocal类型的变量来保存Looper实例,关于ThreadLocal,简单来说,就是,它会保存一个与当前线程相关的唯一一个对象,即每个线程里只创建一个Looper对象,关于他的介绍,我会再写一篇文章,现在我们就简单了解下。
Looper最关键的一个方法就是loop() ,调用这个方法后,消息系统就真正运转起来了,代码如下:
public static void loop() {
        final Looper me = myLooper();
        if (me == null) {
            throw new RuntimeException("No Looper; Looper.prepare() wasn't called on this thread.");
        }
        final MessageQueue queue = me.mQueue;

        // Make sure the identity of this thread is that of the local process,
        // and keep track of what that identity token actually is.
        Binder.clearCallingIdentity();
        final long ident = Binder.clearCallingIdentity();

        for (;;) {
            Message msg = queue.next(); // might block
            if (msg == null) {
                // No message indicates that the message queue is quitting.
                return;
            }

            // This must be in a local variable, in case a UI event sets the logger
            final Printer logging = me.mLogging;
            if (logging != null) {
                logging.println(">>>>> Dispatching to " + msg.target + " " +
                        msg.callback + ": " + msg.what);
            }

            final long traceTag = me.mTraceTag;
            if (traceTag != 0) {
                Trace.traceBegin(traceTag, msg.target.getTraceName(msg));
            }
            try {
                msg.target.dispatchMessage(msg);
            } finally {
                if (traceTag != 0) {
                    Trace.traceEnd(traceTag);
                }
            }

            if (logging != null) {
                logging.println("<<<<< Finished to " + msg.target + " " + msg.callback);
            }

            // Make sure that during the course of dispatching the
            // identity of the thread wasn't corrupted.
            final long newIdent = Binder.clearCallingIdentity();
            if (ident != newIdent) {
                Log.wtf(TAG, "Thread identity changed from 0x"
                        + Long.toHexString(ident) + " to 0x"
                        + Long.toHexString(newIdent) + " while dispatching to "
                        + msg.target.getClass().getName() + " "
                        + msg.callback + " what=" + msg.what);
            }

            msg.recycleUnchecked();
        }
    }
可以看到,loop也是一个死循环方法,里面不断调用messagequeue的next方法,来查看消息队列是否有消息,一旦有消息了,就会调用msg.target.dispatchMessage(msg);这句来出来消息,target就是我们的handler对象,下面我们再来看一下dispatchMessage(msg)这个方法:
public void dispatchMessage(Message msg) {
        if (msg.callback != null) {
            handleCallback(msg);
        } else {
            if (mCallback != null) {
                if (mCallback.handleMessage(msg)) {
                    return;
                }
            }
            handleMessage(msg);
        }
    }
先看第一行,如果callback不为空,就调用handleCallback来出来,这个callback是一个Runnable类型的对象,当我们使用handler的post方法投递消息时,传递的就是一个Runnable类型的参数,看一下代码:
public final boolean post(Runnable r)
    {
       return  sendMessageDelayed(getPostMessage(r), 0);
    }
我们在看一下getPostMessage方法:

private static Message getPostMessage(Runnable r) {
        Message m = Message.obtain();
        m.callback = r;
        return m;
    }
至此我们看到,这个runnable类型的对象赋值给了message的callback字段,然后返回一个Message对象,接着调用sendMessageDelayed把消息发出去了,很巧妙是不是。所以除了使用sendmessage发送消息之外,也可以使用post这种方式放松消息。接下来,我们接着看上面dispatchMessage这段代码,如果没有使用post这种方式,代码就会走到else里面,然后判断mCallback是否为空,mCallback是Callback类型,他是Handler的内部的一个接口,代码如下:
public interface Callback {
        public boolean handleMessage(Message msg);
    }
那么这个mCallback,在哪里赋值的呢,搜索一下看到,在Handler的另一个构造函数的参数里有这个类型,我们可以这样使用:
handler = new Handler(new Handler.Callback() {
            @Override
            public boolean handleMessage(Message msg) {
                //do something
                return false;
            }
        });
这样算是handler的另外一种创建方式吧;我们还是看上面dispatchMessage那段代码,如果mCallback不为空,就执行callbackd的handleMessage方法,如果为空,就执行handler的handleMessage方法;这里我们总结一下dispatchMessage方法,他的处理方式是:如果message的callback不为空,就执行callback的run方法,如果为空,再判断mCallback是否为空,不为空就执行mCallback的handleMessage,为空就执行handler本身的handleMessage方法;
优先级是:message.callback—>Handler.Callback—>Handler.handleMessage
至此,消息从发送到处理,我们就分析完了,也就从当初在子线程发送消息,过渡到到在UI线程处理消息,很巧妙是不是。(注意:不是说只能在子线程发送消息,主线程同意也可以。)
下面我们再来看一张图:这张图是一位大神画的,已经很好了,我就不再画了
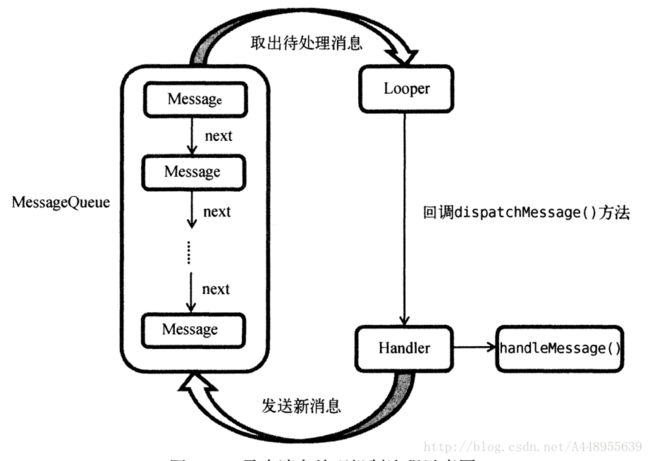
这张图我再简单解释一下:首先handler把消息发送到MessagQueue的单链表中,然后Looper立刻就检测到有消息来了,然后调用msg.target.dispatchMessage()来让handler来处理消息,由于handler是在主线程创建的,所以也就是已经来到主线程来操作UI了。
至此,Android消息机制我们就分析完了,有不懂的或者有建议的欢迎留言,共同学习哈