shiro入门实战笔记(4)--权限认证(上)
[本系列文章是博主的学习笔记,而非经典教程,特此说明]
在前一篇文章中,我们介绍了身份认证的相关内容,本文我们来介绍另一个十分重要的权限认证的内容。惯例,我们来先看一下本文的准备工作:
a.操作系统:win7 x64
b.开发工具:myeclipse 2014,jdk1.7,maven3.3.3
-----------------------------------------------------------------------------------------------------------------------------------------------正文开始:
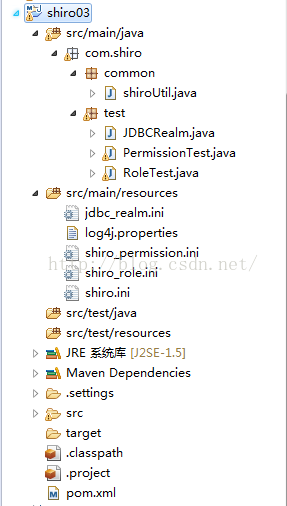
1.创建shiro03工程,工程结构如下图:【博主直接从shiro01工程复制过来,下图所示的文件中有冗余,请读者按照步骤创建即可】
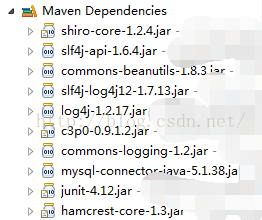
2.我们来看一下本例中需要引入的jar包,pom文件的配置如下:
	4.0.0
	com.java.shiro
	shiro03
	0.0.1-SNAPSHOT
	shiro03
	shiro03


			org.apache.shiro
			shiro-core
			1.2.4


			org.slf4j
			slf4j-log4j12
			1.7.13


			c3p0
			c3p0
			0.9.1.2


			commons-logging
			commons-logging
			1.2


			mysql
			mysql-connector-java
			5.1.38


			junit
			junit
			4.12

3.在前文中,我们叙述了基本的读取shiro配置文件的方法实现,在本例中,我们需要使用到多个配置文件,因此我们把读取配置文件的方法抽象为一个单独的工具包
package com.shiro.common;

import org.apache.shiro.SecurityUtils;
import org.apache.shiro.authc.UsernamePasswordToken;
import org.apache.shiro.config.IniSecurityManagerFactory;
import org.apache.shiro.mgt.SecurityManager;
import org.apache.shiro.subject.Subject;
import org.apache.shiro.util.Factory;

public class shiroUtil {
	public static Subject login(String filepath,String userName,String pwd){
		//读取配置文件,初始化SecurityManager工厂
				Factory factory = new IniSecurityManagerFactory(filepath);
				//获取SecurityManager实例
				SecurityManager securityManager = factory.getInstance();
				//把securityManager 实例绑定到SecurityUtils
				SecurityUtils.setSecurityManager(securityManager);
				//得到当前用户
				Subject currentUser = SecurityUtils.getSubject();
				//创建token令牌,用户名/密码
				UsernamePasswordToken token = new UsernamePasswordToken(userName,pwd);

				try {
					//登陆
					currentUser.login(token);
					System.out.println("success");
				} catch (Exception e) {
					e.printStackTrace();
					System.out.println("fail");
				}
				return currentUser;
	}

}
4.接着我们来看权限的配置文件,shiro_role.ini:
[users]
shiro01=1234,role1,role2
shiro02=1234,role1
	@Test
	public void test() {
		Subject sub = shiroUtil.login("classpath:shiro_role.ini", "shiro02","1234");
//		System.out.println(sub.hasRole("role2")?"hasRole2":"noRole2");
//		System.out.println(sub.hasRoles(Arrays.asList("role1","role2","role3")));
		boolean[] re = sub.hasRoles(Arrays.asList("role1","role2","role3"));
		System.out.println(re[0]);
		System.out.println(re[1]);
		System.out.println(re[2]);
}6.除了上面所示的权限判断方式外,shiro还提供另一种类别判断权限的方式。特别的,这种方式只有异常和正常执行之分,而内有返回值。具体代码示例如下:
	@Test
	public void check() {
		Subject sub = shiroUtil.login("classpath:shiro_role.ini", "shiro02","1234");
		sub.checkRole("role2");
		boolean[] re = sub.hasRoles(Arrays.asList("role1","role2","role3"));
		System.out.println(re[0]);
		System.out.println(re[1]);
		System.out.println(re[2]);
}7.上面的所有内容是基于角色的权限访问控制,下面我们来看看基于权限的访问控制。首先我们来配置权限的配置文件,shiro_permission.ini。具体内容如下:
[users]
shiro01=1234,role1,role2
shiro02=1234
[roles]
role1=user:select
role2=user:add,user:update,user:delete
package com.shiro.test;

import static org.junit.Assert.*;

import org.apache.shiro.subject.Subject;
import org.junit.Test;

import com.shiro.common.shiroUtil;

public class PermissionTest {

	@Test
	public void testIsPermitted() {
		Subject sub = shiroUtil.login("classpath:shiro_permission.ini", "shiro02","1234");
		System.out.println(sub.isPermitted("user:select"));
	}

}
------------------------------------------------------------------------------------------------------------------------
至此,shiro入门实战笔记(4)--权限认证(上)结束
备注:
本文中我们仅仅叙述角色权限认证的程序实现,请读者我们先自行实现上文所示例的代码,先自行理解上文涉及shiro中权限认证的基本方法,下一篇我们将介绍更多关于shiro权限认证的内容,并且详细介绍权限认证的流程,敬请期待!
参考资料:
官方文档:http://shiro.apache.org/documentation.html
其他博文:http://jinnianshilongnian.iteye.com/blog/2018936
