javaWeb前后台交互(二)
接上一篇javaWeb前后台交互。链接:https://blog.csdn.net/blackplus28/article/details/80603863
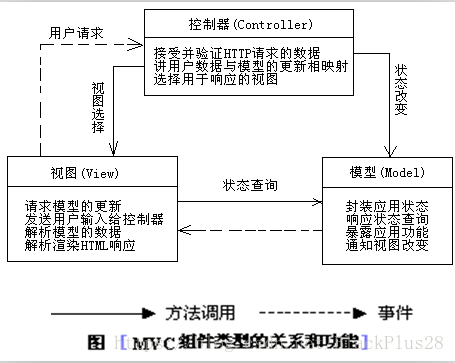
一、MVC思想
责任分离思想.
M:Model,数据模型对象.(JavaBean)
V:View,视图界面.(JSP,Panel,Window)
C:Controller,控制器(Servlet)
本次代码采用:Tomcat7.57 JDK 1.8 Eelipse编写 数据库:Mysql
二、项目结构(MVC模式)
自己创建动态项目,然后再建好包。
1、编写工具类(JdbcUtil)
package util;

import java.io.IOException;
import java.io.InputStream;
import java.sql.Connection;
import java.sql.DriverManager;
import java.sql.ResultSet;
import java.sql.Statement;
import java.util.Properties;

//  连接数据库
public class JdbcUtil {
	private static Properties p = new Properties();
	static {
		try {
			ClassLoader loader = Thread.currentThread().getContextClassLoader();
			// 从classpath的跟路径去寻找db.properties
			InputStream inStream = loader.getResourceAsStream("db.properties");
			p.load(inStream); // 加载
		} catch (IOException e) {
			throw new RuntimeException("加载classpath路径下的db.properties文件失败", e);
		}
		// 1加载注册驱动
		try {
			Class.forName(p.getProperty("DriverName"));
			System.out.println("加载数据驱动正常");
		} catch (Exception e) {
			throw new RuntimeException("数据库驱动加载失败", e);
		}
	}
	// 返回创建好的Connection对象,用静态的这种方式应该把构造器私有化起来
	public static Connection getConn() {
		try {
			System.out.println("连接数据库正常");
			// 2获取连接对象
			return DriverManager.getConnection(p.getProperty("url"), p.getProperty("username"),
					p.getProperty("password"));
		} catch (Exception e) {
			e.printStackTrace();
		}
		throw new RuntimeException("数据库连接异常");
	}
	// 5):释放资源
	public static void close(Connection conn, Statement st, ResultSet re) {
		try {
			if (re != null) {
				re.close();
			}
		} catch (Exception e) {
			e.printStackTrace();
		} finally {
			try {
				if (st != null) {
					st.close();
				}
			} catch (Exception e) {
				e.printStackTrace();
			}
			try {
				if (conn != null) {
					conn.close();
				}
			} catch (Exception e) {
				e.printStackTrace();
			}
		}
	}
	// 防止先创建对象,然后再调用方法。不让外界创建,直接用类名调用
	private JdbcUtil() {
		}

}
2、domain(model)层
package domain;

/**
 *   用户
 * @author
 *
 */
public class User {
	private int id;
	private String username;
	private String password;
	public User() {
		super();
	}

	public User(String username, String password) {
		super();
		this.username = username;
		this.password = password;
	}

	public User(int id, String username, String password) {
		super();
		this.id = id;
		this.username = username;
		this.password = password;
	}

	public int getId() {
		return id;
	}
	public void setId(int id) {
		this.id = id;
	}
	public String getUsername() {
		return username;
	}
	public void setUsername(String username) {
		this.username = username;
	}
	public String getPassword() {
		return password;
	}
	public void setPassword(String password) {
		this.password = password;
	}
	@Override
	public String toString() {
		return "User [id=" + id + ", username=" + username + ", password=" + password + "]";
	}
}
3、写dao层
接口层:
package dao;

import domain.User;

/**
 *  登录
 * @author
 *
 */
public  interface  IUserDao {
	/**
	 * 用户登录
	 * @param username
	 * @param password
	 * @return
	 */
	public  User loginUser(String username,String password);
}
实现层:
package dao.impl;

import java.sql.Connection;
import java.sql.PreparedStatement;
import java.sql.ResultSet;
import java.sql.SQLException;

import dao.IUserDao;
import domain.User;
import util.JdbcUtil;

public class UserDaoImpl implements IUserDao {
	//  登录
	@Override
	public User loginUser(String username, String password) {
		String sql = "SELECT * FROM t_user WHERE username=? AND password=?";
		Connection conn = null;
		PreparedStatement ps = null;
		ResultSet rs = null;
		 try {
			conn = JdbcUtil.getConn();
			ps = conn.prepareStatement(sql);
			ps.setString(1, username);
			ps.setString(2, password);
			rs = ps.executeQuery();
			if (rs.next()) {
				User user = new User();
				user.setUsername(rs.getString("username"));
				user.setPassword(rs.getString("password"));
				return user;
			}
		} catch (SQLException e) {
			e.printStackTrace();
		}
		return null;
	}
}
4、service接口和实现层
接口:
package service;

import domain.User;

public interface IUserService {
	/**
	 * 登录
	 * @param username
	 * @param password
	 * @return
	 */
	public  User loginUser(String username,String password);
}
实现层:
package service.impl;

import dao.IUserDao;
import dao.impl.UserDaoImpl;
import domain.User;
import service.IUserService;

public class UserServiceImpl implements IUserService{
	private IUserDao dao = new UserDaoImpl();
	@Override
	public User loginUser(String username, String password) {

		return dao.loginUser(username, password);
	}
}
5、controller层
package controller;

import java.io.IOException;

import javax.servlet.ServletException;
import javax.servlet.http.HttpServlet;
import javax.servlet.http.HttpServletRequest;
import javax.servlet.http.HttpServletResponse;

import domain.User;
import service.IUserService;
import service.impl.UserServiceImpl;

public class UserServlet  extends HttpServlet{
	private static final long serialVersionUID = 1L;
	private IUserService userService = new UserServiceImpl();

	@Override
	protected void doPost(HttpServletRequest req, HttpServletResponse resp) throws ServletException, IOException {
		String userName = req.getParameter("username");
		String password = req.getParameter("password");

		User user = userService.loginUser(userName, password);
		if (user != null) {
			resp.sendRedirect("login_success.jsp");
		}else {
			resp.sendRedirect("login_fail.jsp");
		}
	}
	@Override
	protected void doGet(HttpServletRequest req, HttpServletResponse resp) throws ServletException, IOException {
		this.doPost(req, resp);
	}
}
6、这个时候记得创建resource文件夹,并创建db.properties (你只需把javaweb换成你的数据库名称,两个root分别是数据库账户和密码,自行修改就好)
#key=value

DriverName=com.mysql.jdbc.Driver
url=jdbc:mysql://localhost:3306/javaweb
username=root
password=root
7、创建三个JSP(view层)
我只贴login.jsp代码,登录成功和失败页面里面都是一句话,仅仅为做跳转看效果。
其实完全用把结果存放到session里面,在login.jsp里面写el表达式接受信息也可以看出效果,但因为是初学者,还是多写几个页面看的直观。
<%@ page language="java" contentType="text/html; charset=UTF-8"
pageEncoding="UTF-8"%>
Insert title here
数据库就不放了,里面就id,username,password三个字段。
效果图:
登录成功:
登录失败:
三、总结
写到这里按照MVC模式进行交互已完成,
源码:JavaWeb源码 。本想着0积分的,但是没有0积分选项,有积分想下载就下载,不想下载评论区留言或私信,我发你邮箱。
如果你完全复制我的代码,还报错,这个时候很有可能是环境问题,因为我都是测试了好几遍完全正确才截图的,有问题欢迎留言讨论。
如果有不同看法,或者是文中写错的地方,麻烦大佬留言指正文章错误,谢谢!!!
转载请声明出处:https://blog.csdn.net/BlackPlus28/article/details/80945137


