DnCNN代码学习—data_generator.py
DnCNN代码学习—data_generator.py
一、源代码+注释
# -*- coding: utf-8 -*-

# =============================================================================
#  @article{zhang2017beyond,
#    title={Beyond a {Gaussian} denoiser: Residual learning of deep {CNN} for image denoising},
#    author={Zhang, Kai and Zuo, Wangmeng and Chen, Yunjin and Meng, Deyu and Zhang, Lei},
#    journal={IEEE Transactions on Image Processing},
#    year={2017},
#    volume={26},
#    number={7},
#    pages={3142-3155},
#  }
# by Kai Zhang (08/2018)
# [email protected]
# https://github.com/cszn
# modified on the code from https://github.com/SaoYan/DnCNN-PyTorch
# =============================================================================

# no need to run this code separately

import matplotlib.pyplot as plt

import operator
import glob  ##文件名操作模块glob
import cv2   #读取图像首先要导入OpenCV包
import numpy as np   #
# from multiprocessing import Pool
from torch.utils.data import Dataset   #torch.utils.data.Dataset 是一个表示数据集的抽象类
import torch  ##包 torch 包含了多维张量的数据结构以及基于其上的多种数学操作。
from torch.utils.data import DataLoader

patch_size, stride = 4, 1  #补丁大小  40   步长10
aug_times = 1

scales = [1, 0.9, 0.8, 0.7]
batch_size = 128   #批量大小


#加噪声类
class DenoisingDataset(Dataset):
    """Dataset wrapping tensors.
    Arguments:
        xs (Tensor): clean image patches
        sigma: noise level, e.g., 25
    """
    def __init__(self, xs):
        super(DenoisingDataset, self).__init__()
        self.xs = xs  #清洁图像


    def __getitem__(self, index):
        batch_x = self.xs[index]

        #torch.randn:返回一个张量,包含了从区间[0,1)的均匀分布中抽取的一组随机数,形状由可变参数sizes 定义
        #在PyTorch中,数学运算有in-place和none-in-place两种形式。  #in-place,就是计算结果替换原始内存中的值  相乘:mul_
        #noise = torch.randn(batch_x.size()).mul_(self.sigma/255.0)
        noise = torch.randn(batch_x.size()).mul_( np.random.randint(55)/255.0)
        print('noise.shape',noise.shape)

        batch_y = batch_x + noise   #加噪声


        return batch_y, batch_x    #返回批量batch_y, batch_x

    def __len__(self):
        print(self.xs. size(0))
        return self.xs. size(0) #xs.size(0)指batchsize的值


#展示图片
def show(x, title=None, cbar=False, figsize=None):
    import matplotlib.pyplot as plt
    # #    图像的长和宽(英寸) #Figure返回的实例也将传递给后端的new_figure_manage
    plt.figure(figsize=figsize)
    # #interpolation 插值方法  #cmap: 颜色图谱(colormap), 默认绘制为RGB(A)颜色空间
    plt.imshow(x, interpolation='nearest', cmap='gray')
    if title:
        plt.title(title)
    if cbar:
        plt.colorbar()  ##将颜色条添加到绘图中。
    plt.show()   #输出图片


def data_aug(img, mode=0):
    # data augmentation #数据增强
    if mode == 0:       #返回原图
        return img
    elif mode == 1:     #翻转变换(flip): 沿着水平或者垂直方向翻转图像  #flipud(a) 上下翻转
        return np.flipud(img)
    elif mode == 2:     #将矩阵A逆时针旋转90°以后返回
        return np.rot90(img)
    elif mode == 3:     #先反转再旋转
        return np.flipud(np.rot90(img))
    elif mode == 4:     #将矩阵逆时针旋转(90×k)°以后返回,k取负数时表示顺时针旋转,再翻转
        return np.rot90(img, k=2)
    elif mode == 5:     #先旋转再翻转
        return np.flipud(np.rot90(img, k=2))
    elif mode == 6:     #将矩阵逆时针旋转(90×k)°以后返回,k取负数时表示顺时针旋转
        return np.rot90(img, k=3)
    elif mode == 7:     #先旋转再翻转
        return np.flipud(np.rot90(img, k=3))

#从一张图像中获取多尺度的补丁
def gen_patches(file_name):
    # get multiscale patches from a single image
    #使用opencv读取图像,直接返回numpy.ndarray 对象,通道顺序为BGR ,注意是BGR,通道值默认范围0-255
    # flag = 0  八位深度 1通道  位深度指的是存储每个像素所用的位数,主要用于存储
    img = cv2.imread(file_name, 0)  # gray scale
    plt.show()
    print('img:',img)
    h, w = img.shape
    print('h,w',h,w,)
    patches = []
    for s in scales:
        h_scaled, w_scaled = int(h*s), int(w*s)
        print('h_scaled, w_scaled:',h_scaled, w_scaled)
        # 图像缩放使用cv2.resize时,参数输入是 宽×高×通道   INTER_CUBIC:4x4像素邻域的双三次插值    缩小图像
        img_scaled = cv2.resize(img, (w_scaled,h_scaled ), interpolation=cv2.INTER_CUBIC)
        print(img_scaled.shape)
        # extract patches
        for i in range(0, h_scaled-patch_size+1, stride):
            for j in range(0, w_scaled-patch_size+1, stride):
                x = img_scaled[i:i+patch_size, j:j+patch_size]
                for k in range(0, aug_times):
                    #调用数据增强 自定义函数     random.randint产生 0 到 8 的一个整数型随机数
                    x_aug = data_aug(x, mode=np.random.randint(0, 8))
                    #print('x_aug',x_aug)
#                   #print(i,j)
                    patches.append(x_aug)
        print('patches.shape()',len(patches))
    #返回补丁值
    print('patches:',patches)
    print('patches.shape()',len(patches))
    return patches    #patches 是列表类型的

#从数据集中生成干净的补丁
def datagenerator(data_dir='testdata', verbose=True):
    # generate clean patches from a dataset
    file_list = glob.glob(data_dir+'/*.png')  # 得到文件列表get name list of all .png files

    # initrialize
    data = []
    # generate patches
    for i in range(len(file_list)):

        #调用自定义函数gen_patches
        patches = gen_patches(file_list[i])
        print('调用gen_patches结束')
        count= 0
        for patch in patches:
            #print(patch)
            count = count+1

            data.append(patch)
        print('count?',count)
        print('data.len',len(data))
        if verbose:
            print(str(i+1) + '/' + str(len(file_list)) + ' is done ^_^')
    #转换数据类型无符号整数(0到255)

    print(operator.eq(patches,data))
    #print('data:',data)
    data = np.array(data, dtype='uint8')
    #print(data)
    print('data.shape',data.shape)
    #np.expand_dims  扩展维度
    data = np.expand_dims(data, axis=3)

    print('data.shape',data.shape)
    print('len(data)',len(data))
    discard_n = len(data)-len(data)//batch_size*batch_size  # because of batch namalization
    print('discard_n',discard_n)
    #delete是可以删除数组的整行和整列的

    data = np.delete(data, range(discard_n), axis=0)
    print(data.shape,len(data))
    print('^_^-training data finished-^_^')
    return data


if __name__ == '__main__':

    data = datagenerator(data_dir='testdata')
    print(data.shape)
    #print(data)

#    print('Shape of result = ' + str(res.shape))
#    print('Saving data...')
#    if not os.path.exists(save_dir):
#            os.mkdir(save_dir)
#    np.save(save_dir+'clean_patches.npy', res)
#    print('Done.')


    data = data.astype('float32')/255.0   #对数据进行处理,位于【0 1】
    print('data.shape',data.shape)

    #torch.from_numpy将numpy.ndarray 转换为pytorch的 Tensor。  transpose多维数组转置
    data = torch.from_numpy(data.transpose((0, 3, 1, 2)))  # tensor of the clean patches, N X C X H X W

    print('data.shape',data.shape)
    print(data)
    #加噪声函数

    DDataset=DenoisingDataset(data)
    #DLoader = DataLoader(dataset=DDataset, num_workers=4, drop_last=True, batch_size=batch_size, shuffle=True)
二、为了更好理解数据生成的过程
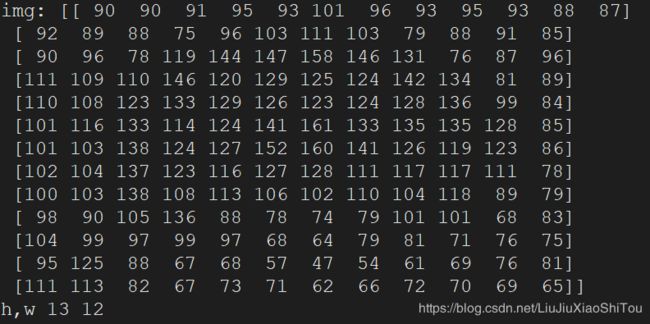
1、将patch_size大小更改为4*4,步长stride修改为1。图片大小利用画图工具将图片大小修改为h*w=13*12,只选区一张图片存放在文件夹testdata里面。主要为测试class DenoisingDataset(Dataset)和datagenerator函数。为了更好理解过程,增加了许多print()语句。
2、修改下面一处代码,cv2.resize时,参数输入是 宽×高×通道,若输入(h_scaled ,w_scaled ),则会出现错误提示:ValueError: setting an array element with a sequence。错误原因是高宽不等时,不正确的参数顺序会导致生成的patch_size小于4*4,所以不可以转换为数组。这种错误再高宽相同的情况下不会发生。
# 图像缩放使用cv2.resize时,参数输入是 宽×高×通道   INTER_CUBIC:4x4像素邻域的双三次插值    缩小图像
        img_scaled = cv2.resize(img, (w_scaled,h_scaled ), interpolation=cv2.INTER_CUBIC)
3、测试数据:数据原始大小为h*w=500*500,选择图像文件打开方式为画图工具,点击重新调整大小—>像素点—>取消‘保持纵横比’—>修改大小,保存。
三、模块运行过程(部分)
在模块if_name_=='__main__'先调用datagenerator()函数,对testdata文件夹里面的每一张图片,都调用gen_patches()函数。我们文件夹只有一张图片,现在进入gen_patches()函数。执行如下代码。
def gen_patches(file_name):
    # get multiscale patches from a single image
    #使用opencv读取图像,直接返回numpy.ndarray 对象,通道顺序为BGR ,注意是BGR,通道值默认范围0-255
    # flag = 0  八位深度 1通道  位深度指的是存储每个像素所用的位数,主要用于存储
    img = cv2.imread(file_name, 0)  # gray scale
    plt.show()
    print('img:',img)
    h, w = img.shape
    print('h,w',h,w,)
patches=[ ]用于存储生成的patch,patches是列表类型。patch大小4*4,stride步长为1,并且对图像进行处理,获得不同尺度的图像,对获得的图像矩阵进行遍历,每获得一个patch对其进行数据增强处理,调用data_aug()函数,旋转和翻转操作。将生成的patch存放在patches[]。
patches = []
    for s in scales:
        h_scaled, w_scaled = int(h*s), int(w*s)
        print('h_scaled, w_scaled:',h_scaled, w_scaled)
        # 图像缩放使用cv2.resize时,参数输入是 宽×高×通道   INTER_CUBIC:4x4像素邻域的双三次插值    缩小图像
        img_scaled = cv2.resize(img, (w_scaled,h_scaled ), interpolation=cv2.INTER_CUBIC)
        print(img_scaled.shape)
        # extract patches
        for i in range(0, h_scaled-patch_size+1, stride):
            for j in range(0, w_scaled-patch_size+1, stride):
                x = img_scaled[i:i+patch_size, j:j+patch_size]
                for k in range(0, aug_times):
                    #调用数据增强 自定义函数     random.randint产生 0 到 8 的一个整数型随机数
                    x_aug = data_aug(x, mode=np.random.randint(0, 8))
                    #print('x_aug',x_aug)
#                   #print(i,j)
                    patches.append(x_aug)
        print('patches.shape()',len(patches))
    #返回补丁值
    print('patches:',patches)
    print('patches.shape()',len(patches))
    return patches    #patches 是列表类型的
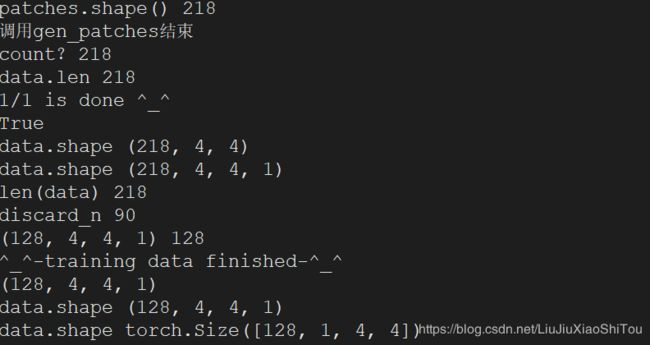
每一个图像文件都会调用一次gen_patches(file_name)函数,将所有的paches[]都存放在data[]并转换为数组类型,扩展维度,因为分为batch_size=128,所以执行discard_n = len(data)-len(data)//batch_size*batch_size,并删除多余的。返回data。datagenerator()执行完毕。返回if __name__ == '__main__',对数据进行处理,位于【0 1】,转换为pytorch的 Tensor,data目前为Tensor类型,再调用DenoisingDataset(Dataset),对data进行加噪处理。
四、如何计算patches大小
以测试数据图像为例,图像大小为h*w=13*12 ,patch_size,= 4,stride = 1 scales = [1, 0.9, 0.8, 0.7],batch_size = 128 。
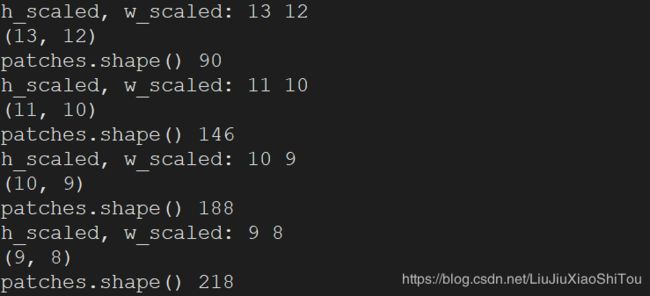
当scales=1时,图像大小为13*12,pacthes=(13-4+1)(12-4+1) = 90
当scales=0.9时,图像大小为11*10,pacthes=(11-4+1)(10-4+1) = 56
当scales=0.8时,图像大小为10*9,pacthes=(10-4+1)(9-4+1) = 42
当scales=0.7时,图像大小为9*8,pacthes=(9-4+1)(8-4+1) = 30
所以patches[] = 218。因为batch_size = 128 ,要整除,所以要删除余数,最后为大小128。


