神经网络基础-梯度下降和BP算法
在深度学习的路上,从头开始了解一下各项技术。本人是DL小白,连续记录我自己看的一些东西,大家可以互相交流。
本文参考:本文参考吴恩达老师的Coursera深度学习课程,很棒的课,推荐
本文默认你已经大致了解深度学习的简单概念,如果需要更简单的例子,可以参考吴恩达老师的入门课程:
http://study.163.com/courses-search?keyword=%E5%90%B4%E6%81%A9%E8%BE%BE#/?ot=5
转载请注明出处,其他的随你便咯
一、前言
在上篇文章中,我们介绍了神经网络的一些基础知识,但是并不能让你真正的做点什么。我们如何训练神经网络?具体该怎么计算?隐层可以添加吗,多少层合适?这些问题,会在本篇文章中给出。
二、神经网络前向计算
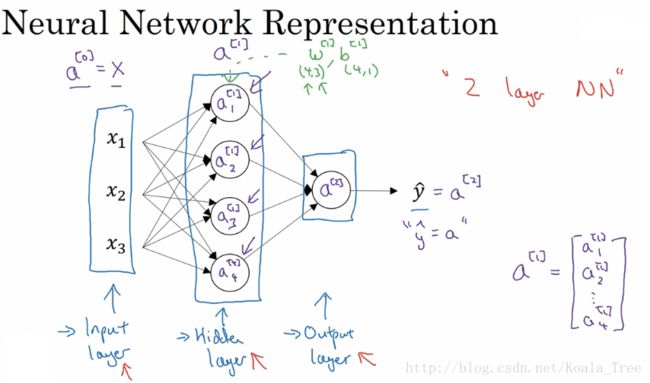
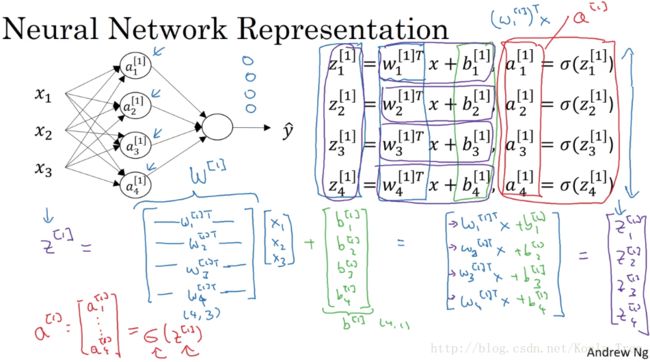
首先,我们在上文中已经初步了解到神经网络的结构,由于我们有很多的全连接,如果用单一的乘法计算,会导致训练一个深层的神经网络,需要上百万次的计算。这时候,我们可以用向量化的方式,将所有的参数叠加成矩阵,通过矩阵来计算。我们将上文中的神经网络复制到上图。
在上图中,我们可以发现,每个隐层的神经元结点的计算分为两个部分,计算z和计算a。
要注意的是层与层之间参数矩阵的形状:
输入层和隐层之间
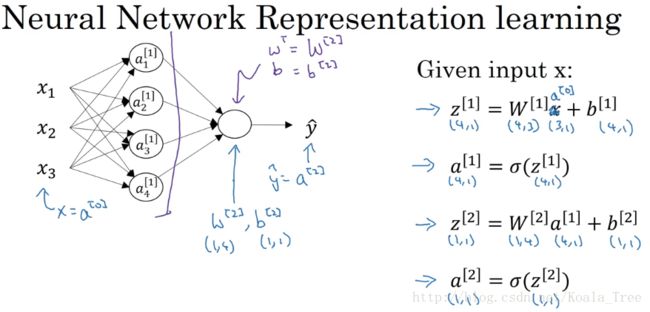
w[1].shape = (4, 3):4为隐层神经元的个数,3为输入层神经元的个数;
b[1].shape = (4, 1):4为隐层神经元的个数,1不用担心,python的广播机制,会让b复制成适合的形状去进行矩阵加法;
隐层和输出层之间
w[2].shape = (1, 4):1为输出层神经元的个数,4个隐层神经元的个数;
b[2].shape = (1, 1):1为输出层神经元的个数,1可以被广播机制所扩展。
通过上述描述,我们可以看出w矩阵的规则,我们以相邻两层来说,前面一层作为输入层,后层为输出。两层之间的w参数矩阵大小为(n_out,n_in),b参数矩阵为(n_out,1)。其中n为该层的神经元个数。
那么我们现在用向量化的方式来计算我们的输出值:
在对应的图中,使用矩阵的方法,实际上只用实现右边的四个公式,即可得到a[2],也就是我们的输出值yhat。
三、向量化神经网络
通过向量化参数,我们可以简化我们的单次训练计算。同样在m个训练样本的计算过程中,我们发现,每个样本的计算过程实际上是相同的,如果按照之前的思路,我们可以用for循环来计算m个样本。
for i in m:
单次训练
但是这种for循环在python中实际上会占用大量的资源,同样我们也可以用向量化的方式,一次性计算所有m个样本,提高我们的计算速度。
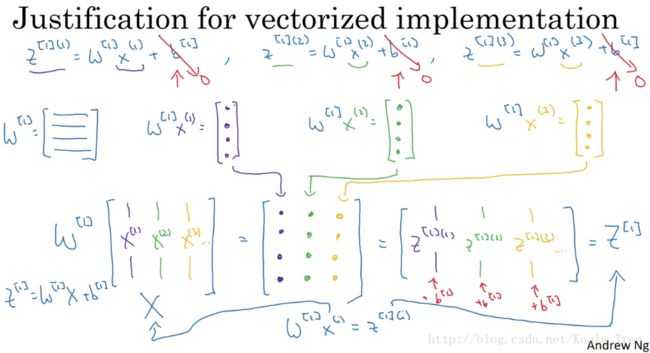
下面是实现向量化的解释:
在上面,我们用 [ l ] 表示第几层,用 ( i ) 表示第几个样本,我们先假设b = 0。
在m个训练样本中,其实都是在重复相同的过程,那么我们可以将m个样本,叠加在一个X矩阵中,其形状为(xn,m)。其中xn表示单个样本的特征数,m为训练样本的个数。
四、反向传播算法
在实现了前向计算之后,我们可以通过计算损失函数和代价函数来得到我们这个神经网络的效果。同时我们也可以开始我们的反向传播(Backward Prop),以此来更新参数,让我们的模型更能得到我们想要的预测值。梯度下降法即使一种优化w和b的方法。
简单理解梯度下降
首先我们使用一个简单的例子来讲解什么是梯度下降:
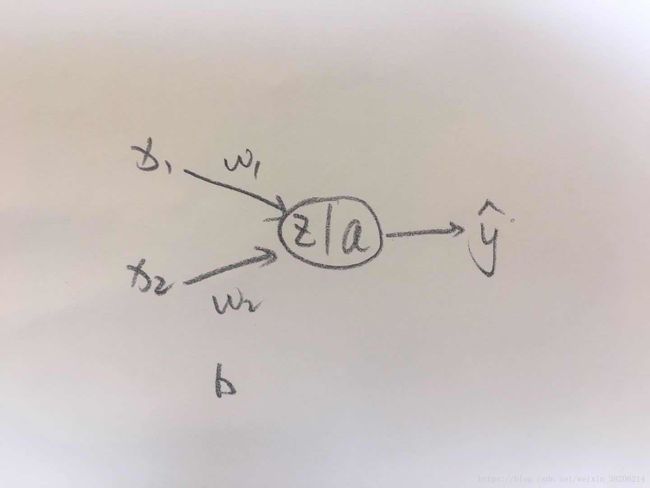
我们先给出一个简单的神经网络(可能叫神经元更合适),损失函数的计算公式为:
我们将上述公式化为一个计算图如下:
现在我们要优化w1、w2和b,来使得L(a,y)的值最小化,那么我们需要对求偏导数,用偏导数来更新我们的w1、w2和b。因为L(a,y)是一个凸函数,我们在逐步更新的过程中,一点点的达到全局最优解。
计算过程如下:
首先我们对da、dz求导:
在对w1、w2和b进行求导:
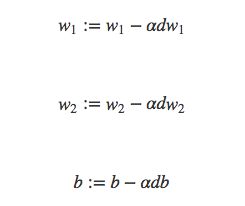
接下来用梯度下降法更新参数:
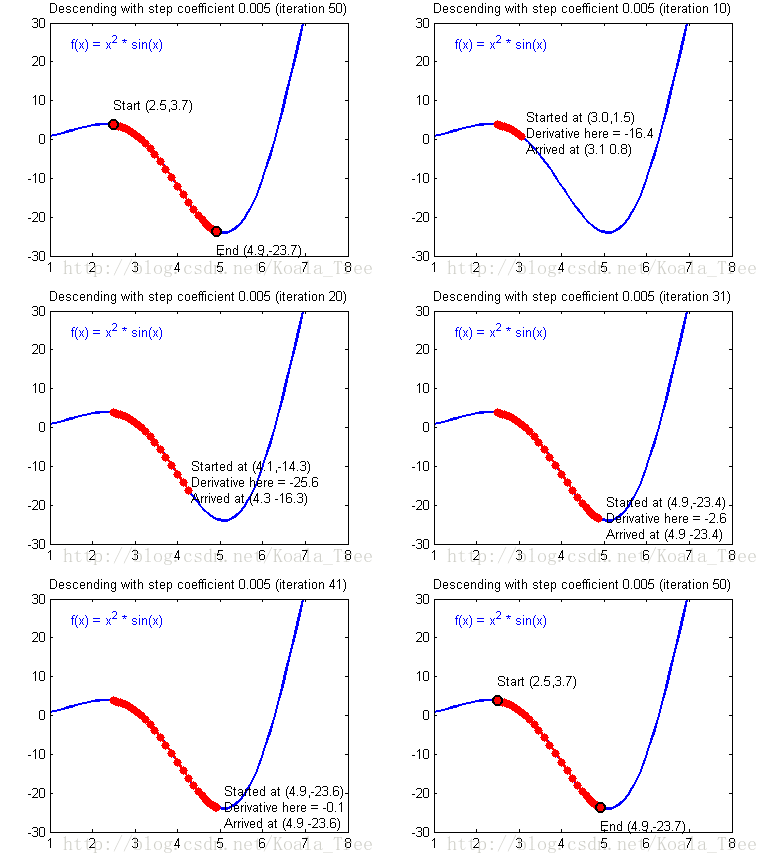
其中 α表示学习率(learning-rate),也可以理解为学习的步长,就是我们每次朝着最优解前进的速度。如果学习率过大,我们可能会在最优解附近来回震荡,没办法到达最优解。如果学习率过小,我们可能需要很多次数的迭代,才能到达最优解,所以选择合适的学习率,也是很重要的。
接下来,我们给出m个样本的损失函数:
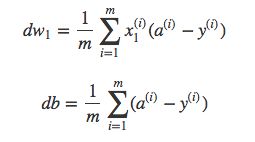
损失函数关于w和b的偏导数,在m个样本的情况下,可以写成所有样本点偏导数的平均形式:
接下来,和单个样本一样,我们可以更新w1、w2和b来进行下一次的训练:
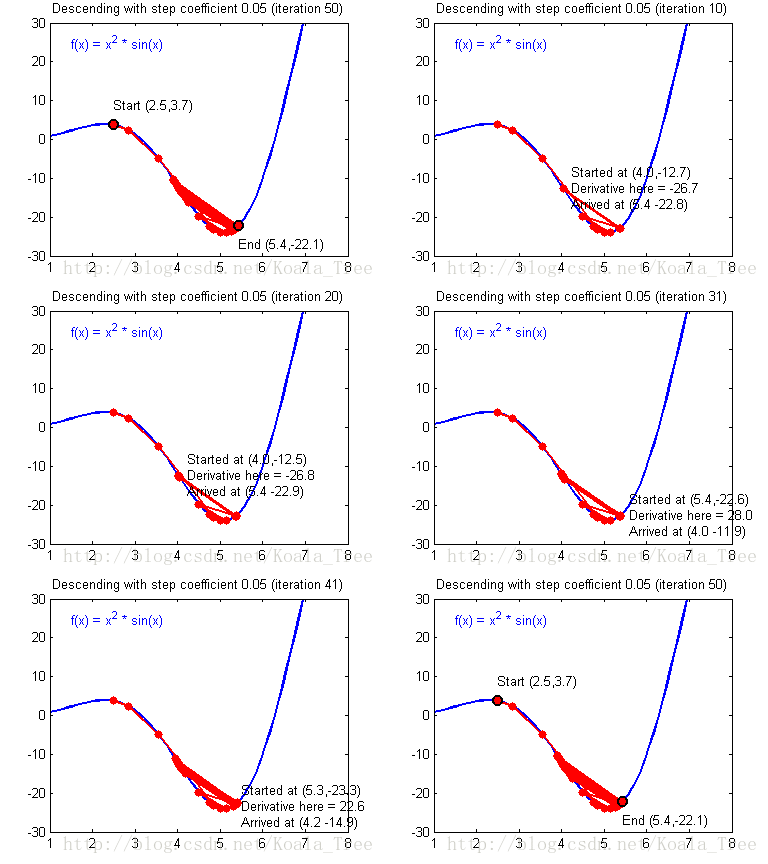
在吴恩达老师的课程中,给出了两幅动图来讲解更新率对梯度下降的影响:
当梯度下降很小或合适时候,我们会得到如下的过程,模型最终会走向最优解。
当我们的更新率设置过高时,我们的步长会让我们不得不在最终结果周围震荡,这会让我们浪费更多时间,甚至达不到最终的最优解,如下:
浅层神经网络的梯度下降
好了,让我们回到本文的第一个例子:
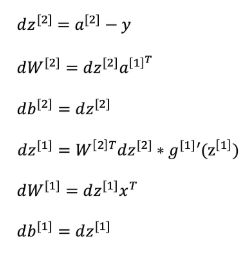
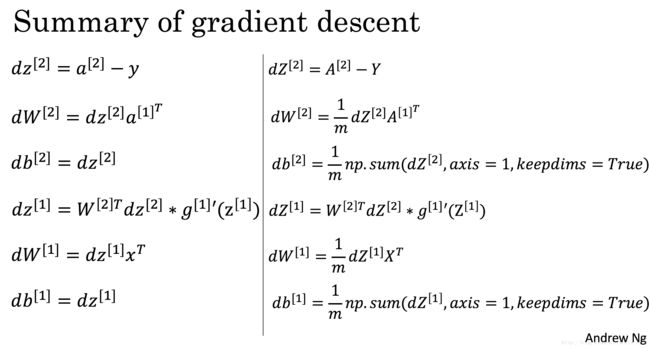
我们继续通过这个式子来讲解梯度下降,首先我们给出单个梯度下降的求导公式:
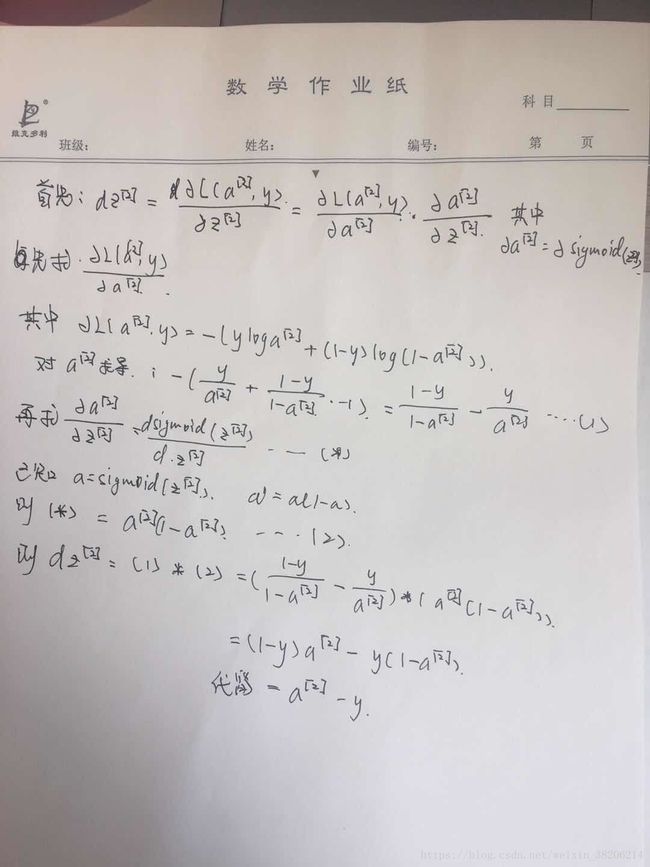
在上图中,我们直接给出了求导的结果,我给出一个dz[2]的手算过程,大家可以以此推导以下其他的结果:
(字比较丑大家忍住看,或者自己手算一遍吧...)整体计算不难,核心思想是链式求导,相信大家都能理解。
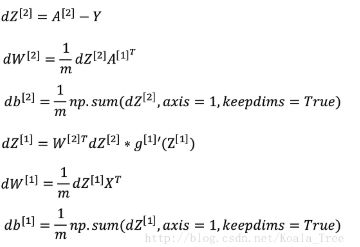
接下来,我们给出向量化的求导结果:
其中与单个样本求导不同的在于,w和b是偏导数的平均数。这样我们就可以更新参数,完成一次迭代。
总结而言
反向传播是相对与正向传播而言的,在神经网络的训练中,我们通过正向传播来计算当前模型的预测值,根据最终得到的代价函数,通过梯度下降算法,求取每个参数的偏导数,更新参数实现反向传播以此来让我们的模型更能准确的预测问题。
五、神经网络代码及查漏补缺
这算是第一篇原创文章,由于分了两篇文章来讲解,我觉得有必要通过代码来将所有的点都串联一下了。
通过一个简单的二分类问题来梳理一下神经网络的构建流程:
0、数据集
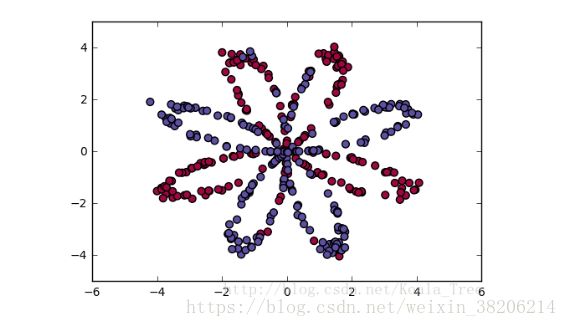
如上图所示,在这个例子中,我们需要用一个简单的神经网络来划分图片上的区域,横轴和数轴为特征x1和x2。每个点的颜色为最终的值y,蓝色为1,红色为0。我们的目标是通过得知该点的坐标(x1,x2)来预测该点的颜色(y)。
神经网络模型
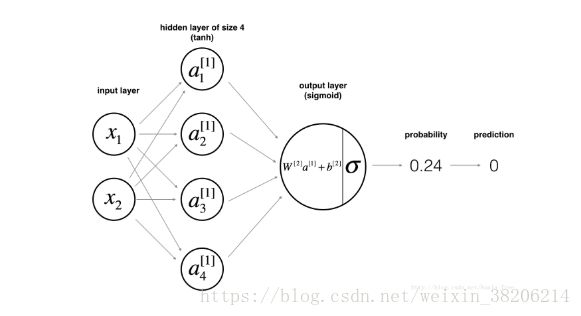
我们选择如上图所示的神经网络模型,在隐层中选择tanh函数来做激活函数,在输出层中,用sigmoid函数来做激活函数。
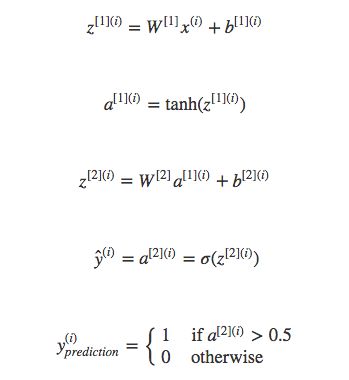
对于每个训练样本,计算公式如下:
最终代价函数公式如下:
现在我们给出构建神经网络的方法:
- 定义神经网络的结构(输入的神经元数,隐层的神经元数等)
- 初始化模型的参数
- 循环(给定的次数)
- 实现前向传播
- 计算损失函数
- 实现反向传播、获得梯度
- 更新参数(梯度下降)
最终将1-3步骤合并为一个模型。构建的模型学习了正确的参数后(训练完成),就可以对新数据进行预测了。
1、定义神经网络结构
我们定义X为输入值(特征数,样本数);
Y为输出值(结果,样本数),每单个x都有对应的y,所以样本数是一致的;
n_x为输入层的大小;
n_h为隐层的大小,4;
n_y为输出层的大小
def layer_sizes(X, Y):
    """
    Arguments:
    X -- input dataset of shape (input size, number of examples)
    Y -- labels of shape (output size, number of examples)

    Returns:
    n_x -- the size of the input layer
    n_h -- the size of the hidden layer
    n_y -- the size of the output layer
    """
    n_x = X.shape[0] # size of input layer
    n_h = 4
    n_y = Y.shape[0]# size of output layer
    return (n_x, n_h, n_y)
2、初始化模型参数
我们使用np.random.randn(a, b) * 0.01来初始化权重w;
使用np.zeros((a, b))来初始化偏置b。
其中w不能用0来初始化。如果用0来初始化w,那么所以的特征值在通过同样的运算,换言之,所有特征值对最后结果的影响是一样的,那么就损失了所有的特征值,我们用randn()随机数来生成w,在将其变的很小,就避免了上述问题。
def initialize_parameters(n_x, n_h, n_y):
    """
    Argument:
    n_x -- size of the input layer
    n_h -- size of the hidden layer
    n_y -- size of the output layer

    Returns:
    params -- python dictionary containing your parameters:
                    W1 -- weight matrix of shape (n_h, n_x)
                    b1 -- bias vector of shape (n_h, 1)
                    W2 -- weight matrix of shape (n_y, n_h)
                    b2 -- bias vector of shape (n_y, 1)
    """

    np.random.seed(2) # we set up a seed so that your output matches ours although the initialization is random.

    W1 = np.random.randn(n_h, n_x)
    b1 = np.zeros((n_h, 1))
    W2 = np.random.randn(n_y, n_h)
    b2 = np.zeros((n_y, 1))

    assert (W1.shape == (n_h, n_x))
    assert (b1.shape == (n_h, 1))
    assert (W2.shape == (n_y, n_h))
    assert (b2.shape == (n_y, 1))

    parameters = {"W1": W1,
                  "b1": b1,
                  "W2": W2,
                  "b2": b2}

    return parameters
3、实现循环
首先需要实现前向传播(forward prop)。
我们可以从dict parameters中得到我们初始化的参数w,b。在计算前向传播中,我们将z、a存储在缓存(cache)中,方便我们在反向传播中调用。
def forward_propagation(X, parameters):
    """
    Argument:
    X -- input data of size (n_x, m)
    parameters -- python dictionary containing your parameters (output of initialization function)

    Returns:
    A2 -- The sigmoid output of the second activation
    cache -- a dictionary containing "Z1", "A1", "Z2" and "A2"
    """
    # Retrieve each parameter from the dictionary "parameters"
    ### START CODE HERE ### (≈ 4 lines of code)
    W1 = parameters["W1"]
    b1 = parameters["b1"]
    W2 = parameters["W2"]
    b2 = parameters["b2"]
    ### END CODE HERE ###

    # Implement Forward Propagation to calculate A2 (probabilities)
    Z1 = np.dot(W1, X) + b1
    A1 = np.tanh(Z1)
    Z2 = np.dot(W2, A1) + b2
    A2 = sigmoid(Z2)

    assert(A2.shape == (1, X.shape[1]))

    cache = {"Z1": Z1,
             "A1": A1,
             "Z2": Z2,
             "A2": A2}

    return A2, cache
接下来我们计算代价函数
我们通过A2,Y即可计算损失函数。
def compute_cost(A2, Y, parameters):
    """
    Computes the cross-entropy cost given in equation (13)

    Arguments:
    A2 -- The sigmoid output of the second activation, of shape (1, number of examples)
    Y -- "true" labels vector of shape (1, number of examples)
    parameters -- python dictionary containing your parameters W1, b1, W2 and b2

    Returns:
    cost -- cross-entropy cost given equation (13)
    """

    m = Y.shape[1] # number of example

    # Compute the cross-entropy cost
    logprobs = np.multiply(np.log(A2), Y) + np.multiply(np.log(1-A2), (1-Y))
    cost = -(1.0/m)*np.sum(logprobs)

    cost = np.squeeze(cost)     # makes sure cost is the dimension we expect.
                                # E.g., turns [[17]] into 17
    assert(isinstance(cost, float))

    return cost
接下来我们计算反向传播(backward prop)
我们将求导值存储在缓存(grads)中。
其中计算公式如下:
代码如下:
def backward_propagation(parameters, cache, X, Y):
    """
    Implement the backward propagation using the instructions above.

    Arguments:
    parameters -- python dictionary containing our parameters
    cache -- a dictionary containing "Z1", "A1", "Z2" and "A2".
    X -- input data of shape (2, number of examples)
    Y -- "true" labels vector of shape (1, number of examples)

    Returns:
    grads -- python dictionary containing your gradients with respect to different parameters
    """
    m = X.shape[1]

    # First, retrieve W1 and W2 from the dictionary "parameters".
    ### START CODE HERE ### (≈ 2 lines of code)
    W1 = parameters["W1"]
    W2 = parameters["W2"]
    ### END CODE HERE ###

    # Retrieve also A1 and A2 from dictionary "cache".
    ### START CODE HERE ### (≈ 2 lines of code)
    A1 = cache["A1"]
    A2 = cache["A2"]
    ### END CODE HERE ###

    # Backward propagation: calculate dW1, db1, dW2, db2.
    dZ2 = A2 - Y
    dW2 = 1.0/m*np.dot(dZ2, A1.T)
    db2 = 1.0/m*np.sum(dZ2, axis=1, keepdims=True)
    dZ1 = np.dot(W2.T, dZ2)*(1-np.power(A1, 2))
    dW1 = 1.0/m*np.dot(dZ1, X.T)
    db1 = 1.0/m*np.sum(dZ1, axis=1, keepdims=True)

    grads = {"dW1": dW1,
             "db1": db1,
             "dW2": dW2,
             "db2": db2}

    return grads
接下来我们更新参数,结束本次循环:
设置更新率为1.2,从dict parameters和grads中取出参数和导数,将更新后的参数,重新存入parameters中。
def update_parameters(parameters, grads, learning_rate = 1.2):
    """
    Updates parameters using the gradient descent update rule given above

    Arguments:
    parameters -- python dictionary containing your parameters
    grads -- python dictionary containing your gradients

    Returns:
    parameters -- python dictionary containing your updated parameters
    """
    # Retrieve each parameter from the dictionary "parameters"
    W1 = parameters["W1"]
    b1 = parameters["b1"]
    W2 = parameters["W2"]
    b2 = parameters["b2"]

    # Retrieve each gradient from the dictionary "grads"
    dW1 = grads["dW1"]
    db1 = grads["db1"]
    dW2 = grads["dW2"]
    db2 = grads["db2"]

    # Update rule for each parameter
    W1 = W1 - learning_rate*dW1
    b1 = b1 - learning_rate*db1
    W2 = W2 - learning_rate*dW2
    b2 = b2 - learning_rate*db2

    parameters = {"W1": W1,
                  "b1": b1,
                  "W2": W2,
                  "b2": b2}

    return parameters
4、整合模型
接下来我们将上述的步骤,整合为一个模型,即为我们的神经网络模型。
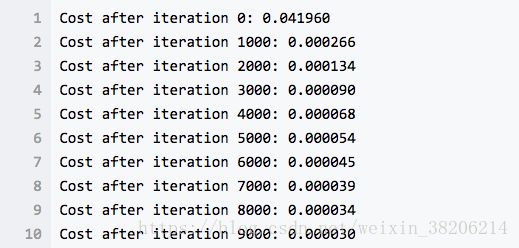
我们设定训练次数(num_iterations)为10000次,每1000次打印出我们的误差。
def nn_model(X, Y, n_h, num_iterations = 10000, print_cost=False):
    """
    Arguments:
    X -- dataset of shape (2, number of examples)
    Y -- labels of shape (1, number of examples)
    n_h -- size of the hidden layer
    num_iterations -- Number of iterations in gradient descent loop
    print_cost -- if True, print the cost every 1000 iterations

    Returns:
    parameters -- parameters learnt by the model. They can then be used to predict.
    """

    np.random.seed(3)
    n_x = layer_sizes(X, Y)[0]
    n_y = layer_sizes(X, Y)[2]

    # Initialize parameters, then retrieve W1, b1, W2, b2. Inputs: "n_x, n_h, n_y". Outputs = "W1, b1, W2, b2, parameters".
    parameters = initialize_parameters(n_x, n_h, n_y)
    W1 = parameters["W1"]
    b1 = parameters["b1"]
    W2 = parameters["W2"]
    b2 = parameters["b2"]

    # Loop (gradient descent)

    for i in range(0, num_iterations):

        # Forward propagation. Inputs: "X, parameters". Outputs: "A2, cache".
        A2, cache = forward_propagation(X, parameters)

        # Cost function. Inputs: "A2, Y, parameters". Outputs: "cost".
        cost = compute_cost(A2, Y, parameters)

        # Backpropagation. Inputs: "parameters, cache, X, Y". Outputs: "grads".
        grads = backward_propagation(parameters, cache, X, Y)

        # Gradient descent parameter update. Inputs: "parameters, grads". Outputs: "parameters".
        parameters = update_parameters(parameters, grads, learning_rate = 1.2)


        # Print the cost every 1000 iterations
        if print_cost and i % 1000 == 0:
            print ("Cost after iteration %i: %f" %(i, cost))

    return parameters
在上图中,我们可以看到每1000次循环,我们的代价函数都会变小,这说明我们的梯度下降是成功的!
5、预测函数
最终,我们用一个预测函数,来结束我们这个文章。
我们将测试数据输入模型,得到预测结果A2,如果A2 > 0.5,就意味着有超过50%的概率,是蓝色的点,反之则是红色的点。
def predict(parameters, X):
    """
    Using the learned parameters, predicts a class for each example in X

    Arguments:
    parameters -- python dictionary containing your parameters
    X -- input data of size (n_x, m)

    Returns
    predictions -- vector of predictions of our model (red: 0 / blue: 1)
    """

    # Computes probabilities using forward propagation, and classifies to 0/1 using 0.5 as the threshold.
    A2, cache = forward_propagation(X, parameters)
    predictions = (A2 > 0.5)

    return predictions
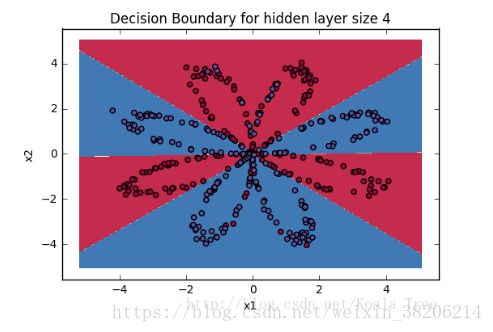
最终,我们将原来的数据集划分为如下图片:
总结而言:
通过这篇文章能了解一个MLP或神经网络是如何组成的。前向传播是通过计算得到一个预测值,而反向传播是通过反向求导,通过梯度下降算法来优化模型参数,让模型能更准确的预测样本数值。
