Spring Cloud(八)Zuul构建微服务网关
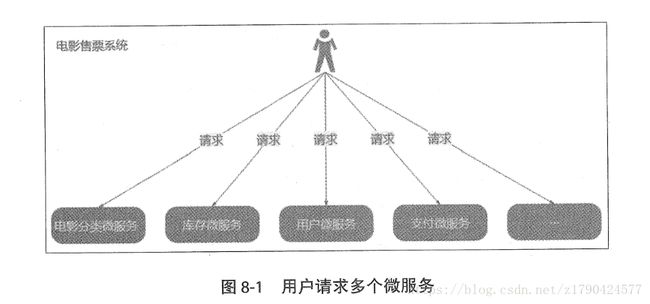
为什么要使用微服务网关


微服务网关封装了应用程序的内部结构,客户端只须跟网关交互,而无须直接调用特定微服务的接口。这样开发就可以得到简化。不仅如此,使用微服务还有以下优点:
- 易于监控
- 易于认证
- 减少了客户端与各个微服务之间的交互次数
Zuul简介
Zuul是 Netflix开源的微服务网关,它可以和Eureka、Ribbon、Hystrix等组件配合使用。Zuul的核心是一系列的过滤器。
使用Zuul
1:新建Spring Boot项目EurekaServer,添加依赖Eureka Server
2:启动类
@EnableEurekaServer
@SpringBootApplication
public class EurekaServerApplication {

    public static void main(String[] args) {
        SpringApplication.run(EurekaServerApplication.class, args);
    }
}
3:application.yml
server:
  port: 8761
eureka:
  client:
    registerWithEureka: false    #是否将自己注册到Eureka Server,默认为True。由于当前应用就是Eureka Server,故false
    fetchRegistry: false         #是否从Eureka Server获取注册信息,默认True。因为这是一个单节点的Eureka Server,不需要同步其他的Eureka Server节点,故false
    serviceUrl:
      defaultZone: http://localhost:8761/eureka/
4:新建Spring Boot项目EurekaClient,添加依赖Eureka Client(已经包含Web)
5:启动类
@EnableDiscoveryClient
@SpringBootApplication

public class EurekaClientApplication {

    public static void main(String[] args) {
        SpringApplication.run(EurekaClientApplication.class, args);
    }
}
6:控制器MyController
@RestController
public class MyController {

    @RequestMapping("/eureka/test")  //等会通过Zuul来访问它,测试Zuul
    public String test()
    {
        return "Hello Zuul";
    }
}
7:新建Spring Boot项目ServerZuul,添加依赖Zuul、Eureka Client
8:启动类
@EnableZuulProxy
@SpringBootApplication
public class ServerZuulApplication {

    public static void main(String[] args) {
        SpringApplication.run(ServerZuulApplication.class, args);
    }
}
9:application.yml
server:
  port: 8040
spring:
  application:
    name: Zuul
eureka:
  client:
    service-url:
      defaultZone: http://localhost:8761/eureka/
management:
  security:
    enabled: false
10:运行测试
启动项目EurekaServer
启动项目EurekaClient
启动项目ServerZuul
访问:http://localhost:8040/eurekaclinet/eureka/test

默认情况下,Zuul会代理所有注册到Eureka Server的微服务,并且Zuul的路由规则如下:
http://ZUUL_HOST:ZUUL_PORT/微服务在Eureka上的serviceId/** 会被转发到serviceId对应的微服务
Zuul的路由端点
当@EnableZuulProxy与Spring Boot Actuator配合使用时,Zuul会暴露一个路由管理端点/routes。借助这个端点,可以方便、直观地查看以及管理Zuul的路由。
spring-cloud-starter-zuul已经包含了spring-cloud-starter-actuator。因此我们编写的ServerZuul已经具备路由管理能力。
运行测试:
访问:http://localhost:8040/routes

可以看到从路径到微服务的映射!
路由配置详解
1:自定义指定微服务的访问路径
zuul:
  routes:
    eurekaclinet: /client/**      #eurekaclinet微服务会被映射到/client/**
访问:http://localhost:8040/client/eureka/test

2:忽略指定微服务
zuul:
  ignored-services: eurekaclinet
访问:http://localhost:8040/eurekaclinet/eureka/test

因为已经设置忽略了它,所以Zuul不会代理它。自然会报错!
3:忽略所有微服务,只路由指定微服务
zuul:
  ignored-services: '*'   # 使用'*'可忽略所有微服务
  routes:
    eurekaclinet: /client/**
让Zuul只路由eurekaclinet微服务
4:同时指定微服务的serviceId和对应路径
zuul:
  routes:
    client-route:                   # 该配置方式中,user-route只是给路由一个名称,可以任意起名。
      service-id: eurekaclinet
      path: /client/**
运行效果同1
5:同时指定path和URL
zuul:
  routes:
    client-route:                   # 该配置方式中,user-route只是给路由一个名称,可以任意起名。
      url: http://localhost:8761/ # 指定的url
      path: /client/**              # url对应的路径。
访问:http://localhost:8040/client 运行结果与http://localhost:8761/是一致的
我们随时可以通过访问:http://localhost:8040/routes 来查看Zuul的路由

6:路由前缀
zuul:
  prefix: /api
  strip-prefix: false
  routes:
    eurekaclinet: /client/**        #/api/eurekaclinet/eureka/tests
                                  #eurekaclinet/api/eureka/tests
更改EurekaClient的MyController
@RestController
public class MyController {

    @RequestMapping("/api/eureka/test")  //等会通过Zuul来访问它,测试Zuul
    public String test()
    {
        return "Hello Zuul";
    }
}
访问:http://localhost:8040/api/client/eureka/test 会被转发到/eurekaclinet/api/eureka/test

访问:http://localhost:8040/routes

使用Zuul上传文件
1:新建Spring Boot项目ServerZuulUpload,添加依赖Web、Eureka Client(2.0.3版本没有包含Web)、Actuator
2:启动类
@EnableEurekaClient
@SpringBootApplication
public class ServerZuulUploadApplication {

    public static void main(String[] args) {
        SpringApplication.run(ServerZuulUploadApplication.class, args);
    }
}
3:控制类MyController
@Controller
public class MyController {
      /**
       * 上传文件
       * ps.该示例比较简单,没有做IO异常、文件大小、文件非空等处理
       * @param file 待上传的文件
       * @return 文件在服务器上的绝对路径
       * @throws IOException IO异常
       */
      @RequestMapping(value = "/upload", method = RequestMethod.POST)
      public @ResponseBody String handleFileUpload(@RequestParam(value = "file", required = true) MultipartFile file) throws IOException {
        byte[] bytes = file.getBytes();
        File fileToSave = new File(file.getOriginalFilename());
        FileCopyUtils.copy(bytes, fileToSave);
        return fileToSave.getAbsolutePath();
      }
}
4:application.yml
server:
  port: 8050
eureka:
  client:
    serviceUrl:
      defaultZone: http://localhost:8761/eureka/
  instance:
    prefer-ip-address: true
spring:
  application:
    name: Upload
  servlet:
    multipart:
      max-file-size: 2000Mb
      max-request-size: 2500Mb
将该服务注册到EurekaServer,并配置了文件上传大小的限制!
运行测试(使用的是Postman):
启动项目


Zuul的过滤器
Zuul大部分功能都是通过过滤器来实现的。Zuul中定义了4种标准过滤器类型,这些过滤器类型对应于请求的典型生命周期:
- PRE:这种过滤器在请求被路由之前调用
- ROUTING:这种过滤器将请求路由到微服务
- POST:这种过滤器在路由到微服务以后执行
- ERROR:在其他阶段发生错误时执行该过滤器
除了默认的过滤器类型,Zuul还允许创建自定义的过滤器类型。
1:编写Zuul过滤器,只需继承抽象类ZuulFilter,然后实现几个抽象方法就可以了
public class PreRequestLogFilter extends ZuulFilter {
  private static final Logger LOGGER = LoggerFactory.getLogger(PreRequestLogFilter.class);

  @Override
  public String filterType() {      //返回过滤器类型。有pre、route、post、error等几种取值,对应上文的几种
    return FilterConstants.PRE_TYPE;
  }

  @Override
  public int filterOrder() {//返回一个int值来指定过滤器的执行顺序,不同的过滤器允许返回相同的数字
    return FilterConstants.PRE_DECORATION_FILTER_ORDER - 1;
  }

  @Override
  public boolean shouldFilter() {
    return true;//返回一个boolen值来判断该过滤器是否被执行,true表示执行,false表示不执行
  }

  @Override
  public Object run() {//过滤器的具体逻辑。这里让它打印请求的HTTP方法以及请求的地址
    RequestContext ctx = RequestContext.getCurrentContext();
    HttpServletRequest request = ctx.getRequest();
    PreRequestLogFilter.LOGGER.info(String.format("send %s request to %s", request.getMethod(), request.getRequestURL().toString()));
    return null;
  }
}
2:Zuul启动类:
@EnableZuulProxy
@SpringBootApplication
public class ServerZuulApplication {

    public static void main(String[] args) {
        SpringApplication.run(ServerZuulApplication.class, args);
    }
      @Bean
      public PreRequestLogFilter preRequestLogFilter() {
        return new PreRequestLogFilter();
      }
}
3:运行测试:
启动项目EurekaServer
启动项目EurekaClient
启动项目ServerZuul
多次访问:http://localhost:8040/eurekaclinet/eureka/test

禁用Zuul过滤器
Zuul的application.yml
zuul:
  PreRequestLogFilter:             #zuul.<ClassNmae>..disable=true即可禁用
    pre:
      disable: true
启动项目后多次访问:http://localhost:8040/eurekaclinet/eureka/test 控制台并不会打印相关信息
Zuul的容错与回退
在Spring Cloud中,Zuul默认已经包整合了Hystrix。
1:新建Spring Boot项目ServerHystrixDashboard 添加依赖Dashboard
2:启动类:
@EnableHystrixDashboard
@SpringBootApplication
public class ServerHystrixDashboardApplication {

    public static void main(String[] args) {
        SpringApplication.run(ServerHystrixDashboardApplication.class, args);
    }
}
3:application.yml
server:
  port: 8030
4:运行测试
启动项目EurekaServer
启动项目EurekaClient
启动项目ServerZuul
启动项目ServerHystrixDashboard
访问:http://localhost:8040/eurekaclinet/eureka/test 可获得正常结果
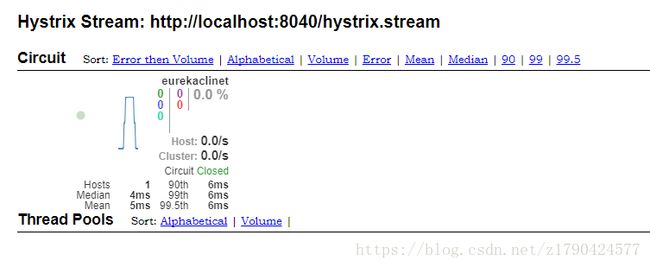
访问:http://localhost:8040/hystrix.stream

访问:http://localhost:8030/hystrix


Zuul的Hystrix监控的粒度是微服务,而不是某个API;同时也说明,所有经过Zuul的请求,都会被Hystrix保护起来。
关闭项目EurekaClient
访问:http://localhost:8040/eurekaclinet/eureka/test

下面来谈谈如何为Zuul实现回退!
为Zuul实现回退
想要为Zuul实现回退,需要实现FallbackProvider接口。在实现类中,指定为哪个微服务提供回退,并提供一个ClientHttpResponse作为回退响应。
@Component
public class MyFallbackProvider  implements FallbackProvider{
  @Override
  public String getRoute() {
    // 表明是为哪个微服务提供回退,*表示为所有微服务提供回退
    return "*";
  }

  @Override
  public ClientHttpResponse fallbackResponse(Throwable cause) {
    if (cause instanceof HystrixTimeoutException) {
      return response(HttpStatus.GATEWAY_TIMEOUT);
    } else {
      return this.fallbackResponse();
    }
  }

  @Override
  public ClientHttpResponse fallbackResponse() {
    return this.response(HttpStatus.INTERNAL_SERVER_ERROR);
  }

  private ClientHttpResponse response(final HttpStatus status) {
    return new ClientHttpResponse() {
      @Override
      public HttpStatus getStatusCode() throws IOException {
        return status;
      }

      @Override
      public int getRawStatusCode() throws IOException {
        return status.value();
      }

      @Override
      public String getStatusText() throws IOException {
        return status.getReasonPhrase();
      }

      @Override
      public void close() {
      }

      @Override
      public InputStream getBody() throws IOException {
        return new ByteArrayInputStream("服务不可用,请稍后再试。".getBytes());
      }

      @Override
      public HttpHeaders getHeaders() {
        // headers设定
        HttpHeaders headers = new HttpHeaders();
        MediaType mt = new MediaType("application", "json", Charset.forName("UTF-8"));
        headers.setContentType(mt);
        return headers;
      }
    };
  }
}参考书籍:Spring Cloud与Docker微服务架构实战
以上只是学习所做的笔记,以供日后参考!!!
