【Python】Python多线程爬虫学习(1)
相关模块:thread
相关函数:start_new_thread(调用的函数,函数里的参数)
例1:thread下的多线程简单示例
#coding=utf-8
2018.1.8\import thread

import time

def fun1():
    print "Hello World %s"%time.ctime()

def main():
    thread.start_new_thread(fun1,())
    thread.start_new_thread(fun1,())
    time.sleep(2)


if __name__=="__main__":
    main()
这里有几个点要提,thread调用的时间函数是在thread下所有的函数执行完成后才调用time.sleep(),如果在if下再次调用main(),那自然就是2s以后才会出现打印的信息;
例2:利用Python来ping自己的主机
#coding=utf-8
import thread
import time
import subprocess

def check_ping():
    cmd="ping -c 2 -w 1 127.0.0.1"
    check=subprocess.Popen(cmd,shell=True,stdin=subprocess.PIPE,stdout=subprocess.PIPE,stderr=subprocess.PIPE)
    data=check.stdout.read()
    print data

if __name__=="__main__":
    check_ping()
subprocess是一个大类,里面有相关进程ping的函数,ping -c后面是ping的次数,-w后面是跟的时间间隔,时间之后就是目标地址,Popen和PIPE是subprocess下面的函数。
在Windows下ping会有一点问题
image
但是在Linux(ubuntu)下可以成功ping通
image
参考到的笔记:
Python标准库
Python多线程
如果要检查主机是否存活,只需要在获取数据后检测ttl字段是否在数据中即可。
if "ttl" in data:
    print "up"
知道了怎么ping一台主机并检查其是否存活,接下来就要检测一个C段上存活的主机数。\
这里以百度为例,先ping一下百度的ip地址:
image\
这里百度的ip就为:115.239.210.27
例3.探测一个C段上所有存活的主机数
#coding=utf-8
import thread
import time
import subprocess

def check_ping(ip):
    cmd="ping -c 2 -w 1 "+ip
    check=subprocess.Popen(cmd,shell=True,stdin=subprocess.PIPE,stdout=subprocess.PIPE,stderr=subprocess.PIPE)
    data=check.stdout.read()
    if "ttl" in data:
        print "%s is up"%(ip)

def main():
    for i in range(1,255):
        ip="115.239.210."+str(i)
        thread.start_new_thread(check_ping,(ip,))
        time.sleep(0.1)
        #注意,使用多线程一定要使用time.sleep(),不然会出错
        #check_ping(ip)
        #如果直接调用函数而没有用多线程,是看不到效果的
if __name__=="__main__":
    main()
至此,对thread模块有了一个初步的了解,但是thread模块有一个缺点,它不能控制线程数,所以下面要引入threading模块。
threading模块
例1:Python数组调用
def fun1(key):
    print "Hello %s:%s"%(key,time.ctime())

def main():
    threads=[]
    keys=['test1','test2','test3']
    thread_cnt=len(keys)
    for i in range(thread_cnt):
        t=threading.Thread(target=fun1,args=(keys[i],))
        threads.append(t)
        print "test of t :%s"%t
image
打印出来的结果如图,t是thread下的线程。然后将线程加入到数组当中。
下面是完整的代码:
#coding=utf-8
import threading
import time
import subprocess

def fun1(key):
    print "Hello %s:%s"%(key,time.ctime())

def main():
    threads=[]
    keys=['test1','test2','test3']
    thread_cnt=len(keys)
    for i in range(thread_cnt):
        t=threading.Thread(target=fun1,args=(keys[i],))
        threads.append(t)

    for i in range(thread_cnt):
        threads[i].start()
    #启动线程

    for i in range(thread_cnt):
        threads[i].join()
    #将多个线程合并为一个线程

if __name__=="__main__":
    main()
扩展,如果同时使用多线程调用多个函数,代码如下:
#coding=utf-8
import threading
import time
import subprocess

def fun1(key):
    print "Hello %s:%s"%(key,time.ctime())

def fun2(key):
    print "Welcome %s:%s"%(key,time.ctime())

def main():
    threads=[]
    threads_=[]
    keys=['test1','test2','test3']
    thread_cnt=len(keys)
    for i in range(thread_cnt):
        t=threading.Thread(target=fun1,args=(keys[i],))
        t_=threading.Thread(target=fun2,args=(keys[i],))
        threads.append(t)
        threads_.append(t_)

    for i in range(thread_cnt):
        threads[i].start()
        threads_[i].start()

    for i in range(thread_cnt):
        threads[i].join()
        threads_[i].join()

if __name__=="__main__":
    main()
\
\
执行结果如图所示,一个进程紧随另一个进程,如果要先单独执行完一个进程,则把start和join分开写即可。
例2:对网站的访问时间和状态码使用多线程
#coding=utf-8
import threading
import time
import requests

def fun1():
    start_time=time.time()
    r=requests.get(url="http://www.baidu.com")
    cnt_time=time.time()-start_time
    print "Status:%s--%s--%s--%s"%(r.status_code,start_time,cnt_time,time.strftime('%H:%M:%S'))

def main():
    threads=[]
    thread_cnt=5
    for i in range(thread_cnt):
        t=threading.Thread(target=fun1,args=())
        threads.append(t)

    for i in range(thread_cnt):
        threads[i].start()

    for i in range(thread_cnt):
        threads[i].join()

if __name__=="__main__":
    main()
运行结果如下所示:
 \
\
由于这样打印的时间不太准确,所以使用系统自带的打印功能,代码修改后如下:
#coding=utf-8
import threading
import time
import requests
import sys

def fun1():
    start_time=time.time()
    r=requests.get(url="http://www.baidu.com")
    cnt_time=time.time()-start_time
    sys.stdout.write("Status:%s--%s--%s--%s\n"%(r.status_code,start_time,cnt_time,time.strftime('%H:%M:%S')))

def main():
    threads=[]
    thread_cnt=5
    for i in range(thread_cnt):
        t=threading.Thread(target=fun1,args=())
        threads.append(t)

    for i in range(thread_cnt):
        threads[i].start()

    for i in range(thread_cnt):
        threads[i].join()

if __name__=="__main__":
    main()
打印结果如下
image
关于Queue模块
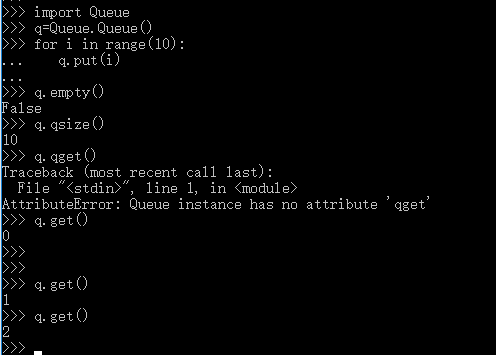
Que模块的使用方法:
1.q=queue.put()把东西放进q里面;
2.q.get()相当于取出模块里的内容;
3.q.qsize()为当前队列的长度;

例3:使用类与多进程来检测C段存活的主机数
#coding=utf-8
import threading
import Queue
import subprocess
import sys

class DoRun(threading.Thread):

    def __init__(self,queue):
        threading.Thread.__init__(self)
        self._queue=queue

    def run(self):
        while not self._queue.empty():
            ip=self._queue.get()
            cmd="ping -c 2 -w 1 %s"%(ip)
            t=subprocess.Popen(cmd,shell=True,stdin=subprocess.PIPE,stdout=subprocess.PIPE,stderr=subprocess.PIPE)
            data=t.stdout.read()
            if "ttl" in data:
               sys.stdout.write("%s is alive\n"%ip)

def main():
    threads=[]
    threads_cnt=20
    q=Queue.Queue()
    for i in range(1,255):
        q.put("115.239.210."+str(i))

    for i in range(threads_cnt):
        threads.append(DoRun(q))

    for i in range(threads_cnt):
        threads[i].start()

    for i in range(threads_cnt):
        threads[i].join()

if __name__=="__main__":
    main()
运行结果如下图所示:
image
关于类中self._queue进行相关解释:
用下划线作为变量名和方法名前缀和后缀来表示类的特殊成员。
* _xxx:这样的对象叫做保护成员,不能用”from module import “,只有类对象和子类对象能访问这些成员。
* xxx:系统定义的特殊成员。
* _xxx:类中私有成员,只有类对象自己能访问,子类对象也不能访问到这个成员,但在对象外部可以通过对象名.类名__xxx*这样的特殊方式访问。
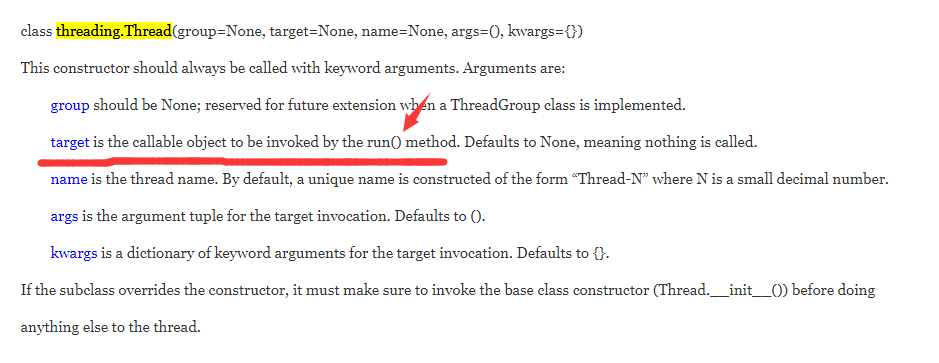
关于DuRun类里面的run函数,为什么没有直接调用就可以就行调用了?
 \
\
这里相当于重写了类里面的run函数;
最后给出一段帮助理解Python面向对象理解的代码:
#类定义
class people:
    #定义基本属性
    name = ''
    age = 0
    #定义私有属性,私有属性在类外部无法直接进行访问
    __weight = 0
    #定义构造方法
    def __init__(self,n,a,w):
        self.name = n
        self.age = a
        self.__weight = w
    def speak(self):
        print("%s is speaking: I am %d years old" %(self.name,self.age))


p = people('tom',10,30)
p.speak()
代码引用于Python面向对象笔记CSDN博客
实践1:爬虫爬下swust研究生院图片(非多线程版本)
自己动手,丰衣足食,这里自己写了一个Python爬虫(没有使用多线程的版本)来爬取swust研究生院页面上的所有图片。
在学习的过程中遇到的问题:首先我是准备把i春秋上Web安全这一页上所有的课程图片爬下来的,i春秋设置了反爬虫机制,要带上headers,OK,带上以后重爬,遗憾的是爬下来的图片依然无法显示,反爬虫的机制很强…这里改爬本校研究生页面咯,代码如下:
#coding=utf-8
import urllib
import urllib2
import re


def get_page(url):
    headers = {"User-Agent": "Mozilla/5.0 (Windows NT 10.0; Win64; x64; rv:56.0) Gecko/20100101 Firefox/56.0"}
    page = urllib2.Request(url=url,headers=headers)
    resp=urllib2.urlopen(page)
    html = resp.read()
    return html

def get_image(html):
    reg =['src="(http.+?\.png)".*?alt','src="(http.+?\.jpg)".*?alt']
    length=len(reg)
    x = 0
    for i in range(length):
        imgre = re.compile(reg[i])
        imglist = re.findall(imgre,html)
        print imglist
        for imgurl in imglist:
            urllib.urlretrieve(imgurl,"E:/test_crawler/%s.jpg" % x)
            #urllib下的urlretrieve()方法的基本用法是,urllib.urlretrieve(图片链接,“图片路径以及名称”)
            x+=1
    print "All done."


html = get_page("http://gs.swust.edu.cn")
get_image(html)
Python爬虫折腾了三天终于折腾出点东西来,还是很欣慰的,下一步争取使用多线程来实现爬虫。
实践2:多线程爬取(由实践1修改)
#coding=utf-8
import urllib
import urllib2
import re
import Queue
import threading


class crawler_producer(threading.Thread):

    def __init__(self,queue,reg):
        threading.Thread.__init__(self)
        self._queue=queue
        self.reg=reg

    def get_page(self):
        url="http://gs.swust.edu.cn"
        headers = {"User-Agent": "Mozilla/5.0 (Windows NT 10.0; Win64; x64; rv:56.0) Gecko/20100101 Firefox/56.0"}
        page = urllib2.Request(url=url,headers=headers)
        resp=urllib2.urlopen(page)
        html = resp.read()
        return html

    def run(self):
        global flag
        reg =self.reg
        length=len(reg)
        x = 0
        html=self.get_page()

        for i in range(length):
            imgre = re.compile(reg[i])
            imglist = re.findall(imgre,html)
            #print imglist
            for imgurl in imglist:
                urllib.urlretrieve(imgurl,"E:/test_crawler/%s.jpg" % x)
                x+=1


def main():
    threads=[]
    q=Queue.Queue()
    reg=['src="(http.+?\.png)".*?alt','src="(http.+?\.jpg)".*?alt']
    threads_cnt=10

    for i in range(len(reg)):
        q.put(reg[i])

    for i in range(threads_cnt):
        threads.append(crawler_producer(q,reg))

    for i in range(threads_cnt):
        threads[i].start()

    for i in range(threads_cnt):
        threads[i].join()

if __name__=="__main__":
    main()
    print "All done."