Flutter系列(二)-----简单布局的搭建
在官方文档的指引下,一步步创建了一个Listview的布局,链接在这里 ,
简单布局的构建都是不错的例子介绍
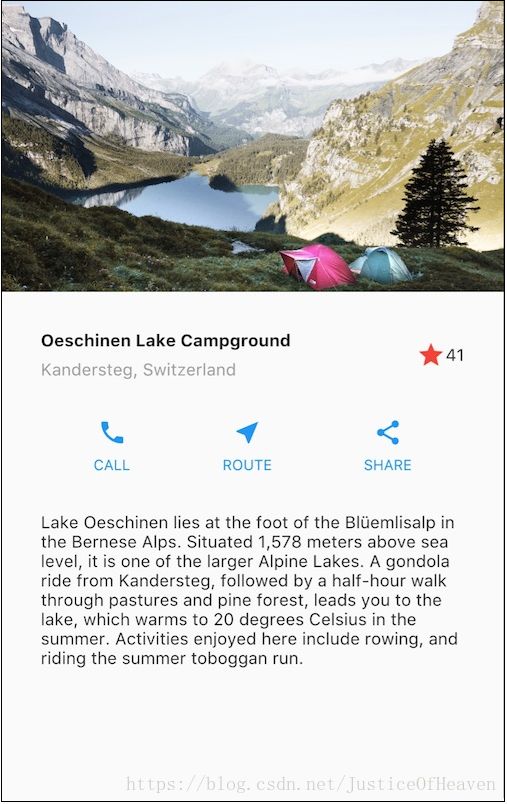
接下来就做下笔记,记下官网实现下图的步骤

1.下载lake.jpg,并在根目录创建images目录,将图片放在images文件夹中,然后在pubspec.yaml文件中将图片地址增加进去()
flutter:
  uses-material-design: true
  assets:
    - images/lake.jpg
2.分析布局构造,对有经验的你来说不难,然后开始写布局。布局构思如下图所示,总体一个纵向编排的布局,包括图片、标题栏(名称,点赞)、功能栏(电话,导航,分享)、简介。其中,标题栏总体横向布局,包含文字的纵向布局;功能栏是3个相同的组合的横向布局。不多啰嗦了。

3.开始写布局的代码
class MyApp extends StatelessWidget {
  // This widget is the root of your application.
  @override
  Widget build(BuildContext context) {
  	//在这个里面写你布局代码,大致思路
  	//标题栏
  	...
  	//功能栏
  	...
  	//简介
  	...

  	return new MaterialApp(
  	  title: 'Flutter Demo',//标题栏
      home: Scaffold(
        body: (
          //这里加载这个页面的内容
        ),
      ),
    );
  }
}
Scaffold—Flutter 控件,MaterialApp 的 child 是 Scaffold Widget,它的几个主要属性:
- appBar:显示在界面顶部的一个 AppBar,也就是 Android 中的 ActionBar 、Toolbar
- body:当前界面所显示的主要内容 Widget
- floatingActionButton:纸墨设计中所定义的 FAB,界面的主要功能按钮
- persistentFooterButtons:固定在下方显示的按钮,比如对话框下方的确定、取消按钮
- drawer:侧边栏控件
- backgroundColor: 内容的背景颜色,默认使用的是
- ThemeData.scaffoldBackgroundColor 的值
- bottomNavigationBar: 显示在页面底部的导航栏
- resizeToAvoidBottomPadding:类似于 Android 中的 android:windowSoftInputMode=”adjustResize”,控制界面内容 body 是否重新布局来避免底部被覆盖了,比如当键盘显示的时候,重新布局避免被键盘盖住内容。默认值为 true。
4.图片先不管,先看看标题栏。Flutter 所有UI元素都是widget组件,因此我们写的也是各种Widget。
Widget titleSection = Container(
      padding: const EdgeInsets.all(32.0),
      child: Row(// 总体横向ROW,纵向是Column
        children: <Widget>[
          Expanded(
            child: Column(
            //mainAxisAlignment和crossAxisAlignment属性来控制行或列如何对齐其子控件
              crossAxisAlignment: CrossAxisAlignment.start,
              children: <Widget>[
                Container(
                  padding: const EdgeInsets.only(bottom: 8.0),
                  child: Text(
                    'Oeschinen Lake Campground',
                    style: TextStyle(fontWeight: FontWeight.bold),
                  ),
                ),
                Text(
                  'Kandersteg, Switzerland',
                  style: TextStyle(
                    color: Colors.grey[500],
                  ),
                )
              ],
            ),
          ),
          Icon(
            Icons.star,
            color: Colors.red[500],
          ),
          Text('41'),
        ],
      ),
    );
Expand 是具有一个flex属性的弹性控件,Expanded控件的默认flex系数为1。相当于Android里面LinearLayout布局的layou_weight属性
5.功能栏。因为三个布局一样,因此可以写一个公共方法。
Column buildButtonColumn(IconData icon,String label){
      Color color = Theme.of(context).primaryColor;//获取主题颜色
      return Column(
        mainAxisSize: MainAxisSize.min,//主轴应该占据多少空间
        mainAxisAlignment: MainAxisAlignment.center,
        children: <Widget>[
          Icon(icon,color: color,),
          Container(
            margin: const EdgeInsets.only(top: 8.0),
            child: Text(
              label,
              style: TextStyle(
                fontSize: 12.0,
                fontWeight: FontWeight.w400,
                color: color,
              ),
            ),
          )
        ],
      );
    }
然后在创建功能栏代码
Widget buttonSection = Container(
      child: Row(
        mainAxisAlignment: MainAxisAlignment.spaceEvenly,
        children: <Widget>[
          buildButtonColumn(Icons.call,'CALL'),
          buildButtonColumn(Icons.near_me,'ROUTE'),
          buildButtonColumn(Icons.share,'SHARE'),
        ],
      ),
    );
- MainAxisAlignment.spaceBetween 将主轴方向上的空白区域等分,使得子孩子控件之间的空白区域相等,两端的子孩子控件都靠近首尾,没有间隙。
- MainAxisAlignment.spaceAround 将主轴方向上的空白区域等分,使得子孩子控件之间的空白区域相等,两端的子孩子控件都靠近首尾,首尾子孩子控件的空白区域为1/2。
- MainAxisAlignment.spaceEvenly 将主轴方向上的空白区域等分,使得子孩子控件之间的空白区域相等,包括首尾。
6.简介。
Widget textSection = Container(
      padding: const EdgeInsets.all(32.0),
      child: Text(
        '''
Lake Oeschinen lies at the foot of the Blüemlisalp in the Bernese Alps. Situated 1,578 meters above sea level, it is one of the larger Alpine Lakes. A gondola ride from Kandersteg, followed by a half-hour walk through pastures and pine forest, leads you to the lake, which warms to 20 degrees Celsius in the summer. Activities enjoyed here include rowing, and riding the summer toboggan run.
        ''',
        //是否自动换行,若为false,文字将不考虑容器大小,单行显示,超出屏幕部分将默认截断处理
        softWrap: true,
      ),
    );
7.最后将上面的所写的布局都放入body中
return new MaterialApp(
      title: 'Flutter Demo',
      home: Scaffold(
        appBar: AppBar(
          title: Text('Top Lakes'),
        ),
        //放入一个ListView里面
        body: ListView(
          children: <Widget>[
            Image.asset('assets/images/lake.jpg',
              width: 600.0,
              height: 240.0,
              fit: BoxFit.cover,
            ),
            titleSection,
            buttonSection,
            textSection,
          ],
        ),
      ),
      //添加主题颜色
      theme: ThemeData(
        primarySwatch: Colors.blue,
      ),
    );
完工,这样,这个界面就写完了。