ULMFiT解读(论文 + PyTorch源码)
可能是笔者孤陋寡闻,感觉这篇论文没有BERT、ELMo这么火,笔者也是在搜索相关话题的文章的时候,看到大家都会带着ULMFiT进行分析,因此也就去研究了一下。总体来说,这篇论文也是pretrain+finetune的思路,探索的比较浅,主要用来做文本分类,而且trick相对来说也比较多。但整体的思路比较值得借鉴。
文章目录
- 一. 前言
- 二. ULMFiT原理
- 1. 通用域语言模型pretrain
- 2. 目标域语言模型fineutune
- 3. 分类任务finetune
- 三. 实验
- 1. 分类任务实验
- 2. 一些分析
- 四. PyTorch实现
- 1. 语言模型pretrain
- 2. 语言模型finetune
- 3. 分类任务finetune
- 五. 总结
- 优势
- 不足
- 六. 一些思考
- 传送门
一. 前言
这里简单复述一下论文的作者在第一章中提到的贡献:
- 提出了ULMFiT(Universal Language Model Fine-tuning),用于实现像CV领域的迁移学习,并可以用于任意NLP任务。
- 提出了一些训练的策略,比如discriminative fine-tuning、slanted triangular learning rates、gradual unfreezing等。
- 在6个文本分类的任务上表现不俗,甚至提升了18~24%。
- 可以用少量样本训练。
- 重点来了!有充足的源码、预训练模型等。
二. ULMFiT原理
ULMFiT,根据它的名字,基本就可以知道它的操作流程,具体见下图:
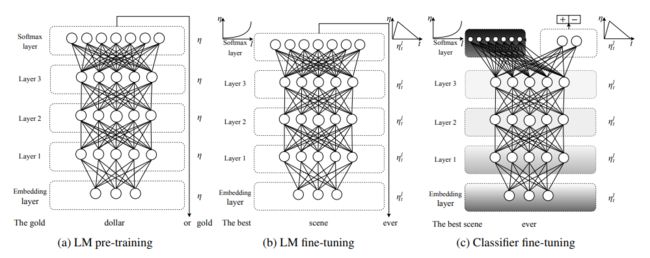
一共是分为3个阶段,首先是语言模型的预训练、然后是语言模型的finetune、最后是分类任务的finetune。其实如果读者之前有过CV中图像分类的经验的话,可以发现这里面的后两步实际上都是finetune的操作,只不过这里将其分开进行叙述。下面将一一进行剖析:
1. 通用域语言模型pretrain
这一步没什么好说的,就是用了一个外部大数据(Wikitext-103,103 million词),先对LM进行pretrain。
2. 目标域语言模型fineutune
这一步的insight很直观,就是觉得通用域的语言模型数据会与目标域的数据有分布上的差别,所以要用目标域的语言数据先把LM finetune一波。这里就用到了两个trick:
- discriminative fine-tuning
从名字上看,就是有区别性的finetune,在哪里有区别?论文中提到是在对不同层做finetune的时候,使用不同的学习率。作者通过经验发现,对于最后一层可先设置 n L n^L nL作为学习率,然后只训练最后一层,然后前面的层用 n l − 1 = n l / 2.6 n^{l-1} = n^l / 2.6 nl−1=nl/2.6继续训练。
- slanted triangular learning rates(STLR)
这是一个学习率调整的方式,作者提到用这种方式的初衷是说,希望能先让参数较快收敛到一个合适的区域,然后再慢慢调整。所以他用这种类似三角的方式:
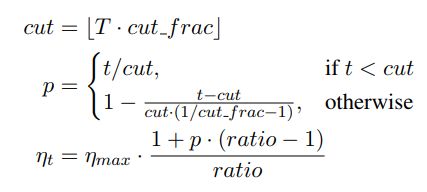
从图上直观来看长这样:
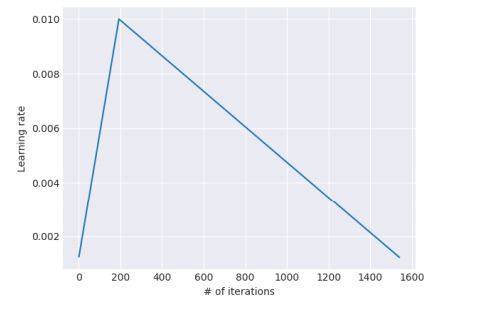
公式里面的 c u t cut cut就表示中间的那个尖对应的iteraion步数, T T T表示总的迭代步数, r a t i o ratio ratio就是一个比例参数, n m a x n_{max} nmax是最大的学习率(就是尖对应的纵坐标)。一般取 c u t _ f r a c = 0.1 , r a t i o = 32 , n m a x = 0.01 cut\_frac = 0.1, ratio=32, n_{max} = 0.01 cut_frac=0.1,ratio=32,nmax=0.01。
3. 分类任务finetune
这里就是将前面的LM输出进行concat,然后在其上加入两个全连接模块(带BN和ReLU激活的),进行分类即可。
具体地,对于LM的输出,将其最后一个隐层输出,与时间上的maxpool及meanpool进行concat:
h c = [ h T , m a x p o o l ( H ) , m e a n p o o l ( H ) ] h_c = [h_T, maxpool(H), meanpool(H)] hc=[hT,maxpool(H),meanpool(H)]
同时也提出了3个trick,用于更好的训练:
- gradual unfreezing
其实就是在finetune的时候,逐层解冻前面的层。因为如果一次性finetune所有层的话,可能会出现灾难性遗忘(即训着训着就忘记了之前pretrain学到的东西),所以这里是逐层向前打开,逐渐加多finetune层数。
与这种方法相似的一个方法是"chain-thaw",这种方法是每次解冻一个层,每次也只训练那一个层,而不像这里,打开了过后,就一直训练下去。
- BPT3C
主要是应对长文本的,将长文本分成batch个短句子,然后每次训练的时候,都是用前面一个batch的隐层状态进行初始化(这个好像也是LM训练的一个小trick),但是梯度不会传递到前面去。
- 双向语言模型
单独训练两个方向的语言模型,最后预测的结果是这两个的融合。
三. 实验
1. 分类任务实验
实验的任务主要是用在了文本分类上,有情感分类、问题分类、主题分类三大类。统计信息如下:
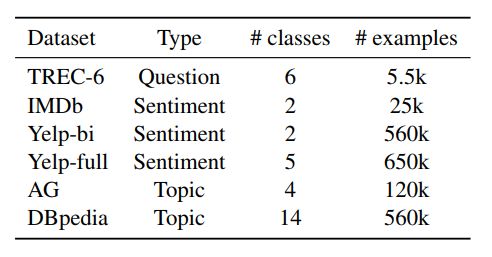
结果如下:


对比的模型都是他们写论文的时候SoTA的模型。
2. 一些分析
作者在论文里面做了很多有趣的分析,比如:
- 少数据量的学习

这个图是表示训练样本与验证集错误率的关系示意图,从左到右依次是IMDb、TREC-6和AG数据集。模型里面的From scratch表示完全从头开始训练,supervised表示仅用当前任务的数据进行LM的finetune,semi-supervised表示可以用所有task的数据进行LM的finetune。明显看出,用了较多数据进行finetune过后的LM,需要的训练样本更少,而且最终收敛效果也最好。
- pretrain的影响
这个都不用多说了,直接看结果:

结论就是pretrain对于中小数据集来说,简直是救命,对于大数据集,也能提升表现。总之就是用就对了!
- LM模型选择的影响
这里作者比较的是用最原始的LM和一个改进版本的好LM进行比较(据说是他们当时的SoTA):

显然好的LM,效果会更好。
- finetune LM方式的影响
这部分就是验证2个trick的影响,结果如下:
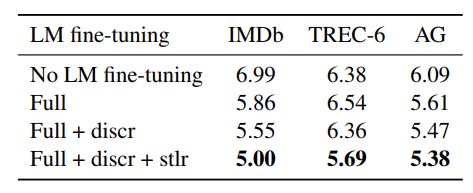
这里证明了finetune LM的必要性,而且也证明了那两个trick非常好用!
- finetune分类器方式的影响
这部分主要是对比一些trick使用的效果:
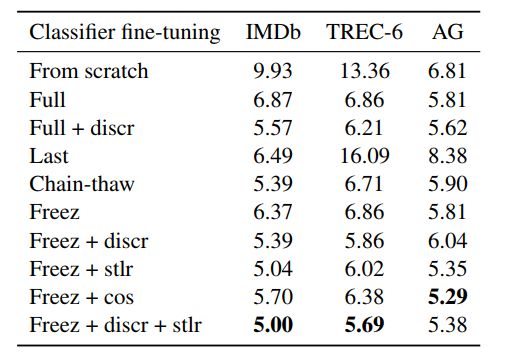
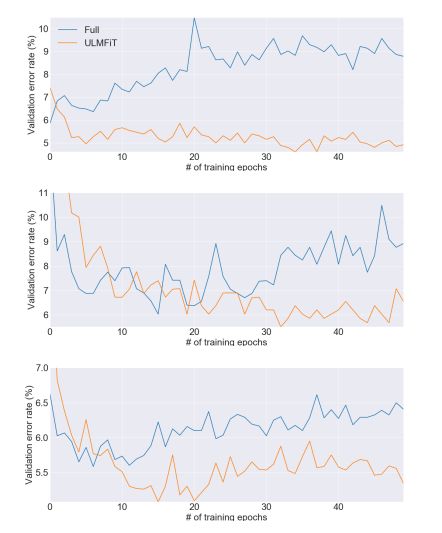
- finetune分类器策略的稳定性
这部分主要是看了一下在finetune classifier的时候,直接finetune full model和用了trick的方式的对比,可见full的很不稳定。
- 双向模型的影响
一般双向融合都是能带来提升的。
四. PyTorch实现
ULMFiT在源码方面还是比较全面的,放出了论文中使用的所有脚本和详细的处理步骤,同时也提供了预训练好的模型,可以复现,也可以自己按照它那个步骤train自己想要的东西。下面笔者将按照论文中的三个步骤对相应的源码进行剖析:
1. 语言模型pretrain
语言模型的构建和训练部分比较简单,其代码如下:
# 构建模型
m = to_gpu(get_language_model(md.n_tok, em_sz, nh, nl, md.pad_idx, decode_train=False, dropouts=drops))
# 损失函数
crit = CrossEntDecoder(prs, m[1].decoder, n_neg=n_neg, sampled=sampled).cuda()
# 训练
learner = RNN_Learner(md, LanguageModel(m), opt_fn=opt_fn)
lrs = np.array([lr/6,lr/3,lr,lr])
learner.fit(lrs, 1, wds=wd, use_clr=(32,10), cycle_len=cl)
主要分为3部分:
- 构建语言模型。其代码如下:
def get_language_model(n_tok, em_sz, nhid, nlayers, pad_token, decode_train=True, dropouts=None):
    if dropouts is None: dropouts = [0.5,0.4,0.5,0.05,0.3]
    rnn_enc = RNN_Encoder(n_tok, em_sz, n_hid=nhid, n_layers=nlayers, pad_token=pad_token, dropouti=dropouts[0], wdrop=dropouts[2], dropoute=dropouts[3], dropouth=dropouts[4])
    rnn_dec = LinearDecoder(n_tok, em_sz, dropouts[1], decode_train=decode_train, tie_encoder=rnn_enc.encoder)
    return SequentialRNN(rnn_enc, rnn_dec)
可见,语言模型主要是构建了RNN_Encoder和LinearDecoder两部分,其具体代码如下:
class RNN_Encoder(nn.Module):

    """A custom RNN encoder network that uses
        - an embedding matrix to encode input,
        - a stack of LSTM or QRNN layers to drive the network, and
        - variational dropouts in the embedding and LSTM/QRNN layers

        The architecture for this network was inspired by the work done in
        "Regularizing and Optimizing LSTM Language Models".
        (https://arxiv.org/pdf/1708.02182.pdf)
    """

    initrange=0.1

    def __init__(self, ntoken, emb_sz, n_hid, n_layers, pad_token, bidir=False,
                 dropouth=0.3, dropouti=0.65, dropoute=0.1, wdrop=0.5, qrnn=False):
        """ Default constructor for the RNN_Encoder class

            Args:
                bs (int): batch size of input data
                ntoken (int): number of vocabulary (or tokens) in the source dataset
                emb_sz (int): the embedding size to use to encode each token
                n_hid (int): number of hidden activation per LSTM layer
                n_layers (int): number of LSTM layers to use in the architecture
                pad_token (int): the int value used for padding text.
                dropouth (float): dropout to apply to the activations going from one LSTM layer to another
                dropouti (float): dropout to apply to the input layer.
                dropoute (float): dropout to apply to the embedding layer.
                wdrop (float): dropout used for a LSTM's internal (or hidden) recurrent weights.

            Returns:
                None
          """

        super().__init__()
        self.ndir = 2 if bidir else 1
        self.bs, self.qrnn = 1, qrnn
        self.encoder = nn.Embedding(ntoken, emb_sz, padding_idx=pad_token)
        self.encoder_with_dropout = EmbeddingDropout(self.encoder)
        if self.qrnn:
            #Using QRNN requires cupy: https://github.com/cupy/cupy
            from .torchqrnn.qrnn import QRNNLayer
            self.rnns = [QRNNLayer(emb_sz if l == 0 else n_hid, (n_hid if l != n_layers - 1 else emb_sz)//self.ndir,
                save_prev_x=True, zoneout=0, window=2 if l == 0 else 1, output_gate=True) for l in range(n_layers)]
            if wdrop:
                for rnn in self.rnns:
                    rnn.linear = WeightDrop(rnn.linear, wdrop, weights=['weight'])
        else:
            self.rnns = [nn.LSTM(emb_sz if l == 0 else n_hid, (n_hid if l != n_layers - 1 else emb_sz)//self.ndir,
                1, bidirectional=bidir) for l in range(n_layers)]
            if wdrop: self.rnns = [WeightDrop(rnn, wdrop) for rnn in self.rnns]
        self.rnns = torch.nn.ModuleList(self.rnns)
        self.encoder.weight.data.uniform_(-self.initrange, self.initrange)

        self.emb_sz,self.n_hid,self.n_layers,self.dropoute = emb_sz,n_hid,n_layers,dropoute
        self.dropouti = LockedDropout(dropouti)
        self.dropouths = nn.ModuleList([LockedDropout(dropouth) for l in range(n_layers)])

    def forward(self, input):
        """ Invoked during the forward propagation of the RNN_Encoder module.
        Args:
            input (Tensor): input of shape (sentence length x batch_size)

        Returns:
            raw_outputs (tuple(list (Tensor), list(Tensor)): list of tensors evaluated from each RNN layer without using
            dropouth, list of tensors evaluated from each RNN layer using dropouth,
        """
        sl,bs = input.size()
        if bs!=self.bs:
            self.bs=bs
            self.reset()
        with set_grad_enabled(self.training):
            emb = self.encoder_with_dropout(input, dropout=self.dropoute if self.training else 0)
            emb = self.dropouti(emb)
            raw_output = emb
            new_hidden,raw_outputs,outputs = [],[],[]
            for l, (rnn,drop) in enumerate(zip(self.rnns, self.dropouths)):
                current_input = raw_output
                with warnings.catch_warnings():
                    warnings.simplefilter("ignore")
                    raw_output, new_h = rnn(raw_output, self.hidden[l])
                new_hidden.append(new_h)
                raw_outputs.append(raw_output)
                if l != self.n_layers - 1: raw_output = drop(raw_output)
                outputs.append(raw_output)

            self.hidden = repackage_var(new_hidden)
        return raw_outputs, outputs
class LinearDecoder(nn.Module):
    initrange=0.1
    def __init__(self, n_out, n_hid, dropout, tie_encoder=None, bias=False):
        super().__init__()
        self.decoder = nn.Linear(n_hid, n_out, bias=bias)
        self.decoder.weight.data.uniform_(-self.initrange, self.initrange)
        self.dropout = LockedDropout(dropout)
        if bias: self.decoder.bias.data.zero_()
        if tie_encoder: self.decoder.weight = tie_encoder.weight

    def forward(self, input):
        raw_outputs, outputs = input
        output = self.dropout(outputs[-1])
        decoded = self.decoder(output.view(output.size(0)*output.size(1), output.size(2)))
        result = decoded.view(-1, decoded.size(1))
        return result, raw_outputs, outputs
前者是通过多层LSTM对输入进行encode,而后经过一个线性变换层,将输出映射到词表上。这里要注意一个细节:在encode时,对于网络不同部分的参数,使用不同的dropout参数。
- 定义损失函数。对于LM的训练,其损失函数一般都是交叉熵,但源码里面用了基于负采样的损失函数,其代码如下:
class CrossEntDecoder(nn.Module):
    initrange=0.1
    def __init__(self, prs, decoder, n_neg=4000, sampled=True):
        super().__init__()
        self.prs,self.decoder,self.sampled = T(prs).cuda(),decoder,sampled
        self.set_n_neg(n_neg)

    def set_n_neg(self, n_neg): self.n_neg = n_neg

    def get_rand_idxs(self): return pt_sample(self.prs, self.n_neg)

    def sampled_softmax(self, input, target):
        idxs = V(self.get_rand_idxs())
        dw = self.decoder.weight
        #db = self.decoder.bias
        output = input @ dw[idxs].t() #+ db[idxs]
        max_output = output.max()
        output = output - max_output
        num = (dw[target] * input).sum(1) - max_output
        negs = torch.exp(num) + (torch.exp(output)*2).sum(1)
        return (torch.log(negs) - num).mean()

    def forward(self, input, target):
        if self.decoder.training:
            if self.sampled: return self.sampled_softmax(input, target)
            else: input = self.decoder(input)
        return F.cross_entropy(input, target)
注意这里的sample_softmax函数即为先进行负采样,而后计算softmax,以及交叉熵的部分。
- 训练。这里需要注意的一个小细节就是,传入了一个
lrs参数,共有4个学习率,分别针对3个LSTM层,和最后的映射层,设置不同的学习率。同时也用了use_clr这个参数,它是用于设置STLR的。
2. 语言模型finetune
这一步与上一步并没有太大区别,除了:1)使用之前pretrain好的模型参数进行初始化;2)使用task相关的数据,而不是之前pretrain用的无监督数据集;3)用了两个trick,一个是之前pretrain也用到的分层设置学习率,另一个是使用STLR这个学习率变化方式,这个也在之前的pretrain里面用到了。所以在代码层面,这两者基本一致,这里就不再赘述。
3. 分类任务finetune
这一步主要是针对imdb实现的分类任务,加载之前pretrain并finetune之后的LM参数进行初始化,再加上特有的分类层,其模型代码如下:
def get_rnn_classifier(bptt, max_seq, n_class, n_tok, emb_sz, n_hid, n_layers, pad_token, layers, drops, bidir=False,
                      dropouth=0.3, dropouti=0.5, dropoute=0.1, wdrop=0.5, qrnn=False):
    rnn_enc = MultiBatchRNN(bptt, max_seq, n_tok, emb_sz, n_hid, n_layers, pad_token=pad_token, bidir=bidir,
                      dropouth=dropouth, dropouti=dropouti, dropoute=dropoute, wdrop=wdrop, qrnn=qrnn)
    return SequentialRNN(rnn_enc, PoolingLinearClassifier(layers, drops))
其中,主要的模块是MultiBatchRNN和PoolingLinearClassifier两部分。
MultiBatchRNN实际上是继承自之前LM的RNN_Encoder,因其需要使用BPT3C,所以这里又做了一层封装,将其按照固定长度对原始长度进行切分,把每一个句子转成一个batch的小句子,而后再与原来的batch合并成一个大batch进行处理。其代码如下:
class MultiBatchRNN(RNN_Encoder):
    def __init__(self, bptt, max_seq, *args, **kwargs):
        self.max_seq,self.bptt = max_seq,bptt
        super().__init__(*args, **kwargs)

    def concat(self, arrs):
        return [torch.cat([l[si] for l in arrs]) for si in range(len(arrs[0]))]

    def forward(self, input):
        sl,bs = input.size()
        for l in self.hidden:
            for h in l: h.data.zero_()
        raw_outputs, outputs = [],[]
        for i in range(0, sl, self.bptt):
            r, o = super().forward(input[i: min(i+self.bptt, sl)])
            if i>(sl-self.max_seq):
                raw_outputs.append(r)
                outputs.append(o)
        return self.concat(raw_outputs), self.concat(outputs)
实际上,对于每个batch来说,每次传入的初始hidden都是前面batch的hidden(这个好像是基于LSTM的LM训练过程中的Trick),只不过是detach之后的,也即不会传播梯度。
然后就是PoolingLinearClassifier,实现Pooling+Concat功能。其代码如下:
class PoolingLinearClassifier(nn.Module):
    def __init__(self, layers, drops):
        super().__init__()
        self.layers = nn.ModuleList([
            LinearBlock(layers[i], layers[i + 1], drops[i]) for i in range(len(layers) - 1)])

    def pool(self, x, bs, is_max):
        f = F.adaptive_max_pool1d if is_max else F.adaptive_avg_pool1d
        return f(x.permute(1,2,0), (1,)).view(bs,-1)

    def forward(self, input):
        raw_outputs, outputs = input
        output = outputs[-1]
        sl,bs,_ = output.size()
        avgpool = self.pool(output, bs, False)
        mxpool = self.pool(output, bs, True)
        x = torch.cat([output[-1], mxpool, avgpool], 1)
        for l in self.layers:
            l_x = l(x)
            x = F.relu(l_x)
        return l_x, raw_outputs, outputs
模型定义完之后,就是对于分类任务的finetune训练过程:
# discriminative fine-tuning
lrm = 2.6
if use_discriminative:
    lrs = np.array([lr/(lrm**4), lr/(lrm**3), lr/(lrm**2), lr/lrm, lr])
else:
    lrs = lr

# load pretrained LM model
if not from_scratch:
    learn.load_encoder(lm_file)
else:
    print('Training classifier from scratch. LM encoder is not loaded.')
    use_regular_schedule = True

# gradual unfreezing + STLR
if (startat<1) and not last and not chain_thaw and not from_scratch:
    learn.freeze_to(-1)
    learn.fit(lrs, 1, wds=wd, cycle_len=None if use_regular_schedule else 1,
              use_clr=None if use_regular_schedule or not use_clr else (8,3))
    learn.freeze_to(-2)
    learn.fit(lrs, 1, wds=wd, cycle_len=None if use_regular_schedule else 1,
              use_clr=None if use_regular_schedule or not use_clr else (8, 3))
    learn.save(intermediate_clas_file)
elif startat==1:
    learn.load(intermediate_clas_file)

if chain_thaw:
    lrs = np.array([0.0001, 0.0001, 0.0001, 0.0001, 0.001])
    print('Using chain-thaw. Unfreezing all layers one at a time...')
    n_layers = len(learn.get_layer_groups())
    print('# of layers:', n_layers)
    # fine-tune last layer
    learn.freeze_to(-1)
    print('Fine-tuning last layer...')
    learn.fit(lrs, 1, wds=wd, cycle_len=None if use_regular_schedule else 1,
              use_clr=None if use_regular_schedule or not use_clr else (8,3))
    n = 0
    # fine-tune all layers up to the second-last one
    while n < n_layers-1:
        print('Fine-tuning layer #%d.' % n)
        freeze_all_but(learn, n)
        learn.fit(lrs, 1, wds=wd, cycle_len=None if use_regular_schedule else 1,
                  use_clr=None if use_regular_schedule or not use_clr else (8,3))
        n += 1

if unfreeze:
    learn.unfreeze()
else:
    learn.freeze_to(-3)

if last:
    print('Fine-tuning only the last layer...')
    learn.freeze_to(-1)
可见与其论文中提到的一样,用了一些trick:1)分层设置不同的学习率;2)用STLR调整学习率;3)逐步unfreezing前面层,这一步有很多参数可以设置,可以用于复现比较不同的unfreezing方式。
总体来看,虽然代码给的很详细,但真正tune起自己的任务来,要设置和关注的点还是比较多的。
五. 总结
优势
在前言部分已经提到了论文中列举的几点贡献,这里笔者自己总结一下感受:
- 思想比较直观,就是pretrain+finetune的思路,也比较有用。
- 提出了一堆优化策略,原理解释的比较清楚。
不足
- 需要调整和注意的点比较多,看三步走的策略和那么多的trick就有点儿望而却步。
- 只在文本分类任务上评估,此方法对比BERT、ELMo等的优势在哪里?还是希望未来能探索更多任务上的应用。
六. 一些思考
在看这篇论文的过程中,笔者曾有几点疑问:
- 为啥需要三步走的策略?一开始的pretrain就不说了,大家都有,后面为何要单独分两步进行finetune,一次直接finetune不行吗?这里作者没有给出明确的解释,但在实验分析环节给出了进行第二步带来的效果提升。笔者觉得还是类似BERT等模型那样直接进行finetune的比较直观,这样分步的总感觉需要调整和注意的点比较多。
- 为啥要把这么多的诸如学习率调整、逐层解冻这样的trick讲得这么详细?这些放到实验环节提一下不就好了。而且像BERT这种的论文里面基本没有提到这么多的trick(当然可能也是在代码里面实现了,并没有说出来而已)。虽说笔者看到这一系列的trick觉得非常的不够clean,但仍然觉得作者很实诚,而且这些原理的介绍也对像笔者这种的小白比较友好一些,只是觉得看起来就需要调好多的样子。
传送门
论文:https://arxiv.org/pdf/1801.06146.pdf
源码:https://github.com/fastai/fastai (PyTorch,与ULMFiT论文相关的脚本戳这里)
官博:http://nlp.fast.ai/category/classification.html (里面有很多资源,包括课程、如何调用、预训练好的模型等)