detectron代码理解(五):Retinanet网络输入理解
在detectron训练网络的过程中,给网络送的blob在下面的函数中生成:(位于minibatch.py)
def get_minibatch(roidb):
    """Given a roidb, construct a minibatch sampled from it."""
    # We collect blobs from each image onto a list and then concat them into a
    # single tensor, hence we initialize each blob to an empty list
    blobs = {k: [] for k in get_minibatch_blob_names()}
    # Get the input image blob, formatted for caffe2
    im_blob, im_scales = _get_image_blob(roidb) #对输入的图像处理程网络需要的形式(batch,channel,height,width),im_scales是变换的尺度
    blobs['data'] = im_blob
    if cfg.RPN.RPN_ON:
        # RPN-only or end-to-end Faster/Mask R-CNN
        valid = rpn_roi_data.add_rpn_blobs(blobs, im_scales, roidb)
    elif cfg.RETINANET.RETINANET_ON:
        im_width, im_height = im_blob.shape[3], im_blob.shape[2]
        # im_width, im_height corresponds to the network input: padded image
        # (if needed) width and height. We pass it as input and slice the data
        # accordingly so that we don't need to use SampleAsOp
        valid = retinanet_roi_data.add_retinanet_blobs(
            blobs, im_scales, roidb, im_width, im_height
        )
    else:
        # Fast R-CNN like models trained on precomputed proposals
        valid = fast_rcnn_roi_data.add_fast_rcnn_blobs(blobs, im_scales, roidb)
    return blobs, valid
其中给retinanet输送blob的函数为retinanet_roi_data.add_retinanet_blobs,具体来分析这个函数。
1.该函数首先完成的工作是对送进来的图片(roidb)生成anchor
1.1 我们首先来回顾一下普通的RPN+FPN网络是如何产生anchor
这里以P2-P6的FPN网络为例(训练图片的大小为1024×1024,其余参数皆为默认):
| 层数 | stride | anchor_sizes | anchor_aspect_ratios | 生成的anchor个数 (乘以3是因为3种比例) |
| P2 | 4(2^2) | 32 | 0.5,1,2 | (1024/4)^2×3=196608 |
| P3 | 8(2^3) | 64 | 0.5,1,2 | (1024/8)^2×3= 49152 |
| P4 | 16(2^4) | 128 | 0.5,1,2 | (1024/16)^2×3=12288 |
| P5 | 32(2^5) | 256 | 0.5,1,2 | (1024/32)^2×3=3072 |
| P6 | 64(2^6) | 512 | 0.5,1,2 | (1024/64)^2×3=768 |
- stride:表示以stride为步长,每隔一个stride生成一个anchor
- anchor_sizes:在同一个FPN层生成的anchor面积为anchor_sizes×anchor_sizes,其中对于P2层,其anchor_sizes的大小是由参数C.FPN.RPN_ANCHOR_START_SIZE决定的,后一层的anchor_sizes是前一层的2倍。
- anchor_aspect_ratios:在同以FPN层,在满足面积相同的情况下,生成三种长宽比例的anchor
1.2 retinanet产生anchor
    k_max, k_min = cfg.FPN.RPN_MAX_LEVEL, cfg.FPN.RPN_MIN_LEVEL
    scales_per_octave = cfg.RETINANET.SCALES_PER_OCTAVE  # scales_per_octave = 3
    aspect_ratios = cfg.RETINANET.ASPECT_RATIOS  #aspect_ratios = (1.0,2.0,0.5) 也就是anchor的长宽比
    num_aspect_ratios = len(cfg.RETINANET.ASPECT_RATIOS) #比例的数量
    anchor_scale = cfg.RETINANET.ANCHOR_SCALE

    # get anchors from all levels for all scales/aspect ratios
    foas = []
    for lvl in range(k_min, k_max + 1):
        stride = 2. ** lvl  #每一层FPN的步长都有所不同。P3-P7:8,16-128。每隔一个stride生成一个anchor
        for octave in range(scales_per_octave):  #range(scales_per_octave) = (0,1,2)
            octave_scale = 2 ** (octave / float(scales_per_octave))    #octave_scale = 2^0,2^(1/3),2^(2/3)
            for idx in range(num_aspect_ratios): #range(num_aspect_ratios) = (0,1,2)
                anchor_sizes = (stride * octave_scale * anchor_scale, )  #anchor的边长
                anchor_aspect_ratios = (aspect_ratios[idx], )  #anchor的长宽比 1.0,2.0,0.5
                foa = data_utils.get_field_of_anchors(   #生成anchor
                    stride, anchor_sizes, anchor_aspect_ratios, octave, idx)
                foas.append(foa)
    all_anchors = np.concatenate([f.field_of_anchors for f in foas])
retianet网络新增了两个参数。
- anchor_scale
- scale_per_octave
我们先来分析主要的循环不,然后就知道上面两个参数的作用了:
(1)第一个for循环确定每层FPN的步长,与上面的RPN+FPN网络相同,P3-P7:8-128。这里从P3开始,stride = 8
(2)第二个for循环,确定octave_scale,octave_scale = 2^(0/3),2^(1/3),2^(2/3),这里从2^(0/3)开始。
其实到这一步该层的anchor_sizes已经确定了,公式为如下,代码中将其放在了第三个循环中,并没有影响。
anchor_sizes = (stride * octave_scale * anchor_scale, )
可以看出新增的那两个参数主要用于构成每一层FPN的anchor_sizes ,也就是在原本的stride的基础上,乘以anchor_scale,之后再乘以octave_scale,由于octave_scale有三个值,也就是相比于原来RPN+RPN网络一个FPN层只产生一种大小的anchor_sizes,retinanet网络产生三种anchor_sizes,直观上来说增加了anchor的数量,大大增加了anchor与gt的覆盖的可能。
(3)第三个循环主要是为了生成anchor_aspect_ratios,也就是针对已经确定的anchor_sizes,依次生成三种比例的anchor。,生成的函数如下,输入的重点就是标黑的三个参数。
foa = data_utils.get_field_of_anchors( stride, anchor_sizes, anchor_aspect_ratios, octave, idx)
下面这个表格以P3层为例,(训练图片的大小为1024×1024,其余参数皆为默认),可以看出对于P3层生成anchor总数为16384×9
表格1
| 名称 | stride 第一个for循环 |
octave_scale 第二个for循环 |
anchor_scale | anchor_sizes | anchor_aspect_ratios 第三个for循环 |
anchor数量 每一行相当于一个foa |
| P3 | 8(2^3) | 2^0 | 4 | 8×2^0×4 = 32 | 0.5 | (1024/8)^2=16384 |
| 1.0 | (1024/8)^2=16384 | |||||
| 2.0 | (1024/8)^2=16384 | |||||
| 2^(1/3) | 4 | 8×2^(1/3)×4 = 40.317 | 0.5 | (1024/8)^2=16384 | ||
| 1.0 | (1024/8)^2=16384 | |||||
| 2.0 | (1024/8)^2=16384 | |||||
| 2^(2/3) | 4 | 8×2^(2/3)×4 = 50.796 | 0.5 | (1024/8)^2=16384 | ||
| 1.0 | (1024/8)^2=16384 | |||||
| 2.0 | (1024/8)^2=16384 |
之后通过代码foas.append(foa),将每一次生成的foa都添加到foas中。一层FPN要添加9个foa,走完上面三个for循环,foas就会有5×9=45个foa。最后通过all_anchors = np.concatenate([f.field_of_anchors for f in foas]),将所有层的anchor放在一起,如下:
| anchor数量 | |
| P3 | (1024/8)^2×9 = 147456 |
| P4 | (1024/16)^2×9 = 36864 |
| P5 | (1024/32)^2×9 = 9216 |
| P6 | (1024/64)^2×9 = 2304 |
| P7 | (1024/128)^2×9 = 576 |
| 求和 | 196416(与上图相同) |
1.3 小结
(1)两种类型的网络默认anchor_aspect_ratios相同,为1.0 2.0 0.5
(2)RPN+FPN网络,每一层FPN只有一种anchor_sizes,由于3种长宽比,生成1×3=3种类型的anchor。
(3)retianet网络,每一层FPN产生三种anchor_sizes,再加上3种长宽比,生成3×3=9种类型的anchor。
(4)无论是FPN生成anchor还是Retianet生成anchor都调用了get_field_of_anchors这个函数,详细讲解见detectron代码理解(六):对输入样本如何产生anchor
(5)all_anchor是将所有FPN层的anchor放在一起
2.构成输入blob
2.1 针对每一张roidb生成blob,主要调用_get_retinanet_blob函数
    blobs['retnet_fg_num'], blobs['retnet_bg_num'] = 0.0, 0.0
    for im_i, entry in enumerate(roidb):
        scale = im_scales[im_i]  #图片的缩放尺度
        im_height = np.round(entry['height'] * scale)  #entry['height']是你样本的大小,×scale变为经过放缩后的大小
        im_width = np.round(entry['width'] * scale) #同上
        gt_inds = np.where(
            (entry['gt_classes'] > 0) & (entry['is_crowd'] == 0))[0]  #gt的序号
        assert len(gt_inds) > 0, \
            'Empty ground truth empty for image is not allowed. Please check.'

        gt_rois = entry['boxes'][gt_inds, :] * scale  #gt的box
        gt_classes = entry['gt_classes'][gt_inds]  #gt的label

        im_info = np.array([[im_height, im_width, scale]], dtype=np.float32)
        blobs['im_info'].append(im_info)
        retinanet_blobs, fg_num, bg_num = _get_retinanet_blobs(
            foas, all_anchors, gt_rois, gt_classes, image_width, image_height)
这段代码的第一个for大循环是针对每一张送入的样本图片,获取其gt信息,主要包括:
- gt_rois:gt的box
- gt_classes :gt的label
- im_height :图片的高度(放缩后)
- im_width :图片的宽度(放缩后)
获取到了上述的信息后,再调用 _get_retinanet_blob函数(见下面),获取针对该样本图片的blob
def _get_retinanet_blobs(
        foas, all_anchors, gt_boxes, gt_classes, im_width, im_height):
    #1.筛选anchor
    #all_anchor是生成的所有anchor,根据变量的命名首先是对anchor进行筛选,保存在图片内的anchor
    #(但是下面实际的代码,并没有筛选,inds_inside实际上是所有anchor的序号)
    total_anchors = all_anchors.shape[0]
    logger.debug('Getting mad blobs: im_height {} im_width: {}'.format(
        im_height, im_width))

    inds_inside = np.arange(all_anchors.shape[0])
    anchors = all_anchors
    num_inside = len(inds_inside)

    logger.debug('total_anchors: {}'.format(total_anchors))
    logger.debug('inds_inside: {}'.format(num_inside))
    logger.debug('anchors.shape: {}'.format(anchors.shape))

    #2.计算重叠率,并根据重叠率计算labels:
    # label=1 正样本, 0 负样本, -1 忽略
    labels = np.empty((num_inside, ), dtype=np.float32)
    labels.fill(-1)  #默认先全部置为-1
    if len(gt_boxes) > 0:  #如果该图片存在gt
        # Compute overlaps between the anchors and the gt boxes overlaps  计算每一个anchor与gt重叠率,anchor_by_gt_overlap.shape = (anchors_num, gt_num)
        anchor_by_gt_overlap = box_utils.bbox_overlaps(anchors, gt_boxes)
        # Map from anchor to gt box that has highest overlap   返回每一个anchor与哪一个gt重叠率最大,anchor_to_gt_argmax.shape = (anchors_num, )
        anchor_to_gt_argmax = anchor_by_gt_overlap.argmax(axis=1)
        # For each anchor, amount of overlap with most overlapping gt box  #上述的重叠率是多少 anchor_to_gt_max.shape = (anchors_num, )
        anchor_to_gt_max = anchor_by_gt_overlap[
            np.arange(num_inside), anchor_to_gt_argmax]

        # Map from gt box to an anchor that has highest overlap 返回与每一个gt重叠最大的anchor的index。gt_to_anchor_argmax.shape = (3,).axis=0表示就是对于每一列找出最大值,刚好每一列代表的就所有anchor与该gt的重叠率
        gt_to_anchor_argmax = anchor_by_gt_overlap.argmax(axis=0)
        # For each gt box, amount of overlap with most overlapping anchor  返回与每个gt重叠最大的重叠率
        gt_to_anchor_max = anchor_by_gt_overlap[
            gt_to_anchor_argmax, np.arange(anchor_by_gt_overlap.shape[1])]
        # Find all anchors that share the max overlap amount
        # (this includes many ties)
        anchors_with_max_overlap = np.where(   #找到所有共享这个最大重叠率的anchors
            anchor_by_gt_overlap == gt_to_anchor_max)[0]

        # Fg label: for each gt use anchors with highest overlap
        # (including ties)  #将与gt重叠率最大的anchor的label设置为gt的label
        gt_inds = anchor_to_gt_argmax[anchors_with_max_overlap]
        labels[anchors_with_max_overlap] = gt_classes[gt_inds]
        # Fg label: above threshold IOU  将与gt重叠率大于cfg.RETINANET.POSITIVE_OVERLAP的anchor的label设置为gt的label
        inds = anchor_to_gt_max >= cfg.RETINANET.POSITIVE_OVERLAP
        gt_inds = anchor_to_gt_argmax[inds]
        labels[inds] = gt_classes[gt_inds]

    fg_inds = np.where(labels >= 1)[0]  #fg的数量
    bg_inds = np.where(anchor_to_gt_max < cfg.RETINANET.NEGATIVE_OVERLAP)[0]  #bg的数量
    labels[bg_inds] = 0 #bg的label设置为0
    num_fg, num_bg = len(fg_inds), len(bg_inds)  #fg和bg的数量

    #3.计算bbox_targets,即平移量(tx,ty)与尺度因子(tw,th),其输入是:
    #(1)anchors[fg_inds, :]:被标为正样本的anchor
    #(2)gt_boxes[anchor_to_gt_argmax[fg_inds], :]:与这些正样本重叠最高的gt
    bbox_targets = np.zeros((num_inside, 4), dtype=np.float32)
    bbox_targets[fg_inds, :] = data_utils.compute_targets(
        anchors[fg_inds, :], gt_boxes[anchor_to_gt_argmax[fg_inds], :])

    4.恢复置原来的顺序(如果第一步anchor经过筛选了,这一步就非常重要)
    labels = data_utils.unmap(labels, total_anchors, inds_inside, fill=-1)
    bbox_targets = data_utils.unmap(bbox_targets, total_anchors, inds_inside, fill=0)
上述代码主要完成的事情已经写在注释中,即1-4,至此已经获取到的是该图片所有FPN层的:
- labels
- bbox_targets
综上可以看出,计算一个图片labels和bbox_targets是基于所有FPN层的生成的all_anchor和该图片的gt做比较得来的,而all_anchor是将foas每一个foa的anchor按照顺序进行拼接生成的,同理labels,bbox_targets的尺度(行数)也和all_anchors一样,顺序也是一样的。
所以下面代码中的for循环中
首先得到H和W,这个H和W相当于再生成anchor过程中,单个边长上生成anchor的数量(在1.3小结的(4)中有提过,需要跳转到另一个博客)所以H×W就是该个foa包括的anchor数量,因而可以确定起始的index,和截至的index。从而获取对应的_labels,_bbox_targets,然后进行变换。
之后找出_labels大于0的,由于_labels(1, 1, H, W)是一个四维的数组,所以返回的inds_4d是一个tupel,包含四个元素,每一个元素表示大于1的label在_labels中的索引位置。因为前两个维度为1,所以实际上H所在的维度和W所在的维度才能体现出具体的位置y, x = inds_4d[2], inds_4d[3]。
多数情况下inds_4d的四个元素都是空的,因为毕竟fg的数量比较少,所以lbls为空,此时for i, lbl in enumerate(lbls)循环是进不去的,直接跳转到blobs_out.append,返回该foa的retnet_cls_labels,retnet_roi_bbox_targets和retnet_roi_fg_bbox_locs,可以看到此时后两个都是空的,同时retnet_cls_labels也是0(bg)或者-1(ignore)
    blobs_out = []
    start_idx = 0
    for foa in foas:
        H = foa.field_size
        W = foa.field_size
        end_idx = start_idx + H * W ##取出相应结束序号
        _labels = labels[start_idx:end_idx]  #取出对应的label
        _bbox_targets = bbox_targets[start_idx:end_idx, :]  #取出对应的bbox_targets
        start_idx = end_idx

        # labels output with shape (1, height, width)
        _labels = _labels.reshape((1, 1, H, W))
        # bbox_targets output with shape (1, 4 * A, height, width)
        _bbox_targets = _bbox_targets.reshape((1, H, W, 4)).transpose(0, 3, 1, 2)
        stride = foa.stride
        w = int(im_width / stride)
        h = int(im_height / stride)

        # data for select_smooth_l1 loss
        num_classes = cfg.MODEL.NUM_CLASSES - 1
        inds_4d = np.where(_labels > 0)
        M = len(inds_4d)    #fg的数量
        _roi_bbox_targets = np.zeros((0, 4))
        _roi_fg_bbox_locs = np.zeros((0, 4))
        if M > 0:
            im_inds, y, x = inds_4d[0], inds_4d[2], inds_4d[3] #y是对应的行序号,x是对应的列序号
            _roi_bbox_targets = np.zeros((len(im_inds), 4))
            _roi_fg_bbox_locs = np.zeros((len(im_inds), 4))
            lbls = _labels[im_inds, :, y, x]
            for i, lbl in enumerate(lbls):
                l = lbl[0] - 1
                if not cfg.RETINANET.CLASS_SPECIFIC_BBOX:
                    l = 0
                assert l >= 0 and l < num_classes, 'label out of the range'
                _roi_bbox_targets[i, :] = _bbox_targets[:, :, y[i], x[i]]
                _roi_fg_bbox_locs[i, :] = np.array([[0, l, y[i], x[i]]])
        blobs_out.append(
            dict(
                retnet_cls_labels=_labels[:, :, 0:h, 0:w].astype(np.int32),
                retnet_roi_bbox_targets=_roi_bbox_targets.astype(np.float32),
                retnet_roi_fg_bbox_locs=_roi_fg_bbox_locs.astype(np.float32),
            ))
    out_num_fg = np.array([num_fg + 1.0], dtype=np.float32)
    out_num_bg = (  #背景的数量×(分类数-1)+前景数量×(分类数-2)
        np.array([num_bg + 1.0]) * (cfg.MODEL.NUM_CLASSES - 1) +
        out_num_fg * (cfg.MODEL.NUM_CLASSES - 2))
    return blobs_out, out_num_fg, out_num_bg
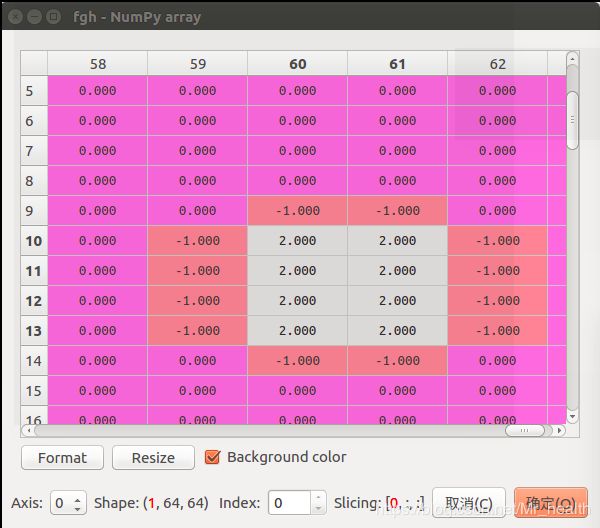
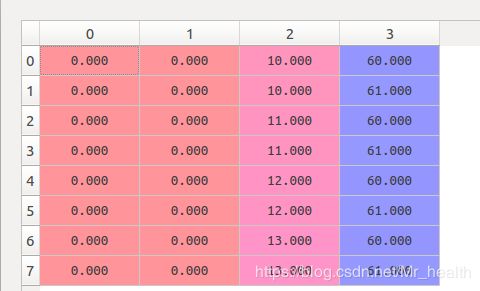
那如果inds_4d是非空呢,如下左图,由于inds_4d是四维所以不能直接可视化,我去掉第一维度可视化,即(1,1,W,H)->(1,W,H),此时就可以看到下面有些值为2代表fg。对比下面的label,以及inds_4d中第三维度和第四维度的值就可以看出来,inds_4d中第三维度表示的是label的行序号,第四维度表示的是label的列序号。
之后就是通过_roi_bbox_targets[i, :] = _bbox_targets[:, :, y[i], x[i]],_roi_fg_bbox_locs[i, :] = np.array([[0, l, y[i], x[i]]]) 取出fg对应的值。此时_roi_fg_bbox_locs并不象bg那样全为0了,如下,在第三列和第第四列存储了fg对应的行列号(按照个行顺序来,一行一行的存储)
2.2 将blob按照FPN层合并
    for i, foa in enumerate(foas):
            for k, v in retinanet_blobs[i].items():
                # the way it stacks is:
                # [[anchors for image1] + [anchors for images 2]]
                level = int(np.log2(foa.stride))
                key = '{}_fpn{}'.format(k, level)
                if k == 'retnet_roi_fg_bbox_locs':
                    v[:, 0] = im_i
                    # loc_stride: 80 * 4 if cls_specific else 4
                    loc_stride = 4  # 4 coordinate corresponding to bbox prediction
                    if cfg.RETINANET.CLASS_SPECIFIC_BBOX:
                        loc_stride *= (cfg.MODEL.NUM_CLASSES - 1)
                    anchor_ind = foa.octave * num_aspect_ratios + foa.aspect
                    # v[:, 1] is the class label [range 0-80] if we do
                    # class-specfic bbox otherwise it is 0. In case of class
                    # specific, based on the label, the location of current
                    # anchor is class_label * 4 and then we take into account
                    # the anchor_ind if the anchors
                    v[:, 1] *= 4
                    v[:, 1] += loc_stride * anchor_ind
                blobs[key].append(v)
        blobs['retnet_fg_num'] += fg_num
        blobs['retnet_bg_num'] += bg_num
    blobs['retnet_fg_num'] = blobs['retnet_fg_num'].astype(np.float32)
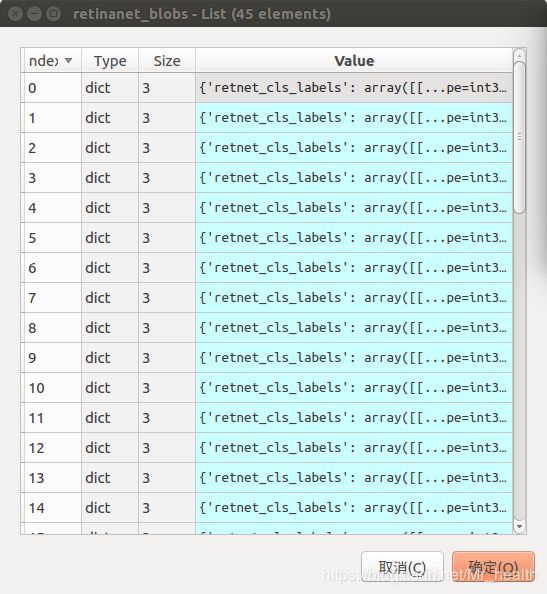
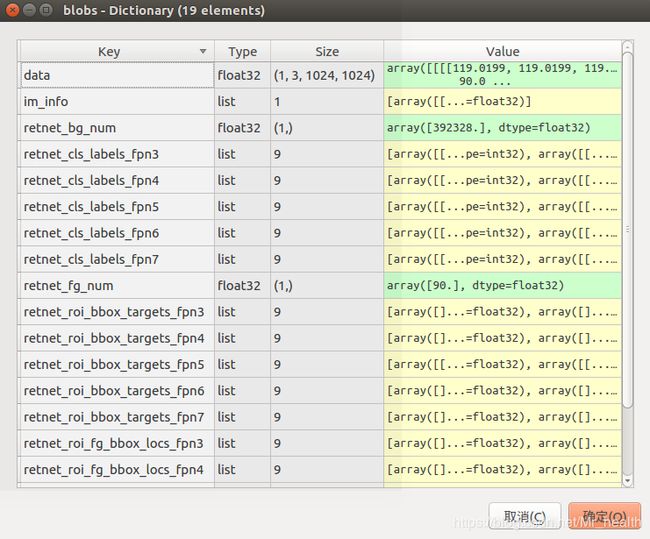
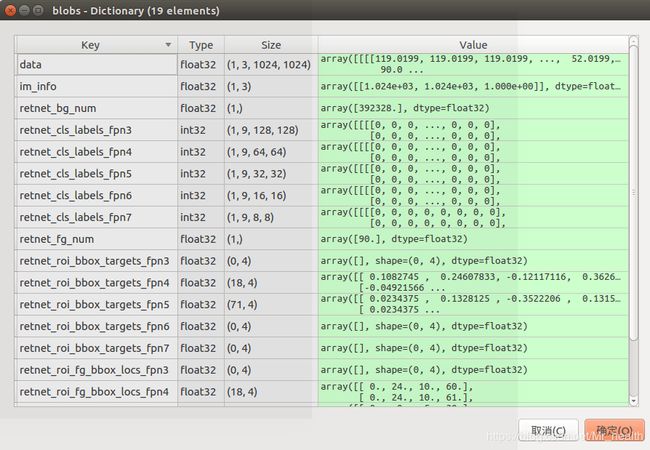
blobs['retnet_bg_num'] = blobs['retnet_bg_num'].astype(np.float32)对每一张roid生成的blob如下图左,每一个元素包含如下图右。retinanet_blob的元素个数为45,其顺序与foas也是一一对应,比如foas中第一个foa是fpn3产生的anchor,但是fpn3对应也产生很多类型的anchor,它是表1第一行产生的anchor类型。
代码中第一个for循环是按照foas中的顺序开始,第二个for循环retinanet_blobs[i].items()保持了与foa的一一对应。所以无论第二个for循环怎么改,只要第一个for循环不进行下去,level = int(np.log2(foa.stride))是不变的。因此这一段代码就是将retinanet_blob中同一FPN层的不同类型的anchor对应的retnet_cls_labels,retnet_roi_bbox_targets和retnet_roi_fg_bbox_locs合并在一起。所以最后blob如下,例如相应的retnet_cls_labels_fpn3变成了含有9个list的字典。
2.3 将list合并为矩阵的形式
    N = len(roidb)
    for k, v in blobs.items():
        if isinstance(v, list) and len(v) > 0:
            # compute number of anchors
            A = int(len(v) / N)
            # for the cls branch labels [per fpn level],
            # we have blobs['retnet_cls_labels_fpn{}'] as a list until this step
            # and length of this list is N x A where
            # N = num_images, A = num_anchors for example, N = 2, A = 9
            # Each element of the list has the shape 1 x 1 x H x W where H, W are
            # spatial dimension of curret fpn lvl. Let a{i} denote the element
            # corresponding to anchor i [9 anchors total] in the list.
            # The elements in the list are in order [[a0, ..., a9], [a0, ..., a9]]
            # however the network will make predictions like 2 x (9 * 80) x H x W
            # so we first concatenate the elements of each image to a numpy array
            # and then concatenate the two images to get the 2 x 9 x H x W

            if k.find('retnet_cls_labels') >= 0:
                tmp = []
                # concat anchors within an image
                for i in range(0, len(v), A):
                    tmp.append(np.concatenate(v[i: i + A], axis=1))
                # concat images
                blobs[k] = np.concatenate(tmp, axis=0)
            else:
                # for the bbox branch elements [per FPN level],
                #  we have the targets and the fg boxes locations
                # in the shape: M x 4 where M is the number of fg locations in a
                # given image at the current FPN level. For the given level,
                # the bbox predictions will be. The elements in the list are in
                # order [[a0, ..., a9], [a0, ..., a9]]
                # Concatenate them to form M x 4
                blobs[k] = np.concatenate(v, axis=0)
合并后
至此针对输入的一张样本,输入进入网络的blob名称为:
[u'im_info', u'retnet_fg_num', u'retnet_bg_num',
u'retnet_cls_labels_fpn3', u'retnet_roi_bbox_targets_fpn3', u'retnet_roi_fg_bbox_locs_fpn3',
u'retnet_cls_labels_fpn4', u'retnet_roi_bbox_targets_fpn4', u'retnet_roi_fg_bbox_locs_fpn4',
u'retnet_cls_labels_fpn5', u'retnet_roi_bbox_targets_fpn5', u'retnet_roi_fg_bbox_locs_fpn5',
u'retnet_cls_labels_fpn6', u'retnet_roi_bbox_targets_fpn6', u'retnet_roi_fg_bbox_locs_fpn6',
u'retnet_cls_labels_fpn7', u'retnet_roi_bbox_targets_fpn7', u'retnet_roi_fg_bbox_locs_fpn7']


