Linux的批量部署
PXE
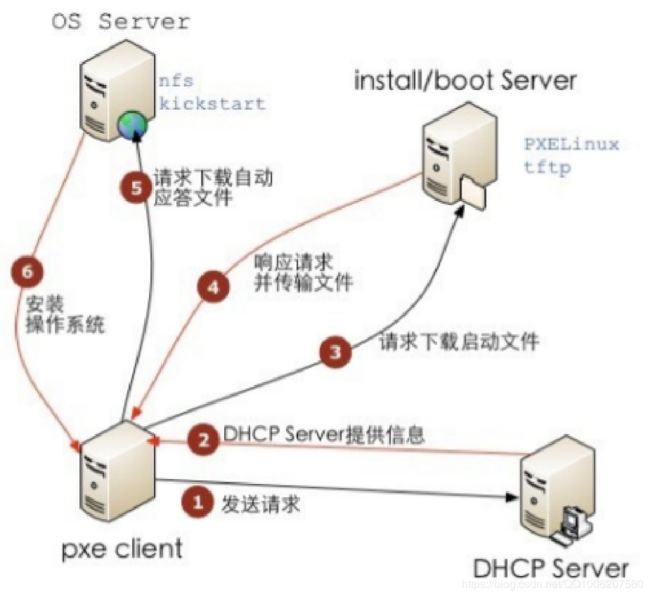
PXE是Preboot Execution Environment的缩写,预启动执行环境
PXE使用需要以下几点:
- 客户端的网卡必须要支持PXE功能,并且开机选择从网卡启动,进入PXE程序
- PXE服务器必须要提供至少含有DHCP以及TFTP的服务!
- DHCP服务提供客户端网络,并且告知TFTP所在的位置;
- TFTP提供客户端boot loader及kernel file下载路径
PXE工作流程:
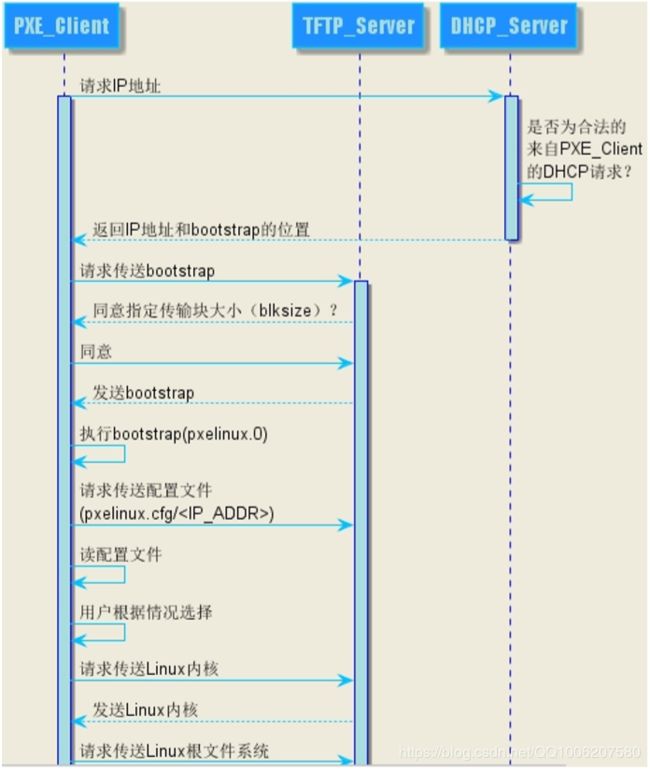
Client向PXE Server上的DHCP发送IP地址请求消息,返回Client的IP地址,同时将pxe环境下的Boot loader文件pxelinux.0的位置信息传送给Client
Client向PXE Server上的TFTP请求pxelinux.0
Client执行接收到的pxelinux.0文件
Client向TFTP请求pxelinux.cfg文件(里面放置的是是启动菜单,即grub的配置文件)
Client向TFTP发送Linux内核请求信息
Client向TFTP发送根文件请求信息
Client加载Linux内核
Client通过nfs/ftp/http下载系统安装文件进行安装
Kickstart
Kickstart是一种无人值守的安装方式
Kickstart工作流程:

在安装过程中记录人工干预填写的各种参数,并生成一个名为ks.cfg的文件。如果在自动安装过程中出现要填 写参数的情况,安装程序首先会去查找ks.cfg文件,如果找到合适的参数,就采用所找到的参数;如果没有找 到合适的参数,便会弹出对话框手工填写
Kickstart配置文件详解(分为3部分)
- 命令部分
- 配置系统
- 用户提示省略的指令
- %packages部分
- 为安装选择软件包和组
- 解决相关依性问题
- 脚本部分
- 定制系统的可选择部分
- 再安装前运行%pre脚本
- 安装后运行%post脚本
创建ks.cfg文件
每安装完一台Centos系统,Centos安装程序(anaconda)会创建一个kickstart配置文件,记录安装配置, 可以参考此配置文件来生成新的kickstart配置文件
Kickstart图形化配置工具,需要安装X Window System、GNOME Desktop、system-config-kickstart,根据 此命令生成配置文件 system-config-kickstart
参考官方手册。用文本编辑器手动创建
PXE+Kickstart批量无人值守部署
服务器配置
1.关闭防火墙和SELinux
[root@linux ~]# systemctl stop firewalld
[root@linux ~]# setenforce 0
2.DHCP
DHCP主要是提供客户端网络参数与TFTP的位置,以及boot loader的文件名
[root@linux ~]# yum clean all
Loaded plugins: fastestmirror
Cleaning repos: c7
Cleaning up everything
Maybe you want: rm -rf /var/cache/yum, to also free up space taken by orphaned data from disabled or removed repos
[root@linux ~]# mount /dev/sr0 /media
mount: /dev/sr0 is write-protected, mounting read-only
[root@linux ~]# yum -y install dhcp
Loaded plugins: fastestmirror
c7                                                       | 3.6 kB     00:00
(1/2): c7/group_gz                                         | 156 kB   00:00
(2/2): c7/primary_db                                       | 3.1 MB   00:00
Determining fastest mirrors
Resolving Dependencies
--> Running transaction check
---> Package dhcp.x86_64 12:4.2.5-58.el7.centos will be installed
--> Finished Dependency Resolution

Dependencies Resolved

================================================================================
 Package      Arch           Version                           Repository  Size
================================================================================
Installing:
 dhcp         x86_64         12:4.2.5-58.el7.centos            c7         513 k

Transaction Summary
================================================================================
Install  1 Package

Total download size: 513 k
Installed size: 1.4 M
Downloading packages:
Running transaction check
Running transaction test
Transaction test succeeded
Running transaction
  Installing : 12:dhcp-4.2.5-58.el7.centos.x86_64                           1/1
  Verifying  : 12:dhcp-4.2.5-58.el7.centos.x86_64                           1/1

Installed:
  dhcp.x86_64 12:4.2.5-58.el7.centos

Complete!

[root@linux ~]# vi /etc/dhcp/dhcpd.conf
  1 #
  2 # DHCP Server Configuration file.
  3 #   see /usr/share/doc/dhcp*/dhcpd.conf.example
  4 #   see dhcpd.conf(5) man page
  5 #
  6 subnet 192.168.130.0 netmask 255.255.255.0 { #设置网段
  7 option routers 192.168.130.2; #设置网关
  8 option subnet-mask 255.255.255.0;  #设置子网掩码
  9 range dynamic-bootp 192.168.130.200 192.168.130.205; #IP地址租用的范围
 10 option domain-name-servers 192.168.130.2; #设置dns服务器地址
 11 next-server 192.168.130.128; #tftp服务器地址
 12 default-lease-time 21600; #默认租约时间
 13 max-lease-time 43200; #大租约时间
 14 filename "pxelinux.0"; #tftp服务器根目录下面的文件名
 15 }

[root@linux ~]# systemctl start dhcpd
[root@linux ~]# systemctl enable dhcpd
Created symlink from /etc/systemd/system/multi-user.target.wants/dhcpd.service to /usr/lib/systemd/system/dhcpd.service.
3.TFTP
boot loader文件pxelinux.0以及内核相关的配置文件(目录pxelinux.cfg下)主要都是由TFTP来提供的!
[root@linux ~]# yum -y install tftp-server xinetd
Loaded plugins: fastestmirror
Loading mirror speeds from cached hostfile
Resolving Dependencies
--> Running transaction check
---> Package tftp-server.x86_64 0:5.2-13.el7 will be installed
---> Package xinetd.x86_64 2:2.3.15-13.el7 will be installed
--> Finished Dependency Resolution

Dependencies Resolved

================================================================================
 Package             Arch           Version                    Repository  Size
================================================================================
Installing:
 tftp-server         x86_64         5.2-13.el7                 c7          44 k
 xinetd              x86_64         2:2.3.15-13.el7            c7         128 k

Transaction Summary
================================================================================
Install  2 Packages

Total download size: 173 k
Installed size: 325 k
Downloading packages:
--------------------------------------------------------------------------------
Total                                              465 kB/s | 173 kB  00:00
Running transaction check
Running transaction test
Transaction test succeeded
Running transaction
  Installing : 2:xinetd-2.3.15-13.el7.x86_64                                1/2
  Installing : tftp-server-5.2-13.el7.x86_64                                2/2
  Verifying  : tftp-server-5.2-13.el7.x86_64                                1/2
  Verifying  : 2:xinetd-2.3.15-13.el7.x86_64                                2/2

Installed:
  tftp-server.x86_64 0:5.2-13.el7         xinetd.x86_64 2:2.3.15-13.el7

Complete!

[root@linux ~]# vim /etc/xinetd.d/tftp
  1 # default: off
  2 # description: The tftp server serves files using the trivial file transfer     \
  3 #       protocol.  The tftp protocol is often used to boot diskless \
  4 #       workstations, download configuration files to network-aware printers    , \
  5 #       and to start the installation process for some operating systems.
  6 service tftp
  7 {
  8         socket_type             = dgram
  9         protocol                = udp
 10         wait                    = yes
 11         user                    = root
 12         server                  = /usr/sbin/in.tftpd
 13         server_args             = -s /var/lib/tftpboot
 14         disable                 = no #此项该为no,其他不变
 15         per_source              = 11
 16         cps                     = 100 2
 17         flags                   = IPv4
 18 }
~

[root@linux ~]# systemctl restart xinetd
[root@linux ~]# systemctl enable xinetd
4.PXE的bootloader和相关配置文件
syslinux是一个功能强大的引导加载程序,而且兼容各种介质。更加确切地说:SYSLINUX是一个小型的Linux操作 系统,它的目的是简化首次安装Linux的时间,并建立修护或其它特殊用途的启动盘
[root@linux ~]# yum -y install syslinux
Loaded plugins: fastestmirror
Loading mirror speeds from cached hostfile
Resolving Dependencies
--> Running transaction check
---> Package syslinux.x86_64 0:4.05-13.el7 will be installed
--> Processing Dependency: mtools for package: syslinux-4.05-13.el7.x86_64
--> Running transaction check
---> Package mtools.x86_64 0:4.0.18-5.el7 will be installed
--> Finished Dependency Resolution

Dependencies Resolved

================================================================================
 Package            Arch             Version                 Repository    Size
================================================================================
Installing:
 syslinux           x86_64           4.05-13.el7             c7           989 k
Installing for dependencies:
 mtools             x86_64           4.0.18-5.el7            c7           203 k

Transaction Summary
================================================================================
Install  1 Package (+1 Dependent package)

Total download size: 1.2 M
Installed size: 2.6 M
Downloading packages:
--------------------------------------------------------------------------------
Total                                               34 MB/s | 1.2 MB  00:00
Running transaction check
Running transaction test
Transaction test succeeded
Running transaction
  Installing : mtools-4.0.18-5.el7.x86_64                                   1/2
  Installing : syslinux-4.05-13.el7.x86_64                                  2/2
  Verifying  : mtools-4.0.18-5.el7.x86_64                                   1/2
  Verifying  : syslinux-4.05-13.el7.x86_64                                  2/2

Installed:
  syslinux.x86_64 0:4.05-13.el7

Dependency Installed:
  mtools.x86_64 0:4.0.18-5.el7

Complete!

[root@linux ~]# cd /var/lib/tftpboot
[root@linux tftpboot]# cp /usr/share/syslinux/pxelinux.0 .
[root@linux tftpboot]# cp /media/images/pxeboot/{vmlinuz,initrd.img} .
[root@linux tftpboot]# cp /media/isolinux/{vesamenu.c32,boot.msg} .
[root@linux tftpboot]# mkdir pxelinux.cfg
[root@linux tftpboot]# cp /media/isolinux/isolinux.cfg pxelinux.cfg/defaul
[root@linux tftpboot]# cd pxelinux.cfg/
[root@linux pxelinux.cfg]# vi defaul
# 删除60行后的所有内容,并添加下列代码,IP地址为服务器地址
 61 label linux
 62  menu label ^Install CentOS 74
 63  kernel vmlinuz
 64  append initrd=initrd.img ks=http://192.168.130.128/config/ks.cfg biosdevnam    e=0 net.ifnames=0
5.HTTP
通过HTTP协议把光盘镜像内容传给客户端
[root@linux ~]# yum -y install httpd
Loaded plugins: fastestmirror
Loading mirror speeds from cached hostfile
Package httpd-2.4.6-67.el7.centos.x86_64 already installed and latest version
Nothing to do
[root@linux ~]# cp -rf /media/* /var/www/html/
[root@linux ~]# mkdir -p /var/www/html/config   #新建目录,把自定义的文件、脚本等放置于此
[root@linux ~]# systemctl start httpd
[root@linux ~]# systemctl enable httpd
6.Kickstart配置文件
[root@linux ~]# vi /var/www/html/config/ks.cfg
  1 #ptform=x86, AMD64 或 Intel EM64T
  2 #version=
  3
  4 # Firewall configuration
  5 firewall --disabled
  6
  7 # Install OS instead of upgrade
  8 install
  9
 10 # Use network installation
 11 url --url="http://192.168.130.128/"
 12 #!!!
 13
 14 # Use CDROM installation media
 15 repo --name="yum" --baseurl=http://192.168.130.128/
 16 #!!!
 17
 18 # Root password
 19 rootpw --iscrypted $1$mi4lP.ZY$j5UDGX34knfGuSYPwd82u/  #redhat
 20 # openssl passwd -1
 21
 22 # Use graphical install graphical or text
 23 text
 24
 25 # Run the Setup Agent on first boot
 26 firstboot --disable
 27
 28 # System keyboard
 29 keyboard us
 30
 31 # System language
 32 lang en_US.UTF-8
 33
 34 # SELinux configuration
 35 selinux --disabled
 36
 37 # Reboot after installation
 38 reboot
 39
 40 # System timezone
 41 timezone  --isUtc Asia/Shanghai
 42
 43 # Network information
 44 network  --bootproto=dhcp --device=eth0 --noipv6 --activate
 45 network  --hostname=web
 46 #!!!
 47
 48 # System bootloader configuration  bootloader --location=mbr
 49
 50 # Clear the Master Boot Record
 51 zerombr
 52
 53 # Partition clearing information
 54 clearpart --all --initlabel
 55 #!!!
 56
 57 # Disk partitioning information
 58 part /boot --asprimary --fstype="ext4" --ondisk=sda --size=200
 59 part swap --fstype="swap" --ondisk=sda --size=4096
 60 part / --fstype="ext4" --ondisk=sda --size=20480
 61 #!!!
 62
 63 %packages
 64 @core
 65 wget
 66 %end
 67
 68 %post
 69 #yum_client
 70 cd /etc/yum.repos.d/
 71 rm -rf *
 72 wget http://192.168.130.128/config/client.repo
 73 %end
 74
 75 %addon com_redhat_kdump --disable --reserve-mb='auto'
 76 %end
 77
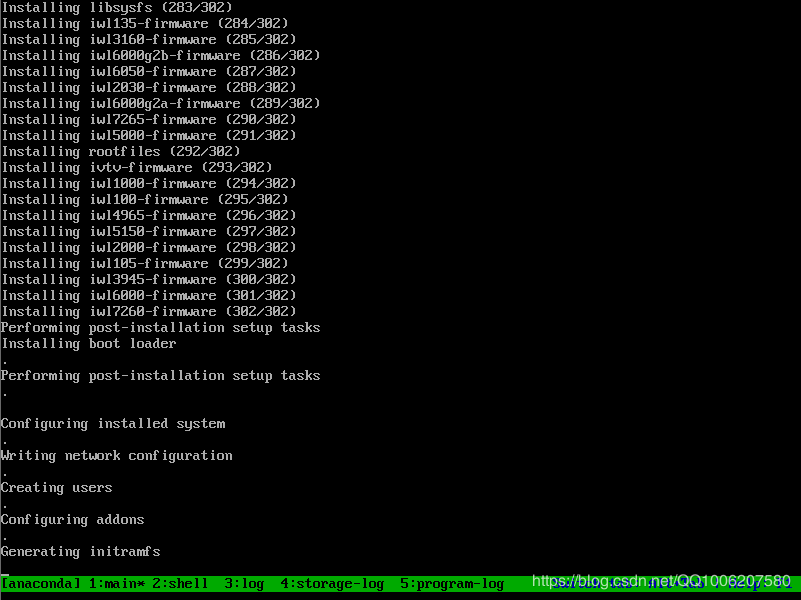
到这一步结束就算配置完成,接下来就可以进行装机测试。
测试
重启后进入系统,这时就可以使用了。


