深度学习笔记7:Tensorflow入门
欢迎关注天善智能,我们是专注于商业智能BI,人工智能AI,大数据分析与挖掘领域的垂直社区,学习,问答、求职一站式搞定!
对商业智能BI、大数据分析挖掘、机器学习,python,R等数据领域感兴趣的同学加微信:tsaiedu,并注明消息来源,邀请你进入数据爱好者交流群,数据爱好者们都在这儿。
作者简介:
鲁伟:一个数据科学践行者的学习日记。数据挖掘与机器学习,R与Python,理论与实践并行。
个人公众号:数据科学家养成记 (微信ID:louwill12)
配套学习视频教程: 手把手教你用Python 实践深度学习
从前面的学习笔记中,笔者和大家一起使用了 numpy 一步一步从感知机开始到两层网络以及最后实现了深度神经网络的算法搭建。而后我们又讨论了改善深度神经网络的基本方法,包括神经网络的正则化、参数优化和调参等问题。这一切工作我们都是基于numpy 完成的,没有调用任何深度学习框架。在学习深度学习的时候,一开始不让大家直接上手框架可谓良苦用心,旨在让大家能够跟笔者一样,一步一步通过 numpy 搭建神经网络的过程就是要让你能够更加深入的理解神经网络的架构、基本原理和工作机制,而不是黑箱以视之。
但学习到这个阶段,你已充分理解了神经网络的工作机制,马上就要接触更深层次的卷积神经网络(CNN)和递归神经网络(RNN),依靠纯手工去搭建这些复杂的神经网络恐怕并不现实。这时候就该深度学习框架出场了。针对深度学习,目前有很多优秀的学习框架,比如说笔者马上要讲的 Tensorflow,微软的 CNTK,伯克利视觉中心开发的 caffe,以及别具一格的 PyTorch 和友好易用的 keras,本系列深度学习笔记打算从 Tensorflow 开始,对三大主流易用的深度学习框架 Tensorflow、PyTorch 和 keras 进行学习和讲解。选择这三个框架的原因在于其简单易用、方便编程和运行速度相对较快。
作为谷歌的深度学习框架, Tensorflow 在深度学习领域可谓风头无二。其中 Tensor 可以理解为类似于 numpy 的 N 维数组,名为张量; flow 则意味着 N 维数组的流计算,而 Tensor 的数据流计算形式则为一个计算图的形式进行计算。这里重点提一下,如果大学本科期间的线性代数忘记了的话,我劝你赶紧回去翻一翻,线性代数和矩阵论是深度学习的基础,希望你能熟练掌握。

先看个简单的例子。
import tensorflow as tf# Define y_hat constant. Set to 36.y_hat = tf.constant(36, name='y_hat')
# Define y. Set to 39           y = tf.constant(39, name='y')                    # Create a variable for the lossloss = tf.Variable((y - y_hat)**2, name='loss')   # When init is run later (session.run(init)), the loss variable will be initialized and ready to be computedinit = tf.global_variables_initializer()        # Create a session and print the outputwith tf.Session() as session:
    # Initializes the variables
    session.run(init)
    # Prints the loss
    print(session.run(loss))
9
在上述代码中,我们首先定义了两个常量,然后定义了一个 loss Tensor(变量),之后对变量进行初始化,创建计算会话,最后执行会话计算并打印结果。所以我们可以看到运行 Tensorflow 的基本机制:
创建一些尚未被执行的张量——定义这些张量之间的运算操作——初始化这些张量——创建会话——执行会话
需要注意的一点是,创建会话后一定要执行这个会话,且看下面示例:
a = tf.constant(2)
b = tf.constant(10)
c = tf.multiply(a,b)
print(c)
Tensor("Mul:0", shape=(), dtype=int32)
在上面的示例中,我们创建了两个 Tensor 和 Tensor 之间的乘积运算,但直接打印的结果却不是我们想要看到的 20. 原因则在于这里我们没有创建会话并执行,只是打印了两个张量运算之后的张量。创建会话并执行操作如下:
sess = tf.Session()
print(sess.run(c))
20
除了直接定义变量之外,我们还可以通过创建占位符变量来稍后为之赋值,然后在运行会话中传入一个 feed_dict ,示例如下:
x = tf.placeholder(tf.int64, name = 'x')
print(sess.run(2 * x, feed_dict = {x: 3}))
sess.close()
6
相信你已经大致明白了基于张量运算的 Tensorflow 的底层运行机制了。总结而言就是:创建张量、初始化张量、创建会话并执行。
下面展示几个 Tensorflow 的神经网络计算的基础函数示例。
线性函数
def linear_function():
    """
    Implements a linear function:
            Initializes W to be a random tensor of shape (4,3)
            Initializes X to be a random tensor of shape (3,1)
            Initializes b to be a random tensor of shape (4,1)
    Returns:
    result -- runs the session for Y = WX + b
    """

    np.random.seed(1)


    X = tf.constant(np.random.randn(3,1), name='X')
    W = tf.constant(np.random.randn(4,3), name='W')
    b = tf.constant(np.random.randn(4,1), name='b')
    Y = tf.add(tf.matmul(W, X), b)    # Create the session using tf.Session() and run it with sess.run(...) on the variable you want to calculate

    init = tf.global_variables_initializer()
    sess = tf.Session()
    sess.run(init)
    result = sess.run(Y)    # close the session
    sess.close()
    return result
计算sigmoid函数
def sigmoid(z):
    """
    Computes the sigmoid of z

    Arguments:
    z -- input value, scalar or vector

    Returns:
    results -- the sigmoid of z
    """

    x = tf.placeholder(tf.float32, name='x')
    sigmoid = tf.sigmoid(x)
    with tf.Session() as sess:
        result = sess.run(sigmoid, feed_dict={x: z})
    return result
计算损失函数

def cost(logits, labels):
    """
    Computes the cost using the sigmoid cross entropy

    Arguments:
    logits -- vector containing z, output of the last linear unit (before the final sigmoid activation)
    labels -- vector of labels y (1 or 0)

    Note: What we've been calling "z" and "y" in this class are respectively called "logits" and "labels"
    in the TensorFlow documentation. So logits will feed into z, and labels into y.

    Returns:
    cost -- runs the session of the cost (formula (2))
    """

    # Create the placeholders for "logits" (z) and "labels" (y) (approx. 2 lines)
    z = tf.placeholder(tf.float32, name='z')
    y = tf.placeholder(tf.float32, name='y')    # Use the loss function (approx. 1 line)
    cost = tf.nn.sigmoid_cross_entropy_with_logits(logits=z, labels=y)    # Create a session (approx. 1 line). See method 1 above.
    sess = tf.Session()    # Run the session (approx. 1 line).
    sess.run(cost, feed_dict={z: logits, y: labels})    # Close the session (approx. 1 line). See method 1 above.
    sess.close()
    return cost
one hot 编码
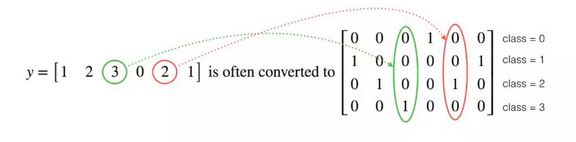
def one_hot_matrix(labels, C):
    """
    Creates a matrix where the i-th row corresponds to the ith class number and the jth column
                     corresponds to the jth training example. So if example j had a label i. Then entry (i,j)
                     will be 1.

    Arguments:
    labels -- vector containing the labels
    C -- number of classes, the depth of the one hot dimension

    Returns:
    one_hot -- one hot matrix
    """
    # Create a tf.constant equal to C (depth), name it 'C'. (approx. 1 line)
    C = tf.constant(C)    # Use tf.one_hot, be careful with the axis (approx. 1 line)
    one_hot_matrix = tf.one_hot(labels, C, axis=0)    # Create the session (approx. 1 line)
    sess = tf.Session()
    one_hot = sess.run(one_hot_matrix)    # Close the session (approx. 1 line). See method 1 above.
    sess.close()
    return one_hot
参数初始化
def ones(shape):    """
    Creates an array of ones of dimension shape
    Arguments:
    shape -- shape of the array you want to create

    Returns:
    ones -- array containing only ones
    """
    # Create "ones" tensor using tf.ones(...). (approx. 1 line)
    ones = tf.ones(shape)    # Create the session (approx. 1 line)
    sess = tf.Session()    # Run the session to compute 'ones' (approx. 1 line)
    ones = sess.run(ones)    # Close the session (approx. 1 line). See method 1 above.
    sess.close()
    return ones
一顿操作之后,我们已经将神经网络的一些基础运算利用 `Tensorflow` 定义好了。在下一期笔记中,我们将学习如何使用 `Tensorflow` 搭建神经网络。
参考资料:
https://www.coursera.org/learn/machine-learning
https://www.deeplearning.ai/
7月26日
Hellobi Live
现场直播
免费!
免费!
免费!
深度学习从哪开始学?从数据分析师到机器学习(深度学习)工程师的进阶之路
内容:1、机器学习/深度学习的学习方法 2、数据职业生涯规划与自我转型路线 3、手把手教你搭建一个深度神经网络(DNN)
扫描下图二维码即可参与学习