Spring Cloud Config配置属性刷新之自动刷新
目录
Push Notifications and Spring Cloud Bus <推送消息基于MQ>
软件环境配置<先后不能调换>
Erlang 下载和安装
rabbitMQ 下载和安装
RabbitMQ测试
安装遇到遇到的问题
问题一
问题二
详细安装教程地址<转载>
编写demo
config server
config client refresh-automatic
配置刷新遇到的问题
解决办法
改变config 自动刷新的侧重点
config client 刷新原理图
如何转移侧重节点变成config server
config server 刷新原理图
- 推荐bus学习博客<转载>
https://www.fangzhipeng.com/springcloud/2018/08/08/sc-f8-bus.html- Push Notifications and Spring Cloud Bus
Push Notifications and Spring Cloud Bus <推送消息基于MQ>
Many source code repository providers (like Github, Gitlab or Bitbucket for instance) will notify you of changes in a repository through a webhook. You can configure the webhook via the provider’s user interface as a URL and a set of events in which you are interested. For instance Github will POST to the webhook with a JSON body containing a list of commits, and a header "X-Github-Event" equal to "push". If you add a dependency on the
spring-cloud-config-monitorlibrary and activate the Spring Cloud Bus in your Config Server, then a "/monitor" endpoint is enabled.
什么是Spring Cloud Bus
Spring Cloud Bus works by adding Spring Boot autconfiguration if it detects itself on the classpath. All you need to do to enable the bus is to add
spring-cloud-starter-bus-amqpto your dependency management and Spring Cloud takes care of the rest. Make sure RabbitMQ is available and configured to provide aConnectionFactory: running on localhost you shouldn’t have to do anything, but if you are running remotely use Spring Cloud Connectors, or Spring Boot conventions to define the broker credentials, e.g.先要安装rabbitMQ
-
软件环境配置<先后不能调换>
-
Erlang 下载和安装
- erlang 下载地址: http://www.erlang.org/downloads
百度网盘下载地址:https://pan.baidu.com/s/1U78ccUw6u0HlJ4wbtYpoyA 提取码:q1jz
推荐安装教程地址:https://blog.csdn.net/qq_23303245/article/details/80402281
-
rabbitMQ 下载和安装
- 1 rabbitMQ 官方下载地址:https://www.rabbitmq.com/download.html
百度网盘下载地址:https://pan.baidu.com/s/1joMGPWDURJnno2sv25wQWA 提取码:v1cd
推荐安装教程地址:https://blog.csdn.net/qq_31634461/article/details/79377256
- 2 安装后启动
界面管理官方 doc文档
Getting Started
The management plugin is included in the RabbitMQ distribution. Like any other plugin, it must be enabled before it can be used. That's done using rabbitmq-plugins:rabbitmq-plugins enable rabbitmq_management
使用方法:进入安装目录,如我自己是 D:\az\RabbitMQ Server\rabbitmq_server-3.7.4\sbin 当前目录下进入dos输入——>rabbitmq-plugins enable rabbitmq_management 结果如下所示<也可以作为环境变量配置>
- 3 RabbitMQ环境变量配置
- 4 在Path中加入
%RABBITMQ_SERVER%\sbin;-
启动 rabbitmq-plugins enable rabbitmq_management
- 3 然后再重启一下RabbitMQ
net stop RabbitMQ && net start RabbitMQ-
RabbitMQ测试
- 测试地址 http://localhost:15672/
默认的用户名:guest
默认的密码为:guest
-
安装遇到遇到的问题
-
问题一
rabbitmq could not start applicaiton.......
解决办法:https://www.oschina.net/question/3251118_2282091 解决办法将 erl10.3 降到 erl9.3
-
问题二
解决办法将 erl9.3 降到 erl9.2
-
详细安装教程地址<转载>
- https://blog.csdn.net/newbie_907486852/article/details/79788471
-
编写demo
-
config server
- 1 pom.yml
		org.springframework.boot
		spring-boot-starter-web


		org.springframework.cloud
		spring-cloud-config-server
- 2 主启动类ConfigServerApplication.java
import org.springframework.boot.SpringApplication;
import org.springframework.boot.autoconfigure.SpringBootApplication;
import org.springframework.cloud.config.server.EnableConfigServer;

@EnableConfigServer
@SpringBootApplication
public class ConfigServerApplication {

	public static void main(String[] args) {
		SpringApplication.run(ConfigServerApplication.class, args);
	}

}
- 3 只有一个配置文件内容为application.yml
server:
  port: 8080

spring:
  cloud:
    config:
      server:
        git:
uri: https://gitee.com/xuhaiyancoco/config-repo-51cto-video-
config client refresh-automatic
- Quick Start
spring:
rabbitmq:
host: mybroker.com
port: 5672
username: user
password: secret
- 1 pom.yml
		org.springframework.boot
		spring-boot-starter-web


		org.springframework.cloud
		spring-cloud-config-server


		org.springframework.cloud
		spring-cloud-starter-bus-amqp


		org.springframework.boot
		spring-boot-starter-actuator
- 2 application.yml
server:
port: 8081- 3 bootstrap.yml
spring:
  application:
    name: foobar
  cloud:
    config:
      uri: http://localhost:8080
      profile: dev
      label: master
  rabbitmq:
    host: localhost
    port: 5672
    username: guest
    password: guest
- 4 Client
@RestController
@RefreshScope
public class ConfigClientController {

    @Value("${profile}")
    private String profile;

    @GetMapping("/profile")
    public String getProfile() {
        return profile;
    }
}
- 5 ConfigClientRefreshBusApplication.java
@SpringBootApplication
public class ConfigClientRefreshBusApplication {

    public static void main(String[] args) {
        SpringApplication.run(ConfigClientRefreshBusApplication.class, args);

    }
}
- 6 启动microserver-config-server项目,再启动microserver-config-client-refresh-bus端口分别为8081、8082,访问localhost:8081(8080)/profile,访问结果如下
- 5 半自动刷新命令
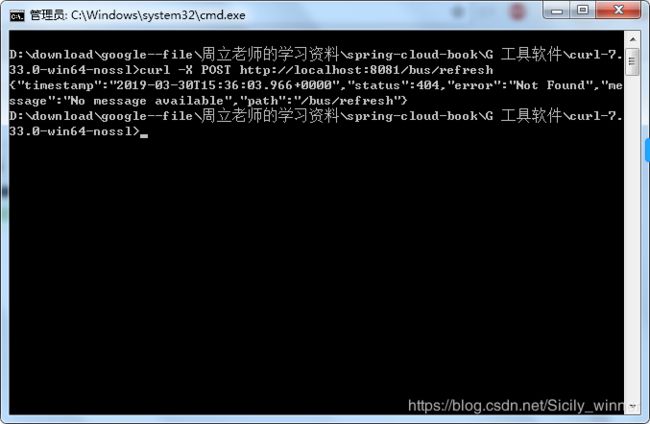
curl -X POST http://localhos:8081/bus/refresh<最终刷新结果是:失败>
-
配置刷新遇到的问题
解决办法
- 1 在microserver-config-server和microserver-config-client-refresh-bus中bootstrap.yml都添加
management:
  endpoints:
    web:
      exposure:
        include: bus-refresh
- 2 在microserver-config-server和microserver-config-client-refresh-bus中pom.xml都添加
   org.springframework.cloud
   spring-cloud-starter-bus-amqp


   org.springframework.boot
   spring-boot-starter-actuator
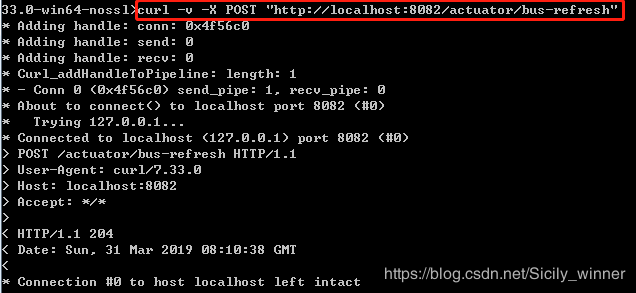
- 3 命令修改为
curl -v -X POST "http://localhost:8082/actuator/bus-refresh"
- 4 curl结果为
- 5 此时我们修改Git上面的配置信息,再去请求一下localhost:8082/profile接口返回结果如下<值得注意的如果是先修改配置信息,curl刚去刷新,就是localhost:8082/profile去请求,会有缓存!!不要立刻去请求数据>
-
改变config 自动刷新的侧重点
localhost:8081通过curl刷新之后呢,localhost:8082的配置也会刷新,也就是下面的图片逻辑,也就是说本来ABC都是一个节点,他们本身的身份都是同样重量的,但是现在的A借点负责去刷新,别的负责读取刷新的数据,对于节点的重量来说就是不同了!!!
-
config client 刷新原理图
-
如何转移侧重节点变成config server
为了避免这个问题呢,我们可以在config server 进行刷新,操作就是上面解决办法的例子,就是通过在config server 中添加bus-amqp 的jar 和bootstrap.yml中再添加rabbitMQ的配置信息!!执行完curl命令后localhost:8081(8082)的配置内容就立刻更新了
-
config server 刷新原理图


