安卓中的弹窗界面介绍(AlertDialog、ProgressDialog,PopupWindow)遇到问题继续补充
AlertDialog的使用
介绍
AlertDialog可以在当前界面弹出一个对话框,这个对话框是置顶于所有的界面元素上,可以屏蔽掉其他控件的交互能力,在代码中使用灵活简单。
功能
- 基本使用(设置标题,内容,自定义内容区域)
- 让Dialog铺满屏幕
- 在自定义Dialog上弹出软键盘
- 保持Dialog不退出
- 自定义Dialog的介绍
推荐
这里推荐一个Git项目,上面提供的比较多的功能:
material-dialogs
基本使用
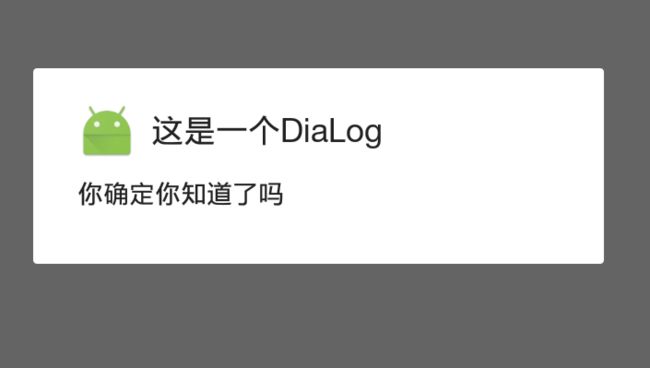
AlertDialog.Builder builder= new AlertDialog.Builder(MainActivity.this);
builder.setTitle("这是一个DiaLog");
//设置标题
builder.setMessage("你确定你知道了吗");
//设置内容
builder.setIcon(R.mipmap.ic_launcher);
//设置头像Icon
builder.show();
/**解释说明:
AlertDialog是通说Builder构建者模式来创建的,其中使用builder来创建Dialog,
通过show()方法展示*/
添加按钮
上面都是简单使用,在弹出框上还可以添加事件按钮,一共可以监听四种事件
在上面基础上添加在builder.show()之前
//添加一个确定按钮,打印log发现是 i=-1
builder.setPositiveButton("确定", new DialogInterface.OnClickListener() {
            @Override
            public void onClick(DialogInterface dialogInterface, int i) {
                Log.d("Main","用户点击了确定按钮");
                Log.d("Main","用户点击了确定按钮"+i);
            }
        });
//添加一个取消按钮,打印log 发现是 i=-2
        builder.setNegativeButton("取消", new DialogInterface.OnClickListener() {
            @Override
            public void onClick(DialogInterface dialogInterface, int i) {
                Log.d("Main","用户点击了取消按钮");
                Log.d("Main","用户点击了取消按钮"+i);
            }
        });
 //添加一个中立按钮,打印log,发现是 i=-3
        builder.setNeutralButton("中立", new DialogInterface.OnClickListener() {
            @Override
            public void onClick(DialogInterface dialogInterface, int i) {
                Log.d("Main","用户点击了中立");
                Log.d("Main","用户点击了中立"+i);
            }
        });
//这个方法是监听当用户点击了dialog窗体之外的方法,
// dialog.setCancelable(false);如果存在这句话的话,那么这个监听就无效了,
//哪怕用户按回退键
//注意的是,这个监听所指窗体之外也包括了用户按回退键这个动作
        builder.setOnCancelListener(new DialogInterface.OnCancelListener() {
            @Override
            public void onCancel(DialogInterface dialogInterface) {
              Log.d("Main","用户点击了视图外面");
            }
        });


        /**你会发现你可以使用好多setNegativeButton,方法来设置按钮,但是最终有效果
        最后添加或执行的。这样你就可以根据不同的情况来展示不同的AlertDialog界面了
        另外你点了哪一个按钮,那么AlertDialog窗体就会消失*/

修改内容主题部分
当然,那就不能使用setMessage()这个方法了。
第一种:展示列表内容
builder.setItems(ss, new DialogInterface.OnClickListener() {
@Override
public void onClick(DialogInterface dialogInterface, int i) {
Log.d("Main","点击了内容区域");
Log.d("Main","点击了"+i); //会发现下角标是从0、1、2开始变化的
}
});
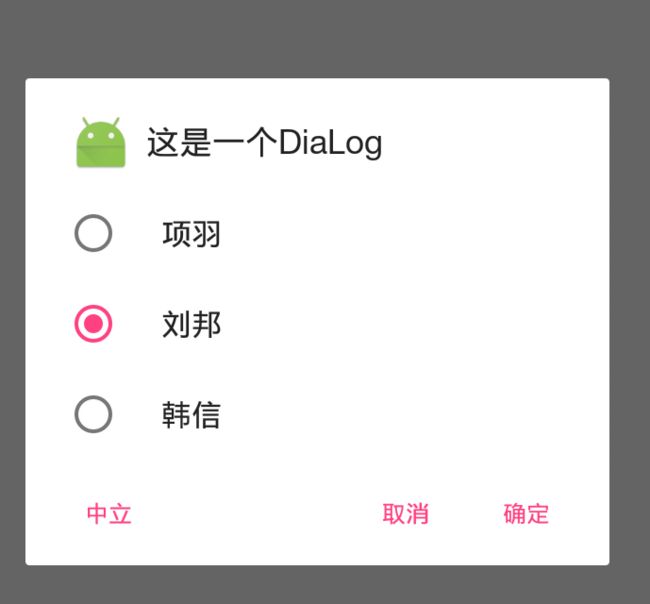
//说明这里的ss其实: private String [] ss = {"项羽","刘邦","韩信"};

展示单选框内容
builder.setSingleChoiceItems(ss, 1, new DialogInterface.OnClickListener() {
            @Override
            public void onClick(DialogInterface dialogInterface, int i) {
                Log.d("Main","最后确定的是"+i);
                //这个的特色是选中之后,dialog并不会消失,但是会确定i,用来定位的。
            }
        });
         //这个是带有单选框的,参数二是默认选中哪一个,比如1就是默认选中1位置的
展示复选框内容
builder.setMultiChoiceItems(ss, dd, new DialogInterface.OnMultiChoiceClickListener() {
  @Override
  public void onClick(DialogInterface dialogInterface, int i, boolean b) {
                Log.d("Main",""+dialogInterface);
                Log.d("Main",""+i);
                Log.d("Main",""+b);
            }
//这里面参数二是默认选中哪几项,是一个Boolean类型的数组
//当用户改变一个item 的条目的时候,就会走一遍监听,将改变的那一个item的位置i以及变化变化之后的
//状态true 或者 false 都可以知道
//前面的ss有多长,那么dd就应该有多长,要不然就会存在数组越界
        });
//附上数组dd:  private boolean []dd ={true,false,true};

使用自定义内容区域
如果上面的内容还不是能过满足你,可以使用自己定义布局样式
首先准备一个布局:


其次在show()方法执行之前调用这个方法:
 builder.setView(R.layout.sd);
 ***这里注意的是,在AlertDialog展示的内容区域,只能放一个内容,要不然就会出问题的***,

如何让dialog从底部弹出
需要注意的是,前面的都可以通过builder来完成,但是这个需要通过AlertDialog来完成,
其实,可以是在builder的基础上,新建一个AlertDialog(也就是说,你在builder.create方法之后在调用builder修改属性,对于生成的dialog是没有意义的,没有效果),因为你同时调用builder.show()还有dialog.show(),你会发现,两个窗体都会出现,谁先调用谁现出来,但是都会出来。当然了,AlertDialog 对象有许多值是不能设置的,是要builder来完成基础的搭建,并且builder也不能完成许多操作,比如调用dismiss()方法,还比如下面的,让dialog从底部弹出,这种修改窗体的。
/*介绍了这么多,其实最简单来讲:你前面构建了一个builder,然后你也得到了一个dialog对象,但是你最后在使用的时候使用builder.show(),那么最后展示出来的是builder配置的样式,和dialog配置的一点关系没有/
AlertDialog mDialog = builder.create(); //得到一个新建的AlertDialog窗体对象
 Window window = mDialog.getWindow();
window.setGravity(Gravity.BOTTOM);
window.setWindowAnimations(R.style.mydialog);
mDialog.setCanceledOnTouchOutside(true);
mDialog.show();
这里引用了style格式文件,
进入时候动画,根据具体需求来写,这里只是例子罢了


退出时候动画
让Dialog和屏幕一样宽
在使用AlertDialog时候很大情况不仅需要从底部弹出,还希望的是要铺满全屏,先看几张效果图:
(1)使用 alertDialog.setView(views);

(2)alertDialog.setView(views,40,40,40,40);
发现我在布局的时候,确实是让其match_parent了,但是展示出来却没有效果,从网上找了代码如下:
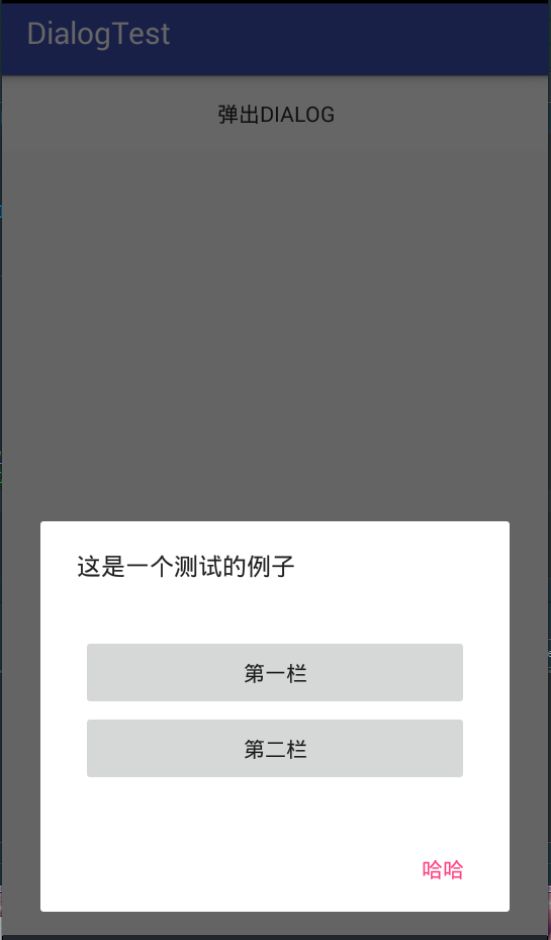
View views = LayoutInflater.from(this).inflate(R.layout.myitem,null,false);
        AlertDialog.Builder builder = new AlertDialog.Builder(MainActivity.this);
        builder.setMessage("这是一个测试的例子");
        builder.setNegativeButton("哈哈", new DialogInterface.OnClickListener() {
            @Override
            public void onClick(DialogInterface dialogInterface, int i) {
                Toast.makeText(MainActivity.this,"点击了哈哈",Toast.LENGTH_SHORT).show();
            }
        });
        builder.setView(views);//也可以展示出来
        AlertDialog alertDialog = builder.create();
        Window window = alertDialog.getWindow();
        window.setGravity(Gravity.BOTTOM);
        window.setWindowAnimations(R.style.mystyle);
        WindowManager.LayoutParams lp = window.getAttributes();
        lp.width = WindowManager.LayoutParams.MATCH_PARENT;
        lp.height = WindowManager.LayoutParams.WRAP_CONTENT;
        window.setAttributes(lp);
        alertDialog.show();
运行发现,还是原样,如图一,没有达到自己想要的结果。
其实,在写代码时候:
AlertDialog.Builder builder = new AlertDialog.Builder(MainActivity.this,R.style.DialogTheme);
给其使用上主题就可以了,
< style name="DialogTheme" parent="@android:style/Theme.Dialog">
        < item name="android:windowFrame">@null移除边框
        < item name="android:windowNoTitle">true去除顶部标题栏
        < item name="android:windowIsTranslucent">true窗体透明
        < item name="android:background">@android:color/white背景透明
        < item name="android:windowBackground">@android:color/transparent窗体背景透明
        < item name="android:windowIsFloating">false窗体是否浮动
        < item name="android:backgroundDimEnabled">true背景是否昏暗
        < item name="android:backgroundDimAmount">0.6昏暗数量
    < /style>
如果上面的还不可以,那么可以使用办法(推荐):
        Window window = getWindow();
        WindowManager.LayoutParams layoutParams = window.getAttributes();
        layoutParams.width = WindowManager.LayoutParams.MATCH_PARENT;
        layoutParams.horizontalMargin = 0;
        window.setAttributes(layoutParams);
        window.setBackgroundDrawable(new ColorDrawable(Color.TRANSPARENT));
        window.getDecorView().setPadding(0,0,0,0);
        window.setGravity(Gravity.BOTTOM);
如何在自定义Dialog上弹出软键盘
1、自定义主题-在使用自定义dialog的时候设置
2、自定义dialog-示例
public class MyInfoDialog extends Dialog {


    private onClicker monClicker = null; //自定义接口,实现接口回调
    private Context context;


    public void setMonClicker(onClicker monClicker) {
        this.monClicker = monClicker;
    }

    protected MyInfoDialog(Context context) {
        super(context);
        this.context = context;
    }

    public MyInfoDialog(Context context, int themeResId) {
        super(context, themeResId);
        this.context = context;
    }

    private EditText myEditText;
    private TextView myTextView;

    @Override
    protected void onCreate(Bundle savedInstanceState) {
        super.onCreate(savedInstanceState);

        setContentView(R.layout.my_info_dialog_input);

        myEditText = findViewById(R.id.editText_input_send_dialog);
        myTextView = findViewById(R.id.textview_input_send_dialog);

        Window window = getWindow();
        WindowManager.LayoutParams layoutParams = window.getAttributes();
        layoutParams.width = WindowManager.LayoutParams.MATCH_PARENT;
        layoutParams.horizontalMargin = 0;
        window.setAttributes(layoutParams);
        window.setBackgroundDrawable(new ColorDrawable(Color.TRANSPARENT));
        window.getDecorView().setPadding(0,0,0,0);
        window.setGravity(Gravity.BOTTOM);

        myTextView.setOnClickListener(new View.OnClickListener() {
            @Override
            public void onClick(View v) {
                String input =  myEditText.getText().toString().trim();
                if (monClicker != null){
                    monClicker.sendInput(input);
                }
                dismiss();
            }
        });
        myEditText.setOnEditorActionListener(new TextView.OnEditorActionListener() {
            @Override
            public boolean onEditorAction(TextView v, int actionId, KeyEvent event) {
                InputMethodManager imm = (InputMethodManager) context.getSystemService(Context.INPUT_METHOD_SERVICE);
                if (imm.isActive()) {
                    imm.hideSoftInputFromWindow(v.getWindowToken(), 0);
                    return false;
                }
                return false;
            }
        });

  额外注意的是,我集成的是Dialog,并不是AlertDialog,上述代码如果使用AlertDialog,并不能弹出键盘来。


    }
}
如何让让dialog不退出
前面知道dialog可以有三个按钮的监听,但是你会发现,当你点击了某一个按钮之后,它就会消失,这是因为:
这里以设置setPositiveButton为例子,
public Builder setPositiveButton(CharSequence text, final OnClickListener listener) {
            P.mPositiveButtonText = text;
            P.mPositiveButtonListener = listener;
            return this;
        }
//可以发现:设置的text赋给了mPositiveButteonText,
//设置的监听赋给了mPositiveButtonListener
关键是p:
  //这个是在AlertDialog的Builder里面,这是在AlertController中定义的内部类,里面定义了大量的属性
  private final AlertController.AlertParams P;
在AlertParams 中有一个方法:
 public void apply(AlertController dialog) {
            if (mCustomTitleView != null) {
                dialog.setCustomTitle(mCustomTitleView);
            } else {
                if (mTitle != null) {
                    dialog.setTitle(mTitle);
                }
                if (mIcon != null) {
                    dialog.setIcon(mIcon);
                }
                if (mIconId != 0) {
                    dialog.setIcon(mIconId);
                }
                if (mIconAttrId != 0) {
                    dialog.setIcon(dialog.getIconAttributeResId(mIconAttrId));
                }
            }
            if (mMessage != null) {
                dialog.setMessage(mMessage);
            }
            if (mPositiveButtonText != null) {
                dialog.setButton(DialogInterface.BUTTON_POSITIVE, mPositiveButtonText, mPositiveButtonListener, null);
            }
            if (mNegativeButtonText != null) {
                dialog.setButton(DialogInterface.BUTTON_NEGATIVE, mNegativeButtonText,mNegativeButtonListener, null);
            }
            if (mNeutralButtonText != null) {
                dialog.setButton(DialogInterface.BUTTON_NEUTRAL, mNeutralButtonText,mNeutralButtonListener, null);
            }
            // For a list, the client can either supply an array of items or an
            // adapter or a cursor
            if ((mItems != null) || (mCursor != null) || (mAdapter != null)) {
                createListView(dialog);
            }
            if (mView != null) {
                if (mViewSpacingSpecified) {
                    dialog.setView(mView, mViewSpacingLeft, mViewSpacingTop, mViewSpacingRight,
mViewSpacingBottom);
                } else {
                    dialog.setView(mView);
                }
            } else if (mViewLayoutResId != 0) {
                dialog.setView(mViewLayoutResId);
            }
        }
//可以发现,在这个名为应用的方法中,有如下代码
//dialog.setButton(DialogInterface.BUTTON_POSITIVE, //mPositiveButtonText, mPositiveButtonListener, null);
//而setButton方法是AlertController中定义的方法,如下:
 public void setButton(int whichButton, CharSequence text, DialogInterface.OnClickListener listener, Message msg) {
           if (msg == null && listener != null) {
            msg = mHandler.obtainMessage(whichButton, listener);
        }//如果msg不为空,并且存在听者,可以得到相对应的msg
        switch (whichButton) {
          //针对与各种不同的按钮whichButton,通过前面的调用,可以发现,
          //whichButton就是一些int数值,下面完成赋值操作
            case DialogInterface.BUTTON_POSITIVE:
                mButtonPositiveText = text;
                mButtonPositiveMessage = msg;
                break;

            case DialogInterface.BUTTON_NEGATIVE:
                mButtonNegativeText = text;
                mButtonNegativeMessage = msg;
                break;

            case DialogInterface.BUTTON_NEUTRAL:
                mButtonNeutralText = text;
                mButtonNeutralMessage = msg;
                break;

            default:
                throw new IllegalArgumentException("Button does not exist");
        }
    }
上述表示,设置完监听的底层操作,用于接下来的点击事件。
在AlertDialog类中的onCreate方法中,存在:
mAlert.installContent();
在AlertController类中找到这个方法,里面调用了,
setupView();
里面存在:
setupButtons(buttonPanel);
在这个方法中会发现:
mButtonPositive.setOnClickListener(mButtonHandler);
然后,会发现mButtonHandler参数
  private final View.OnClickListener mButtonHandler = new View.OnClickListener() {
        @Override
 public void onClick(View v) {
  final Message m;
  if (v == mButtonPositive && mButtonPositiveMessage != null) {
   m = Message.obtain(mButtonPositiveMessage);
            } else if (v == mButtonNegative && mButtonNegativeMessage != null) {
                m = Message.obtain(mButtonNegativeMessage);
            } else if (v == mButtonNeutral && mButtonNeutralMessage != null) {
                m = Message.obtain(mButtonNeutralMessage);
            } else {
                m = null;
            }
            if (m != null) {
                m.sendToTarget();
            }         mHandler.obtainMessage(ButtonHandler.MSG_DISMISS_DIALOG, mDialog).sendToTarget();
        }
    };
   //会对于前面准备的相对应的msgt进行判断,然后,要是存在的话,就会调用sendToTarget()方法。异步的方式通知Handler的handleMessage方法执行我们最开始设置的监听器中的onClick()方法。通过发送MSG_DISMISS_DIALOG消息,在Handler的handleMessage()方法中调用dismiss()方法退出dialog,这就是为什么点击按钮之后对话框无条件退出的原因。
总结:dialog的时候一般会调用setPositiveButton()方法传入我们自己的监听器,然后在create()(show会首先执行create)的时候该监听器会被赋值给dialog内部AlertParams对象的mPositiveButtonListener属性,然后该对象的apply()方法将该赋值后的mPositiveButtonListener封装在一个message对象中,
//上述是准备工作,下述是刺激事件,
在按钮被点击之后,就会获取我们先前message对象中封装的监听器,进而调用该监听器的onClick()方法执行我们在setPositiveButton()中传入的监听器逻辑,同时发送消息调用dismiss()方法让对话框消失。
解决办法:
用户输入不满意的话就通过反射修改mShowing的值为false,再手动调用dismiss(),由于mShowing为false,对话框就不会消失
 mBuilder.setPositiveButton("确定", new DialogInterface.OnClickListener() {
            @Override
            public void onClick(DialogInterface dialogInterface, int i) {
                Field field = null;
                try {
                    field = dialogInterface.getClass().getSuperclass().getSuperclass().getDeclaredField("mShowing");
                    field.setAccessible(true);
                } catch (NoSuchFieldException e) {
                    e.printStackTrace();
                }
                if (is != 3) {
                    try {
                        field.set(dialogInterface, false);
                        dialogInterface.dismiss();
                        Toast.makeText(MainActivity.this, "还不够,现在是" + is, Toast.LENGTH_SHORT).show();
                        is++;
                    } catch (IllegalAccessException e) {
                        e.printStackTrace();
                    }
                } else {
                    Toast.makeText(MainActivity.this, "还不够,现在是" + is, Toast.LENGTH_SHORT).show();
                    try {
                        field.set(dialogInterface,true);
                        dialogInterface.dismiss();
                    } catch (IllegalAccessException e) {
                        e.printStackTrace();
                    }
                }
            }
        });
        通过上述就可以不退出了
注意:
(1)setView和setContentView()两者的区别:
setView()覆盖AlertDialog的Title和Button之间的部分,而setContentView()全部覆盖。
如果不注意这点的话,很容易在使用自定义样式的时候,出现黑框。
自定义AlertDialog,建议这样用,比较简单直接
public class YinSiDialog extends AlertDialog {

    public YinSiDialog(Context context) {
        super(context);
    }


    private TextView butongyiText;
    private TextView tongyiText;
    private WebSettings webSettings;

    @Override
    protected void onCreate(Bundle savedInstanceState) {
        super.onCreate(savedInstanceState);
        setContentView(R.layout.dialog_yin_si);
      //和Activity一样用
        butongyiText = findViewById(R.id.textView_yin_si_butongyi);
        tongyiText = findViewById(R.id.textView_yin_si_tongyi);
        Window window = getWindow();
        window.setBackgroundDrawable(new ColorDrawable(Color.TRANSPARENT));//关键代码,要不然无法全部用你的背景
        //上面两句是你自定义布局展示出来的关键,没有这句话的话,你的dialog的宽度就是系统默认的,你在布局中设置的宽度,
        只是改变内容区域,
        initWebView();
        setCancelable(false);
        butongyiText.setOnClickListener(new View.OnClickListener() {
            @Override
            public void onClick(View v) {
                if (butongyiInfo != null){
                    butongyiInfo.clickBtn();
                }
                dismiss();

            }
        });

        tongyiText.setOnClickListener(new View.OnClickListener() {
            @Override
            public void onClick(View v) {
                if (tongyiInfo != null){
                    tongyiInfo.clickBtn();
                }
                dismiss();
            }
        });

    }


    //自定义接口,用来完成接口回调功能
    private InfoDialogInterface butongyiInfo;
    private InfoDialogInterface tongyiInfo;

    public void setButongyiInfo(InfoDialogInterface butongyiInfo) {
        this.butongyiInfo = butongyiInfo;
    }

    public void setTongyiInfo(InfoDialogInterface tongyiInfo) {
        this.tongyiInfo = tongyiInfo;
    }
}
ProgressDialog的使用
介绍
与AlertDialog类似,都是可以在界面上弹出一个对话框,都能够屏蔽掉其他空间爱你的交互能力。
基本使用
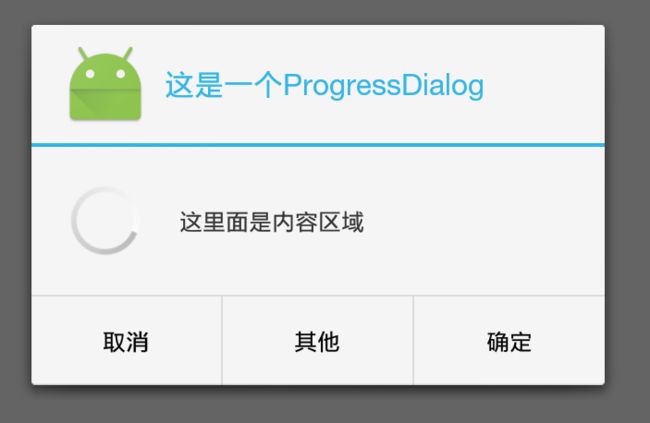
 progressDialog = new ProgressDialog(MainActivity.this);
 //这是创建方式之一,还有一种,是需要两个参数,参数二是主题,int theme;
 progressDialog.setTitle("这是一个ProgressDialog");
 //设置题目
 progressDialog.setMessage("这里面是内容区域");
 //设置内容区域
 progressDialog.setIcon(R.mipmap.ic_launcher);
 //设置Icon
 progressDialog.show();

添加按钮
与AlertDialog类似,也是提供了三个按钮的操作,一共可以有四个监听事件
progressDialog.setButton(ProgressDialog.BUTTON_NEGATIVE, "取消", new DialogInterface.OnClickListener() {
  @Override
  public void onClick(DialogInterface dialogInterface, int i) {
      Log.d("Main",""+i);//-2
     }
   });

progressDialog.setButton(ProgressDialog.BUTTON_POSITIVE, "确定", new DialogInterface.OnClickListener() {
      @Override
      public void onClick(DialogInterface dialogInterface, int i) {
           Log.d("Main",""+i);//-1
       }
        });

progressDialog.setButton(ProgressDialog.BUTTON_NEUTRAL, "其他", new DialogInterface.OnClickListener() {
   @Override
   public void onClick(DialogInterface dialogInterface, int i) {
       Log.d("Main",""+i);//-3
     }
    });
progressDialog.setOnCancelListener(new DialogInterface.OnCancelListener() {
     @Override
     public void onCancel(DialogInterface dialogInterface) {
       Log.d("Main","点击了空白区域");
        }
   });
        //上述四个动作一点,progressDialog也是消失
        //除非设置progressDialog.setCancelable(false);当然设置这个属性,表示的是
        //针对于点击空白处和回退键处无效了,那么点击三个按钮还是一样会隐藏dialog窗体
改变中间显示内容
可以根据不同的style确定不同的style
progressDialog.setProgressStyle(ProgressDialog.STYLE_HORIZONTAL);
//会展示一个条形状
progressDialog.setProgressStyle(ProgressDialog.STYLE_SPINNER);
//就是默认的,不断转圈的样式()就是图一的样式
看看ProgressDialog.SYTLE_HORIZONTAL是什么??

通过上面,你会发现,类似于下载的那个progress,
在show()方法之前,可以
 progressDialog.setIndeterminate(false);
 //这样就可以保证可以修改进度了
 在show方法之后可以调用:
 progressDialog.setProgress(10);
 //改变进度条的样式
// 通过下面方法可以改变进度条的颜色。progressDialog.setProgressDrawable(getResources().getDrawable(R.drawable.ss));

PopupWindow的使用
介绍
其实AlertDialog使用起来已经比较方便了,但是其 有一个致命的缺点,就是不能随意的设置弹出位置,当然,你也可以通过设置弹出的某些属性完成,但肯定不方便,所以PopupWindow推出使用.
创建PopupWindow
一共有四种方法创建PopUpWindow
//方法一:
public PopupWindow (Context context)
//方法二:
public PopupWindow(View contentView)
//方法三:
public PopupWindow(View contentView, int width, int height)
//方法四:
public PopupWindow(View contentView, int width, int height, boolean focusable)
---------------------
作者:启舰
来源:CSDN
原文:https://blog.csdn.net/harvic880925/article/details/49272285
版权声明:本文为博主原创文章,转载请附上博文链接!
系统提供四种方法,官产方法四,其参数最全,表明PopupWindow在使用过程中最关键的四部分
contentView 你要设置给PopupWindow使其显示的内容
width 与 height 必须设置的,要不然PopupWindow无法显示
focusable 是否可以接受点击
用法
PopupWindow popupWindow = new PopupWindow(MainActivity.this);
//填充出弹出的View
View pop_view = getLayoutInflater().inflate(R.layout.pop_up_view,null);
//设置给popupwindow
popupWindow.setContentView(pop_view);
//必须给popupwindow设置大小
popupWindow.setWidth(ViewGroup.LayoutParams.MATCH_PARENT); // 可以设置大小,也可以用这样设定
 popupWindow.setHeight(ViewGroup.LayoutParams.WRAP_CONTENT);
//进行展示
popupWindow.showAsDropDown(textView);
//展示出来,参数一是锚点,就是相对于哪一个View来展示,另外你还可以选择三个参数的该方法,
可以通过设置x,y设置偏移量
结果如图一
R.layout.pop_up_view就是设置给PopupWindow的布局,你希望展示什么,就怎么布局

你会发现挺丑的,背景还是黑色的,那么尝试给自己的布局文件:R.layout.pop_up_view ,在根哪里设置
android:background="#FFFFFF",运行效果如下图二

这样就好看多了
如果进行下面配置 popupWindow.setHeight(ViewGroup.LayoutParams.MATCH_PARENT);
效果如下:

会把下面全部填充了
另一种展示出来方式showAtLocation
   popupWindow.showAtLocation(textView,Gravity.BOTTOM,0,0);
  虽然设置给textview,但是其自动找父布局进行展示,结果如下

注意,上面的popupwindow点击外部不能取消,必须进行下面操作才可以
 //但是有一点需要注意的是,你都不能点击外部取消,所以必须进行下面的操作
popupWindow.setBackgroundDrawable(new ColorDrawable(Color.TRANSPARENT));
 //设置背景色为透明
 //如果你的布局文件设置背景颜色了,那么还是会展示布局的背景颜色,就不再是透明的了
popupWindow.setOutsideTouchable(true);
如果你的布局文件里面没有设置根背景,那么就是透明的,效果如下:

给内容区域添加点击事件
                //添加点击事件
                TextView textView = pop_view.findViewById(R.id.first_textView);
                textView.setOnClickListener(new View.OnClickListener() {
                    @Override
                    public void onClick(View v) {
                        Toast.makeText(MainActivity.this,"点击了第一个条目",Toast.LENGTH_SHORT).show();
                        popupWindow.dismiss();
                    }
                });
你会发现,添加了popupWindow.dismiss(),因为你点击了相应的控件之后,PopupWindow不会主动dismiss

给PopUpWindows添加动画
1 先定义两个动画,一个是进来动画,一个是出去动画
进来动画
出去动画
写一个主题文件
给PopUpWindows使用
        mPopupWindow.setAnimationStyle(R.style.pop_anim);
这样PopUpWindow就可以带有动画了.
给PopupWindows释放内存
可以在Activity的onDestroy中,调用:
if(popUpWindow != null ){
  popUpWindow.dismiss();
  popUpWindw = null;
  }
  这样可以避免内存的回收.
##给PopUpWinddows添加遮罩
使用PopupWindows你会发现,只是弹出一个框,但是和Dialog不一样,dialog出了内容区域都是灰色的,所以需要给popUpwindows添加遮罩,完成出了popup内容之外区域的灰色化。
   在弹出popup时候,设置当前Window的窗口的灰度,然后popup再铺在上面,完成这个效果,取消popup时候,
   也需要在重置回来:
    WindowManager.LayoutParams lp = ((Activity)context).getWindow().getAttributes();
    lp.alpha = alpha;// 0.0-1.0
    ((Activity)context).getWindow().setAttributes(lp);
此方法可以用于别的情况下的窗口灰度处理,
方法二:
针对于特殊情况,有一个当前可视区域的全屏View,
可以设置当前view的透明度来实现效果呢!