OAuth2.0系列二:OAuth2.0授权码模式
OAuth2.0授权模式
OAuth2.0支持如下四种授权模式,其中安全级别最高的是授权码模式。我们先了解一下在代码中如何简单的实现四种授权模式,下一篇在介绍关于四种授权模式的选型。
- 授权码
- 密码式
- 隐藏式
- 客户端凭证
注意:不管通过哪种授权模式获取授权,第三方应用在获取授权之前,都必须在系统备案,拿到客户端ID(Client ID)和客户端密钥(Client Secret)后再通过OAuth2.0获取令牌,这是避免令牌被滥用,只有备案的第三方应用才可以获取令牌。
jdk:1.8 开发工具:Intellij IDEA 2018.2 springboot版本:1.5.10
由于Spring Security对OAuth2.0进行了实现,所以我这里直接使用Spring-Security-OAuth2.0进行演示。
授权码模式
这种方式是最常用的也是安全性也最高的方式。授权码通过前端传送,令牌则是储存在后端,而且所有与资源服务器的通信都在后端完成。这样的前后端分离,可以避免令牌泄漏。
流程

- 用户通过浏览器向授权服务器申请授权码,附带客户端凭证等信息和跳转链接,并设置response_type为code
- 授权服务器校验通过后返回授权码并跳转到跳转链接
- 客户端拿到授权码后去授权服务器申请Access Token,授权服务器校验通过后返回Access Token
第一步,创建父级Maven工程microservice,如何使用IDEA创建Maven项目很简单,这里不说明了,直接贴一下pom文件
com.curise.microservice
    microservice-parent
    1.0-SNAPSHOT
    pom


        UTF-8
        UTF-8
        1.8
        1.5.10.RELEASE
        1.16.20


                org.springframework.boot
                spring-boot-starter-parent
                ${spring.boot.version}
                pom
                import


                org.projectlombok
                lombok
                ${lombok.version}


                org.springframework.boot
                spring-boot-maven-plugin
其中引入了spring-boot-starter-parent的pom依赖,其余没有特殊的地方。
第二步,创建microservice的Module项目authcode_server,贴一下pom文件
        microservice-parent
        com.curise.microservice
        1.0-SNAPSHOT

    4.0.0

    authcode_server
    OAuth2授权码模式


            org.springframework.boot
            spring-boot-starter-security


            org.springframework.boot
            spring-boot-starter-web


            org.springframework.security.oauth
            spring-security-oauth2


            org.projectlombok
            lombok
其中引入了spring-boot-starter-security和spring-security-oauth2依赖
第三步,创建授权服务器
@Configuration
@EnableAuthorizationServer
public class OAuth2AuthorizationServer extends AuthorizationServerConfigurerAdapter {

    @Override
    public void configure(ClientDetailsServiceConfigurer clients) throws Exception {
        clients.inMemory()
                // 客户端id
                .withClient("app")
                // 客户端密钥
                .secret("123")
                // 权限
                .scopes("read","write")
                // 获取授权码后重定向地址
                .redirectUris("http://localhost:9000/callback")
                // 授权码和刷新token
                .authorizedGrantTypes("authorization_code","refresh_token");
    }
}通过@EnableAuthorizationServer注解开启授权管理器,其中客户端信息是放在了内存中,当然生产级别肯定不能这么做,这里只是学习级别的代码。
第四步,创建资源管理器
@Configuration
@EnableResourceServer
public class OAuth2ResourceServer extends ResourceServerConfigurerAdapter {
    @Override
    public void configure(HttpSecurity http) throws Exception {
        http.authorizeRequests()
                .anyRequest()
                .authenticated()
                .and()
                .requestMatchers()
                // /api/**请求需要OAuth鉴权
                .antMatchers("/api/**");
    }
}通过@EnableResourceServer注解开启资源管理器,并设置对/api/**的请求url进行拦截需要鉴权,当前生产上一般授权管理器和资源管理器是分开的。
第五步,创建配置文件,配置端口号和Spring Security的信息
server.port=8080
security.user.name=root
security.user.password=root第六步,添加Controller
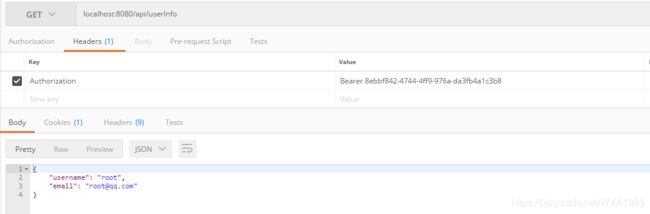
@RestController
public class UserController {

    @GetMapping("/api/userInfo")
    public ResponseEntity getUserInfo(){
        User user = (User)SecurityContextHolder.getContext().getAuthentication().getPrincipal();
        String email = user.getUsername() + "@qq.com";

        UserInfo userInfo = new UserInfo();
        userInfo.setUsername(user.getUsername());
        userInfo.setEmail(email);
        return ResponseEntity.ok(userInfo);
    }

}
第七步,启动服务,现在按照规定的流程去获取授权码和Access Token
步骤1,通过浏览器发送请求
http://localhost:8080/oauth/authorize?client_id=app&
redirect_uri=http://localhost:9000/callback&
response_type=code&
scope=read&
state=1001
其中client_id是第三方应用在授权系统中备案的client名称
redirect_uri是授权成功或失败后跳转回来的地址,localhost:9000我是没有启动服务的,只是为了拿到授权码
response_type是请求返回授权码
scope是请求的授权范围
state是自定义的信息,会跟着 redirect_uri返回。
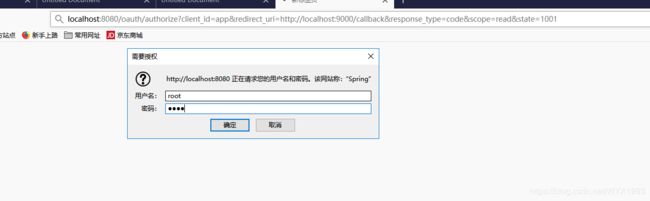
如图:这里授权服务要求输入用户名和密码,这里输入配置文件里配置的root:root

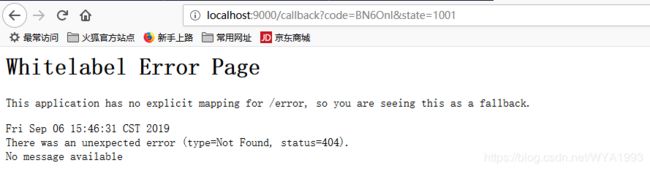
这里选择Approve并授权,页面会跳转如下地址,就可以拿到授权码了。
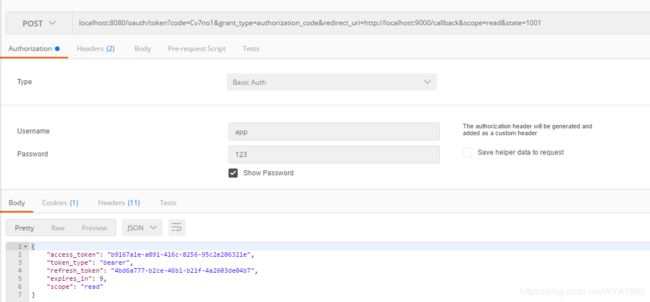
步骤2:通过授权码获取Access Token,这里使用Postman工具

![]()
Header添加Content-Type,点击发送获得了access_token就是令牌。
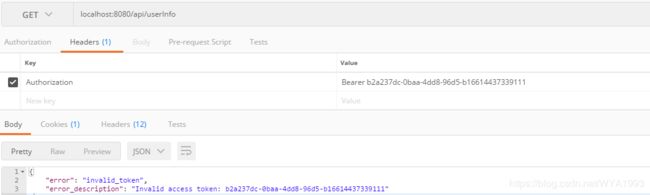
步骤3:通过令牌获取用户信息

步骤4:修改一下token,后面添加111,提示token无效
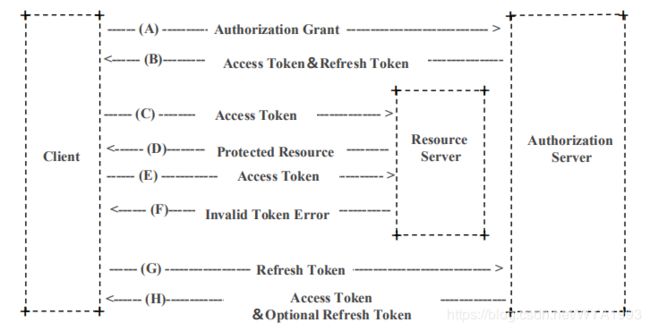
刷新令牌
令牌的有效期默认是12个小时,如果令牌到期了,提示用户再去重新走一遍流程,体验不太好,所以OAuth2.0支持刷新令牌,使用刷新令牌去申请一个新令牌。
先修改一下授权服务器的配置,把令牌有效期修改为10秒(默认12小时),刷新令牌(默认30天),同时必须配置支持refresh_token。
@Configuration
@EnableAuthorizationServer
public class OAuth2AuthorizationServer extends AuthorizationServerConfigurerAdapter {

    @Override
    public void configure(ClientDetailsServiceConfigurer clients) throws Exception {
        clients.inMemory()
                // 客户端id
                .withClient("app")
                // 客户端密钥
                .secret("123")
                // 权限
                .scopes("read","write")
                // 获取授权码后重定向地址
                .redirectUris("http://localhost:9000/callback")
                //令牌有效期秒
                .accessTokenValiditySeconds(10)
                // 刷新令牌有效期秒
                //.refreshTokenValiditySeconds(1000)
                // 授权码和刷新token
                .authorizedGrantTypes("authorization_code","refresh_token");
    }

}
启动应用,再次获取授权码和令牌

等待令牌超时后调用获取用户信息接口,提示token无效

通过发送请求去获得新的token
http://localhost:8080/oauth/token?grant_type=refresh_token&refresh_token=4bd6a777-b2ce-46b1-b21f-4a2603de04b7

再次获取用户信息
代码已经共享到GitHub,地址:https://github.com/WYA1993/microservice
参考文章和课程:
OAuth2.0标准 RFC6749
OAuth 2.0 的四种方式
OAuth2.0详解(授权模式篇)
《微服务架构实战160讲》——杨波