Android——View绘制流程
ActivityManagerService
在介绍ActivityManagerService之前,我们先简单了解一下Android Zygote系统启动过程。
在Android系统中,所有的应用程序进程和系统服务进程SystemServer都是由Zygote进程孕育(fork)出来的,因为Android系统是基于Linux内核的,而在Linux系统中,有一个init进程,他是内核启动的第一个用户级进程,也是最基本的程序之一,所有的进程都是init进程的子孙进程,也就是说,所有的进程都是直接或者间接地由init进程fork出来的。Zygote进程也不例外,它是在系统启动的过程中,由init进程创建的,在系统启动脚本system/core/rootdir/init.rc文件中,就可以看到启动Zygote进程的脚本命令。
在这个过程中会调用ZygoteInit.java的main函数,这个main函数里面会创建一个新进程来启动SystemServer组件,SystemServer的 main 函数会被执行。打开Android Studio,找到SystemServer这个类的main方法:
    /**
     * The main entry point from zygote.Zygote的主要入口
     */
    public static void main(String[] args) {
        new SystemServer().run();
    }
    private void run() {

            //设置一些系统属性
            if (!SystemProperties.get("persist.sys.language").isEmpty()) {
                final String languageTag = Locale.getDefault().toLanguageTag();

                SystemProperties.set("persist.sys.locale", languageTag);
                SystemProperties.set("persist.sys.language", "");
                SystemProperties.set("persist.sys.country", "");
                SystemProperties.set("persist.sys.localevar", "");
            }

            // Here we go!
            Slog.i(TAG, "Entered the Android system server!");
            int uptimeMillis = (int) SystemClock.elapsedRealtime();
            EventLog.writeEvent(EventLogTags.BOOT_PROGRESS_SYSTEM_RUN, uptimeMillis);

            // Prepare the main looper thread (this thread).
            android.os.Process.setThreadPriority(
                android.os.Process.THREAD_PRIORITY_FOREGROUND);
            android.os.Process.setCanSelfBackground(false);
            Looper.prepareMainLooper();    //准备MainLooper
            Looper.getMainLooper().setSlowLogThresholdMs(
                    SLOW_DISPATCH_THRESHOLD_MS, SLOW_DELIVERY_THRESHOLD_MS);

            // Initialize the system context.
            createSystemContext();

            // Create the system service manager.
            mSystemServiceManager = new SystemServiceManager(mSystemContext);
            mSystemServiceManager.setStartInfo(mRuntimeRestart,
                    mRuntimeStartElapsedTime, mRuntimeStartUptime);
            LocalServices.addService(SystemServiceManager.class, mSystemServiceManager);
            // Prepare the thread pool for init tasks that can be parallelized
            SystemServerInitThreadPool.get();
        } finally {
            traceEnd();  // InitBeforeStartServices
        }

        // Start services.
        try {
            traceBeginAndSlog("StartServices");
            startBootstrapServices();
            startCoreServices();
            startOtherServices();
            SystemServerInitThreadPool.shutdown();
        }

        // Loop forever.
        Looper.loop();
        throw new RuntimeException("Main thread loop unexpectedly exited");
    }
SystemServer的run方法中主要做了5件事:
1、初始化一些系统属性;
2、准备MainLooper;
3、初始化system context对象;
4、创建system server manager;
5、调用startBootstrapServices(),startCoreServices(),startOtherServices()启动各种service,包括ActivityManagerService,PowerManagerService,DisplayManagerService,PackageManagerService,WindowManagerService...等。
其中ActivityManagerService(AMS)是Android中最核心的服务,主要负责系统中四大组件的启动、切换、调度及应用程序的管理和调度等工作。
AMS通信结构如下图所示:
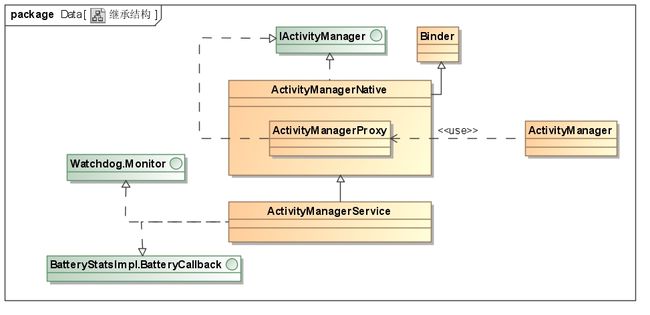
1、AMS继承自ActivityManagerNative(AMN),并实现了Watchdog.Monitor和BatteryStatsImpl.BatteryCallback接口。
2、AMN继承Java的Binder类,同时实现了IActivityManager接口,即AMN将作为Binder通信的服务端为用户提供支持。
3、在ActivityManagerNative类中定义了内部类ActivityManagerProxy,该类同样实现了IActivityManager接口,将作为客户端使用的服务端代理。
4、其它进程将使用ActivityManager来使用AMS的服务。ActivityManager通过AMN提供的getDefault接口得到ActivityManagerProxy,然后再以Binder通信的方式调用AMS的接口。
接下来简单分析一下AMS的启动过程:
1、在SystemServer开启ActivityServiceManager之后,SystemServer进程就创建出自己的Android运行环境。
在这一部分,SystemServer进程主要创建出对应的 ActivityThread 和 ContextImpl ,它们是Android运行环境的重要部分。
AMS的后续工作依赖于SystemServer在此创建出的运行环境。
2、完成AMS的初始化和启动。
在这一部分,单纯地调用AMS的构造函数和start函数,完成AMS的一些初始化工作。
3、将SystemServer进程纳入到AMS的管理体系中。
AMS作为Java世界的进程管理和调度中心,要对所有Java进程一视同仁,SystemServer可以看做一个特殊的应用进程,因此SystemServer进程也必须被AMS管理。
4、开始执行 AMS 启动完毕后才能进行的工作。
系统中的一些服务和进程,必须等待AMS完成启动后,才能展开后续工作。
在这一部分,AMS通过调用 systemReady 函数,通知系统中的其它服务和进程,可以进行对应工作了。
在这个过程中,值得我们关注的是:Home Activity被启动了。当该Activity被加载完成后,最终会触发ACTION_BOOT_COMPLETED广播。
AMS的启动流程大致就是这样,不止SystemServer需要被AMS管理,我们的应用进程也需要被AMS管理。
好了,我们知道了AMS的大致启动流程,开始看我们的应用进程的绘制流程的入口。
在介绍绘制流程前,先看几个类:
ActivityThread:首先我们要知道ActivityThread是Android Framework中一个非常重要的类,它代表一个应用进程的主线程,其职责就是调度及执行在该线程中运行的四大组件。SystemServer中也运行着一些系统APK,例如framework-res.apk、SettingsProvider.apk等,因此也可以认为SystemServer是一个特殊的应用进程。
ApplicationThread:ApplicationThread是ActivityThread的内部类,ActivityThread的成员变量中也包含ApplicationThread对象,它作为AMS与应用进程Binder通信的服务端。AMS通过ApplicationThreadNative获取应用进程对应的ApplicationThreadProxy对象。通过ApplicationThreadProxy对象,将调用信息通过Binder传递到ActivityThread中的ApplicationThread。
Let's start!
ActivityThread的main函数是应用程序的入口,main方法中做了一些初始化工作:
1、初始化looper 2、初始化ActivityThread 3、ApplicationThread和AMS建立联系 4、开启Looper循环
我们已经知道,ApplicationThread 是接收 AMS 的消息然后通知应用程序执行组件相关操作的,那么我们看一下ApplicationThread 类:
private class ApplicationThread extends IApplicationThread.Stub {

    //通知相应的进程执行启动Activity的操作
    public final void scheduleLaunchActivity(Intent intent, IBinder token, int ident,
            ActivityInfo info, Configuration curConfig, Configuration overrideConfig,
            CompatibilityInfo compatInfo, String referrer, IVoiceInteractor voiceInteractor,
            int procState, Bundle state, PersistableBundle persistentState,
            List pendingResults, List pendingNewIntents,
            boolean notResumed, boolean isForward, ProfilerInfo profilerInfo) {

        sendMessage(H.LAUNCH_ACTIVITY, r);
    }
    public final void scheduleResumeActivity(IBinder token, int processState,
            boolean isForward, Bundle resumeArgs) {

        sendMessage(H.RESUME_ACTIVITY, token, isForward ? 1 : 0, 0, seq);
    }
    //.....

}
当Activity启动时会先调用到 scheduleLaunchActivity() 方法,由 Handler 发送通知消息后执行 handleLaunchActivity()->performLaunchActivity()->callActivityOnCreate()->Activity.onCreate()。
private class H extends Handler {
    public void handleMessage(Message msg) {
        switch (msg.what) {
            case LAUNCH_ACTIVITY: {
                Trace.traceBegin(Trace.TRACE_TAG_ACTIVITY_MANAGER, "activityStart");
                final ActivityClientRecord r = (ActivityClientRecord) msg.obj;

                r.packageInfo = getPackageInfoNoCheck(
                        r.activityInfo.applicationInfo, r.compatInfo);
                //该方法中会执行Activity的onCreate()方法。
                handleLaunchActivity(r, null, "LAUNCH_ACTIVITY");
                Trace.traceEnd(Trace.TRACE_TAG_ACTIVITY_MANAGER);
            } break;
            //onResume();
             case RESUME_ACTIVITY:
                Trace.traceBegin(Trace.TRACE_TAG_ACTIVITY_MANAGER, "activityResume");
                SomeArgs args = (SomeArgs) msg.obj;
                handleResumeActivity((IBinder) args.arg1, true, args.argi1 != 0, true,
                        args.argi3, "RESUME_ACTIVITY");
                Trace.traceEnd(Trace.TRACE_TAG_ACTIVITY_MANAGER);
                break;
        }
    }
}

final void handleResumeActivity(IBinder token,
            boolean clearHide, boolean isForward, boolean reallyResume, int seq, String reason) {
        ActivityClientRecord r = mActivities.get(token);

    //.............

    //执行onResume()方法
    r = performResumeActivity(token, clearHide, reason);

     if (r != null) {
        final Activity a = r.activity;
         if (r.window == null && !a.mFinished && willBeVisible) {
                r.window = r.activity.getWindow();
                View decor = r.window.getDecorView();
                decor.setVisibility(View.INVISIBLE);
                ViewManager wm = a.getWindowManager();
                //获取window的layoutparams,之后赋予decorview
                WindowManager.LayoutParams l = r.window.getAttributes();
                a.mDecor = decor;

            if (a.mVisibleFromClient) {
                if (!a.mWindowAdded) {
                    a.mWindowAdded = true;
                    //将DecorView添加到Window上,参数是decorview和layoutparams
                    wm.addView(decor, l);
            }
        }
    //说法二:执行makeVisible()来添加View,但也是添加到Window里和上面一样的操作。清楚的小伙伴可以告诉我下。
    if (r.activity.mVisibleFromClient) {
            r.activity.makeVisible();
        }
    }
}
在 handleResumeActivity() 方法中,先调用了 Activity.onResume() 方法,在执行 WindowManager 的 addView() 方法将Activity的顶级View(即DecorView) 添加到Activity中,然后才开始绘制流程。这就解释了为什么初次在 onResume() 方法中获取不到 View 的宽高。
WindowManager 的实现类为 WindowManagerImpl ,它的 addView 方法又会调用 WindowManagerGlobal 的 addView 方法:
 public void addView(View view, ViewGroup.LayoutParams params,
            Display display, Window parentWindow) {
    ······
    //转化为WindowManager.LayoutParams
    final WindowManager.LayoutParams wparams = (WindowManager.LayoutParams) params;
    //创建ViewRootImpl对象
    root = new ViewRootImpl(view.getContext(), display);
    //为decorView设置LayoutParams
    view.setLayoutParams(wparams);

    mViews.add(view);
    mRoots.add(root);
    mParams.add(wparams);
    //即将开始流程绘制
    //将root和DecorView绑定起来,绘制流程也将由root来执行
    root.setView(view, wparams, panelParentView);
    ·······
}
ViewRootImpl:ViewRoot 的实现类,它是连接 WindowManager 和 DecorView 的纽带,其成员对象 mView 就是 activity 的decorView,View 的三大流程均是通过 ViewRoot 来完成的。
DecorView:它是 Activity 窗口的根视图(顶级View),是个 FrameLayout ,一般情况下它内部会包含一个竖直方向的LinearLayout ,这个 LinearLayout 分为上下两部分,即标题栏和内容栏(FrameLayout),我们的 setContentView 所设置的布局就是被加到内容栏之中,而内容的 id 是 content,所以叫 setContentView。
这里创建 ViewRootImpl 对象,并调用 setView() 方法设置 decorView。
root 的 setView 方法绘执行 requestLayout 方法,requestLayout 会异步执行 performTraversals 方法:
private void performTraversals() {

    //计算DecorView的MeasureSpec
    //这里的lp就是在addView添加decorView的时候传入的decorView的LayoutParams
    //mWidth是窗口的宽度,mHeight是窗口的高度
    int childWidthMeasureSpec = getRootMeasureSpec(mWidth, lp.width);
    int childHeightMeasureSpec = getRootMeasureSpec(mHeight, lp.height);

    performMeasure(childWidthMeasureSpec, childHeightMeasureSpec);

    performLayout(lp, mWidth, mHeight);

    performDraw();
}
在这里我们看到了View绘制的三大流程,依次是 performMeasure->performLayout->performDraw,在接下来分析这个过程是怎么回事。
measure
performMeasure 中会调用 measure 方法,measure 方法中又会调用 onMeasure 方法,onMeasure 方法中则会对所有的子元素进行 measure 过程,这时候 measure 就从父容器传递到子元素中了。
首先我们了解一下 MeasureSpec:MeasureSpec 是由父 View 的 MeaureSpec 和子View的 LayoutParams 通过简单的计算得出的一个针对 子View 的测量要求,是由 父View 的 MeaureSpec 和 子View 的 LayoutParams 共同决定的。它是一个32位的 int 类型,高二位代表 SpecMode,低30位代表 SpecSize。SpecMode代表测量模式,SpecSize代表测量的大小。它通过将SpecMode 和 SpecSize 打包成一个 int 值来避免过多的对象内存分配。
SpecMode有三种:
UNSPECIFIED:父容器不对View有限制,即可以超出父容器给的大小,要多大给多大,这种情况我们很少用到,一般用于系统内部,表示一种测量状态。
EXACTLY:父容器已经检测出View所需要的精确大小,这个时候View的最终大小就是SpecSize所指定的值。它对应于LayoutParams中的match_parent和具体的数值这两种模式。
AT_MOST:父容器指定了一个可用大小即 SpecSize,View的大小不能超过这个值,具体是多大要看不同View的具体实现。它对应于 LayoutParams 中的 wrap_content。
那么问题来了,MeasureSpec是用来干什么的呢?它由什么决定呢?(〃>皿<)
首先,MeasureSpec参与了View的measure过程,它决定了一个View的尺寸规格。对于普通View,其MeasureSpec是由其父容器的MeasureSpec和自身的LayoutParams来共同决定。对于DecorView,由于它是Activity的顶级View,所以它的MeasureSpec由窗口的尺寸和自身的LayoutParams来共同确定。
(View的LayoutParams其实就是我们在xml中设置的layout_width,layout_height转化而来的,还有其他比如padding,margin)
那计算过程是怎么样的呢?(〃>皿<)
其实计算的过程和我们平常在xml布局的时候用的思维是一样的,或者说我们布局时候的思维就是由它促成的。打个比方:
比如我们xml中的根布局是个垂直的LinearLayout,我们设置它的宽度是400,然后我们在LinearLayout中加一个子元素A,它的宽度是MATCH_PARENT,那么按照我们平常写xml布局时的思维,子元素A的宽度是多少?^_^
很多人想都不用想,反手就是一个400!没错,就是400。因为父元素的宽度固定是400,子元素的宽度又是MATCH_PARENT(填充满父容器),所以也是400嘛。这是我们平常写xml时的常用的思维,其实源码里面的计算也差不多是这个思维。
我们再从源码的角度分析这个情况,LinearLayout的MeasureSpec由它的父容器DecorView和自身共同确定,这里假设LinearLayout的MeasuresPec是模式为EXACTLY,大小为400,子元素A的LayoutParams中宽度是MATCH_PARENT,根据这两个条件计算出子元素A的LayoutParams是模式为EXACTLY,大小为400。
这里先大概理解一下,后面其他情况看的时候就容易理解一些。
1)DecorView的MeasureSpec产生过程
measure流程开始执行之前,会先计算出DecorView(即顶级View)的 MeasureSpec,前面说过 DecorView 的 MeasureSpec由窗口的尺寸和自身的 LayoutParams 来共同确定。performTraversals 方法调用了 measureHierarchy,
private void performTraversals() {
    ...
    //可以从属性名称看出screenWidthDp就是屏幕的宽度
    //screenWidthDp就是屏幕的高度
    desiredWindowWidth = dipToPx(config.screenWidthDp);
    desiredWindowHeight = dipToPx(config.screenHeightDp);

    windowSizeMayChange |= measureHierarchy(host, lp, res,
                    desiredWindowWidth, desiredWindowHeight);
}
measureHierarchy方法的参数 desiredWindowWidth 和 desiredWindowHeight 就是屏幕的宽和高,lp 就是decorView 的 LayoutPrams 。在这个方法中对 decorView 的 MeasureSpec 进行了计算 ,有如下代码:
    private boolean measureHierarchy(final View host, final WindowManager.LayoutParams lp,
            final Resources res, final int desiredWindowWidth, final int desiredWindowHeight) {
    //计算DecorView的MeasureSpec
    //这里的lp就是在addView添加decorView的时候传入的decorView的LayoutParams
    //mWidth是屏幕的宽度,mHeight是屏幕的高度
    childWidthMeasureSpec = getRootMeasureSpec(desiredWindowWidth, lp.width);
    childHeightMeasureSpec = getRootMeasureSpec(desiredWindowHeight, lp.height);
    performMeasure(childWidthMeasureSpec, childHeightMeasureSpec);
    }
    private void performMeasure(int childWidthMeasureSpec, int childHeightMeasureSpec) {
        if (mView == null) {
            return;
        }
        Trace.traceBegin(Trace.TRACE_TAG_VIEW, "measure");
        try {
            //调用decorView的measure方法,开始整个View树的测量
            mView.measure(childWidthMeasureSpec, childHeightMeasureSpec);
        } finally {
            Trace.traceEnd(Trace.TRACE_TAG_VIEW);
        }
    }
注释写的很清楚,decorView 的 MeasureSpec 由屏幕的宽高和自身的LayoutParams共同确定。再看一下 getRootMeasureSpec方法的实现,此处的 mWidth 和 mHeight 为屏幕宽度,LayoutParams 都是 match_parent:
    private static int getRootMeasureSpec(int windowSize, int rootDimension) {
        int measureSpec;
        switch (rootDimension) {

        case ViewGroup.LayoutParams.MATCH_PARENT:
            // Window can't resize. Force root view to be windowSize.
            measureSpec = MeasureSpec.makeMeasureSpec(windowSize, MeasureSpec.EXACTLY);
            break;
        case ViewGroup.LayoutParams.WRAP_CONTENT:
            // Window can resize. Set max size for root view.
            measureSpec = MeasureSpec.makeMeasureSpec(windowSize, MeasureSpec.AT_MOST);
            break;
        default:
            // Window wants to be an exact size. Force root view to be that size.
            measureSpec = MeasureSpec.makeMeasureSpec(rootDimension, MeasureSpec.EXACTLY);
            break;
        }
        return measureSpec;
    }
通过上述代码,DecorView 的 MeasureSpec 的产生过程就和明确了,这里以宽度为例:
1.如果DecorView的LayoutParams宽度是MATCH_PARENT,那就代表宽度充满窗口,窗口宽度又是一个固定的值,所以是精确模式EXACTLY,尺寸是窗口大小。
2.如果DecorView的LayoutParams宽度是WRAP_CONTENT,代表content(即包含的内容) 多大,宽度就多大,但是content 只有在调用了decorView的measure()方法的时候,才能测出content 的大小,现在内容还不确定,所以decorView宽度也无法确定,所以模式不可能是确定模式EXACTLY,那只能是最大模式AT_MOST,尺寸暂定为窗口的大小,表示decorView的大小还不确定,但是decorView不能超过这个值。
3.如果DecorView的LayoutParams宽度是一个固定值,比如100dp,既然已经确定,那就是精确模式EXACTLY,尺寸是100dp。
以上就是DecorView的MeasureSpec的产生过程,计算出DecorView的MeasureSpec后,执行DecorView的measure()方法开始整个View树的测量,measure方法中会调用onMeasure()方法,decorView 继承自 FrameLayout,decorView 的 onMeasure()方法又会调用 FrameLayout 的 onMeasure() 方法,FrameLayout 的 onMeasure() 方法中会遍历每个 子View。
测量完所有的子View后,最终调用setMeasuredDimension方法确定自己的宽高!
2)ViewGroup的measure过程

ViewGroup的measure过程会先遍历并测量每个子View,等子View测量结束了,再确定自己的宽高。
ViewGroup 的子View 的measure过程由ViewGroup 传递而来,子View 的MeasureSpec 也同样由ViewGroup计算并传递下来,ViewGroup是一个抽象类,其测量过程的 onMeasure 方法需要各个子类去具体实现,比如LinearLayout、RelativeLayout等,不同的ViewGroup子类有不同的布局特性,测量细节各不相同,ViewGroup无法做统一实现,有兴趣的可以去看看他们的具体实现,这里就不赘述了。但是我们要关注一点,ViewGroup的measureChildWithMargins()就是用来测量子View的,我们先来看一下ViewGroup的measureChildWithMargins方法:
    protected void measureChildWithMargins(View child,
            int parentWidthMeasureSpec, int widthUsed,
            int parentHeightMeasureSpec, int heightUsed) {
        //获得子View的Layoutparams
        final MarginLayoutParams lp = (MarginLayoutParams) child.getLayoutParams();
        //通过自身的MeasureSpec和子View的LayoutParams计算子View的MeasureSpe
        //计算宽度的MeasureSpec
        final int childWidthMeasureSpec = getChildMeasureSpec(parentWidthMeasureSpec,
                mPaddingLeft + mPaddingRight + lp.leftMargin + lp.rightMargin
                        + widthUsed, lp.width);
        //计算高度的MeasureSpec
        final int childHeightMeasureSpec = getChildMeasureSpec(parentHeightMeasureSpec,
                mPaddingTop + mPaddingBottom + lp.topMargin + lp.bottomMargin
                        + heightUsed, lp.height);
        //调用子View的measure方法
        child.measure(childWidthMeasureSpec, childHeightMeasureSpec);
    }
方法名很明确了,测量子元素,且测量过程和子元素的margin及父容器的padding有关。代码也简单明了,获取子元素的MarginLayoutParams,因为和View的margin有关,所以需要进行类型转化。然后通过getChildMeasureSpec方法,传入ViewGroup的MeasureSpec和子元素的LayoutParams,那第二个参数是什么?是ViewGroup的padding和子元素的margin的和,之后会减去这部分,因为我们写xml时都知道它是外边距和内边距,是不可用的。
我们看一下getChildMeasureSpec方法:
public static int getChildMeasureSpec(int spec, int padding, int childDimension) {
        int specMode = MeasureSpec.getMode(spec);
        int specSize = MeasureSpec.getSize(spec);

        //减去父容器的内边距和子元素的外边距
        int size = Math.max(0, specSize - padding);

        int resultSize = 0;
        int resultMode = 0;

        switch (specMode) {
        // Parent has imposed an exact size on us
        case MeasureSpec.EXACTLY:
            if (childDimension >= 0) {
                resultSize = childDimension;
                resultMode = MeasureSpec.EXACTLY;
            } else if (childDimension == LayoutParams.MATCH_PARENT) {
                // Child wants to be our size. So be it.
                resultSize = size;
                resultMode = MeasureSpec.EXACTLY;
            } else if (childDimension == LayoutParams.WRAP_CONTENT) {
                // Child wants to determine its own size. It can't be
                // bigger than us.
                resultSize = size;
                resultMode = MeasureSpec.AT_MOST;
            }
            break;

        // Parent has imposed a maximum size on us
        case MeasureSpec.AT_MOST:
            if (childDimension >= 0) {
                // Child wants a specific size... so be it
                resultSize = childDimension;
                resultMode = MeasureSpec.EXACTLY;
            } else if (childDimension == LayoutParams.MATCH_PARENT) {
                // Child wants to be our size, but our size is not fixed.
                // Constrain child to not be bigger than us.
                resultSize = size;
                resultMode = MeasureSpec.AT_MOST;
            } else if (childDimension == LayoutParams.WRAP_CONTENT) {
                // Child wants to determine its own size. It can't be
                // bigger than us.
                resultSize = size;
                resultMode = MeasureSpec.AT_MOST;
            }
            break;

        // Parent asked to see how big we want to be
        case MeasureSpec.UNSPECIFIED:
            if (childDimension >= 0) {
                // Child wants a specific size... let him have it
                resultSize = childDimension;
                resultMode = MeasureSpec.EXACTLY;
            } else if (childDimension == LayoutParams.MATCH_PARENT) {
                // Child wants to be our size... find out how big it should
                // be
                resultSize = View.sUseZeroUnspecifiedMeasureSpec ? 0 : size;
                resultMode = MeasureSpec.UNSPECIFIED;
            } else if (childDimension == LayoutParams.WRAP_CONTENT) {
                // Child wants to determine its own size.... find out how
                // big it should be
                resultSize = View.sUseZeroUnspecifiedMeasureSpec ? 0 : size;
                resultMode = MeasureSpec.UNSPECIFIED;
            }
            break;
        }
        //noinspection ResourceType
        return MeasureSpec.makeMeasureSpec(resultSize, resultMode);
    }
上述方法的注释很明确,根据父容器的MeasureSpec和子元素本身的LayoutParams来确定子元素的MeasureSpec,除了一些很少接触的,大部分可以用我们平时写xml布局时的思维来理解,这里我们拿其中一个来讲:
如果父View的MeasureSpec是EXACTLY,说明父View的大小是确切的,(确切的意思很好理解,如果一个View的MeasureSpec 的mode是EXACTLY,那么它的size是多大,最后展示到屏幕就一定是那么大)。
如果子View 的layout_xxxx是WRAP_CONTENT,也就是子View的大小是根据自己的content 来决定的,但是子View的毕竟是子View,大小不能超过父View的大小,但是子View的是WRAP_CONTENT,我们还不知道具体子View的大小是多少,要等到child.measure(childWidthMeasureSpec, childHeightMeasureSpec) 调用的时候才去真正测量子View 自己content的大小(比如TextView wrap_content 的时候你要测量TextView content 的大小,也就是字符占用的大小,这个测量就是在child.measure(childWidthMeasureSpec, childHeightMeasureSpec)的时候,才能测出字符占用的大小)。通过上述描述,子View MeasureSpec mode的应该是AT_MOST,而size 暂定父View的 size,表示的意思就是子View的大小没有确切的值,子View的大小最大为父View的大小,不能超过父View的大小(这就是AT_MOST 的意思),然后这个MeasureSpec 做为子View measure方法 的参数,做为子View的大小的约束或者说是要求,有了这个MeasureSpec子View再实现自己的测量。
注意在方法前面,specSize减去了参数padding,因为参数padding包含父容器的padding和子元素的margin,是不可用的。
        int specMode = MeasureSpec.getMode(spec);
        int specSize = MeasureSpec.getSize(spec);

        //减去父容器的内边距和子元素的外边距
        int size = Math.max(0, specSize - padding);
getChildMeasureSpec明确了子View的MeasureSpec的创建规则,
ViewGroup在所有子View的measure流程都执行结束后,会调用setMeasureDimension()方法给自己设置宽高!
3)View的measure过程
由于measure()方法时final类型的,这意味着子类不能重写此方法,从ViewGroup 的 measure过程我们可以知道,ViewGroup会调用View 的 measure 方法,并传入计算好的MeasureSpec,我们看一下View 的 measure 方法:
public final void measure(int widthMeasureSpec, int heightMeasureSpec) {
        ...
        int cacheIndex = forceLayout ? -1 : mMeasureCache.indexOfKey(key);
        if (cacheIndex < 0 || sIgnoreMeasureCache) {
            // measure ourselves, this should set the measured dimension flag back
            onMeasure(widthMeasureSpec, heightMeasureSpec);
            mPrivateFlags3 &= ~PFLAG3_MEASURE_NEEDED_BEFORE_LAYOUT;
        }
}
可以看到,最终会用ViewGroup传来MeasureSpec调用onMeasured 方法,因此我们只要看onMeasure方法即可:
    protected void onMeasure(int widthMeasureSpec, int heightMeasureSpec) {
        setMeasuredDimension(getDefaultSize(getSuggestedMinimumWidth(), widthMeasureSpec),
                getDefaultSize(getSuggestedMinimumHeight(), heightMeasureSpec));
    }
先看getDefaultSize 这个方法:
    public static int getDefaultSize(int size, int measureSpec) {
        int result = size;
        int specMode = MeasureSpec.getMode(measureSpec);
        int specSize = MeasureSpec.getSize(measureSpec);

        switch (specMode) {
        case MeasureSpec.UNSPECIFIED:
            result = size;
            break;
        case MeasureSpec.AT_MOST:
        case MeasureSpec.EXACTLY:
            result = specSize;
            break;
        }
        return result;
    }
MeasureSpec 中的 mode 是 AT_MOST 和 EXACTLY 两种情况下,返回的大小就是 measureSpec中的 specSize,而这个specSize就是View测量后的大小,这里提到测量后的大小,是measure阶段得到的大小,View最终的大小是在layout阶段确定的,这里要加以区分,但是几乎所有情况下View的测量大小和最终大小是相等的。
UNSPECIFIED这种情况一般用与系统内部的测量过程,这种情况下,View的大小为 getDefaultSize 的第一个参数 size,即宽/高分别为 getSuggestedMinimumWidth 和 getSuggestedMinimumHeight 的返回值,
    protected int getSuggestedMinimumHeight() {
        return (mBackground == null) ? mMinHeight : max(mMinHeight, mBackground.getMinimumHeight());

    }
    protected int getSuggestedMinimumWidth() {
        return (mBackground == null) ? mMinWidth : max(mMinWidth, mBackground.getMinimumWidth());
    }
这里只分析getSuggestedMinimumWidth方法,另外一个原理是一样的。从代码上看,如果View没有设置背景,那么View的宽度为mMinWidth,mMinWidth 对应于 android:minWidth 这个属性指定的值,默认为0;如果View指定了背景,则 View 的宽度为max(mMinWidth,mBackground.getMinimumWidth)。那mBackground.getMinimumWidth是什么?
我们看到Drawable的getMinimumWidth方法:
    public int getMinimumWidth() {
        final int intrinsicWidth = getIntrinsicWidth();
        return intrinsicWidth > 0 ? intrinsicWidth : 0;
    }
getIntrinsicWidth()方法,从方法名看起来是返回图片的固有宽度,但是其实返回值和设备的dpi有关,返回的是图片被系统拉伸后的大小。比如如果你把图片放在drawable-mdpi中,然后在240dpi即hdpi(density = 240/160)的机子上测试,系统会自动以1.5的倍数拉伸图片,因为你的图片在mdpi中显示正常,但是在像素密度更高的hdpi中会显得比较小,所以系统会对图片进行拉伸,当你调用getIntrinsicWidth()方法的时候返回的就是图片被拉伸后的大小,比如图片是高度是1920,那么getIntrinsicWidth()返回1920 * 1.5 = 2880,如果将图片放在hdpi中就不会被拉伸。还有一点,ShapeDrawable的 getIntrinsicWidth() 放回0。
所以getSuggestedMinimumWidth:如果View没有设置背景,返回android:minWidth 这个属性的值,默认是0;如果View设置了背景,则返回 android:minWidth 和 背景图片getIntrinsicWidth()值 这两者的最大值。
当 View 的 MeasureSpec 的 mode 是 UNSPECIFIED 情况下,宽高就是 getSuggestedMinimumWidth 和getSuggestedMinimumHeight 的值。
从 getDefaultSize 方法来看,View 的宽高由 specSize 决定,这里有一点注意:当我们直接继承 View 的自定义控件时,需要重写 onMeasure 方法并设置 wrap_content 时的自身大小,否则在布局中使用 wrap_content 就相当于使用 match_parent 。因为如果在布局中使用 wrap_content ,在计算MeasureSpec 的时候,specMode 是 AT_MOST 模式,specSize 就是父容器的大小,而在 getDefaultSize 中,对应 AT_MOST 模式,View 的宽高就是 specSize 。TextView、ImageView等的源码中就针对wrap_content做了处理。
layout
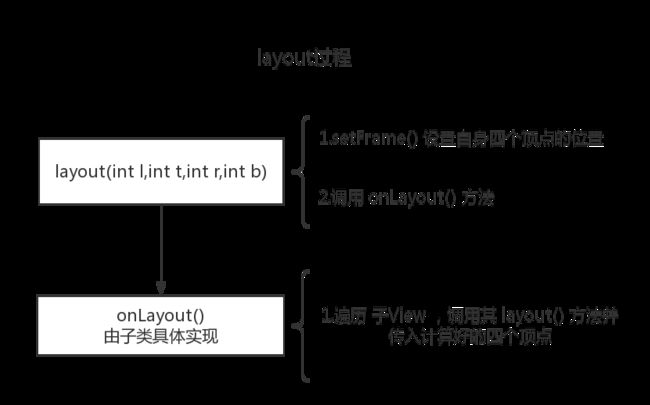
Layout 的作用是 ViewGroup 用来确定子元素的位置,当 ViewGroup 的位置被确定后,它在 onLayout 中会遍历所有的子元素并调用其 layout 方法,在 layout 方法中 onLayout 方法又会被调用。layout 方法确定 View 本身的位置,而 onLayout 方法则会确定所有子元素的位置,先看 View 的 layout 方法:
    public void layout(int l, int t, int r, int b) {
        if ((mPrivateFlags3 & PFLAG3_MEASURE_NEEDED_BEFORE_LAYOUT) != 0) {
            onMeasure(mOldWidthMeasureSpec, mOldHeightMeasureSpec);
            mPrivateFlags3 &= ~PFLAG3_MEASURE_NEEDED_BEFORE_LAYOUT;
        }

        int oldL = mLeft;
        int oldT = mTop;
        int oldB = mBottom;
        int oldR = mRight;

        boolean changed = isLayoutModeOptical(mParent) ?
                setOpticalFrame(l, t, r, b) : setFrame(l, t, r, b);

        if (changed || (mPrivateFlags & PFLAG_LAYOUT_REQUIRED) == PFLAG_LAYOUT_REQUIRED) {
            onLayout(changed, l, t, r, b);

            mPrivateFlags &= ~PFLAG_LAYOUT_REQUIRED;

            ListenerInfo li = mListenerInfo;
            if (li != null && li.mOnLayoutChangeListeners != null) {
                ArrayList listenersCopy =
                        (ArrayList)li.mOnLayoutChangeListeners.clone();
                int numListeners = listenersCopy.size();
                for (int i = 0; i < numListeners; ++i) {
                    listenersCopy.get(i).onLayoutChange(this, l, t, r, b, oldL, oldT, oldR, oldB);
                }
            }
        }
        mPrivateFlags &= ~PFLAG_FORCE_LAYOUT;
        mPrivateFlags3 |= PFLAG3_IS_LAID_OUT;
    }
四个参数均是由 父容器计算并传递下来的,首先调用 setFrame 方法来设定 View 的四个顶点的位置,
    protected boolean setFrame(int left, int top, int right, int bottom) {
            mLeft = left;
            mTop = top;
            mRight = right;
            mBottom = bottom;
            mRenderNode.setLeftTopRightBottom(mLeft, mTop, mRight, mBottom);

            if (sizeChanged) {
                sizeChange(newWidth, newHeight, oldWidth, oldHeight);
            }

            return changed;
    }
初始化 mLeft、mRight、mTop和mBottom这四个值,View 的四个顶点一旦确定,那么 View 在父容器中的位置也就确定了;我们平常调用的getWidth()、getHeight()等方法就是通过这四个参数计算而来的:
    public final int getWidth() {
        return mRight - mLeft;
    }

    public final int getHeight() {
        return mBottom - mTop;
    }
上面两个方法和getMeasuredWidth() 和 getMeasuredHeight() 有点区别!
测量宽高:getMeasuredWidth() 和 getMeasuredHeight() 方法是在 View 测量完成即 measure 过程完成后才能获取到;
最终宽高: getWidth() 和 getHeight() 则是在 layout 过程完成后才能得到。
两者的赋值时机不同。
setFrame() 后,接着会调用 onLayout 方法,这个方法的用途是父容器确定子元素的位置,和 onMeasure 方法类似,onLayout 的具体实现和具体的布局有关,所以 View 和 ViewGroup 均没有真正实现 onLayout 方法。这里我们看一下 LinearLayout 的 onLayout 方法:
    protected void onLayout(boolean changed, int l, int t, int r, int b) {
        if (mOrientation == VERTICAL) {
            layoutVertical(l, t, r, b);
        } else {
            layoutHorizontal(l, t, r, b);
        }
    }
这里只看一下 layoutVertical 方法:
    void layoutVertical(int left, int top, int right, int bottom) {
        final int paddingLeft = mPaddingLeft;

        int childTop;
        int childLeft;

        // Where right end of child should go
        final int width = right - left;
        int childRight = width - mPaddingRight;

        // Space available for child
        int childSpace = width - paddingLeft - mPaddingRight;

        final int count = getVirtualChildCount();

        final int majorGravity = mGravity & Gravity.VERTICAL_GRAVITY_MASK;
        final int minorGravity = mGravity & Gravity.RELATIVE_HORIZONTAL_GRAVITY_MASK;

        for (int i = 0; i < count; i++) {
            final View child = getVirtualChildAt(i);
            if (child == null) {
                childTop += measureNullChild(i);
            } else if (child.getVisibility() != GONE) {
                //获取子元素的测量宽高
                final int childWidth = child.getMeasuredWidth();
                final int childHeight = child.getMeasuredHeight();
                //获取子元素的LayoutParams
                final LinearLayout.LayoutParams lp =
                        (LinearLayout.LayoutParams) child.getLayoutParams();
                ...

                childTop += lp.topMargin;
                setChildFrame(child, childLeft, childTop + getLocationOffset(child),
                        childWidth, childHeight);
                childTop += childHeight + lp.bottomMargin + getNextLocationOffset(child);

                i += getChildrenSkipCount(child, i);
            }
        }
    }
layoutVertical中会遍历所有子元素并调用 setChildFrame 方法来为子元素指定位置,其中 childTop 会逐渐增大,后面的子元素的位置逐渐往下,符合竖直方向的 LinearLayout 的特性。其中 getMeasuredWidth 和 getMeasuredHeight 就是获取View在 measure 阶段 测量出来的宽高 ,setChildFrame方法则调用child 的 layout 方法,传入计算好的坐标。
    private void setChildFrame(View child, int left, int top, int width, int height) {
        child.layout(left, top, left + width, top + height);
    }
draw
Draw过程的作用是将View绘制到屏幕上,步骤如下:
1)绘制背景 background.draw(canvas).
2)保存画图的图层,准备用于绘制View 在滑动时的边框渐变效果
3)绘制自己 (onDraw)
4)绘制children(dispatchDraw)
5)绘制 View 在滑动时的边框渐变效果
6)绘制装饰(onDrawScrollBars)
我们先看一下 draw 方法:
public void draw(Canvas canvas) {
        final int privateFlags = mPrivateFlags;
        final boolean dirtyOpaque = (privateFlags & PFLAG_DIRTY_MASK) == PFLAG_DIRTY_OPAQUE &&
                (mAttachInfo == null || !mAttachInfo.mIgnoreDirtyState);
        mPrivateFlags = (privateFlags & ~PFLAG_DIRTY_MASK) | PFLAG_DRAWN;

        /*
         * Draw traversal performs several drawing steps which must be executed
         * in the appropriate order:
         *
         *      1. Draw the background
         *      2. If necessary, save the canvas' layers to prepare for fading
         *      3. Draw view's content
         *      4. Draw children
         *      5. If necessary, draw the fading edges and restore layers
         *      6. Draw decorations (scrollbars for instance)
         */

        // Step 1, draw the background, if needed
        int saveCount;

        if (!dirtyOpaque) {
            drawBackground(canvas);
        }

        // skip step 2 & 5 if possible (common case)
        final int viewFlags = mViewFlags;
        boolean horizontalEdges = (viewFlags & FADING_EDGE_HORIZONTAL) != 0;
        boolean verticalEdges = (viewFlags & FADING_EDGE_VERTICAL) != 0;
        if (!verticalEdges && !horizontalEdges) {
            // Step 3, draw the content
            if (!dirtyOpaque) onDraw(canvas);

            // Step 4, draw the children
            dispatchDraw(canvas);

            drawAutofilledHighlight(canvas);

            // Overlay is part of the content and draws beneath Foreground
            if (mOverlay != null && !mOverlay.isEmpty()) {
                mOverlay.getOverlayView().dispatchDraw(canvas);
            }

            // Step 6, draw decorations (foreground, scrollbars)
            onDrawForeground(canvas);

            // Step 7, draw the default focus highlight
            drawDefaultFocusHighlight(canvas);

            if (debugDraw()) {
                debugDrawFocus(canvas);
            }

            // we're done...
            return;
        }
    }
ViewGroup 的 dispatchDraw 中会遍历所有子元素并调用 drawChild() 方法,drawChild() 方法调用子元素的 draw() 方法。View 中的 dispatchDraw() 是空实现,其他 ViewGroup 的子类不覆写该方法。
View 的 onDraw() 方法是空的,该方法用于绘制 View 本身的内容,需要子类自己实现。比如TextView绘制自身文字、LinearLayout 绘制分割线等,有些容器不需要覆写该方法。我们自定义View时一般覆写 onDraw 方法,在这里绘制我们想画的东西。
View的绘制流程到这里就结束了,喜欢点个赞~~
参考文章:
https://www.jianshu.com/p/5a71014e7b1b
《Android开发艺术探索》