SpringMVC+Spring+mybatis+redis项目从零开始--Springmvc配置实现
文章列表:
四、SSM项目-Springmvc配置实现
上几章我们简单介绍了SSM项目工程结构、SSM相关配置和集成Redis实现等,本章将实现Springmvc等相关配置,同时通过简单的文件上传、图片上传等实例。
1. Springmvc简介
Spring Web MVC是一种基于Java的实现了Web MVC设计模式的请求驱动类型的轻量级Web框架,即使用了MVC架构模式的思想,将web层进行职责解耦,基于请求驱动指的就是使用请求-响应模型,框架的目的就是帮助我们简化开发,Spring Web MVC也是要简化我们日常Web开发的。
另外还有一种基于组件的、事件驱动的Web框架在此就不介绍了,如Tapestry、JSF等。
Spring Web MVC也是服务到工作者模式的实现,但进行可优化。前端控制器是DispatcherServlet;应用控制器其实拆为处理器映射器(Handler Mapping)进行处理器管理和视图解析器(ViewResolver)进行视图管理;页面控制器/动作/处理器为Controller接口(仅包含ModelAndView handleRequest(request, response) 方法)的实现(也可以是任何的POJO类);支持本地化(Locale)解析、主题(Theme)解析及文件上传等;提供了非常灵活的数据验证、格式化和数据绑定机制;提供了强大的约定大于配置(惯例优先原则)的契约式编程支持。
2. Springmvc优势
1) 让我们能非常简单的设计出干净的Web层和薄薄的Web层;
2) 进行更简洁的Web层的开发;
3) 天生与Spring框架集成(如IoC容器、AOP等);
4) 提供强大的约定大于配置的契约式编程支持;
5) 能简单的进行Web层的单元测试;
6) 支持灵活的URL到页面控制器的映射;
7) 非常容易与其他视图技术集成,如Velocity、FreeMarker等等,因为模型数据不放在特定的API里,而是放在一个Model里(Map数据结构实现,因此很容易被其他框架使用);
8) 非常灵活的数据验证、格式化和数据绑定机制,能使用任何对象进行数据绑定,不必实现特定框架的API;
9) 提供一套强大的JSP标签库,简化JSP开发;
10)支持灵活的本地化、主题等解析;
11)更加简单的异常处理;
12)对静态资源的支持;
13) 支持Restful风格。
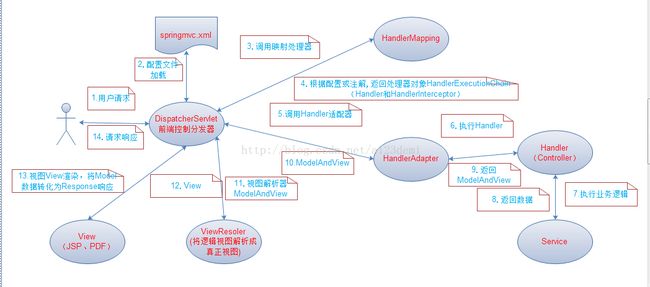
3. Springmvc原理
4. Springmvc常用注解
Springmvc中常用注解有RequestMapping、RequestParam、ResponseBody、PathVariable等,下面我们将一一介绍。
4.1 RequsetMapping
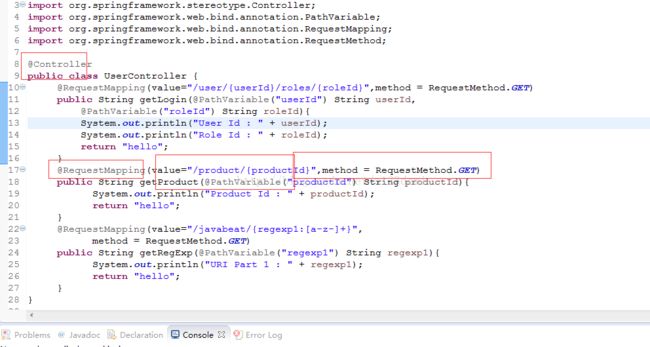
RequestMapping是一个用来处理请求地址映射的注解,可用于类或方法上。用于类上,表示类中的所有响应请求的方法都是以该地址作为父路径。
RequestMapping注解有六个属性,下面我们把她分成三类进行说明(下面有相应示例)。
a、 value, method;
value: 指定请求的实际地址,指定的地址可以是URITemplate 模式(后面将会说明);
method: 指定请求的method类型, GET、POST、PUT、DELETE等;
b、consumes,produces
consumes: 指定处理请求的提交内容类型(Content-Type),例如application/json, text/html;
produces: 指定返回的内容类型,仅当request请求头中的(Accept)类型中包含该指定类型才返回;
c、params,headers
params: 指定request中必须包含某些参数值是,才让该方法处理。
headers: 指定request中必须包含某些指定的header值,才能让该方法处理请求。
4.2 RequstParam
@requestParam主要用于在SpringMVC后台控制层获取参数,
类似一种是request.getParameter("name"),它有三个常用参数:defaultValue = "0", required = false, value ="isApp";defaultValue 表示设置默认值,required 通过boolean设置是否是必须要传入的参数,value 值表示接受的传入的参数类型。
4.3 PathVariable
用于将请求URL中的模板变量映射到功能处理方法的参数上,即取出uri模板中的变量作为参数。
{id}在这个请求的URL里就是个变量,可以使用@PathVariable来获取。
@PathVariable和@RequestParam的区别就在于:
@RequestParam用来获得静态的URL请求参数;
@PathVariable用来获得动态的URL请求入参。
4.4 ResponseBody
该注解用于将Controller的方法返回的对象,通过适当的HttpMessageConverter转换为指定格式后,写入到Response对象的body数据区。
使用时机:返回的数据不是html标签的页面,而是其他某种格式的数据时(如json、xml等)使用;
4.5 新版本引入注解
Spring4.3中引进了
{@GetMapping、@PostMapping、@PutMapping、@DeleteMapping、@PatchMapping},来帮助简化常用的HTTP方法的映射,并更好地表达被注解方法的语义。
以@GetMapping为例,Spring官方文档说:
@GetMapping是一个组合注解,是@RequestMapping(method =RequestMethod.GET)的缩写。该注解将HTTP Get 映射到 特定的处理方法上。
5. Springmvc相关配置
5.1 springmvc.xml配置
error
5.2 web.xml配置
	ssm-manager

		index.html
		index.htm
		index.jsp
		default.html
		default.htm
		default.jsp


		contextConfigLocation
		classpath:spring/applicationContext-service.xml


		org.springframework.web.context.ContextLoaderListener


		CharacterEncodingFilter
		org.springframework.web.filter.CharacterEncodingFilter

			encoding
			utf-8


		CharacterEncodingFilter
		/*


		ssm-manager
		org.springframework.web.servlet.DispatcherServlet


			contextConfigLocation
			classpath:spring/springmvc.xml

		1


		ssm-manager
		/
6. 实例文件上传下载
6.1 jsp文件
<%@ page language="java" contentType="text/html; charset=UTF-8"
pageEncoding="UTF-8"%>
SSM项目实战-上传
下载
6.2 controller文件
package com.ssm.manager.controller;

import java.io.File;
import java.io.FileInputStream;
import java.io.FileNotFoundException;
import java.io.IOException;
import java.io.InputStream;
import java.io.OutputStream;
import java.text.SimpleDateFormat;
import java.util.Date;

import javax.servlet.http.HttpServletRequest;
import javax.servlet.http.HttpServletResponse;

import org.springframework.stereotype.Controller;
import org.springframework.web.bind.annotation.RequestMapping;
import org.springframework.web.bind.annotation.RequestParam;
import org.springframework.web.multipart.MultipartFile;

import com.ssm.commons.FileUtil;

@Controller
public class TestController {

	@RequestMapping("/")
	public String index() {
		return "index";
	}

	@RequestMapping("/hello")
	public String hello() {
		return "hello";
	}

	@RequestMapping("/upload")
	public String upload() {
		return "upload";
	}

	@RequestMapping("/uploadFile")
	public String upload(@RequestParam MultipartFile[] myfiles,
			HttpServletRequest request) throws IOException {
		if (myfiles == null || myfiles.length == 0) {
			return "upload";
		}
		for (MultipartFile file : myfiles) {
			// 此处MultipartFile[]表明是多文件,如果是单文件MultipartFile就行了
			if (file.isEmpty()) {
				System.out.println("文件未上传!");
			} else {
				// 得到上传的文件名
				String fileName = file.getOriginalFilename();
				boolean isImage = FileUtil.isImage(fileName);
				// 得到服务器项目发布运行所在地址
				String sourcePath = "";
				if (isImage) {
					sourcePath = request.getSession().getServletContext()
							.getRealPath("image")
							+ File.separator;
				} else {
					sourcePath = request.getSession().getServletContext()
							.getRealPath("tempFile")
							+ File.separator;
				}
				// 此处未使用UUID来生成唯一标识,用日期做为标识
				String path = sourcePath
						+ new SimpleDateFormat("yyyyMMddHHmmss")
								.format(new Date()) + fileName;
				// 查看文件上传路径,方便查找
				System.out.println(path);
				// 把文件上传至path的路径
				File localFile = new File(path);
				file.transferTo(localFile);
			}
		}
		return "success";
	}

	@RequestMapping("/download")
	public void download(String fileName, HttpServletRequest request,
			HttpServletResponse response) {
		response.setCharacterEncoding("utf-8");
		response.setContentType("multipart/form-data");
		response.setHeader("Content-Disposition", "attachment;fileName="
				+ fileName);
		try {
			String path = request.getSession().getServletContext()
					.getRealPath("image")
					+ File.separator;
			InputStream inputStream = new FileInputStream(new File(path
					+ fileName));

			OutputStream os = response.getOutputStream();
			byte[] b = new byte[2048];
			int length;
			while ((length = inputStream.read(b)) > 0) {
				os.write(b, 0, length);
			}

			// 这里主要关闭。
			os.flush();
			os.close();
			inputStream.close();
		} catch (FileNotFoundException e) {
			e.printStackTrace();
		} catch (IOException e) {
			e.printStackTrace();
		}
		// 返回值要注意,要不然就出现下面这句错误!
		// java+getOutputStream() has already been called for this response
	}
}
7. 总结
至此,我们Springmvc+spring+mybatis+mysql+redis的web项目介绍完毕。我们通过四章分别从项目结构、Spring+mybatis集成、Spring+mybatis+redis集成和Springmvc+spring+mybatis+redis集成实现ssm项目。本系列文章只是简单介绍原理,使用方式,如果想深入了解,需要自身通过其他途径加强。
谢谢!
8. 代码
代码地址:http://download.csdn.net/download/a123demi/10029883
GITHUB地址:https://github.com/a123demi/spring_ssm

