日常运维 3
firewalld的9个zone
firewalld是centons7自带的防火墙
关闭iptables服务,
systemctl disable iptables
systemctl stop iptables
打开firewallld服务
systemctl enable firewalld
systemctl start firewalld

查看系统所有的zone
firewall-cmd --get-zones
查看系统默认的zone
firewall-cmd --get-default-zone

firewalld的9个zone
(1)drop(丢弃):任何接收的网路数据包都被丢弃,没有任何回复。仅能有发送出去的网络连接。{最安全}
(2)block(限制):任何接收的网络连接都被IPV4的icmp-host-prohibited信息和IPV6的icmp-host-prohibited信息所拒绝。
(3)public(公共):在公共区域内使用,不能相信网络内的其他计算机不会对你的计算机造成危害,只能接收经过选取的连接。
(4)dmz(非军事区):用于你的非军事区内的电脑,此区域内可以公开访问,可以有限地进入你的内部网络,仅仅接收经过选择的连接。
(5)external(外部):特别是为路由器启用了伪装功能的外部网,你不能信任来自网络的其他计算,不能相信它们不会对你的计算机造成危害,只能接收经过选取的连接。
(6)work(工作):用于工作区。你可以基本信任网络内的其他电脑不会危害你的电脑。仅仅接收经过选择的连接。
(7)home(家庭):用于家庭网络,你可以基本信任网络内的其他电脑不会危害你的电脑。仅仅接收经过选择的连接。
(8)internal(内部):用于内部网络。你可以基本信任网络内的其他电脑不会危害你的电脑。仅仅接收经过选择的连接。
(9)trusted(信任):可接受所有的网络连接。
firewalld关于zone的操作
修改默认的zone 为work
firewall-cmd --set-default-zone=work

查看指定网卡所在的zone
firewall-cmd --get-zone-of-interface=ens33
如果查看另一块网卡ens37的zone,如果显示no zone ,那么需要配置下,步骤如下
1. 可能是缺少配置文件切换到/etc/sysconfig/network-scripts/下,拷贝ifcfg-ens33的配置文件修改网卡名为ifcfg-ens37,然后修改配置文件
2. 重启网络服务
systemctl restart network
3.然后再重启firewalld服务
systemctl restart firewalld
查看是否显示zone
firewall-cmd --get-zone-of-interface=ens37
4. 如果还是没有,可以用到下面的命令,给指定网卡配置zone
firewall-cmd --zone=dmz --add-interface=ens37

针对指定网卡更改zone,可以使用以下命令
firewall-cmd --zone=work --change-interface=ens37

针对指定网卡删除zone
firewall-cmd --zone=work --remove-interface=ens37

查看系统所有网卡所在的zone
firewall-cmd --get-active-zones

firewalld关于service的操作
services 就是针对一个服务(端口)
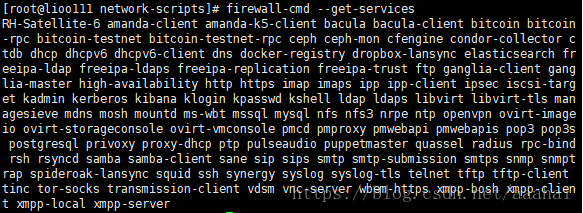
查看系统所有的services
firewall-cmd --get-services
这些service都是由一个个配置文件定义的,配置文件的模板在/usr/lib/firewalld/services/目录下,真正生效的配置在/etc/firewalld/services/目录下
查看当前zone下有哪些service
firewall-cmd --list-services

也可以查看指定zone下的services
firewall-cmd --zone=block --list-services block里面没有services

针对public进行操作
将http和ftp增加到public zone下面
firewall-cmd --zone=public --add-service=http
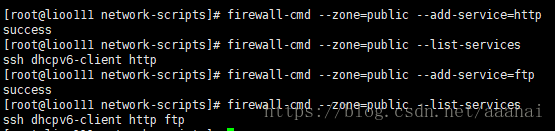
仅仅是保存到内存里,重启后就又需要重新添加,永久修改就需要增加到配置文件里
firewall-cmd --zone=public --add-service=http --permanent (--permanent增加到配置文件)
cat /etc/firewalld/zones/public.xml
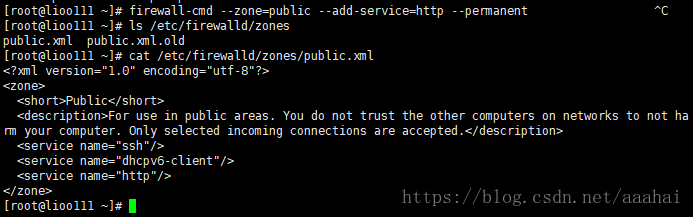
在修改完zones后,会在做一个备份文件,后缀名是.old
因为还没有更改过services,所以默认是空的。
删除public zone里的http
firewall-cmd --zone=public --remove-service=http
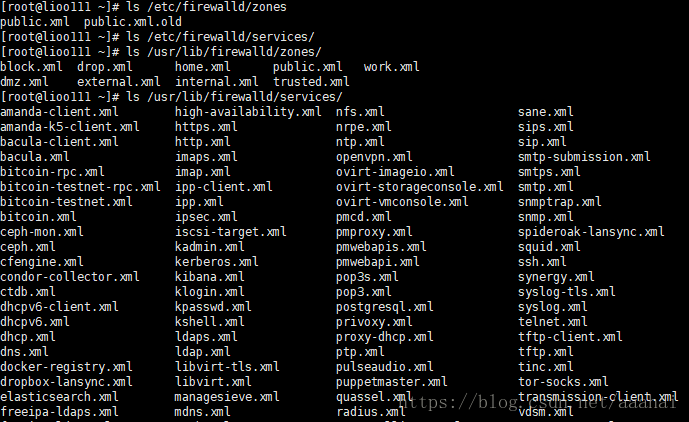
/etc/firewalld/zones/和/etc/firewalld/services/都是有配置文件模板的在:
ls /usr/lib/firewalld/zones/和 ls /usr/lib/firewalld/services/ 下面
实验操作
1.需求:ftp服务端口修改为1121,把ftp服务service加到work zone下面
2.操作过程
(1)拷贝cp /usr/lib/firewalld/services/ftp.xml 到 /etc/firewalld/services/
(2)然后进行编辑 vi /etc/firewalld/services/ftp.xml (把21端口改为1121)

然后 cp /usr/lib/firewalld/zones/work.xml拷贝到/etc/firewalld/zones/后 ,
编辑 vi /etc/firewalld/zones/work.xml
增加一行

最后重新加载firewalld
firewall-cmd --reload
查看有没有成功
rewall-cmd --zone=work --list-services

linux任务计划cron
任务计划的配置文件
cat /etc/crontab
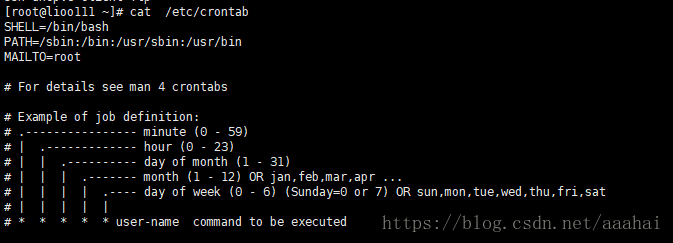
分时日月周
第1位表示分钟 0-59分
第2位表示小时 0-23点(0表示24)
第3位表示日期 1-31
第4位表示月份 1-12 0R jan,feb,mar…..(英文月份简写)
第5位表示星期 0-6(周日可以是0或者是7)
uesr 表示用户是谁,在root用户下,不填写默认为root。
command to be executed表示需要执行的命令。
当使用者执行crontab命令时,系统会按如下步骤操作
1.先查找/etc/corn.allow文件,在该文件中存在的用户可以使用crontab,不在该文件中的用户不能使用crontab(即使用没有写在/etc/cron.deny中)
2.如果没有/etc/cron.allow就寻找/etc/cron.deny文件,在该文件中存在的用户不能使用crontab,在该文件中不存的用户就可以用crontab
制定任务计划
crontab -e

每天三点执行这个脚本正确和错误的信息记录到123.log里
每天三点1-10号每两个月执行一次
每天三点1-10号每两个月周二和周五执行
systemctl start crond 启动任务计划
ps aux | grep cron 查看进程有没有运行
systemctl start crond 也可以用这个命令查看状态 如果没有运行会显示dead

cron任务计划功能的操作都是通过crontab这个命令来完成的。其中常用的选项有:
-u :指定某个用户,不加-u选项则为当前用户;
-e :制定计划任务;
-l :列出计划任务;
-r :删除全部计划任务。
如果编写的脚本计划如果没有执行,很有可能是脚本里命令没有使用绝对路径,或者命令并没有在它的PASH变量里面。建议使用绝对路径,编写的任务计划执行后都需要追加到日志里面,方便查看。
备份
ls /var/spool/cron/root 会有已用户名字命名的文件 root或者user1...
直接复制目录就可以备份了
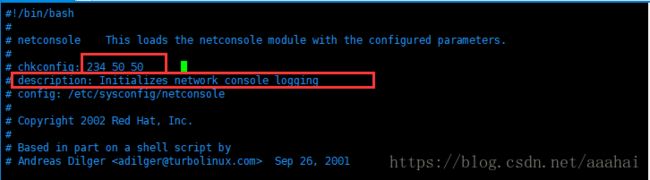
系统服务管理工具 chkconfig
centos6用的比较多
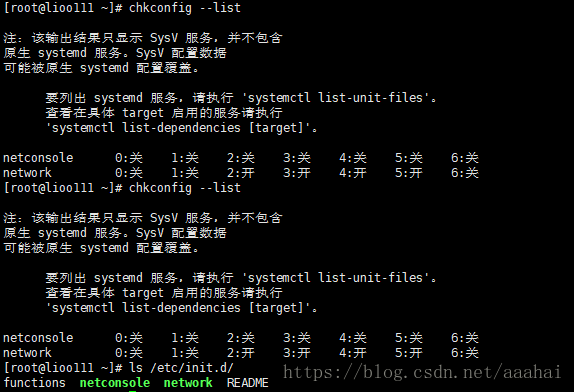
chkconfig --list 查看使用工具的服务
linxu系统所欲的预设服务都可以通过 ls /etc/init.d目录得到
这里的7个级别的含义: 0 关机状态 1 单用户模式 2 多用户模式,相比3级别缺少了nfs服务 3 多用户模式,不带图形 4 保留状态 5 多用户模式,并带有图形,如果安装就可以启动 6 重启
指定某一级别是关闭或者是开启
chkconfig --level 3 network off 关闭3和5级别写成 chkconfig --level 35 network off

把某项服务脚本加入到系统服务列表中来
首先启动脚本加入到 /etc/init.d 目录下才能被加入到系统服务中
再添加到 chkconfig --add 123
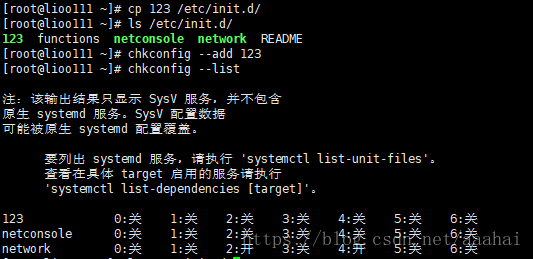
chkconfig 2345(运行级别) 10(第十位启动) 90(第90位关闭)
下面这部分描述都要有才能被识别
chkconfig --del 123 删除服务

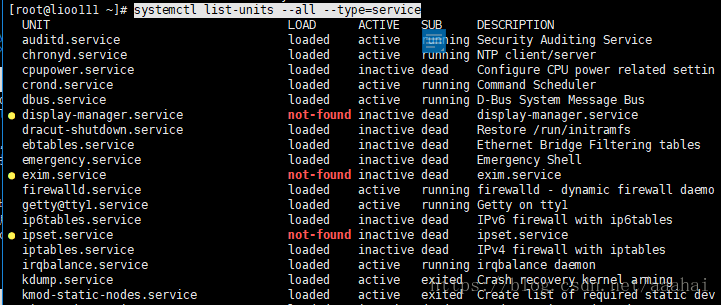
systemd管理服务
在centos7中使用
systemctl list-unit-files 来查看所有的服务
systemctl list-units --all --type=service 只查看service服务信息
systemctl list-units --type=service 去掉 --all 不查看未激活状态服务
systemctl enable crond.service 让服务开机启动
systemctl disable crond.service 不让服务开机启动
systemctl status crond.service 查看状态
systemctl stop crond 停止服务
systemctl start crond 启动服务
systemctl restart crond 重启服务
systemctl is-enabled crond 检查服务是否开机启动
systemctl enable crond.service 后就会生成一个软连接
systemctl disable crond.service 软连接就会取消

unit介绍
ls /usr/lib/systemd/system/ 这里是系统所有unit
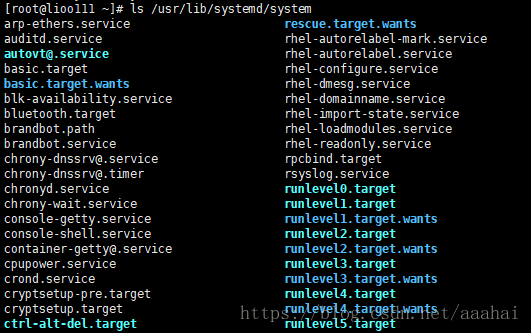
分为以下类型
(1)service 系统服务
(2)target 多个unit组成的组
(3)device 硬件设备
(4)mount 文件系统挂载点
(5)automount 自动挂载点
(6)path 文件或路径
(7)scope 不是由systemctl启动的外部进程
(8)slice 进程组
(9)snapshot systemd 快照
(10)socket 进程间通信套接字
(11)swap swap文件
(12)timer 定时器
也有7个类型的target
unit相关的命令
(1) systemctl list-units //列出正在运行的unit
(2)systemctl list-units --all //列出所有,包括失败的或者inactive的
(3)systemctl list-units --all --state=inactive //列出inactive的unit
(4)systemctl list-units --type=service //列出状态为active的service
(5)systemctl is-active crond.service //查看某个服务是否为active
(6)systemctl is-enabled crond.service //查看某个服务是否为enabled
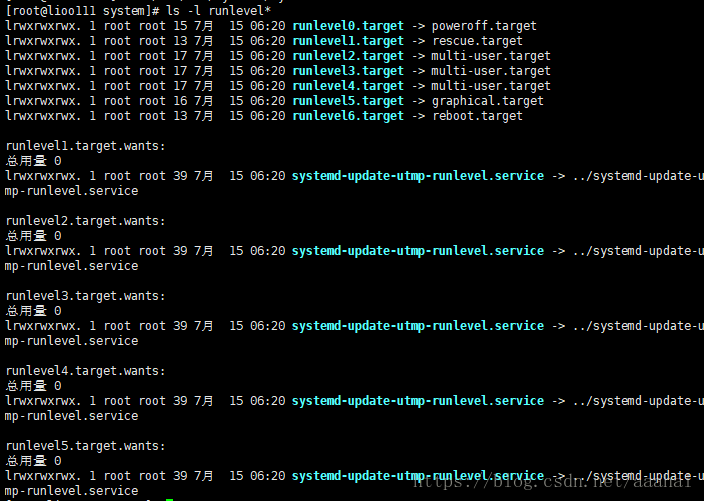
target介绍
系统为例方便管理用target来管理unit
systemctl list-unit-files --type=target //列出所有的target
systemctl list-dependencies multi-user.target //查看指定target下面有哪些unit
systemctl get-default //查看系统默认的target
systemctl set-default multi-user.target 设置一个默认的target 同时也会创建个软连接

一个service属于一个类型的unit
多个unit组成了一个target
一个target里面包含了多个service
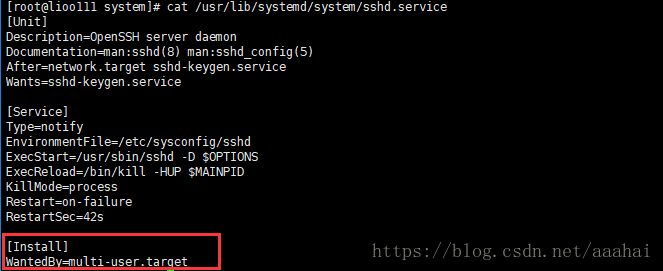
cat /usr/lib/systemd/system/sshd.service //看[install]部分就会看见属于哪个target