Android 简单实现缓存机制
Android 简单实现缓存机制(反射和数据库)
现在的app每个页面都有从服务器后台拿的数据,数据基本是以文本形式返回的,大多数是json格式(json是一种文本形式的文本,跟xml一样,赋予了一定意义),很多app的首页或者朋友圈等类似的功能是没必要总向后台请求的,我们可以把每次请求的数据存起来,下次先拿缓存,有新数据了再追加或替换。
一.首先大家会问,为什么要用缓存?
如果断网了,app页面还有数据,提示断网,是不是显示不单调了,体验会好不少。有的app断网了就是大白板。。。。说句心里话,我看见大白板的app就想卸载了。
二.原理
简述原理:创建一个表,表结构包括key、value和lasttime等,分别存储键值和保存时间,其他的都是备用,系统的SQLiteOpenHelper有onCreat和onUpgrade方法,触发这两个方法后调用检查数据方法,用反射得到HistoryCache.class的所有属性,遍历属性集合查看是否有key为相应属性的数据,有就不管,没有就添加,数据库表里数据多出的数据被删除,这就是用反射根据类属性动态控制表数据了(不敢说表结构)。剩下的就是update数据和取数据了。
三.为什么不动态改变表结构?
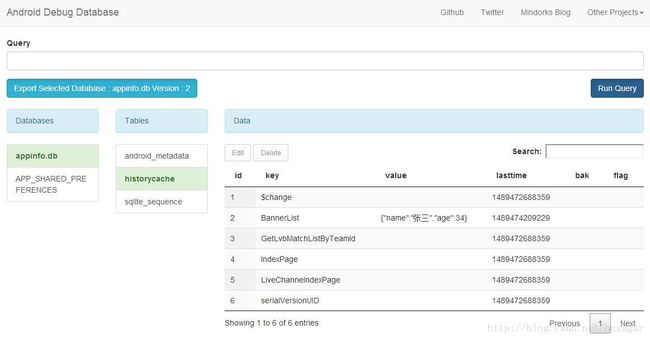
仔细看下图,表结构是固定的,有多少条数据也是固定的,根据HistoryCache类决定,但是,数据库增删数据快还是更改表结构快?当然是数据啦,每条数据就是一条缓存,而且,同一个缓存只有一个,只能被更新。如果在app运行时可以随意添加key,那。。。。再次拿缓存就麻烦了,数据库会越来越大,我觉得一条数据代表特定意义的缓存是合理的。
重要的是,结构有多少条是开发时就订好了,缓存哪里的数据是一一对应的,改不了,这样不会出现脏数据。
基于这种想法,缓存只有获取get方法和更新update方法两个。
说明一下:截图内容是用的https://github.com/amitshekhariitbhu/Android-Debug-Database 这个库可以直接访问局域网手机的数据库,调试时很方便的。推荐
四.开始写代码
1.创建HistoryCache类
  /**
     * Created by xiong on 2016/11/29.
     * 数据结构
     * 添加或者删除属性变量值,都必须更改数据库版本号,否则不会修改
     *
     * @author xiong
     */

    public static class HistoryCache {
        /**
         * 首页
         */
        public static String IndexPage = "IndexPage";
        /**
         * 朋友圈
         */
        public static String FriendLife = "FriendLife";
        /**
         * 首页Banner图片
         */
        public static String BannerList = "BannerList";
    }
2.写SQLiteOpenHelper
sql语句
   private static final String CREATE_CacheTABLE = "create table historycache (id integer primary key autoincrement, key text, value text, lasttime long, bak text, flag text)";
提示,我定义的是传入的类的名字和表名是同一个,自定义的dbhelper内封装了根据类属性动态改变数据结构的方法,只在数据库升级时执行。
    /**
     * Created by xiong on 2016/11/29.
     * SQLiteOpenHelper
     *
     * @author xiong
     */
    public static class DBHelper extends SQLiteOpenHelper {

    private static final String CREATE_CacheTABLE = "create table historycache (id integer primary key autoincrement, key text, value text, lasttime long, bak text, flag text)";
        public DBHelper (final Context context, final String name, final SQLiteDatabase.CursorFactory factory, final int version) {
            super (context, name, factory, version);
        }

        @Override
        public void onCreate (final SQLiteDatabase db) {
            db.execSQL (CREATE_CacheTABLE);
            updatetable (db, HistoryCache.class);
        }

        @Override
        public void onUpgrade (final SQLiteDatabase db, final int oldVersion, final int newVersion) {
            updatetable (db, HistoryCache.class);
        }

        /**
         * 传入的类名即为表名,传入的类的属性即为表内的记录,字段固定,用来实现动态增减记录,记录为缓存内容,所以数量较少,
         * 只需要更改实体类属性,就可以管理数据库了,动态升级。
         *
         * @param db
         * @param mClass
         */
        private void updatetable (final SQLiteDatabase db, Class mClass) {
            /**
             * 通过反射拿到当前所有cache名
             */
            List mList = new ArrayList<> ();
            Field[] fields = mClass.getDeclaredFields ();
            for (Field fd : fields) {
                fd.setAccessible (true);
                mList.add (fd.getName ());
            }

            Cursor mCursor = db.rawQuery ("select * from " + mClass.getSimpleName (), null);
            while (mCursor.moveToNext ()) {
                boolean ishave = false;
                String string = mCursor.getString (1);
                Iterator mStringIterator = mList.iterator ();
                while (mStringIterator.hasNext ()) {
                    if (mStringIterator.next ().equals (string)) {
                        ishave = true;
                        mStringIterator.remove ();
                        break;
                    }
                }
                /**
                 * 类里没有这个缓存名就将其删掉
                 */
                if (!ishave) {
                    db.delete (mClass.getSimpleName (), "key=?", new String[]{string});
                }
            }
            mCursor.close ();
            for (int mI = 0; mI < mList.size (); mI++) {
                ContentValues values = new ContentValues ();
                values.put ("key", mList.get (mI));
                values.put ("lasttime", System.currentTimeMillis ());
                db.insert (mClass.getSimpleName (), null, values);
            }
        }
} - 1
- 2
- 3
- 4
- 5
- 6
- 7
- 8
- 9
- 10
- 11
- 12
- 13
- 14
- 15
- 16
- 17
- 18
- 19
- 20
- 21
- 22
- 23
- 24
- 25
- 26
- 27
- 28
- 29
- 30
- 31
- 32
- 33
- 34
- 35
- 36
- 37
- 38
- 39
- 40
- 41
- 42
- 43
- 44
- 45
- 46
- 47
- 48
- 49
- 50
- 51
- 52
- 53
- 54
- 55
- 56
- 57
- 58
- 59
- 60
- 61
- 62
- 63
- 64
- 65
- 66
- 67
- 68
- 69
- 70
- 1
- 2
- 3
- 4
- 5
- 6
- 7
- 8
- 9
- 10
- 11
- 12
- 13
- 14
- 15
- 16
- 17
- 18
- 19
- 20
- 21
- 22
- 23
- 24
- 25
- 26
- 27
- 28
- 29
- 30
- 31
- 32
- 33
- 34
- 35
- 36
- 37
- 38
- 39
- 40
- 41
- 42
- 43
- 44
- 45
- 46
- 47
- 48
- 49
- 50
- 51
- 52
- 53
- 54
- 55
- 56
- 57
- 58
- 59
- 60
- 61
- 62
- 63
- 64
- 65
- 66
- 67
- 68
- 69
- 70
3.写CacheManager管理类
根据之前的分析,我们只需要updateCache和getCache方法,还有就是deleteDatabase。
1.写updateCache()方法:
根据需求,需要根据key更新value值,所以方法如下:
   /**
     * 更新缓存
     *
     * @param key   预定义名称
     * @param value 待缓存数据
     */
    public synchronized static void updateCache (String key, String value) {
        updateCache (new CacheEntity ().setKey (key).setValue (value));
}- 1
- 2
- 3
- 4
- 5
- 6
- 7
- 8
- 9
- 1
- 2
- 3
- 4
- 5
- 6
- 7
- 8
- 9
一直点下去调用方法是不是很好用呢,我的Android tips分类里会介绍如何自定义模板。
/**
     * 更新缓存
     * 不能手动更新id、key和lasttime
     *
     * @param mCacheEntity
     */
    public synchronized static void updateCache (CacheEntity mCacheEntity) {
        if (mCacheDBHelper == null) {
            mCacheDBHelper = new DBHelper (mContext, DBName, null, DBVersion);
        }
        if (mSQLiteDatabase == null) {
            mSQLiteDatabase = mCacheDBHelper.getWritableDatabase ();
        }
        ContentValues m = new ContentValues ();
        m.put ("value", mCacheEntity.value);
        m.put ("lasttime", System.currentTimeMillis ());
        m.put ("bak", mCacheEntity.bak);
        m.put ("flag", mCacheEntity.flag);
        try {
            mSQLiteDatabase.update (HistoryCache.class.getSimpleName (), m, "key=?", new String[]{mCacheEntity.key});
        } catch (Exception mE) {
            mE.printStackTrace ();
        }
}- 1
- 2
- 3
- 4
- 5
- 6
- 7
- 8
- 9
- 10
- 11
- 12
- 13
- 14
- 15
- 16
- 17
- 18
- 19
- 20
- 21
- 22
- 23
- 24
- 1
- 2
- 3
- 4
- 5
- 6
- 7
- 8
- 9
- 10
- 11
- 12
- 13
- 14
- 15
- 16
- 17
- 18
- 19
- 20
- 21
- 22
- 23
- 24
不能手动更新id、key和lasttime,这些是自动的,可以手动设置就出问题了,道理大家都懂的<( ̄︶ ̄)>
忘了介绍CacheEntity这个类了,代码如下:
   public static class CacheEntity {
        private String value="";
        private String key="";
        private int id;
        private long lasttime;
        private String bak="";
        private String flag="";

        public String getValue () {
            return value;
        }

        public CacheEntity setValue (final String mValue) {
            value = mValue;
            return this;
        }

        public String getKey () {
            return key;
        }

        public CacheEntity setKey (final String mKey) {
            key = mKey;
            return this;
        }

        public int getId () {
            return id;
        }

        public CacheEntity setId (final int mId) {
            id = mId;
            return this;
        }

        public long getLasttime () {
            return lasttime;
        }

        public CacheEntity setLasttime (final long mLasttime) {
            lasttime = mLasttime;
            return this;
        }

        public String getBak () {
            return bak;
        }

        public CacheEntity setBak (final String mBak) {
            bak = mBak;
            return this;
        }

        public String getFlag () {
            return flag;
        }

        public CacheEntity setFlag (final String mFlag) {
            flag = mFlag;
            return this;
        }
}- 1
- 2
- 3
- 4
- 5
- 6
- 7
- 8
- 9
- 10
- 11
- 12
- 13
- 14
- 15
- 16
- 17
- 18
- 19
- 20
- 21
- 22
- 23
- 24
- 25
- 26
- 27
- 28
- 29
- 30
- 31
- 32
- 33
- 34
- 35
- 36
- 37
- 38
- 39
- 40
- 41
- 42
- 43
- 44
- 45
- 46
- 47
- 48
- 49
- 50
- 51
- 52
- 53
- 54
- 55
- 56
- 57
- 58
- 59
- 60
- 61
- 62
- 1
- 2
- 3
- 4
- 5
- 6
- 7
- 8
- 9
- 10
- 11
- 12
- 13
- 14
- 15
- 16
- 17
- 18
- 19
- 20
- 21
- 22
- 23
- 24
- 25
- 26
- 27
- 28
- 29
- 30
- 31
- 32
- 33
- 34
- 35
- 36
- 37
- 38
- 39
- 40
- 41
- 42
- 43
- 44
- 45
- 46
- 47
- 48
- 49
- 50
- 51
- 52
- 53
- 54
- 55
- 56
- 57
- 58
- 59
- 60
- 61
- 62
至此更新方法就写完了。为什么属性要初始化?总不能让数据库存null吧!
2.写getCache()方法:
直接上代码了:
 /**
     * 获取缓存数据
     *
     * @param key 预定义名称
     * @return 缓存数据,异常或者不存在则返回null
     */
    public static CacheEntity getCache (String key) {
        CacheEntity mCacheEntity = new CacheEntity ();
        if (mCacheDBHelper == null) {
            mCacheDBHelper = new DBHelper (mContext, DBName, null, DBVersion);
        }
        if (mSQLiteDatabase == null) {
            mSQLiteDatabase = mCacheDBHelper.getWritableDatabase ();
        }
        Cursor mCursor = null;
        try {
            mCursor = mSQLiteDatabase.rawQuery ("select * from " + HistoryCache.class.getSimpleName () + " where key=?", new String[]{key});
            if (mCursor != null && mCursor.getCount () == 1) {
                mCursor.moveToNext ();
                mCacheEntity.id = mCursor.getInt (0);
                mCacheEntity.key = mCursor.getString (1);
                mCacheEntity.value = mCursor.getString (2);
                mCacheEntity.lasttime = mCursor.getLong (3);
                mCacheEntity.bak = mCursor.getString (4);
                mCacheEntity.flag = mCursor.getString (5);

            }
        } catch (Exception mE) {
            mE.printStackTrace ();
        } finally {
            if (mCursor != null) {
                mCursor.close ();
            }
            return mCacheEntity;
        }
}- 1
- 2
- 3
- 4
- 5
- 6
- 7
- 8
- 9
- 10
- 11
- 12
- 13
- 14
- 15
- 16
- 17
- 18
- 19
- 20
- 21
- 22
- 23
- 24
- 25
- 26
- 27
- 28
- 29
- 30
- 31
- 32
- 33
- 34
- 35
- 36
- 1
- 2
- 3
- 4
- 5
- 6
- 7
- 8
- 9
- 10
- 11
- 12
- 13
- 14
- 15
- 16
- 17
- 18
- 19
- 20
- 21
- 22
- 23
- 24
- 25
- 26
- 27
- 28
- 29
- 30
- 31
- 32
- 33
- 34
- 35
- 36
3.删除数据库
/**
 * 删除数据库
 */
public synchronized static void deleteDB () {
    mContext.deleteDatabase (DBName);
}
五.调用总结
 public void test(View mView){
        CacheManager.updateCache (CacheManager.HistoryCache.BannerList,"{\"name\":\"张三\",\"age\":34}");
        Toast.makeText (this,CacheManager.getCache (CacheManager.HistoryCache.BannerList).getValue (),Toast.LENGTH_LONG).show ();
    }
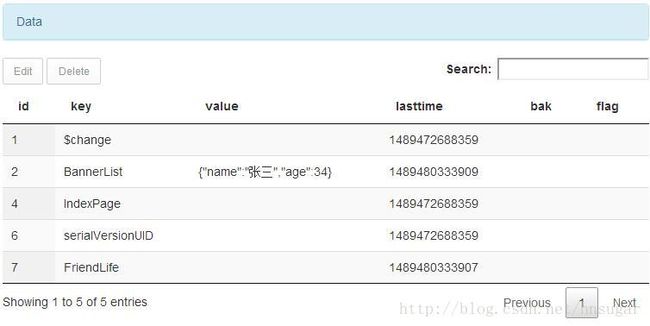
OK,测试成功,不截图了,还有就是动态更新表数据结构如图。ok,更改成功,至于$change和serialVersionUID是Object类的,我就不过滤对的那么仔细了,无伤大雅︿( ̄︶ ̄)︿。
