Spring Cloud实战系列(六) - 分布式配置中心Spring Cloud Config
前言
在 分布式系统 中,由于服务数量巨多,为了方便 服务配置文件 的 统一管理 和 实时更新,所以需要 分布式配置中心 组件。 Spring Cloud 提供的 分布式配置中心 组件是 Spring Cloud Config,它支持将 配置服务 放在配置服务的 内存 中(即 本地),也支持放在 远程 Git 仓库中。Spring Cloud Config 提供了两个角色,其一是 Config Server,其二是 Config Client。
正文
1. Config Server从本地读取配置文件
创建一个新的 Spring Boot 项目模块,取名为 config-server,它的 pom.xml 配置如下:
    4.0.0

        org.springframework.boot
        spring-boot-starter-parent
        1.5.3.RELEASE


    io.github.ostenant.springcloud
    config-server
    0.0.1-SNAPSHOT
    config-server
    Demo project for Spring Boot


        1.8
        Dalston.RELEASE


            org.springframework.cloud
            spring-cloud-config-server


            org.springframework.boot
            spring-boot-starter-test
            test


                org.springframework.cloud
                spring-cloud-dependencies
                ${spring-cloud.version}
                pom
                import


                org.springframework.boot
                spring-boot-maven-plugin
在应用启动类上使用 注解 @EnableConfigServer 开启 配置服务器。
@EnableConfigServer
@SpringBootApplication
public class ConfigServerApplication {

    public static void main(String[] args) {
        SpringApplication.run(ConfigServerApplication.class, args);
    }
}
需要在程序的 配置文件 application.properties 里面进行如下配置。通过 spring.profile.active=native 来配置 Config Server 从 本地读取配置,读取的路径为 Classpath 下的 shared 目录。
server:
  port: 8769
spring:
  application:
    name: config-server
  profiles:
    active: native
  cloud:
    config:
      server:
        native:
          search-locations: classpath:/shared
在 src/main/resources 目录下新建 shared 文件夹,在 shared 文件夹下新建一个 config-client-dev.yml 文件。
server:
  port: 8762
foo: foo version 1
运行 ConfigServerApplication 的 main() 方法,在 8769 端口启动 Config Server 应用程序。
2. 构建Config Client
创建一个 Spring Boot 项目模块,取名为 config-client,它的 pom.xml 配置如下:
    4.0.0

        org.springframework.boot
        spring-boot-starter-parent
        1.5.3.RELEASE


    io.github.ostenant.springcloud
    config-client
    0.0.1-SNAPSHOT
    config-client
    Demo project for Spring Boot


        1.8
        Dalston.RELEASE


            org.springframework.cloud
            spring-cloud-starter-config


            org.springframework.boot
            spring-boot-starter-web


            org.springframework.boot
            spring-boot-starter-test
            test


                org.springframework.cloud
                spring-cloud-dependencies
                ${spring-cloud.version}
                pom
                import


                org.springframework.boot
                spring-boot-maven-plugin
在 resources 目录下新建 bootstrap.yml 文件,因为 bootstrap 相对于 application 具有 优先的执行顺序。
变量 {spring.application.name} 和 {spring.profiles.active},两者使用 “-” 相连,作为 Config Client 向 Config Server 读取的 配置文件名。
bootstrap.yml
spring:
  application:
    name: config-client
  cloud:
    config:
      uri: http://localhost:8769
      fail-fast: true # 读取没有成功,执行快速失败
  profiles:
    active: dev
配置一个接口,用于测试 读取配置文件 的 foo 变量,并通过 API 接口返回客户端。
@RestController
@SpringBootApplication
public class ConfigClientApplication {

    public static void main(String[] args) {
        SpringApplication.run(ConfigClientApplication.class, args);
    }

    @Value("${foo}")
    private String foo;

    @RequestMapping(value = "/foo")
    public String foo(){
        return foo;
    }
}
启动 config-client 应用程序,访问 http://localhost:8762/foo,服务端的响应数据如下:
foo version 1
可见 config-client 成功地从 config-server 项目的 shared 本地文件目录 读取到 配置文件 config-client-dev.yml 中的 foo 变量。
3. Config Server从远程Git仓库读取配置文件
修改 config-server 的配置文件 application.yml,代码如下.
server:
  port: 8769
spring:
  application:
    name: config-server
  cloud:
    config:
      server:
        git:
          uri: https://coding.net/ostenant/config-repo
          search-paths: test
          username: [email protected]
          password: xxxx
      label: master
如果 Git 仓库为 公开仓库,可以不填写 用户名 和 密码;如果是 私有仓库 则需要填写,本例子配置了一个 私有仓库。
| 配置 | 解释 |
|---|---|
| spring.cloud.config.server.git.uri | 配置git仓库地址 |
| spring.cloud.config.server.git.searchPaths | 配置仓库路径 |
| spring.cloud.config.label | 配置仓库的分支 |
| spring.cloud.config.server.git.username | 访问git仓库的用户名 |
| spring.cloud.config.server.git.password | 访问git仓库的用户密码 |
远程仓库 https://coding.net/ostenant/config-repo 中有个 名为 config-client-dev.properties 的 配置文件,里面配置有一个属性:
foo = foo version 2
重新启动应用程序 config-server 和 config-client,再次访问 http://localhost:8762/foo,服务端的响应数据如下:
foo version 2
可见,config-server 从远程 Git 仓库读取了 配置文件,进一步 config-client 从 config-server 读取了相关的 配置属性。
4. 构建高可用的Config Server
将 配置中心 config-server 做成一个 微服务,并且将其 集群化,从而实现 高可用。
4.1. 改造Config Server
在 Config Server 中引入 Eureka 客户端的 起步依赖 spring-cloud-starter-eureka。
     org.springframework.cloud
     spring-cloud-starter-eureka
在应用的 启动类 上加上 注解 @EnableEurekaClient,将 Config Server 注册到 Eureka Server 上面。
在配置文件 application.yml 加入 服务注册地址:
eureka:
  client:
    service-url:
      defaultZone: http://locahost:8761/eureka/
4.2. 改造Config Client
同样的在 Config Client 中引入 Eureka 客户端的 起步依赖 spring-cloud-starter-eureka。
     org.springframework.cloud
     spring-cloud-starter-eureka
在应用的 启动类 上加上 注解 @EnableEurekaClient,将 Config Client 注册到 Eureka Server 上面。
在配置文件 application.yml 加入 服务注册地址:
eureka:
  client:
    service-url:
      defaultZone: http://locahost:8761/eureka/
在配置文件 application.yml 加入相关配置,从 service-id 为 config-server 的 配置服务 读取相关 配置文件。
spring:
  application:
    name: config-client
  cloud:
    config:
      fail-fast: true
      discovery:
        enabled: true
        service-id: config-server
  profiles:
    active: dev
server:
  port: 8762
eureka:
  client:
    service-url:
      defaultZone: http://localhost:8761/eureka/
重新启动应用程序 config-server 和 config-client,再次访问 http://localhost:8762/foo,服务端的响应数据如下:
foo version 2
只需要启动多个 config-server 实例,即可搭建一个 高可用 的 config-server 集群。
5. 使用Spring Cloud Bus刷新配置
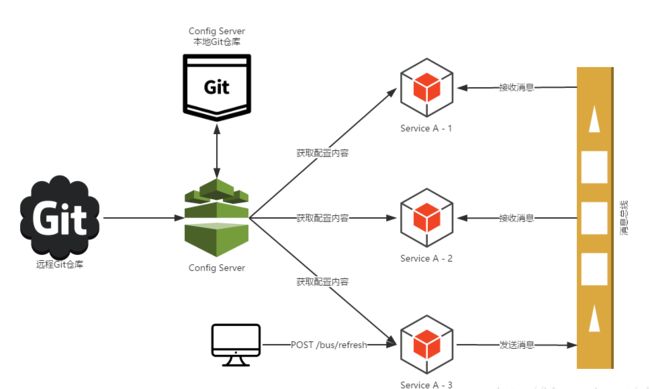
Spring Cloud Bus 将 分布式节点 通过轻量级的 消息代理 连接起来。它可以用于 广播配置文件 的更改或者 服务之间 的通讯,也可以用于 监控。在 分布式配置文件 被更改后,可以通过 Spring Cloud Bus 通知各个微服务中的即时刷新 本地配置。
5.1. 改造config-client
在 config-client 的 pom.xml 里面加入 起步依赖 spring-cloud-starter-bus-amqp。
    org.springframework.cloud
    spring-cloud-starter-bus-amqp
在项目的配置文件 application.yml 文件中添加 RabbitMQ 的相关配置,包括 RabbitMQ 的 地址、端口、用户名 和 密码。为了方便验证,将 management.security.enabled 改为 false。
spring.rabbitmq.host=localhost
spring.rabbitmq.port=5672
spring.rabbitmq.username=guest
spring.rabbitmq.password=guest
management.security.enabled=false
最后,在需要更新属性的 配置类 上加 @RefreshScope 注解。
@RefreshScope
@RestController
@SpringBootApplication
public class ConfigClientApplication {

    public static void main(String[] args) {
        SpringApplication.run(ConfigClientApplication.class, args);
    }

    @Value("${foo}")
    private String foo;

    @RequestMapping(value = "/foo")
    public String foo(){
        return foo;
    }
}
依次启动应用,启动两个 config-client 实例,端口 分别为 8762 和 8763。启动完成后,访问 http://localhost:8762/foo 或者 http://localhost:8763/foo,服务端响应数据如下:
foo version 2
更改远程Git 仓库 配置文件 的 config-client-dev.properties,将 foo 的值改为 “foo version 3”。
访问 http://localhost:8762/bus/refresh 请求 刷新配置,设置 “destination” 参数为 待刷新 属性的 服务名称。例如 “http://localhost:8762/bus/refresh?destination=config-client:**”,即 刷新服务名 为 config-client 的所有 服务实例。
再次访问 http://localhost:8762/foo 和 http://localhost:8763/foo,服务端响应数据如下:
foo version 3
测试结果表明,/bus/refresh 通知服务名为 config-client 的所有实例 刷新 了本地的 foo 属性配置。
参考
- 方志朋《深入理解Spring Cloud与微服务构建》
欢迎关注技术公众号: 零壹技术栈
本帐号将持续分享后端技术干货,包括虚拟机基础,多线程编程,高性能框架,异步、缓存和消息中间件,分布式和微服务,架构学习和进阶等学习资料和文章。

