python3+pyqt5详细介绍-附opencv
转载自博客:https://blog.csdn.net/qq_37541097/article/details/79143898
关于python3下搭建pyqt5(pycharm)参考自简书:https://www.jianshu.com/p/344bdf61e69e
pyqt官方下载地址:
https://sourceforge.net/projects/pyqt/files/PyQt5/PyQt-5.6/
pyqt5 英文教程
http://zetcode.com/gui/pyqt5/
中文教程:
https://www.kancloud.cn/digest/py-qt/119454
PyQt5的中文教程
http://code.py40.com/pyqt5/32.html

对于pyqt的使用个人比较建议 ui设计 与 逻辑功能 分开开发
ui界面的建立

通过pycharm的Tools->External Tools->QtDesigner打开界面设计窗口(本文以创建一个Main Window为例)。

通过拖拽可以简单的设计界面,设计好后保存UI文件(本文创建的文件名为GUI),对UI文件点击鼠标反键选择External Tools->PyUIC,会生成一个对应UI界面的GUI.py文件。

接下来为了让UI设计文件与逻辑功能文件分开,在新建一个py文件,导入刚生成的GUI.py中的 Ui_MainWindow。
import sys
import cv2
from PyQt5 import QtCore, QtGui, QtWidgets
from PyQt5.QtCore import *
from PyQt5.QtWidgets import QFileDialog, QMessageBox, QDockWidget, QListWidget
from PyQt5.QtGui import *

from GUI import Ui_MainWindow  # 导入创建的GUI类

class mywindow(QtWidgets.QMainWindow,Ui_MainWindow):

    def __init__(self):
        super(mywindow, self).__init__()
        self.setupUi(self)

if __name__ == '__main__':
    app = QtWidgets.QApplication(sys.argv)
    window = mywindow()
    window.show()
    sys.exit(app.exec_())
OK!一个超级简单的UI设计以及UI的调用全部完成。
接下来再写点基础UI开发中常用到的功能:
PyQt窗口界面位置以及透明度调节
下面介绍几个函数用来调节窗口界面的位置以及界面边框和背景的隐藏。
在逻辑功能文件的初始化中进行设置:
import sys
import cv2
from PyQt5 import QtCore, QtGui, QtWidgets
from PyQt5.QtCore import *
from PyQt5.QtWidgets import QFileDialog, QMessageBox, QDockWidget, QListWidget
from PyQt5.QtGui import *

from main_window import Ui_MainWindow  # 导入创建的GUI类

class mywindow(QtWidgets.QMainWindow, Ui_MainWindow):
    def __init__(self):
        super(mywindow, self).__init__()
        self.setupUi(self)

        # setting main window geometry
        desktop_geometry = QtWidgets.QApplication.desktop()  # 获取屏幕大小
        main_window_width = desktop_geometry.width()  # 屏幕的宽
        main_window_height = desktop_geometry.height()  # 屏幕的高
        rect = self.geometry()  # 获取窗口界面大小
        window_width = rect.width()  # 窗口界面的宽
        window_height = rect.height()  # 窗口界面的高
        x = (main_window_width - window_width) // 2  # 计算窗口左上角点横坐标
        y = (main_window_height - window_height) // 2  # 计算窗口左上角点纵坐标
        self.setGeometry(x, y, window_width, window_height)  # 设置窗口界面在屏幕上的位置

        # 无边框以及背景透明一般不会在主窗口中用到,一般使用在子窗口中,例如在子窗口中显示gif提示载入信息等等
        self.setWindowFlags(Qt.FramelessWindowHint)  # 无边框
        self.setAttribute(Qt.WA_TranslucentBackground)  # 背景透明
Pyqt中的常用小控件
QPushbutton的简单使用
首先打开QtDesigner通过鼠标添加一个pushbutton,双击进行更改pushbutton的text。

接下来对pushbutton反键选择Change objectName进行修改,这个名称是在逻辑功能设计时调用的名称。重要!

修改完之后进行保存,记得每次修改后都要对UI文件反键进行External Tools->PyUIC操作对GUI.py文件进行更新。
接着进入逻辑功能文件,添加pushbutton对应的响应函数与槽连接。
设计pushbutton点击对应的响应函数:
class mywindow(QtWidgets.QMainWindow,Ui_MainWindow):

    def __init__(self):
        super(mywindow, self).__init__()
        self.setupUi(self)

    def pushbutton_fuction(self):   # pushbutton对应的响应函数
        # do some things
添加槽连接:
class mywindow(QtWidgets.QMainWindow,Ui_MainWindow):

    def __init__(self):
        super(mywindow, self).__init__()
        self.setupUi(self)

        self.one_pushButton.clicked.connect(pushbutton_fuction)   # one_pushButton是对应的objectName
                                                                  # 将点击事件与槽函数进行连接
    def pushbutton_fuction(self):
        # do some things
QLabel与opencv读取并显示图片
首先添加一个QLabel,修改text内容以及Change objectName.

接下来我们要实现通过点击一个pushbutton在QLabel中显示一张图片。
class mywindow(QtWidgets.QMainWindow,Ui_MainWindow):

    def __init__(self):
        super(mywindow, self).__init__()
        self.setupUi(self)

        self.one_pushButton.clicked.connect(pushbutton_fuction)

    def pushbutton_fuction(self):
        Im = cv2.imread('***.jpg')  # 通过Opencv读入一张图片
        image_height, image_width, image_depth = Im.shape  # 获取图像的高,宽以及深度。
        QIm = cv2.cvtColor(Im, cv2.COLOR_BGR2RGB)  # opencv读图片是BGR,qt显示要RGB,所以需要转换一下
        QIm = QImage(QIm.data, image_width, image_height,  # 创建QImage格式的图像,并读入图像信息
                     image_width * image_depth,
                     QImage.Format_RGB888)
        #QImage(uchar *data, int width, int height, int bytesPerLine, Format format,
        #        QImageCleanupFunction cleanupFunction = Q_NULLPTR, void *cleanupInfo = Q_NULLPTR)
        # 根据已有的数据构造一个对象,其中bytePerLine的计算方式是
        # (图像宽度* 图像位数/8个bit位 +3(为了不丢失数据))/4 * 4 从而得到每行的字节数是4的整数倍的大小
        self.image_label.setPixmap(QPixmap.fromImage(QIm))  # 将QImage显示在之前创建的QLabel控件中
如果想让图片适应QLabel的大小,在 __init__中添加一行代码:
self.image_label.setScaledContents(True)
如果想自定义QLabel的大小以及位置,可以用:
self.image_label.setGeometry(x, y, width, height)
QLineEdit的读取与写入
QLineEdit控件常用的就是读取与写入两个功能:
self.my_lineEdit.text()  # 读取QLineEdit中的内容
self.my_lineEdit.setText('show some text')  # 将字符串写入QLineEdit中
self.my_lineEdit.clear()  # 清除QLineEdit中的信息
QCheckBox的使用
QCheckBox主要是检查其勾选状态,或者连接改变状态触发事件,常用函数如下:
self.my_checkbox.stateChanged.connect(self.related_function)  # 将checkbox状态变化事件连接相应函数

self.my_checkbox.isChecked()  # 检查checkbox是否被勾选

self.my_checkbox.setCheckState(QtCore.Qt.Unchecked)  # 将checkbox状态设置为未勾选状态
                                                     # QtCore.Qt.Checked 为勾选状态
QCombo box的使用
首先通过QtDesigner将Comb box控件托至界面中,双击Combo box控件在弹出的界面中点击左下角的加号添加选项:
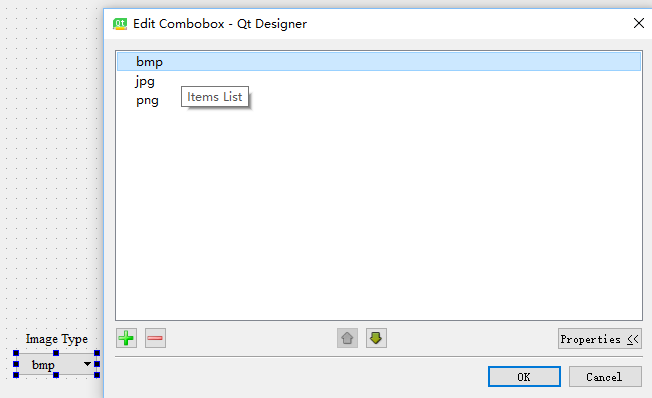
获取Combo box选择信息的常用方法主要有两种,一种是获取选项的index一种是直接获取选项的文本。
self.image_type_comboBox.currentIndex()   # 获取当前选项的Index(int)
self.image_type_comboBox.currentText()    # 获取当前选项的文本(Qstring)
QMovie的使用
QMovie可将gif动态图在label中进行显示。用起来也非常简单。
Movie = QMovie('time.gif')  # 载入Gif图,注意QMovie在PyQt5.QtCore内
self.movie_label.setMovie(Movie)  # 将gif显示在gif中
Movie.start()  # 启动gif
Movie.stop()   # 停止gif
什么时候使用QMovie(它不在设计师界面,不可拖拽),我们这里举个例子:
Qt 使用QMovie加载gif图片实现动态等待窗口
有时候要进行某项后台处理,但后台处理时间很长,需要提示用户等待,不妨做一个动态等待窗口。具体实现过程如下:
1 自定义窗口类DlgWait
(1) 在资源中添加动态的gif图片,记住它的大小。
我添加的是一个“loading.gif”图片,大小是100x100,如下:

(2)添加一个窗口界面类DlgWait
窗口大小比gif稍大即可,如150x150
在界面上添加2个QLabel:
第一个用来显示gif,名为lbl_gif,text为空,大小为100x100
第二个在下,用来显示提示信息,名为lbl_text,text为“后台处理中,请稍候”
如下所示:

(3) 设置DlgWait窗口无边框,背景透明的效果,并加载gif图片
在DlgWait的构造函数中添加如下代码:
  setWindowFlags(Qt::FramelessWindowHint);//无边框

  setAttribute(Qt::WA_TranslucentBackground);//背景透明

  //屏幕居中显示

  int frmX = width();

  int frmY = height();

  QDesktopWidget w;

  int deskWidth = w.width();

  int deskHeight = w.height();

  QPoint movePoint(deskWidth / 2 - frmX / 2, deskHeight / 2 - frmY / 2);

  move(movePoint);

  //加载gif图片

  QMovie *movie = new QMovie(":/img/loading");

  ui->lbl_gif->setMovie(movie);

  movie->start();
2 使用该等待窗口
效果如下:

pyqt中的常用小功能
通过QFileDialog选择文件或者文件夹
directory = QFileDialog.getExistingDirectory(self,
                                    "选取文件夹",
                                    "D:/")   # 打开路径为D盘,若不指定路径,默认打开当前py文件所在文件夹
fileName, filetype = QFileDialog.getOpenFileName(self,
                                    "选取文件",
                                    "C:/",
                                    "Image Files (*.jpg);;Text Files (*.txt)")   # 设置文件扩展名过滤,
                                                                                 # 注意用双分号间隔
QMessageBox简单用法
information框:
QMessageBox.information(self, 'Information', '提示消息')
question框:
reply = QMessageBox.question(self,
                                "question",
                                "选择是或否",
                                QMessageBox.Yes | QMessageBox.No)
DateTime获取当前时间命名文件
通常保存图片或者文件时,会经常纠结如何命名文件,别想了直接用时间命名吧!
time = datetime.datetime.now().strftime('%Y-%m-%d-%H-%M-%S')   # import datetime
save_file_name = time + '.jpg'
cv2.imwrite(save_file_name, save_image)
PyQt菜单栏的创建
首先打开Qt Designer,在界面的最上端双击“Type Here”输入“File(&F)”后按回车键,创建一级菜单,如图所示,(&F)表示通过“Alt + F”快捷键直接打开。同理创建二级菜单等。
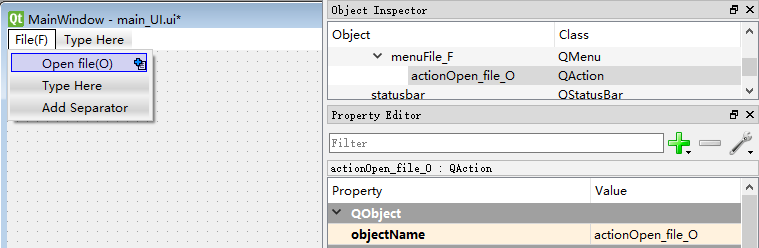
创建好菜单后在右侧menuFile_F一级菜单下可以看到相应menu名称,例如图中创建的Open file二级菜单对应的名称为actionOpen_file_O
接下来在逻辑功能文件中的__init__函数下进行槽连接即可。
self.actionOpen_file_O.triggered.connect(self.open_file_function)
PyQt底部状态栏
状态栏的使用主要是显示一些信息,便于使用。主要使用两个函数:
self.statusBar().showMessage()  # 显示字符串
self.statusBar().clearMessage()  # 清除字符串
有时候会有这么一个需求,就是label上显示的图像,我鼠标放在某个位置,能够显示出当前像素点的RGB,以及坐标信息

    def mouseMoveEvent(self, event):
        # 缺省情况下,只有按下鼠标键移动时,才会调用mouseMoveEvent()
        # 如果要处理窗口中鼠标移动的事件,需要调用grabMouse()方法

        self.setMouseTracking(True)

        pointX = event.globalX()
        pointY = event.globalY()
        AA = QPoint(pointX,pointY)
        BB = self.mapFromGlobal(AA)  # mapFromGlobal(QPoint) - 将屏幕坐标转换成窗口坐标;
        # 除了上述方法,计算出QT界面的(x,y),也可以直接通过 XY = event.pos() 获取当前鼠标在QT界面的坐标
        resultX = BB.x()  # QPoint中返回x,y的值
        resultY = BB.y()
        print('(', resultX,',',resultY, ')')
重载mouseMoveEvent函数后去实现
PyQt创建子界面
首先新建一个UI文件(Widget)sub_window.py以及相应的逻辑功能文件sub_main.py。

创建相应的逻辑文件sub_main.py(要将创建的子UI界面导入):
from PyQt5 import QtCore, QtGui, QtWidgets
from PyQt5.QtCore import *
from PyQt5.QtWidgets import QFileDialog, QMessageBox, QDockWidget, QListWidget
from PyQt5.QtGui import *

from sub_window import Ui_Form   # 导入子UI界面

class secondwindow(QtWidgets.QWidget, Ui_Form):   #  创建子UI类

    def __init__(self):
        super(secondwindow, self).__init__()
        self.setupUi(self)
接着在主逻辑文件中导入子类,并进行实例化:
import sys
import cv2
from PyQt5 import QtCore, QtGui, QtWidgets
from PyQt5.QtCore import *
from PyQt5.QtWidgets import QFileDialog, QMessageBox, QDockWidget, QListWidget
from PyQt5.QtGui import *

from GUI import Ui_MainWindow
from sub_main import secondwindow    # 导入子UI类

class mywindow(QtWidgets.QMainWindow,Ui_MainWindow):

    def __init__(self):
        super(mywindow, self).__init__()
        self.setupUi(self)

        self.second_window = secondwindow()     # 实例化子界面
        self.one_pushButton.clicked.connect(pushbutton_fuction)  # 槽函数连接

    def pushbutton_fuction(self):
        self.second_window.show()   # 通过点击按钮弹出子界面

if __name__ == '__main__':
    app = QtWidgets.QApplication(sys.argv)
    window = mywindow()
    window.show()
    sys.exit(app.exec_())
注意:本示例创建的子窗口继承自QWidget,是非模态化的窗口(可以同时在子窗口和主窗口上进行操作)。若要创建一个模态化的窗口(只有在关闭子窗口后才能对主窗口进行操作),需要继承自QDialog,实例化并打开窗口代码如下:
self.second_window = secondwindow()  # 实例化子界面,注意secondwindow继承自QDialog
self.second_window.exec_()  # 打开子窗口,注意和非模态化不同
创建pyqt信号并进行连接
在主逻辑文件中创建pyqt信号传递到子窗口中:
import sys
import cv2
from PyQt5 import QtCore, QtGui, QtWidgets
from PyQt5.QtCore import *
from PyQt5.QtWidgets import QFileDialog, QMessageBox, QDockWidget, QListWidget
from PyQt5.QtGui import *

from GUI import Ui_MainWindow
from sub_main import secondwindow

class mywindow(QtWidgets.QMainWindow,Ui_MainWindow):
        emit_image_signal = pyqtSignal(QImage)    # 创建pyqt信号,指定传递的变量类型为QImage

    def __init__(self):
        super(mywindow, self).__init__()
        self.setupUi(self)

        self.second_window = secondwindow()     # 实例化子界面

        self.one_pushButton.clicked.connect(pushbutton_fuction)
        self.emit_image_signal.connect(self.second_window.show_label)    # 将pyqt信号连接到
                                                                         # 子窗口的show_label()函数

    def pushbutton_fuction(self):
        Im = cv2.imread('***.jpg')  # 通过Opencv读入一张图片
        image_height, image_width, image_depth = Im.shape    # 获取图像的高,宽以及深度。
        QIm = cv2.cvtColor(Im, cv2.COLOR_BGR2RGB)    # opencv读图片是BGR,qt显示要RGB,所以需要转换一下
        QIm = QImage(QIm.data, image_width, image_height,    # 创建QImage格式的图像,并读入图像信息
                     image_width * image_depth,
                     QImage.Format_RGB888)
        self.second_window.show()    #  弹出子窗口
        self.emit_image_signal.emit(QIm)   # 释放pyqt信号

if __name__ == '__main__':
    app = QtWidgets.QApplication(sys.argv)
    window = mywindow()
    window.show()
    sys.exit(app.exec_())
在子逻辑文件中接收pyqt信号并绘制图像:
class secondwindow(QtWidgets.QWidget, Ui_Form):   #  创建子UI类

    def __init__(self):
        super(secondwindow, self).__init__()
        self.setupUi(self)

    def show_label(self, QIm)
        self.image_label.setPixmap(QPixmap.fromImage(QIm))   # 将传递进来的图片显示在创建好的QLabel控件中
pyqt鼠标事件
使用鼠标事件首先要开启鼠标跟踪,接着重写鼠标事件:
class mywindow(QtWidgets.QMainWindow,Ui_MainWindow):

    def __init__(self):
        super(mywindow, self).__init__()
        self.setupUi(self)

        self.setMouseTracking(True)     # 开启鼠标跟踪
        self.centralwidget.setMouseTracking(True)
        self.image_label.setMouseTracking(True)   # 在image_label中开启鼠标跟踪

    def mouseMoveEvent(self, a0: QtGui.QMouseEvent):  # 鼠标移动事件
        #  a0.x()  -> x坐标 ; a0.y() -> y坐标

    def mousePressEvent(self, a0: QtGui.QMouseEvent):  # 鼠标点击事件
        if a0.button() == Qt.LeftButton:   # 按下鼠标左键
           # do something
        if a0.button() == Qt.RightButton:  # 按下鼠标右键
           # do something
        if a0.button() == Qt.MidButton:  # 按下鼠标中间
           # do something

    def mouseReleaseEvent(self, a0: QtGui.QMouseEvent):  # 鼠标释放事件
        # do something
pyqt多线程的简单使用
pyqt多线程的使用,主要是先创建一个线程类,接着在主线程中进行实例化并开启线程。
首先创建一个线程类,新建一个py文件:
import cv2
from PyQt5 import QtCore, QtGui, QtWidgets
from PyQt5.QtCore import *
from PyQt5.QtWidgets import QFileDialog, QMessageBox, QDockWidget, QListWidget
from PyQt5.QtGui import *

class mythread(QThread):

    def __init__(self, parent=None):
        super(mythread, self).__init__()

    def __del__(self):
        self.wait()

    def run(self):
        #  do something
接着在主函数中导入自定义线程类,实例化并开启:
import sys
import cv2
from PyQt5 import QtCore, QtGui, QtWidgets
from PyQt5.QtCore import *
from PyQt5.QtWidgets import QFileDialog, QMessageBox, QDockWidget, QListWidget
from PyQt5.QtGui import *

from GUI import Ui_MainWindow
from costom_thread import mythread   # 导入自定义线程类

class mywindow(QtWidgets.QMainWindow,Ui_MainWindow):

    def __init__(self):
        super(mywindow, self).__init__()
        self.setupUi(self)

        self.one_pushButton.clicked.connect(pushbutton_fuction)  # 槽函数连接
        self.sub_thread = mythread()   # 实例化新线程

    def pushbutton_fuction(self):
        self.sub_thread.start()    # 开启新线程

if __name__ == '__main__':
    app = QtWidgets.QApplication(sys.argv)
    window = mywindow()
    window.show()
    sys.exit(app.exec_())