Flutter之Stepper的简单使用
Stepper组件展示了一些列的步骤。这个组件可以让我们处理这样的逻辑:让前一步(step)完成的时候,下一个步骤(step)才能开始的一系列相关的事件,其运行效果。可能描述的不是太清楚,具体效果可以看官网给的例子图片:
在这里就详细的说一下Stepper组件的用法:
每一个步骤(step)都有如下的状态(StepState):,此状态为枚举类型
| 状态名 | 状态说明 |
|---|---|
| indexed | 此为默认状态,此状态下会在圆圈里里展示当前步骤的索引,代表着当前是第几个步骤(从1开始) |
| eidting | 编辑状态,此状态太下会在 |
| complete | 完成状态,此状态下会在圆圈里显示一个对号 |
| disabled | 不可用状态,此状态下状态标题字体颜色是灰色,且不会响应onStepTapped事件 |
| error | 错误状态,此状态下会显示一个带有叹号的红色三角形来替代其余状态下的圆圈,步骤标题和副标题字体颜色都是红色 |
为了更直观的说明上述状态,下面看下具体的运行效果:

细心的读者可能会发现步骤二的圆圈是蓝色的,这个其实是将Stepper组件的isActive属性设置为true的结果。
下面就来看看这个组件怎么用,在阅读下文之前可以点击此处看看具体的运行效果gif图:
Step对象的使用:
首先上面的步骤A到步骤F其实是一个List对象的集合,每一步用一个Step表示,Step的属性如下所示:
  const Step({
    @required this.title,///步骤标题
    this.subtitle,//步骤副标题
    @required this.content,//当前步骤的内容
    this.state = StepState.indexed,//当前步骤的状态,默认是indexed状态
    this.isActive = false,//当前状态是否激活
  })
所以,如果想要上图实现步骤三的状态,那么Step就如下所示:
  Step(
      title: Text('stepTitle C'),
      subtitle:Text('error状态'),
      state: StepState.error,
      content:  Card(
          color:Colors.red,
          child:SizedBox(
            child: Center( child: Text("设置state: StepState.error,表明此步骤错误,为进度条显示红色警告"),),
            width: 600.0,
            height: 100.0,
          )
      ),
    )
我们将Step对象组成一个List集合steps交给Stepper组件的 steps属性使用。另外Stepper组件有一个currentStep属性,代表着当前步骤位于哪一步,比如如果这个属性是1,那么就是说步骤2的content内容将会展示出来,其余的step的content都是关闭状态,运行效果如下:
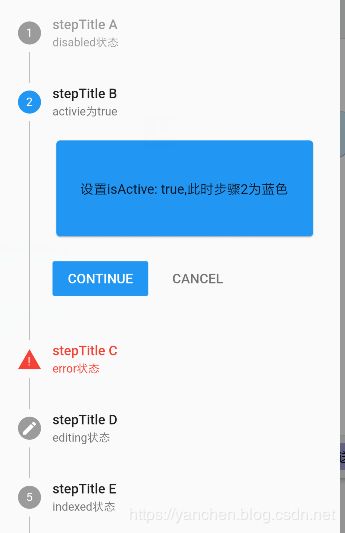
注意到了没有,上面有一个CONTINUE和CANCEl这两个按钮,这两个按钮是Stepper自动给每一个Step对象追加的,当我们点击continue的时候将会打开下一个步骤C且关闭自己(StepB),这是怎么实现的呢?在Stepper组件中提供了onStepCancel和onStepContinue两个监听函数,实现之即可,代码如下:
 currentStep: this.current_step,
       onStepCancel: () {//回到上一步
         setState(() {
           if (current_step > 0) {
             current_step = current_step - 1;
           } else {
             current_step = 0;
           }
         });
       },
       onStepContinue: () {//下一步
         setState(() {
           if (current_step < steps.length - 1) {
             current_step = current_step + 1;
           } else {
             current_step = 0;
           }
         });
       },
     )
到此为止,Steper的使用讲解完毕,下面附上本片博文的demo源码,供大家参考。或者从博主的github上下载源码:
import 'package:flutter/material.dart';
class StepperDemo extends StatefulWidget {
  @override
  _StepperState createState() => _StepperState();
}
class _StepperState extends State {
  int current_step = 0;
  List steps =[
    Step(
      title: Text('stepTitle A'),
      subtitle:Text('disabled状态') ,
      state: StepState.disabled,
      content: Card(
          color:Colors.red,
          child:SizedBox(
            child: Center( child: Text("设置state: StepState.disabled,注意标题setTitle A字体颜色为灰色,此时该Step"
                "不会响应onStepTapped 事件"),),
            width: 600.0,
            height: 100.0,
          )
      ),
    ),
    Step(
      title: Text('stepTitle B'),
      subtitle:Text('activie为true'),
      isActive: true,
      content:  Card(
          color:Colors.blue,
          child:SizedBox(
            child: Center( child: Text("设置isActive: true,此时步骤2为蓝色"),),
            width: 600.0,
            height: 100.0,
          )
      ),
    ),
    Step(
      title: Text('stepTitle C'),
      subtitle:Text('error状态'),
      state: StepState.error,
      content:  Card(
          color:Colors.red,
          child:SizedBox(
            child: Center( child: Text("设置state: StepState.error,表明此步骤错误,为进度条显示红色警告"),),
            width: 600.0,
            height: 100.0,
          )
      ),
    ),
    Step(
      title: Text('stepTitle D'),
      subtitle:Text('editing状态'),
      state: StepState.editing,
      content:  Card(
          color:Colors.yellow,
          child:SizedBox(
            child: Center( child: Text("设置state: StepState.editing,自动设置了编辑状态的铅笔标志"),),
            width: 600.0,
            height: 50.0,
          )
      ),
    ),
    Step(
      title: Text('stepTitle E'),
      subtitle:Text('indexed状态'),
      state: StepState.indexed,
      content:  Card(
          color:Colors.pink,
          child:SizedBox(
            child: Center( child: Text("设置state: StepState.indexed,此状态为默认状态,显示当前步骤的索引"),),
            width: 600.0,
            height: 50.0,
          )
      ),
    ),
    Step(
      title: Text('stepTitle F'),
      subtitle:Text('complete状态'),
      state: StepState.complete,
      content:  Card(
          color:Colors.pink,
          child:SizedBox(
            child: Center( child: Text("设置state: StepState.complete,此状态为默认状态,显示对号"),),
            width: 600.0,
            height: 50.0,
          )
      ),
    ),
  ];
  @override
  Widget build(BuildContext context) {
    return Scaffold(
        appBar: AppBar(
          title: Center(child: Text("Stepper简单使用")),
          elevation: 0.0,
        ),
        body: _createStepper()
    );
  }

  Widget _createStepper(){
     return Stepper(
         steps:  steps,
         onStepTapped: (step) {///点击某step直接打开
           setState(() {
             current_step = step;
           });
         },
       currentStep: this.current_step,
       onStepCancel: () {//回到上一步
         setState(() {
           if (current_step > 0) {
             current_step = current_step - 1;
           } else {
             current_step = 0;
           }
         });
       },
       onStepContinue: () {//下一步
         setState(() {
           if (current_step < steps.length - 1) {
             current_step = current_step + 1;
           } else {
             current_step = 0;
           }
         });
       },
     );
  }

  Widget test(){
    return Container(
      margin:const EdgeInsets.all(10.0),
      color: const Color(0xFF00FF00),
      width: 48.0,
      height: 48.0,
    );
  }
}