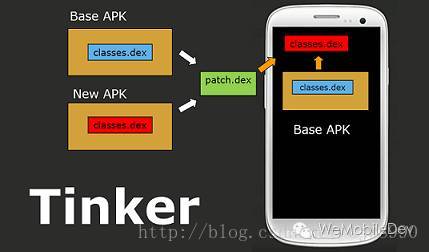
tinker热修护—命令行接入
由于原理与系统限制,Tinker有以下已知问题
- Tinker不支持修改AndroidManifest.xml,Tinker不支持新增四大组件(1.9.0支持新增非export的Activity);
- 由于Google Play的开发者条款限制,不建议在GP渠道动态更新代码;
- 在Android N上,补丁对应用启动时间有轻微的影响;
- 不支持部分三星android-21机型,加载补丁时会主动抛出”TinkerRuntimeException:checkDexInstall failed”;
- 对于资源替换,不支持修改remoteView。例如transition动画,notification icon以及桌面图标。
接入Tinker的几种方式
TinkerPatch 平台
提供了补丁后台托管,版本管理,保证传输安全等功能,让你无需搭建一个后台,无需关心部署操作,只需引入一个 SDK 即可立即使用 Tinker。
第三方平台
如TinkerPatch平台 和Bugly热更新功能
这种方式对Application进行了反射,是有风险
反射失败的情况,我们会自动回退到代理 Application
生命周期模式,防止因为反射失败而造成应用无法启动的问题。
自己后台管理patch包
主要介绍这种
1. 命令行接入
2. gradle接入
命令行接入
这种方式:
在Tinker gradle脚本接入成功后,并打出patch包后,发现如果在版本中都加入脚本,感觉没有必要。毕竟我们只需要patch包。在后台生成patch,然后客户端下载并加载patch包这个流程就可以的。版本中并没有必要知道patch生产的过程和patch生成的脚本。
 )
)
百度过后发现一个博客有介绍:命令接入 张鸿洋的博客
但是没有介绍项目分包情况
defaultConfig {
    // Enabling multidex support.
    multiDexEnabled true

    ...
}
现在介绍 分包情况下的 Tinker命令 接入 :
客户端
会有以下步骤
1. 依赖引入、分包规则
2. 混淆文件 添加
4. 代码application AndroidManifest.xml
依赖引入
//app(项目)目录下build.gradle
//介绍需要接入的
//根(项目)目录下build.gradle没有必要加引用
android{

    defaultConfig {
         ...

        // Enabling multidex support.
        multiDexEnabled true
        //分包规则 重要
        //必须打入第一个dex包的java类
        multiDexKeepProguard file("tinkerMultidexKeep.pro")

         ...
    }

    dependencies {
        // ...
        //可选,用于生成application类 推荐用
        //大部分项目中我们都自己定义类application
        provided('com.tencent.tinker:tinker-android-anno:1.9.2')
        //tinker的核心库
        compile('com.tencent.tinker:tinker-android-lib:1.9.2')
    }

    signingConfigs {
       //根据自己项目实际情况来
       //不介绍
    }

    dexOptions {
        //tinker
        jumboMode = true
    }

    buildTypes {
        //名字而已 可以随便命名 Develop、release、debug
        release {
            minifyEnabled true
            signingConfig signingConfigs.release
            //必须这样写
            //我的项目中是 proguardFiles 'proguard-rules.pro' 编译失败了
            proguardFiles getDefaultProguardFile('proguard-android.txt'), 'proguard-rules.pro'
        }
        debug {
            debuggable true
            minifyEnabled true
            signingConfig signingConfigs.release
            proguardFiles getDefaultProguardFile('proguard-android.txt'), 'proguard-rules.pro'
        }
    }

    //没有必要接入tinker gradle 脚本
}
tinkerMultidexKeep.pro介绍
这个是分包规则,打入第一个dex包中的类
//tinkerMultidexKeep.pro
//和proguard-rules.pro混淆文件同级

#tinker multidex keep patterns:
-keep public class * implements com.tencent.tinker.loader.app.ApplicationLifeCycle {
    (...);
    void onBaseContextAttached(android.content.Context);
}

-keep public class * extends com.tencent.tinker.loader.TinkerLoader {
    (...);
}

-keep public class * extends android.app.Application {
     ();
     void attachBaseContext(android.content.Context);
}

-keep class com.tencent.tinker.loader.TinkerTestAndroidNClassLoader {
    (...);
}

#your dex.loader patterns here
#注意 AndroidManifest.xml中的applicaion
-keep class com.unionpay.base.UPTinkerApplication {
    (...);
}

-keep class com.tencent.tinker.loader.** {
    (...);
}
混淆文件添加 (proguard-rules.pro )
# ***************** Tinker 混淆
-keepattributes *Annotation*
-dontwarn com.tencent.tinker.anno.AnnotationProcessor
-keep @com.tencent.tinker.anno.DefaultLifeCycle public class *

-keep public class * extends android.app.Application {
    *;
}

-keep public class com.tencent.tinker.loader.app.ApplicationLifeCycle {
    *;
}
-keep public class * implements com.tencent.tinker.loader.app.ApplicationLifeCycle {
    *;
}

-keep public class com.tencent.tinker.loader.TinkerLoader {
    *;
}
-keep public class * extends com.tencent.tinker.loader.TinkerLoader {
    *;
}

-keep public class com.tencent.tinker.loader.TinkerTestDexLoad {
    *;
}

#your dex.loader pattern here
-keep class com.tencent.tinker.loader.**
#注意 AndroidManifest.xml中的applicaion
-keep class com.unionpay.base.UPTinkerApplication

# ***************** Tinker patch包
# 打替换apk包的时候需要
#-applymapping mapping.txt
代码application AndroidManifest.xml
我们在AndroidManifest.xml会自己定义一个application文件 如图:
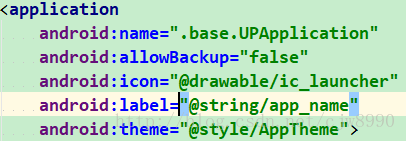
替换成如图(名字可以自己取,位置最好和以前application同级):
虽然我们这么写了,但是实际上Application会在编译期生成
意思就是不需要去创建一个类,build它会自己生成
如果报红,也可以build下

AndroidManifest还需要添加
<meta-data
    android:name="TINKER_ID"
    android:value="最好是自己的版本号" />


<service
    android:name="com.tinker.service.SampleResultService"
    android:exported="false"/>
以前Application修改为
//tinker推荐下面的写法
//UPTinkerApplication 是application
@DefaultLifeCycle(application = "com.xxxxx.base.UPTinkerApplication",
        flags = ShareConstants.TINKER_ENABLE_ALL,
        loadVerifyFlag = false)
public class UPApplication extends ApplicationLike {

   public UPApplication(Application application, int tinkerFlags, boolean tinkerLoadVerifyFlag, long applicationStartElapsedTime, long applicationStartMillisTime, Intent tinkerResultIntent) {
        super(application, tinkerFlags, tinkerLoadVerifyFlag, applicationStartElapsedTime, applicationStartMillisTime, tinkerResultIntent);
    }

    /**
     * install multiDex before install tinker
     * so we don't need to put the tinker lib classes in the main dex
     *
     * @param base
     */
    @TargetApi(Build.VERSION_CODES.ICE_CREAM_SANDWICH)
    @Override
    public void onBaseContextAttached(Context base) {
        super.onBaseContextAttached(base);
        //you must install multiDex whatever tinker is installed!
        MultiDex.install(base);

        TinkerManager.setTinkerApplicationLike(this);

        TinkerManager.initFastCrashProtect();
        //should set before tinker is installed
        TinkerManager.setUpgradeRetryEnable(true);

        //optional set logIml, or you can use default debug log
        TinkerInstaller.setLogIml(new MyLogImp());

        //installTinker after load multiDex
        //or you can put com.tencent.tinker.** to main dex
        TinkerManager.installTinker(this);
        Tinker tinker = Tinker.with(getApplication());
    }
}
onBaseContextAttached 配置是根据 Tinker提供的Demo编入
当然也可以不按照Demo写
Tinker Demo
引入文件如下 不做分析 UPTinkerUtils自己写的工具类

生成patch的 方法
命令行如下
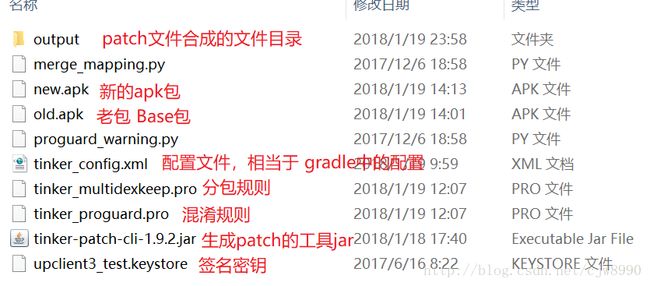
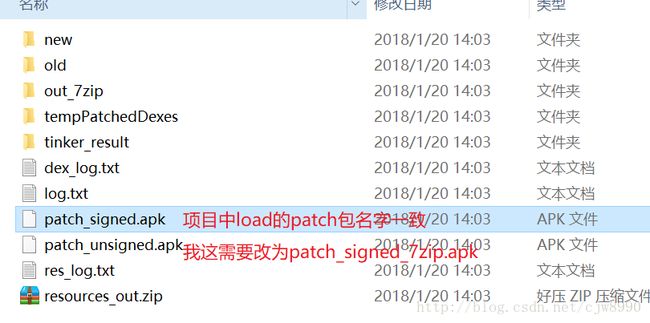
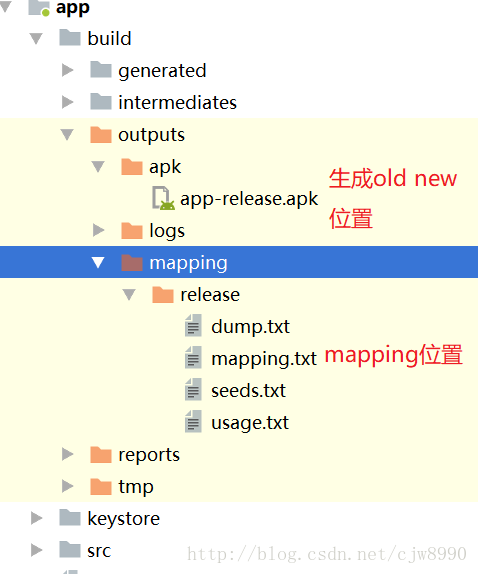
java -jar tinker-patch-cli-1.9.2.jar -old old.apk -new new.apk -config tinker_config.xml -out output文件结构
注意:
打new.apk 和old.apk是
第一次打出apk(new.apk)的时候,保留下生成的mapping文件,
在打第二次修护包(old.apk),需要copy到与proguard-rules.pro同目录
目的是第二次打修复包的时候使用mapping文件
然后在proguard-rules.pro中添加上:
-applymapping mapping.txt
不打修护包注销
目的 保证后续的打包与线上包使用的是同一个mapping文件。
tinker_config.xml介绍
<tinkerPatch>
    <issue id="property">


        <ignoreWarning value="false"/>


        <useSign value="true"/>


        <sevenZipPath value="/usr/local/bin/7za"/>


        <isProtectedApp value="false"/>


        <supportHotplugComponent value="false"/>
    issue>

    <issue id="dex">


        <dexMode value="jar"/>


        <pattern value="classes*.dex"/>
        <pattern value="assets/secondary-dex-?.jar"/>


        <loader value="com.tencent.tinker.loader.*"/>

        <loader value="com.xxxxx.base.UPTinkerApplication"/>
    issue>

    <issue id="lib">


        <pattern value="lib/*/*.so"/>
    issue>

    <issue id="resource">


        <pattern value="res/*"/>
        <pattern value="assets/*"/>
        <pattern value="resources.arsc"/>
        <pattern value="AndroidManifest.xml"/>


        <ignoreChange value="assets/sample_meta.txt"/>


        <largeModSize value="100"/>

    issue>

    <issue id="packageConfig">


        <configField name="platform" value="all"/>
        <configField name="patchMessage" value="classes.dex"/>
    issue>


    <issue id="sign">

        <path value="upclient3_test.keystore"/>

        <storepass value="android"/>

        <keypass value="android"/>

        <alias value="androiddebugkey"/>
    issue>

tinkerPatch>
tinker_multidexkeep.pro 介绍
#tinker multidex keep patterns:
-keep public class * implements com.tencent.tinker.loader.app.ApplicationLifeCycle {
    ();
    void onBaseContextAttached(android.content.Context);
}

-keep public class * extends com.tencent.tinker.loader.TinkerLoader {
    ();
}

-keep public class * extends android.app.Application {
     ();
     void attachBaseContext(android.content.Context);
}

-keep class com.tencent.tinker.loader.TinkerTestAndroidNClassLoader {
    ();
}

#your dex.loader patterns here
#AndroidManifest.xml中的applicaion
-keep class com.xxxxx.base.UPTinkerApplication {
    ();
}

-keep class com.tencent.tinker.loader.** {
    ();
}
tinker_proguard.pro介绍
#生成patch包 没有加mapping 也成功了
#生成修护包一定需要加
#待再次测试
#-applymapping "old apk mapping here"

-keepattributes *Annotation*
-dontwarn com.tencent.tinker.anno.AnnotationProcessor
-keep @com.tencent.tinker.anno.DefaultLifeCycle public class *
-keep public class * extends android.app.Application {
    *;
}

-keep public class com.tencent.tinker.loader.app.ApplicationLifeCycle {
    *;
}
-keep public class * implements com.tencent.tinker.loader.app.ApplicationLifeCycle {
    *;
}

-keep public class com.tencent.tinker.loader.TinkerLoader {
    *;
}
-keep public class * extends com.tencent.tinker.loader.TinkerLoader {
    *;
}

-keep public class com.tencent.tinker.loader.TinkerTestDexLoad {
    *;
}

#AndroidManifest.xml中的applicaion
-keep public class com.tencent.tinker.loader.TinkerTestAndroidNClassLoader {
    *;
}

#for command line version, we must keep all the loader class to avoid proguard mapping conflict
#your dex.loader pattern here
-keep public class com.tencent.tinker.loader.** {
    *;
}

-keep class com.unionpay.base.UPTinkerApplication {
    *;
}
提供一个基于官方Demo的 -命令接入
Git库
CSDN