Faster R-CNN从原理详解(基于keras代码)
Faster R-CNN从原理详解(基于keras代码)
本文主要通过通过keras版本的代码来讲解:https://github.com/yhenon/keras-frcnn
原文链接:http://www.ee.bgu.ac.il/~rrtammy/DNN/reading/FastSun.pdf
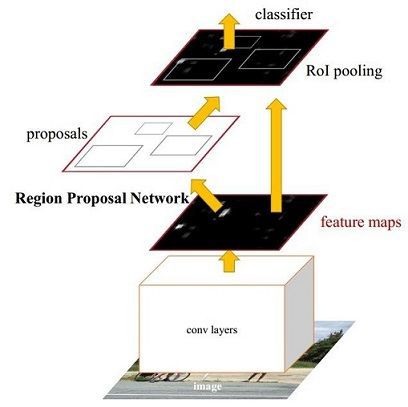
1.faster RCNN整个流程图

其实RCNN系列目标检测,大致分为两个阶段:一是获取候选区域(region proposal 或 RoI),二是对候选区域进行分类判断以及边框回归。Faster R-CNN其实也是符合两个阶段,只是Faste R-CNN使用RPN网络提取候选框,后面的分类和边框回归和R-CNN差不多。所以有时候我们可以将faster r-cnn看成RPN部分和R-CNN部分。
从如图1可以看出,faster r-cnn又包含了以下4重要的部分:
1. Conv layers
这里应该理解为基本卷积网络(base net).通过该网络来提取原始图片的featuremap特征,最后将这些特征送入RPN网络和RCNN网络。有一点需要注意的就是,真正送入RPN网络的featuremap其实并不是整张图片的产生的featuremap,具体怎么选择,后面仔细说明。在本文的讲解中,我们会使用到两种base Net:vgg16 和 Resnet50.**
2. RPN网络
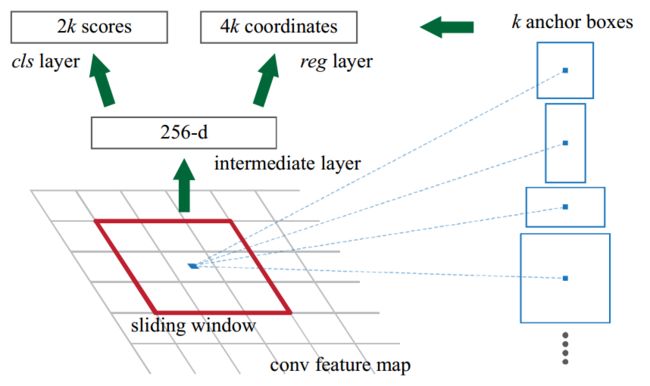
RPN网络用于生成region proposals(也可以说是RoI-region of interest)。该层通过sigmoid函数判断anchors属于foreground或者background(其实就是一个二分类,论文代码-caffe版本用的softmax输出两个值,前景和背景的概率,本文使用keras版本指数一个值表示前景的概率),再利用bounding box regression修正anchors获得修正后的RoI。**
3. Roi Pooling
该层通过输入feature maps和RoI,其中featuremap就是base Net提取的,而RoI是RPN网络提取的。通过该层pooling实现提取RoI的feature maps,送入后续全连接层判定目标类别。**
4. Classifier
该部分,叫做分类部分,其实就是对候选区域进行检测部分了。利用RoI feature maps计算RoI的类别,同时再次bounding box regression获得检测框最终的位置。**
2.定义网络
2.1 VGG16版本的base Net.
也就是前面提到的Conv layers,可以看到,该定义的网络在标准的VGG16的基础上去掉了后面的全连接层和softmax层。注意网络中的名字不能乱命名,一定要保持和标准的VGG16网络一直,因为最后训练网络进行初始化的时候,需要根据名字加载预训练的网络。
可以看到整个网络由5个Block组成:
Block1和Block2:
由2个(3*3)的卷积层和1个(2*2)的最大池化层构成,由于设置的卷积层的边界padding为1,stride默认为(1,1),所以可以知道(3*3)的卷积层并不改变featuremap的长宽尺度,仅仅改变的featuremap的通道数。而最大池化层池化核的大小为(2,2)同时stride为(2,2),所以经过池化后,featuremap的长宽都变为原来的1/2.
Block3和Block4:
由三个(3*3)的卷积层和1个(2*2)的最大池化层构成。其中每个层的构成与Bloc1和Block2一致。也即卷积层不会改变featuremap的大小,只有池化层会缩小featuremap的尺度。
Block5:
仅仅有三个(3*3)的卷基层。
从整个网络可以得出:
假如输入的图片的shape为:(600 * 600 * 3)
输出的featuremap的shape为:(600/16 * 600/16 * 512) = (37 * 37 * 512)
注:假设不考虑batch维。
def nn_base(input_tensor=None, trainable=False):


    # Determine proper input shape
    if K.image_dim_ordering() == 'th':
        input_shape = (3, None, None)
    else:
        input_shape = (None, None, 3)

    if input_tensor is None:
        img_input = Input(shape=input_shape)
    else:
        if not K.is_keras_tensor(input_tensor):
            img_input = Input(tensor=input_tensor, shape=input_shape)
        else:
            img_input = input_tensor

    if K.image_dim_ordering() == 'tf':
        bn_axis = 3
    else:
        bn_axis = 1

    # Block 1
    x = Conv2D(64, (3, 3), activation='relu', padding='same', name='block1_conv1')(img_input)
    x = Conv2D(64, (3, 3), activation='relu', padding='same', name='block1_conv2')(x)
    x = MaxPooling2D((2, 2), strides=(2, 2), name='block1_pool')(x)

    # Block 2
    x = Conv2D(128, (3, 3), activation='relu', padding='same', name='block2_conv1')(x)
    x = Conv2D(128, (3, 3), activation='relu', padding='same', name='block2_conv2')(x)
    x = MaxPooling2D((2, 2), strides=(2, 2), name='block2_pool')(x)

    # Block 3
    x = Conv2D(256, (3, 3), activation='relu', padding='same', name='block3_conv1')(x)
    x = Conv2D(256, (3, 3), activation='relu', padding='same', name='block3_conv2')(x)
    x = Conv2D(256, (3, 3), activation='relu', padding='same', name='block3_conv3')(x)
    x = MaxPooling2D((2, 2), strides=(2, 2), name='block3_pool')(x)

    # Block 4
    x = Conv2D(512, (3, 3), activation='relu', padding='same', name='block4_conv1')(x)
    x = Conv2D(512, (3, 3), activation='relu', padding='same', name='block4_conv2')(x)
    x = Conv2D(512, (3, 3), activation='relu', padding='same', name='block4_conv3')(x)
    x = MaxPooling2D((2, 2), strides=(2, 2), name='block4_pool')(x)

    # Block 5
    x = Conv2D(512, (3, 3), activation='relu', padding='same', name='block5_conv1')(x)
    x = Conv2D(512, (3, 3), activation='relu', padding='same', name='block5_conv2')(x)
    x = Conv2D(512, (3, 3), activation='relu', padding='same', name='block5_conv3')(x)

    return x
2.2 RPN网络的定义。

该网络非常简单,仅仅在前面定义的base net的基础上加了一个(3*3)的卷基层,然后就是由两个一个(1*1)的卷基层构成的输出层。一个输出用于判断前景和背景,另外一个用于bboxes回归.而且,这里的卷积层都不改变featuremap的尺度,仅仅改变通道数。
该网络的输入为:
base_layers: 也就是前面Vgg版本的base Net网络最后的输出。假设输入base Net的图片尺度为(600 * 600 * 3).则该RPN输入featuremap的shape也就是(37 * 37 * 512)。
num_anchors: 这个是值得每个锚点产生的RoI的数量。例如:根据论文中anchors的尺度为:[16, 32, 64]共3种, 长宽比例为:[1:1,1:2,2:1]也是三种。则num_anchors=3*3.
(该值并不固定,可能需要根据具体实验数据以及应用场景做相应的修改)网络的输出为:
x_class: 根据前面的输入,可知输出的shape为:(37 * 37 * 9).注意在论文中输出的时2*9=18维,因为考虑使用的时softmax分别输出forground和background的概率,但是次数仅仅输出foreground的概率所以时1*9=9维。效果其实是一样的。
x_regr: bboxes回归层.bboxes回归由于是RCNN系列的核心部分,所以需要特别说明.请参照这里
def rpn(base_layers, num_anchors):

    x = Conv2D(512, (3, 3), padding='same', activation='relu', kernel_initializer='normal', name='rpn_conv1')(base_layers)

    x_class = Conv2D(num_anchors, (1, 1), activation='sigmoid', kernel_initializer='uniform', name='rpn_out_class')(x)
    x_regr = Conv2D(num_anchors * 4, (1, 1), activation='linear', kernel_initializer='zero', name='rpn_out_regress')(x)

    return [x_class, x_regr, base_layers]
2.3 最终的classifier部分网络的定义:
def classifier(base_layers, input_rois, num_rois, nb_classes = 21, trainable=False):

    # compile times on theano tend to be very high, so we use smaller ROI pooling regions to workaround

    if K.backend() == 'tensorflow':
        pooling_regions = 7
        input_shape = (num_rois,7,7,512)
    elif K.backend() == 'theano':
        pooling_regions = 7
        input_shape = (num_rois,512,7,7)

    out_roi_pool = RoiPoolingConv(pooling_regions, num_rois)([base_layers, input_rois])

    out = TimeDistributed(Flatten(name='flatten'))(out_roi_pool)
    out = TimeDistributed(Dense(4096, activation='relu', name='fc1'))(out)
    out = TimeDistributed(Dropout(0.5))(out)
    out = TimeDistributed(Dense(4096, activation='relu', name='fc2'))(out)
    out = TimeDistributed(Dropout(0.5))(out)

    out_class = TimeDistributed(Dense(nb_classes, activation='softmax', kernel_initializer='zero'), name='dense_class_{}'.format(nb_classes))(out)
    # note: no regression target for bg class
    out_regr = TimeDistributed(Dense(4 * (nb_classes-1), activation='linear', kernel_initializer='zero'), name='dense_regress_{}'.format(nb_classes))(out)

    return [out_class, out_regr]
[参考链接]:
1. https://zhuanlan.zhihu.com/p/31426458
2. http://geyao1995.com/Faster_rcnn%E4%BB%A3%E7%A0%81%E7%AC%94%E8%AE%B0_test_2_roi_helpers/
3. https://dongjk.github.io/code/object+detection/keras/2018/05/21/Faster_R-CNN_step_by_step,_Part_I.html