吴恩达作业2 利用两层神经网络实现不同颜色点的分类,可更改隐藏层数量
任务:将400个两种颜色的点用背景色分为两类。
前面的还是建议重点学神经网络知识,至于数据集怎么做的后面在深究,首先先看看数据集,代码如下:
def load_planar_dataset():
    np.random.seed(1)
    m = 400 # number of examples
    N = int(m/2) # number of points per class
    D = 2 # dimensionality
    X = np.zeros((m,D)) # data matrix where each row is a single example
    Y = np.zeros((m,1), dtype='uint8') # labels vector (0 for red, 1 for blue)
    a = 4 # maximum ray of the flower

    for j in range(2):
        ix = range(N*j,N*(j+1))
        t = np.linspace(j*3.12,(j+1)*3.12,N) + np.random.randn(N)*0.2 # theta
        r = a*np.sin(4*t) + np.random.randn(N)*0.2 # radius
        X[ix] = np.c_[r*np.sin(t), r*np.cos(t)]
        Y[ix] = j
    X = X.T
    Y = Y.T
    return X, Y
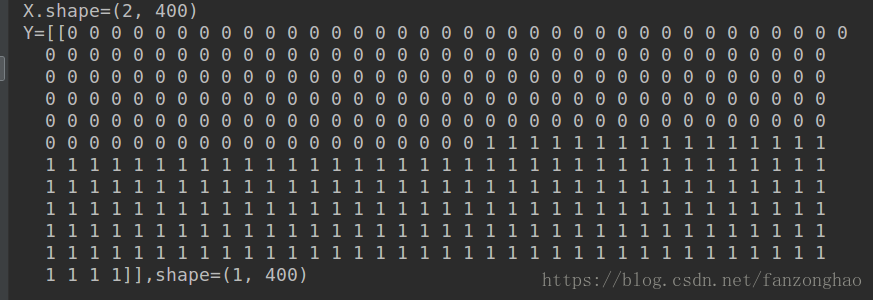
打印看看返回的X,Y
由于X太多不方便粘贴,只打印了shape,可看出X是2行400列的矩阵(2,400),Y是1行400列矩阵(1,400)。
然后用X的数据作为二维的坐标点,Y的0,1作为分类点,比如0代表红色点,1代表蓝色点,这样400个两种颜色的点就可以显示出来,代码如下:
"""
测试函数:实现数据集的显示
"""
def test():
    X,Y=planar_utils.load_planar_dataset()
    plt.scatter(X[0,:],X[1,:],c=np.squeeze(Y),s = 80,cmap=plt.cm.Spectral)
    plt.show()
显示结果如下:
利用两层神经网络,一层隐藏层,一层输出层,400个点,所以有400个样本,两种特征(两种颜色),所以输入层节点是2个,隐藏层定义4个节点,输出层1个节点,脑海里就有神经网络的结构图了,故W1(4,2),b1(4,1),W2(1,4),b2(1,1)简单的演示一遍。Z1=W1*X=(4,400),Z2=W2*Z1=(1,400),就对应Y的维度了。中间加激活函数和b值不影响维度
具体公式推导如下,右上角是神经网络:
下面看代码:
def sigmoid(z):
    s=1.0/(1+np.exp(-z))
    return s
"""
返回输入层节点和输出层节点
"""
def lay_sizer(X,Y):
    n_x = X.shape[0]
    n_y = Y.shape[0]
    return n_x,n_y
"""
初始化W和b,n_h就是隐藏层节点
"""
def initialize_parameters(n_x,n_h,n_y):
    W1 = np.random.randn(n_h,n_x)*0.01
    b1=np.zeros((n_h,1))
    W2 = np.random.randn(n_y, n_h) * 0.01
    b2 = np.zeros((n_y, 1))
    parameters={'W1':W1,
                'b1':b1,
                'W2':W2,
                'b2':b2}
    return parameters
"""
前向传播,返回中间量Z1 A1 Z2 A2 最后一层加sigmoid因为要实现二分类
"""
def forward_propagation(X,parameters):
    W1 = parameters['W1']
    W2 = parameters['W2']
    b1 = parameters['b1']
    b2 = parameters['b2']
    Z1 = np.dot(W1, X) + b1
    A1 = np.tanh(Z1)#Relu(Z1)
    Z2 = np.dot(W2, A1) + b2
    A2 = sigmoid(Z2)
    cache={'Z1':Z1,
           'Z2':Z2,
           'A1':A1,
           'A2':A2}
    return cache,A2
"""
利用交叉熵函数计算损失值
"""
def compute_cost(A2,Y):
    m=Y.shape[1]
    cost=-1 / m *(np.dot(Y,np.log(A2).T)+np.dot((1-Y),np.log(1-A2).T))
    cost=np.squeeze(cost)
    return cost
"""
后向传播:注意维度
"""
def back_propagation(parameters,cache,X,Y):
    m = Y.shape[1]
    A2 = cache['A2']
    A1 = cache['A1']
    W2 = parameters['W2']
    dZ2 = A2-Y
    dW2 = 1/m*(np.dot(dZ2,A1.T))
    db2 = 1/m*(np.sum(dZ2,axis=1,keepdims=True)) #db2(n_y,1) 按行相加 保持二维性
                                               # [[1,2],[3,4]] [[3],[7]]
    dA1 = np.dot(W2.T,dZ2)
    dZ1 = dA1*(1-np.power(A1,2))
    dW1 = 1/m*np.dot(dZ1,X.T)
    db1 = 1/m*(np.sum(dZ1,axis=1,keepdims=True))  #db1(n_h,1) 按行相加 保持二维性
    grads={'dW2':dW2,
           'dW1':dW1,
           'db2':db2,
           'db1':db1}
    return grads
"""
更新参数 W和b
"""
def update_parameters(grads,parameters,learning_rate):
    dW2=grads['dW2']
    dW1=grads['dW1']
    db2=grads['db2']
    db1=grads['db1']
    W2=parameters['W2']
    W1= parameters['W1']
    b2 = parameters['b2']
    b1 = parameters['b1']
    W2 = W2 - learning_rate*dW2
    W1 = W1 - learning_rate * dW1
    b2 = b2 - learning_rate * db2
    b1 = b1 - learning_rate * db1
    parameters = {'W1': W1,
                  'b1': b1,
                  'W2': W2,
                  'b2': b2}
    return parameters
"""
构建模型
"""
def nn_model(X,Y,num_iterations,learning_rate,print_cost,n_h):
    n_x,n_y = lay_sizer(X, Y)
    parameters = initialize_parameters(n_x, n_h, n_y)
    #costs=[]
    for i in range(num_iterations):
        cache, A2 = forward_propagation(X, parameters)
        cost = compute_cost(A2, Y)
        #costs.append(cost)
        grads = back_propagation(parameters, cache, X,Y)
        parameters = update_parameters(grads, parameters, learning_rate)
        if print_cost and i%100==0:
            print('Cost after iterations {}:{}'.format(i,cost))
    return parameters  #,costs
"""
用更新好的参数预测Y值
"""
def prediction(X,parameters):
    cache,A2=forward_propagation(X,parameters)
    predictions=np.around(A2)
    return predictions
def train_accuracy():
     X, Y = planar_utils.load_planar_dataset()
     parameters = nn_model(X, Y, num_iterations=10000, learning_rate=1.2, print_cost=True,n_h=8)
     # print('parameters W1', parameters['W1'])
     # print('parameters W2', parameters['W2'])
     # print('parameters b1', parameters['b1'])
     # print('parameters b2', parameters['b2'])
     predictions = prediction(X, parameters)
     print(predictions)
     planar_utils.plot_decision_boundary(lambda x: prediction(x.T, parameters), X, np.squeeze(Y))
     plt.show()
     ###########二分类精度求解
     result = np.dot(np.squeeze(Y), np.squeeze(predictions.T)) + np.dot(np.squeeze(1 - Y), np.squeeze(1 - predictions.T))
     print('The accuracy is {}%'.format((result) / Y.size * 100))

if __name__=='__main__':
    #test()
    train_accuracy()
结果:
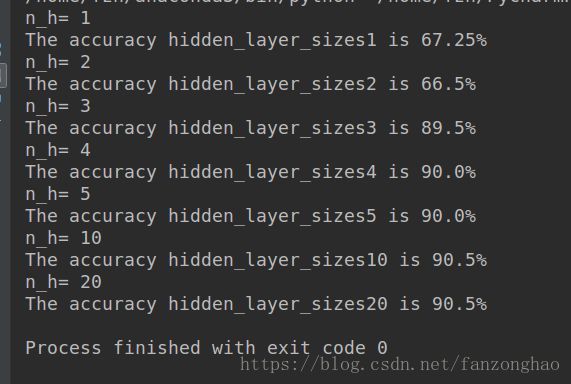
更改隐藏层个数:
def Different_Hidden_Size():
    X, Y = planar_utils.load_planar_dataset()
    hidden_layer_sizes=[1,2,3,4,5,10,20]
    plt.figure(figsize=(16,16))
    for i,n_h in enumerate(hidden_layer_sizes):
        print('n_h=',n_h)
        plt.subplot(3,3,i+1)
        plt.title('hidden_layer_sizes{}'.format(n_h))
        parameters = nn_model(X, Y, num_iterations=2000, learning_rate=1.2, print_cost=False,n_h=n_h)
        planar_utils.plot_decision_boundary(lambda x: prediction(x.T, parameters), X, np.squeeze(Y))
        predictions = prediction(X, parameters)
        ###########二分类精度求解
         result = np.dot(np.squeeze(Y), np.squeeze(predictions.T)) + np.dot(np.squeeze(1 - Y),
                                                                           np.squeeze(1 - predictions.T))
        print('The accuracy hidden_layer_sizes{} is {}%'.format(n_h,(result) / Y.size * 100))
    plt.savefig('1.png')
    plt.show()
if __name__=='__main__':
#test()
#train_accuracy()
Different_Hidden_Size()结果:


