基于Visual C++2010与windows SDK fo windows7开发Windows 7的多点触摸特性应用


大家在上一篇博客

http://blog.csdn.net/yincheng01/archive/2009/12/27/5084946.aspx

里面了解了windows7的多点触摸特性,这次我们来实践windows7的多点触摸特性的手势识别应用


大家跟我来!

1.创建MFC工程, 命名为TouchGestureDemo

基于Visual C++2010与windows SDK fo windows7开发Windows 7的多点触摸特性应用_第1张图片


2.按照下列图片配置程序

基于Visual C++2010与windows SDK fo windows7开发Windows 7的多点触摸特性应用_第2张图片

基于Visual C++2010与windows SDK fo windows7开发Windows 7的多点触摸特性应用_第3张图片

基于Visual C++2010与windows SDK fo windows7开发Windows 7的多点触摸特性应用_第4张图片

基于Visual C++2010与windows SDK fo windows7开发Windows 7的多点触摸特性应用_第5张图片


2.老规矩,添加多点触摸硬件的检测程序, TouchGestureDemo.cpp文件中加入CTouchGestureDemoApp::InitInstance():


BYTE digitizerStatus = (BYTE) GetSystemMetrics(SM_DIGITIZER);if ((digitizerStatus & (0x80 + 0x40)) == 0) //准备完毕与硬件设备准备好了{  AfxMessageBox(L"无可用硬件设备");  return FALSE;}BYTE nInputs = (BYTE) GetSystemMetrics(SM_MAXIMUMTOUCHES);CString str;str.Format(L"Touch input available with %d touch points.", nInputs);//检测出现了几个硬件触摸点AfxMessageBox(str);return TRUE;
3.直接运行,用两个手指按下,看看效果
 
   
4.添加多点触摸的,绘图文件,根据多点触摸翻转图形,就要绘图
添加一个#include附近stdafx.h的头文件的末尾,仅次于#包括 DrawingObject.h行:
   #include "DrawingObject.h"

 添加以下保护的成员变量的定义ChildView.h。这是主要的图形对象:

CDrawingObject m_drawingObject;


此外,添加以下受保护的成员变量ChildView.h。这些都是需要支持的定位和绘图对象的大小:

//绘图变量

double m_dblZoomRatioStart;
    double m_dblZoomRatioTotal;
    CPoint m_ptCenter;


要绘制的矩形,添加在CChildCiew结束ChildView.cpp以下行::OnPaint中():

m_drawingObject.Paint(&dc);


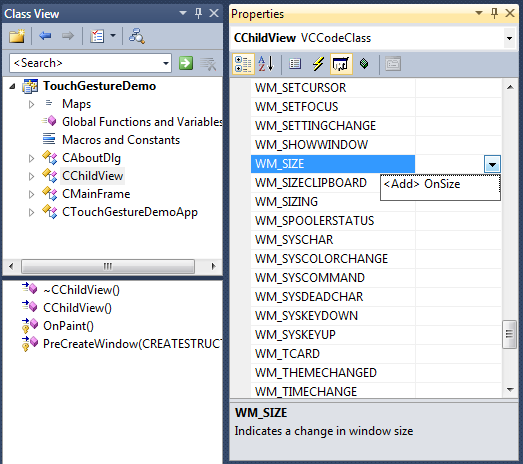
5.在CChildView类中,加入WM_SIZE的ONSIZE函数

基于Visual C++2010与windows SDK fo windows7开发Windows 7的多点触摸特性应用_第6张图片


6.在onsize函数中加入

  m_drawingObject.ResetObject(cx, cy);
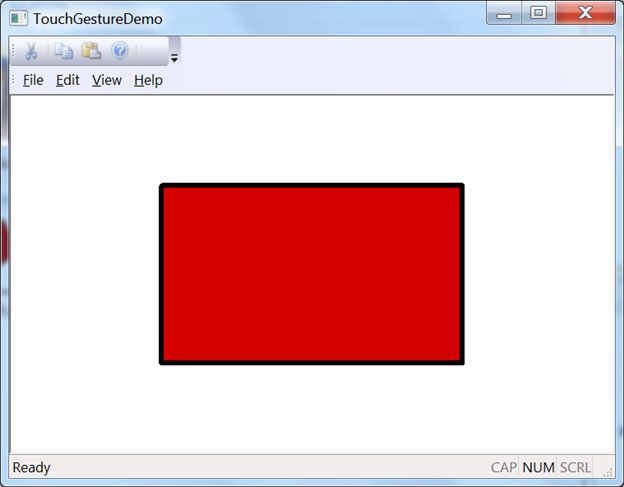
然后直接运行,看见效果如下

基于Visual C++2010与windows SDK fo windows7开发Windows 7的多点触摸特性应用_第7张图片


7.默认情况下触摸功能的系统提供WM_GESTURE消息发送到目标窗口。这有点类似于鼠标和键盘消息。该系统的耗电量低级别的触摸输入事件和计算结果为我们的状态。 MFC提供的消息处理覆盖数字,可以收到每种类型的手势,每返回一个布尔值。如果一个手势输入的应用程序处理,相应的覆盖应该返回TRUE,否则返回FALSE。

ChildView.h中加入声明:

// Overrides
protected:

// 手势句柄
virtual BOOL OnGestureZoom(CPoint ptCenter, long lDelta);
virtual BOOL OnGesturePan(CPoint ptFrom, CPoint ptTo);
virtual BOOL OnGestureRotate(CPoint ptCenter, double dblAngle);
virtual BOOL OnGesturePressAndTap(CPoint ptFirstFinger, long lDelta);
virtual BOOL OnGestureTwoFingerTap(CPoint ptCenter);


首先是泛手势处理,添加此代码ChildView.cpp:
BOOL CChildView::OnGesturePan(CPoint ptFrom, CPoint ptTo)
{
int dx = ptTo.x - ptFrom.x;
int dy = ptTo.y - ptFrom.y;

if (dx != 0 || dy != 0)
{
m_drawingObject.Move(dx, dy);
RedrawWindow();
}
return TRUE;
}
现在,执行缩放的手势,将此代码添加到ChildView.cpp:C + +的代码复制


BOOL CChildView::OnGestureZoom(CPoint ptCenter, long lDelta)
{
if ((m_pCurrentGestureInfo->dwFlags & GF_BEGIN) == GF_BEGIN)
{
m_dblZoomRatioStart = m_dblZoomRatioTotal = lDelta;
}
else if (lDelta != 0)
{
m_dblZoomRatioTotal += lDelta;
double zoomFactor = (double)m_dblZoomRatioTotal / m_dblZoomRatioStart;

m_drawingObject.Zoom(zoomFactor, ptCenter.x, ptCenter.y);

m_dblZoomRatioStart = m_dblZoomRatioTotal;
RedrawWindow();
}

return TRUE;
}


添加在ChildView.cpp旋转手势的处理程序
BOOL CChildView::OnGestureRotate(CPoint ptCenter, double dblAngle)
{
if ((m_pCurrentGestureInfo->dwFlags & GF_BEGIN) == GF_BEGIN)
{
// 创建旋转中心
m_ptCenter = ptCenter;
}
else if (dblAngle != 0.)
{
m_drawingObject.Rotate(dblAngle * PI / 100.0, m_ptCenter.x, m_ptCenter.y);
RedrawWindow();
}

return TRUE;
}


同样,添加了“消息处理”和“两个手指头触摸点”的ChildView.cpp手势
BOOL CChildView::OnGesturePressAndTap(CPoint ptFirstFinger, long lDelta)
{
if ((m_pCurrentGestureInfo->dwFlags & GF_BEGIN) != 0)
{
m_drawingObject.ShiftColor();
RedrawWindow();
}

return TRUE;
}

BOOL CChildView::OnGestureTwoFingerTap(CPoint ptCenter)
{
m_drawingObject.TogleDrawDiagonals();
RedrawWindow();

return TRUE;
}


创建并运行
尝试将两个手指按住矩形,你可以看到,它跟随你的手指运动。
尝试将不接触的矩形,而是触及一个窗口的空白区域在屏幕上。它会动哦!我们没有履行“点击测试”,以检查是否接触的位置内的矩形'界线。我们的状态应对任何在整个客户区。
尝试使用剩余的手势以及:旋转,缩放,两个手指按下和手指卷住。


8.尝试旋转矩形。发生了什么事?默认情况下,窗口接收所有除旋转姿态。但是,我们可以配置触摸引擎提供任何手势,我们想要的。 MFC提供的类CGestureConfig,可以帮助您自定义Windows手势功能,如缩放,平移或旋转。

ChildView.h中加入

protected:
// 保持手势设置
CGestureConfig m_gestureConfig;

在CChildView类视图中加入WM-CREATE消息的处理函数

GetGestureConfig(&m_gestureConfig);

    // 只有旋转不是默认启用
    m_gestureConfig.EnableRotate();

    SetGestureConfig(&m_gestureConfig);


编译和运行。
尝试旋转矩形。
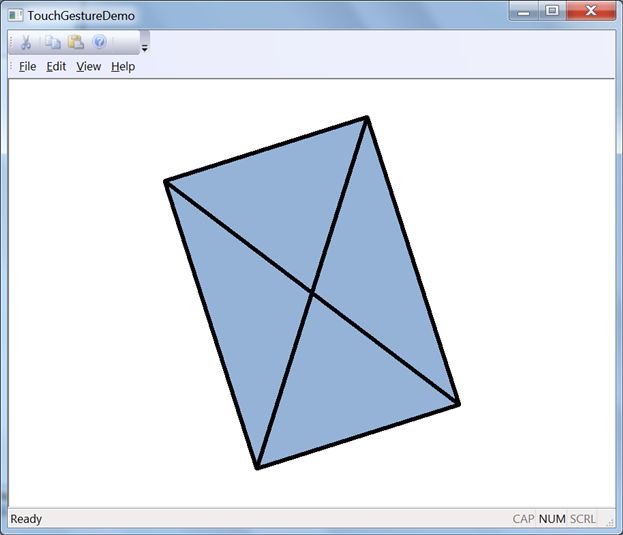
下面是一个行动演示画面,在“旋转”,“按住与放开”和“两个手指头操控”手势都被应用于:

基于Visual C++2010与windows SDK fo windows7开发Windows 7的多点触摸特性应用_第8张图片


 核心图形绘制源文件如下,


 #pragma once#include "stdafx.h"#include #include #define MAX_COLORS 5#define PI 3.1415926535897932384626433832795// CDrawingObject class holds information about rectangle. Instead of storingclass CDrawingObject{public:    CDrawingObject(void);    void ResetObject(const int cxClient,const int cyClient);    void Paint(CDC* pDC);    void Move(LONG ldx,LONG ldy);    void TogleDrawDiagonals(void){_bDrawDiagonals = !_bDrawDiagonals;}    void Zoom(const double dZoomFactor,const LONG iZx,const LONG iZy);    void Rotate(const double dAngle,const LONG iOx,const LONG iOy);    void ShiftColor(void);public:    ~CDrawingObject(void);private:    //这是一个颜色数组    //生成过渡状态    static const COLORREF s_colors[];    // 我们保留中心矩形(对角线intesection点)    LONG    _iCx;     LONG    _iCy;     // 定义矩形的宽度和高度    int     _iWidth;     int     _iHeight;     // 放大缩小的定义    double  _dScalingFactor;     //存储矩形旋转角度(从X轴)    double  _dRotationAngle;     //这个变量触发绘制对角线如果设置为true    bool    _bDrawDiagonals;     // 这个变量定义了矩形(索引颜色)    int     _iColorIndex; };#include "stdafx.h"#include "DrawingObject.h"const COLORREF CDrawingObject::s_colors[] = { RGB(210,0,0),  // RED    RGB(255,139,23), // yellow       RGB(146,208,80), // green    RGB(13,13,13),   // black    RGB(149,179,215) // blue};CDrawingObject::CDrawingObject(void){    }CDrawingObject::~CDrawingObject(void){}void CDrawingObject::ShiftColor(void){    _iColorIndex++;    if(MAX_COLORS == _iColorIndex)         _iColorIndex = 0;    }}void CDrawingObject::ResetObject(const int cxClient,const int cyClient){        _iCx = cxClient/2;    _iCy = cyClient/2;      _iWidth = cxClient/2;    _iHeight = cyClient/2;    // Initial scaling factor is 1.0 (no scaling)    _dScalingFactor = 1.0;    // Initial rotation angle is 0.0 (no rotation)    _dRotationAngle = 0.0;     _bDrawDiagonals = false; // 没有图纸的对角线    _iColorIndex = 0; // 设置初始颜色为黑色}// WM_PAINT 消息触发后的处理void CDrawingObject::Paint(CDC* pDC){    double localScale = 1.0;    localScale = max(_dScalingFactor, 0.05);     // 创建一个新笔    CPen pen(PS_SOLID,6,RGB(0,0,0));    // 选择新笔,保存旧的    CPen* oldPen = pDC->SelectObject(&pen);    // 首先创建一个折线,它描述了缩放因子stratched矩形    POINT ptRect[5];        ptRect[0].x = -(LONG)(localScale * _iWidth/2);    ptRect[0].y = -(LONG)(localScale * _iHeight/2);    ptRect[1].x = (LONG)(localScale * _iWidth/2);    ptRect[1].y = ptRect[0].y;    ptRect[2].x = ptRect[1].x;    ptRect[2].y = (LONG)(localScale * _iHeight/2);    ptRect[3].x = ptRect[0].x;    ptRect[3].y = ptRect[2].y;        ptRect[4].x = ptRect[0].x;    ptRect[4].y = ptRect[0].y;      double dCos = cos(_dRotationAngle);    double dSin = sin(_dRotationAngle);    for(int i=0; i<5; i++)    {        LONG lDX = ptRect[i].x;        LONG lDY = ptRect[i].y;        ptRect[i].x = (LONG)(lDX*dCos + lDY*dSin);        ptRect[i].y = (LONG)(lDY*dCos - lDX*dSin);    }    // 把这个矩形旋转后的图形绘制出来    for(int i=0; i<5; i++)    {        ptRect[i].x += _iCx;        ptRect[i].y += _iCy;    }     CRgn rgn; rgn.CreatePolygonRgn(ptRect,5,WINDING); CBrush brush;  brush.CreateSolidBrush(s_colors[_iColorIndex]); pDC->FillRgn(&rgn, &brush);    pDC->Polyline(ptRect,5);    if(_bDrawDiagonals)    {        // 绘制对角线        pDC->MoveTo(ptRect[0].x,ptRect[0].y);        pDC->LineTo(ptRect[2].x,ptRect[2].y);        pDC->MoveTo(ptRect[1].x,ptRect[1].y);        pDC->LineTo(ptRect[3].x,ptRect[3].y);    } pDC->SelectObject(oldPen);}//此函数负责移动矩形的中心点。// 递增的X坐标减//递增递减的Y坐标void CDrawingObject::Move(LONG ldx,LONG ldy){    _iCx += ldx;    _iCy += ldy;}//此函数缩放输出在矩形// dZoomFactor - 缩放的缩放因子// iZx - x坐标变焦中心// iZy - y坐标缩放中心void CDrawingObject::Zoom(const double dZoomFactor,const LONG iZx,const LONG iZy){    _dScalingFactor *= dZoomFactor;}// 根据用户旋转中心进行旋转void CDrawingObject::Rotate(const double dAngle,const LONG iOx,const LONG iOy){       _dRotationAngle += dAngle;}

如果需要源码请在本人CSDN博客留言!欢迎技术交流!


 本文作者专著《Visual C++2010开发权威指南》即将推出,敬请关注,Visual C++2010最近技术,Windows7开发最新技术!


再分享一下我老师大神的人工智能教程吧。零基础!通俗易懂!风趣幽默!还带黄段子!希望你也加入到我们人工智能的队伍中来!https://blog.csdn.net/jiangjunshow

你可能感兴趣的:(基于Visual C++2010与windows SDK fo windows7开发Windows 7的多点触摸特性应用)