TortoiseSVN 日常操作指南
TortoiseSVN
A Subversion client for Windows
Stefan Küng
Lübbe Onken
Simon Large
2005/01/17 19:09:21
二〇〇五年四月 Daan译
Table of Contents
Chapter 4. 日常操作指南... 4
4.1. 使用 TortoiseSVN.. 4
4.2. 认证... 5
4.3. 导入数据到仓库Importing Data Into A Repository. 5
4.3.1. 仓库规划Repository Layout 5
4.3.2. 导入Import 7
4.3.3. 特殊文件Special Files. 8
4.3.4. 参考项目Referenced Projects. 9
4.4. 取出工作副本Checking Out A Working Copy. 9
4.5. 获取状态信息Getting Status Information. 10
4.5.1. 覆盖图标Icon Overlays. 10
4.5.2. 资源管理器中TortoiseSVN的专栏... 12
4.5.3. 仓库状态Status Of The Repository. 12
4.5.4. 查看区别Viewing Diffs. 13
4.6. 更新工作副本Update Your Working Copy With Changes From Others. 13
4.7. 解决冲突Resolving Conflicts. 16
4.8. 把你的修改发送到仓库Sending Your Changes To The Repository. 16
4.9. 获取(修改)文件(目录)信息Get/Set Information About Files/Directories. 19
4.10. 整合Bug跟踪系统Integration with Bugtracking Systems. 21
4.11. 加入新文件和新目录Adding New Files And Directories. 22
4.12. 忽略文件和目录Ignoring Files And Directories. 23
4.13. 删除、重命名、移动Deleting, Renaming And Moving. 24
4.14. 取消改变Undo Changes. 25
4.15. 修订日志窗口Revision Log Dialog. 26
4.15.1. 调用日志窗口Invoking The Log Dialog. 26
4.15.2. 获取附加信息Getting Additional Information. 27
4.15.3. 获取所有日志Getting all log messages. 29
4.15.4. 修改日志内容和作者Changing the log message and author 29
4.15.5. 统计信息Statistical Information. 29
4.16. 分支/标记Branching / Tagging. 30
4.16.1. 创建分支或标记Creating a Branch or Tag. 30
4.16.2. 取出还是切换?To Checkout or to Switch... 31
4.17. 合并Merging. 32
4.17.1. Merging a Range of Revisions. 32
4.17.2. Merging Two Different Trees. 34
4.18. 创建和应用补丁Creating and Applying Patches. 35
4.18.1. 创建补丁Creating a Patch File. 35
4.18.2. 应用补丁Applying a Patch File. 35
4.19. 副本重定位Relocating a working copy. 36
4.20. 仓库浏览器The Repository Browser 36
4.21. TSVN的设置TortoiseSVN's Settings. 37
4.21.1. 一般设置... 37
4.21.2. 外观感受设置... 40
4.21.3. 网络设置... 41
4.21.4. 比较/合并设置... 42
4.22. 谁动了哪一行?Who Changed Which Line?. 45
4.23. 版本路线图Revision Graphs. 46
4.24. 最后Final Step. 48
Chapter 4. 日常操作指南
Table of Contents
这份文档描述TortoiseSVN的日常用法。注意这里不介绍CVS或者Subversion。
如果你需要一份Subversion的版本控制介绍,我们推荐您阅读Subversion: The Definitive Guide 。
这份文档像TortoiseSVN和Subversion一样,也一直在改进之中。如果发现任何错误,请在邮件列表中告诉我们,以便我们更新这份文档。请原谅,下面的一些贴图可能不是最新软件版本的贴图,因为我们都是在工作之余来维护的。
4.1. 使用 TortoiseSVN
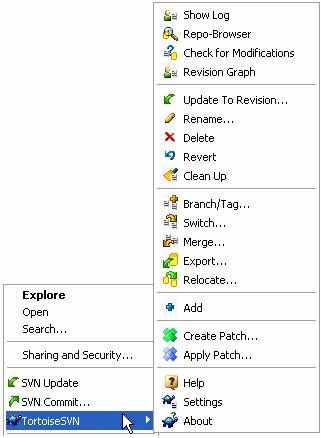
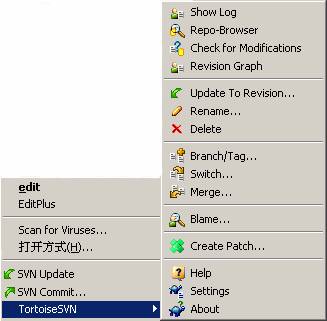
图1:在版本控制下的目录菜单
所有TortoiseSVN命令都集成在Windows的资源管理器的菜单中。当你在一个文件或文件夹单击鼠标右键时,大多数命令都会直接显示出来。哪些菜单显示出来,依赖于文件或文件夹是否处于版本控制之下。
在工作副本目录中,当你用鼠标右键拖拽文件或文件夹到一个新目录,或者把没有在版本控制下的文件或文件夹拖拽到版本控制下的目录中,就会显示另外一些命令在右键菜单中。
4.2. 认证
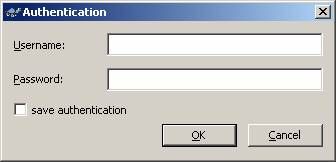
假如你试图访问一个有密码保护的仓库,一个认证对话框会跳出来。
图2:认证对话框
输入你的用户名和密码。那个复选框可以让TortoiseSVN保存认证信息在Subversion的默认目录中:$APPDATA/Subversion/auth。
如果你想让Subversion和TortoiseSVN忘记你的认证信息,你必须删除相关的文件。
| 重要信息: 在Windows2000及其以上的系统中,认证信息被加密保存在注册表中。要删除认证信息,请选择settings对话框,并且点击Clear Auth Cache按钮。 |
| 提示: 如果你是使用WindowsNT域的认证方式,那么在输入用户名时要包括域名,比如:MYDOMAIN/johnd。 |
4.3. 导入数据到仓库Importing Data Into A Repository
4.3.1. 仓库规划Repository Layout
在将数据导入到仓库之前,你必须先想好如何组织存放你的数据。如果你使用一种我们推荐的规划方式,你将在以后的使用中感觉到很舒服。
我们这里有很多种标准的推荐仓库组织形式。大多数人会创建一个trunk目录来存放开发的“主线”,一个branches目录来存放支线副本,另外还有一个tags目录来存放标签副本。假如一个仓库只保存一个项目,经常会创建这样的几个顶级目录:
/trunk
/branches
/tags
如果一个仓库存放多个项目,经常会像下面这样根据分支来规划:
/trunk/paint
/trunk/calc
/branches/paint
/branches/calc
/tags/paint
/tags/calc
...或者根据项目分成多个目录:
/paint/trunk
/paint/branches
/paint/tags
/calc/trunk
/calc/branches
/calc/tags
如果多个项目之间的关系不是很紧密,并且他们都是被单独取出的,那根据项目来规划会比较有意义些。For related projects where you may want to check out all projects in one go, or where the projects are all tied together in a single distribution package, it is often better to index by branch. This way you have only one trunk to checkout, and the relationships between the sub-projects is more easily visible.对那些相关的项目(),最好根据分支来组织规划。这样的话,你就只有一个trunk需要checkout,而且子项目间的关系会更明显。
你如果采用/trunk /tags /branches并列于根目录的方式,那你必须为每个branch和tag复制整个trunk,也就是说这种结构显得更机动些。
对不相干的项目来说,你可以使用多个不同的仓库。当你提交一个改动,版本号会是整个仓库的版本号,而不是项目的版本号。2个不相干的项目共享一个仓库会在版本号方面导致极大的不方便。Subversion和TortoiseSVN的项目看起来好像在同一个地址,但事实上他们在完全不同的仓库中研发着,并且在版本号方面完全的不相干。
当然,你可以不管上面提到的这些形式。你可以随意发挥以满足你或者你的团队的需要。记住不管你怎么选择,那都不会是一个永久的形式,你可以在任何时候重新组织你的仓库。因为branches和tags都是很普通的目录,只要你愿意,TortoiseSVN可以随时移动它们,或改名。
从一种形式转换到另一种形式仅仅需要在服务器端做一些文件或目录移动操作;如果你不喜欢你仓库的某种组织形式,尽管大胆的操作那些目录。
到这里,如果你还没有在你的仓库中创建一个基本的目录架构,接下来你应该这么做:
1. 在你的硬盘中创建一个空目录。
2. 在这个目录中创建一个你中意的目录组织形式。注意现在不要放任何文件进去。
3. 接下来把这个结构导入仓库。在新建的那个目录上单击鼠标右键,选择Import…。这样,就把你刚才创建的临时目录导入到仓库的根目录了,并创建了仓库的基本架构。
注意:你导入的这个目录的目录名是不应该出现在仓库中的,应该只有目录中的内容会出现。比如,创建下面的目录结构:
C:/Temp/New/trunk
C:/Temp/New/branches
C:/Temp/New/tags
将C:/Temp/New 导入到仓库的根目录,那么根目录看起来应该是这样的:
/trunk
/branches
/tags
另外你也可以使用仓库浏览器(repository browser)直接在仓库中创建新目录。
4.3.2. Import
在把你的项目导入到仓库之前,下面的工作必须做好:
1. 把项目中不需要的文件删除。(临时文件、编译器创建的文件,比如*.obj、2进制文件等。)
2. 把目录和子目录中的所有文件整理一遍。虽然你可以在导入之后再来进行重命名或删除等操作,但是还是推荐你在导入之前把你的项目整理好。
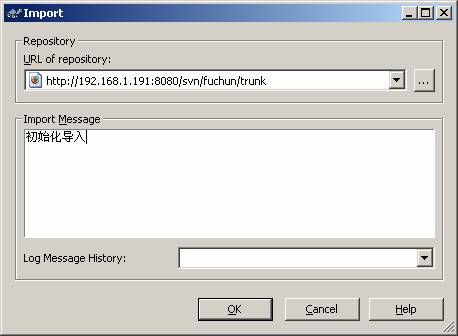
现在,在资源管理器(windows explorer)中选择项目的根目录,单击鼠标右键,选择Import…命令,跳出一个对话框:
在这个对话框中你需要填写你要将项目导入仓库的URL地址。
那个Important Message是用来记录日志信息的。
| 重要信息: 和exclude pattern匹配的文件或文件夹不会被导入。 |
当你按下OK按钮,TortoiseSVN就开始把整个目录树包括所有文件导入到仓库了。和前面讲到的一样,这个目录的名字不会出现在仓库中,只有目录中的内容会出现。现在,你的这个项目就处于版本控制之下了。请注意,你刚才导入的这个目录(在你本地硬盘上的这个)并没有处于版本控制下!要获取一份处于版本控制之下的工作副本,你需要对刚导入的版本做一次取出(Checkout)操作。
4.3.3. Special Files
有时候你需要版本控制一个存储着用户个性信息的文件。也就是说这个文件每个开发者或用户都会去修改以适应他本地的设置。但每个用户在进行提交(commit)操作时都会把这个文件的修改提交给仓库,这就使得版本控制这样一个文件很困难。
在这种境况下,建议使用模版文件。你可以创建一个包含开发人员需要的所有数据的文件,把它添加到版本控制之下,然后让开发人员取出这份文件。接下来,每个开发人员就可以给这个文件做个备份,然后给他改个名字。这样操作之后,不管怎么修改这个备份都不再是什么问题了。
As an example, you can have a look at TortoiseSVN's build script. It calls a file named TortoiseVars.bat which doesn't exist in the repository. Only the file TortoiseVars.tmpl. TortoiseVars.tmpl is the template file which every developer has to create a copy from and rename that file to TortoiseVars.bat. Inside that file, we added comments so that the users will see which lines they have to edit and change according to their local setup to get it working.
So as not to disturb the users, we also added the file TortoiseVars.bat to the ignore list of its parent folder, i.e. we've set the Subversion property svn:ignored to include that filename. That way it won't show up as unversioned on every commit.
4.3.4. Referenced Projects
Sometimes it is useful to construct a working copy that is made out of a number of different checkouts. For example, you may want different subdirectories to come from different locations in a repository, or perhaps from different repositories altogether. If you want every user to have the same layout, you can define the svn:externals properties.
Let's say you check out a working copy of /project1 to D:/dev/project1. Select the folder D:/dev/project1, right click and choose properties from the context menu. The Properties Dialog comes up. Then go to the Subversion tab. There, you can set properties. Select the svn:externals property from the combobox and write in the edit box the repository url in the format name url. For example
subversion http://svn.collab.net/repos/svn/trunk
Now click Set and commit your changes. If a user updates their working copy the external project is checked out, too.
If you need more information how TortoiseSVN handles Properties read Section 4.9, “Get/Set Information About Files/Directories”.
4.4. 取出工作副本Checking Out A Working Copy
为了获取一个工作副本,你必须从仓库中做一次取出(checkout)操作。
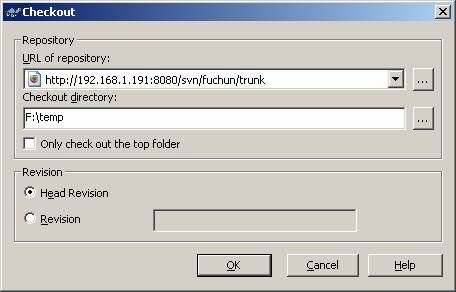
在资源管理器中选择一个你想要存放工作副本的目录。单击鼠标右键跳出菜单,选择命令Checkout…,再跳出一个窗口:
如果你输入一个不存在的目录名,那这个目录会自动创建。
| 重要信息 你只能取出到一个空目录。假如你想要取出到先前导入的原始目录,Subversion会抛出一个错误。你必须取出到另外的一个目录或者先把原始目录删掉。 |
强烈建议您仅取出trunk部分。假如你坚持要取出父目录,那你有可能就会把你的硬盘塞满,因为你将得到整个仓库的数据(包括项目的每一个branch和tag)。
| 导出Exporting 有时候你也许需要一份没有那些.svn目录的工作副本,比如要建一个源代码zip压缩包。TortoiseSVN提供一个导出命令 Export…,可以免除我们自己动手来操作(做一个副本,然后手动删除所有.svn目录)。如果你在工作副本中执行这个命令,你可以选择一个目录用来存放没有.svn目录的干净工作副本。同样,你也可以指定是导出所有文件还是那些被版本控制的文件。 导出的另一种方法是,用鼠标右键拖拽一个工作目录到其他地方,然后选择Subversion export here 或者 Subversion export all here。 |
4.5. 获取状态信息Getting Status Information
当你在你的工作副本中工作的时候,你经常会需要知道哪些文件被修改过,哪些被增加,哪些被重命名,或者哪些文件是其他人修改和提交的。
4.5.1. 覆盖图标Icon Overlays
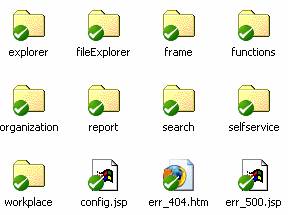
图4.5 覆盖图标
在从仓库中取出工作副本之后,你会发现资源管理器中文件的图标发生了变化。这就是TortoiseSVN受欢迎的一个原因。TortoiseSVN为每个文件图标在原来的基础上增加了一个叫做覆盖图标的东东。覆盖图标根据Subversion状态的不同而显示不同的图标。
![]()
绿色图标表示这是一个最新取出的工作副本,他的Subversion状态是normal。
![]()
当你开始编辑一个文件,这个文件的状态就会变成modified,图标也会变成红色圆圈带一个感叹号。这样你就可以轻易的知道自从上次更新以来都有修改过哪些文件,需要提交哪些文件。
![]()
这个黄色三角符号带感叹号,表示在一次update中产生了一个冲突(conflict)。
![]()
蓝色加号意味着这个文件或文件夹已经被计划加入到版本控制之下。
![]()
红叉叉表示相应文件或文件夹被计划删除(deleted),或者表示文件缺失。
文件夹也有这样的覆盖图标显示。默认情况下只会显示文件夹自己的状态。但你也可以在Settings(4.21节,“TortoiseSVN的Settings”)中做一些设置,让文件夹的图标递归显示。但这会导致覆盖图标显示缓慢,因此在不太好的机器上或工作副本太大我们都不推荐这样。
在这样设置之后,每个文件夹都会显示为他下面所有文件的状态,优先显示顺序为confilct>modified>normal。这样你就可以轻松的看到一个文件夹是否有冲突或者修改过了。
| Slow Overlays You may notice that if you enable the recursive overlay for folders that the explorer slows down remarkably when browsing working copies. This depends on how big your working copy is and how much RAM Windows can use for file index caching. Usually it's only very slow the first time you browse such a directory - if you browse the same directory later again it's much faster. If you want to disable the recursive overlays for some folders but not for all then you can do that by creating a file called _tsvnexcluderecursive inside that folder. This will disable the recursive overlays for that folder, but not for the files or folders inside it. You can also disable the overlays completely for a folder by creating a file called _tsvnexcludethis inside that folder. Again, this disables the overlays only for that folder, not the folders inside it. You can define specific paths to be excluded from showing overlays on the settings page (Section 4.21.2, “The Settings Dialog, Look and Feel Tab”). |
和TortoiseCVS(CVS客户端)不一样,没有被版本控制的文件是没有覆盖图标的。所以这样做,是因为覆盖图标的数量是有限的,我们应该节约点使用:)
4.5.2. 资源管理器中TortoiseSVN的专栏
和覆盖图标一样有用(或更有用)的信息可以显示在浏览器详细资料视图方式时的附加栏中。
Simply right click on one of the headings of a column, choose More... from the context menu displayed. A dialog will appear where you can specify the columns and their order, which is displayed in the "Detailed View". Scroll down until the entries starting with SVN come into view. Check the ones you would like to have displayed and close the dialog by pressing OK. The columns will be appended to the right of those currently displayed. You can reorder them by drag and drop, or resize them, so that they fit your needs.
| 技巧Tip If you want the current layout to be displayed in all your working copies, you may want to make this the default view. |
4.5.3. 仓库状态Status Of The Repository
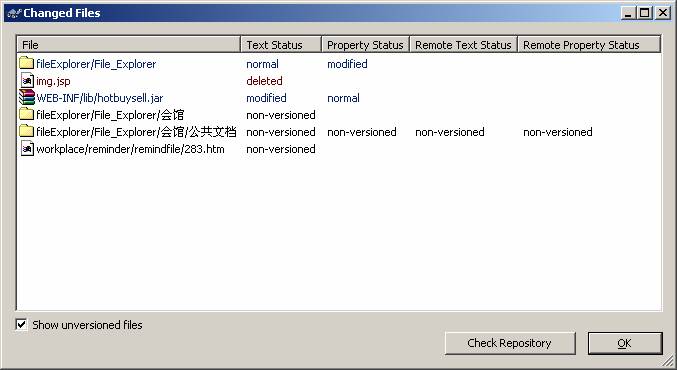
图 4.6. 检查修改Check for Modifications
清楚地知道自己修改了哪些文件以及别人修改提交了哪些文件是很有用的。这就是命令Check For Modifications用的着的地方了。这个对话框显示出你的工作副本中修改过的每一个文件,没有在版本控制下的文件也会被显示出来。点击Check Repository按钮,可以检查仓库中的改动。在做update之前,你可以这么做一下,来检查是否有冲突的可能。
在其中选择文件或文件夹单击鼠标右键,在菜单中我们可以选择查看文件的差别,或者把本地的修改取消。TortoiseSVN会从仓库中自动下载最新的版本来进行比较。
4.5.4. Viewing Diffs
我们经常会想要在文件里面查看哪些地方修改了。你可以先选择已经修改的文件,单击鼠标右键,选择TortoiseSVN的命令Diff。然后会打开一个比较查看器,它会对本地的文件和仓库中最新版本的内容进行详细的对比。
| 技巧Tip 不在工作目录中,或者你有多个版本的文件在一起的时候,你也可以使用比较功能: 在资源管理器中选中你要进行比较的两个文件(使用Ctrl键和鼠标),然后选择TortoiseSVN的菜单命令Diff。最后被点选的文件(焦点所在的那个,也就被虚线矩形框住的那个)将被认为是被修改过的那个。 |
4.6. 更新工作副本Update Your Working Copy With Changes From Others
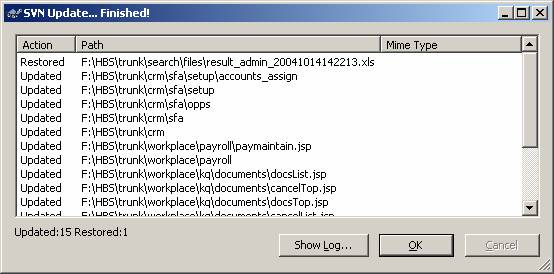
图 4.7. 已完成更新的对话框
有时候你想要把别人做的修改融合到自己的本地副本当中。这个把改动从服务器拿到本地的过程就是我们已经知道的updating。Updating操作可以针对一个文件,或几个被选择的文件,或某个目录中的所有文件。选择你想要进行update操作的文件和(或)文件夹,单击鼠标右键,在菜单中选择Update。这时会跳出一个窗口显示正在update的进程。别人做的修改会合并到你的文件中,而你所做的修改会被保留。Update操作对仓库是不会产生任何影响的。
进程对话框用不同颜色的文字来表示不同的update动作。
蓝色
加入到你的工作副本中的新条目。
深红
从你的副本中删除的条目。
绿色
成功将改动合并到本地的条目。
亮红
合并改动到本地,但是有冲突需要解决。
黑色
所有其它的。
如果你在更新中产生了冲突(当你和别人同时修改了同一个文件的同一行并且改动的不同会发生这种情况),对话框中会用红色文字显示出冲突。双击对应的行就可以启动外挂程序来解决冲突。
TortoiseSVN 同时也允许你更新工作副本到一个特定的版本,并不仅仅是最新的版本。这个命令就是Update to Revision…,他会跳出一个对话框来让你输入你需要的版本。
| 小心Caution If you update a file or folder to a specific revision, you will get out of date error messages when you try to commit them! If you want to undo changes to a file and start afresh from an earlier revision, you must either use the Revert changes from this revision command from the log dialog or the Merge... menu command. |
命令Update to Revision...可以让你的工作回复到以前的版本。比如说你的工作副本现在的版本是100,但你想要看看版本为50的时候是什么样子,那就可以简单的将版本更新到50即可。
一般来说,更新一个单独的文件到以前的版本并不太好,因为这会导致你的工作副本处于一个不一致的状态。假如你更新的文件改过名字,有可能你只是发现那个文件消失了,因为在以前的那个版本,根本不存在那个名字的文件。如果你只是需要某个文件的老版本副本,最好在日志对话框中使用Save revision to...命令来搞定。
| 警告Warning If you updated your working copy to an earlier revision, you must not make changes to the files! You will get out of date errors if you try to commit those changes. If you want to revert some changes in your working copy, then use the repository browser and save the file in question over the file in your working copy. Or you can use the log dialog and use the command Revert changes in this revision. This will undo only those changes made in the selected revision. Changes made after that revision will be retained. For reverting multiple revisions, you should use the merge command, where you can specify the range of revisions you want to undo. |
| 多个文件或文件夹Multiple Files/Folders If you select multiple files and folders in the explorer and then select Update, all of those files/folders are updated one by one. TortoiseSVN makes sure that all files/folders which are from the same repository are updated to the exact same revision! Even if between those updates another commit occurred. |
| 本地文件已存在Local File Already Exists Sometimes when you try to update, the update fails with a message to say that there is already a local file of the same name. This typically happens when Subversion tries to checkout a newly versioned file, and finds that an unversioned file of the same name already exists in your working folder. Subversion will never overwrite an unversioned file - it might contain something you are working on, which coincidentally has the same filename as another developer has used for his newly committed file. If you get this error message, the solution is simply to rename the local unversioned file. After completing the update, you can check whether the renamed file is still needed. If you keep getting error messages, use Check for modifications instead to list all the problem files. That way you can deal with them all at once. |
4.7. 解决冲突Resolving Conflicts
有时候,你从仓库更新文件时会发生一些冲突。当两个或更多开发人员对同一个文件的某几行做了修改,就会产生冲突。因为Subversion对你的项目一无所知,他会把冲突留给开发人员来解决。只要冲突产生了,你就应该打开有问题的文件,然后找到以“<<<<<<<”开头的那几行,有冲突的区域会被下面这样标示:
<<<<<<< filename
your changes
=======
code merged from repository
>>>>>>> revision
另外,对每一个有冲突的文件,Subversion都会在你的目录中放三个另外的文件:
filename.ext.mine
这个文件是更新工作副本之前,冲突文件在你的工作副本中原来的样子。其中没有任何冲突标记。
filename.ext.rOLDREV
这个文件是版本号为OLDREV时的文件。也就是你做修改之前最后一次取出的文件。
filename.ext.rNEWREV
这是你更新时Subversion客户端从服务器收到的最新版本的文件。他是仓库的最新版本。
你可以在菜单中选择Edit Conflict来打开一个合并工具或冲突编辑器,或者用其他编辑器来解决这个冲突。你必须决定这些代码到底该是什么样子,做一些必要的修改,然后保存文件。
然后选择菜单中的Resolved命令执行,接着提交修改到仓库。请注意,命令Resolved并没有真正的解决冲突,它只不过是把filename.ext.mine 和 filename.ext.r*删除,并允许你提交修改而已。
4.8. 把你的修改发送到仓库Sending Your Changes To The Repository
发送你对工作副本的修改就是提交修改。在提交之前,你应该确认你的工作副本是最新的。你可以直接作一次Update操作,或者先Check for Modifications看看在本地或在服务器上哪些文件修改过。
如果你的副本是最新的,并且没有冲突,你就可以提交你的修改了。选中你想要提交的任意文件或文件夹,然后选择在菜单中选择Commit…。
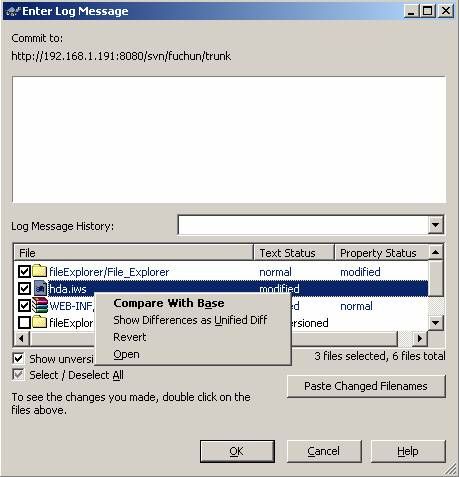
图 4.8. 提交对话框
提交对话框会显示每一个有修改的文件,包括新增的,删除的,还有没有版本控制的。如果你不想提交某个有修改的文件,只要不勾选那个文件就好了。如果你要提交某个没有做版本控制的文件,只要勾选它就可以提交了。
| Commit files or folders? When you commit files, the commit dialog shows only the files you have selected. When you commit a folder the commit dialog will select the changed files automatically. If you forget about a new file you created, committing the folder will find it anyway. Committing a folder does not mean that every file gets marked as changed; It just makes your life easier by doing more work for you. |
| Many unversioned files in the commit dialog If you think that the TSVN commit dialog shows you too many unversioned (e.g. compiler generated or editor backup) files, there are several ways to handle this. You can: add the file (or a wildcard extension) to the list of files to exclude on the settings page. This will affect every working copy you have. add the file to the svn:ignore list using the Add to ignore list context menu. This will only affect the directory on which you set the svn:ignore property. Using the SVN Property Dialog, you can alter the svn:ignore property for a directory. Read Section 4.12, “Ignoring Files And Directories” for more information. |
在提交对话框中双击一个有修改的文件,可以启动外挂的比较工具来显示修改细节。
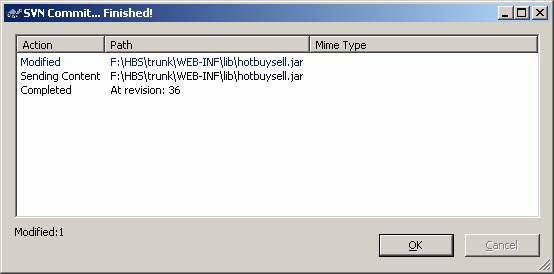
在按下OK按钮之后,会出来一个显示提交进程的对话框。
图 4.9. 显示提交进程的对话框
这个显示进程的窗口中采用了不同颜色的文字来表示不同的提交动作。
蓝色Blue
提交一个修改的或新的条目。
深红Dark red
提交一个删除或覆盖操作。
黑色Black
其它所有条目。
| Special Folder Properties There are several special folder properties which can be used to help give more control over the formatting of commit log messages. Read Section 4.9, “Get/Set Information About Files/Directories” for further information. |
| Integration with Bugtracking Tools If you have activated the bugtracking system, you could set one or more Issues in the Bug-ID / Issue-Nr: Textfield. Several Issues should be comma separated. Learn more Section 4.10, “Integration with Bugtracking Systems”. |
4.9. Get/Set Information About Files/Directories
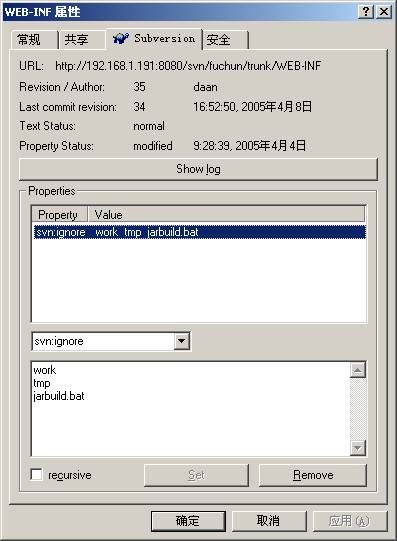
图4.10. Subversion属性页
有时你想得到一个文件或文件夹更细节的,比覆盖图标更多的信息。你可以在浏览器属性对话框中得到Subversion提供的所有信息。选择文件或文件夹,然后在菜单中选择属性(注意:这个属性是资源管理器提供的那个菜单中的属性,不在TortoiseSVN子菜单里面)。在属性对话框中TortoiseSVN为在Subversion控制下的文件或文件夹加入了一个新的属性页。
在Subversion的属性页,你可以看到选中文件或文件夹所有的相关信息。另外你还可以读到或设置它的subversion属性。你可以加入你自己的属性,或者一些在subversion中有特殊含义的属性。那些以svn:和svn:externals就是这样的属性。如何使用这些扩展信息请参看4.3.4节, “Referenced Projects”。更多subversion属性信息,请参看Subversion Manual。
要设置一个属性,先在下拉框选择需要的属性名,然后在下方的输入框中键入值。那些有多个值得属性,比如忽略列表,可以分成多行来输入。单击Set按钮来添加属性到列表中。
如果你要应用一个属性到一个目录下的每一个文件和目录,注意选中Recursive复选框。
如果你要修改一个已存在的属性,先在列表中选中他,然后就可以修改了。
同样,要删除一个已存在的属性,可以先在列表中选中他,再单击Remove按钮。
TortoiseSVN也有一些自己的特殊属性,他们以tsvn:打头:
● tsvn:minlogmsgsize设置了提交时日志的最小长度。如果你没有输入指定长度的信息,是不能提交的。这个功能对你在每一次做提交操作时提醒你写一些合适的描述信息是很有用的。如果这个属性没有设置,或者他的值为0,那表示不填日志信息也可以。
● tsvn:logwidthmarker用在需要有一定格式日志信息的项目中,日志信息每行的宽度有限制(常见的是80个字符)。设置这个属性为一个非零值,将导致2个现象:出现一个灰色线条指示最宽的宽度,还有,自动换行没有了。这样你就能看到自己的文字是不是写的太长了。注意:这个功能只有在给日志显示选择了固定宽度字体时才能正常工作。
● tsvn:logtemplate用在一些有日志格式规范的项目中。这个属性包含多行的文本,当进行一个commit操作时,这些文本就会自动插入到提交信息窗口中。接下来,你就可以在其中再加入必要的信息。注意:如果你还使用了tsvn:minlogmsgsize属性,那一定要保证设置的长度比模板中的长,否则你将失去这个保护机制。(Note: if you are also using tsvn:minlogmsgsize, be sure to set the length longer than the template or you will lose the protection mechanism.)
● 在提交对话框中,你可以把有改动的文件列表粘贴进来,包括每个文件的状态(added,modified,等)。tsvn:logfilelistenglish定义了显示的文件状态文字是英文还是本地语言。如果这个属性没有设置,默认为true。
● TortoiseSVN可以使用拼写检查模块,就像OpenOffice和Mozilla使用的。如果你安装了这些东东,这个属性可以决定使用哪个拼写检查模块,比如你的项目的日志信息应该用哪种语言来写。tsvn:projectlanguage设置了日志信息中拼写检查器要使用的语言模块。在这里可以找到你的语言要使用的值:MSDN: Language Identifiers。
某些tsvn:属性需要一个true或者false的值。另外,TSVN会懂得把yes当作true,把no当作false。
| Set the tsvn: properties on folders These tsvn: properties must be set on folders for the system to work. When you commit a file or folder the properties are read from that folder. If the properties are not found there, TortoiseSVN will search upwards through the folder tree to find them until it comes to an unversioned folder, or the tree root (eg. C:/) is found. If you can be sure that each user checks out only from e.g trunk/ and not some subfolder, then it is sufficient to set the properties on trunk/. If you can't be sure, you should set the properties recursively on each subfolder. A property setting deeper in the project hierarchy overrides settings on higher levels (closer to trunk/). For tsvn: properties only you can use the Recursive checkbox to set the property to all subfolders in the hierarchy, without also setting it on all files. |
| Commit properties Subversion properties are versioned. After you change or add a property you have to commit your changes. |
| Conflicts on properties If there's a conflict on committing the changes, because another user has changed the same property, Subversion generates a .prej file. Delete this file after you have resolved the conflict. |
| Automatic property setting You can configure subversion to set properties automatically on files and folders when they are added to the repository. Read Section 4.21, “TortoiseSVN's Settings” for further information. |
TortoiseSVN能够和一些bug跟踪系统整合到一起。这需要使用那些bugtraq:开头的属性。更多相关信息请阅读第4.10节 “整合BUG跟踪系统Integration with Bugtracking Systems”。
4.10. Bug跟踪系统Integration with Bugtracking Systems
你可以选择为TortoiseSVN整合一套Bug跟踪系统。要达到这个目的,你必须为目录定义一些以bugtraq:开头的属性(第4.9节 获取(修改)文件(目录)信息):
bugtraq:message
这个属性能够激活Bug跟踪系统。一旦这个属性被设置,提交修改时,TortoiseSVN会要求你输入一个流水号。而这个属性的值将被放在日志信息的末尾,其中必须包含%BUGID%,这个%BUGID%在提交时会被流水号替换掉。这就能保证你提交的日志信息中包括Bug流水号,这个流水号经常会有一个特定的格式,并且与你的Bug跟踪系统协调工作。比如,我们的TortoiseSVN项目就正在使用这样的流水号:%BUGID%。(e.g the TortoiseSVN project is using Issue : %BUGID%, but this depends on your Tool.)
bugtraq:append
当这个属性为true时,上面提到的BUGID将出现在日志的末尾,当为false时,BUGID将出现在日志的开头。该属性的有效值为true或false。假如没有定义,系统将默认为true,这样能够保证已有项目正常运行。
bugtraq:url
将这个属性设置为你的Bug跟踪系统的url。这个url应该被合适的编码过并且包含%BUGID%,%BUGID%会被输入的流水号替换掉的。这样,TortoiseSVN就会在日志对话框中显示一个链接,你就可以通过点击这个链接直接跳到Bug跟踪系统。如果你不提供这个属性,TortoiseSVN将只显示那个流水号,也不会链接到哪里。比如:TortoiseSVN项目使用的是http://tortoisesvn.tigris.org/issues/show_bug.cgi?id=%BUGID%
bugtraq:label
这个属性用来指定将显示在提交窗口中流水号输入框前的标签里的文字。如果没有设置的话,默认显示的是Bug-ID/Issue-Nr:。注意,窗口不会变化大小去适应这个标签的,所以要保证文字不要超过20-25个字符。
bugtraq:number
该属性为true时,流水号将只允许数字输入。逗号是个例外,你可以输入多个用逗号隔开的数字。有效的属性值为true或者false。如果没有定义,默认为true。
bugtraq:warnifnoissue
如果想要让TortoiseSVN提醒不要输入空流水号,那就把这个属性设置为true。有效的属性值为true或者false。如果没有定义,默认为false。
某些tsvn:属性需要一个true或者false的值。另外,TSVN会懂得把yes当作true,把no当作false。
| Set the Properties on Folders These properties must be set on folders for the system to work. When you commit a file or folder the properties are read from that folder. If the properties are not found there, TortoiseSVN will search upwards through the folder tree to find them until it comes to an unversioned folder, or the tree root (eg. C:/) is found. If you can be sure that each user checks out only from e.g trunk/ and not some subfolder, then it's enough if you set the properties on trunk/. If you can't be sure, you should set the properties recursively on each subfolder. A property setting deeper in the project hierarchy overrides settings on higher levels (closer to trunk/). For tsvn: properties only you can use the Recursive checkbox to set the property to all subfolders in the hierarchy, without also setting it on all files. |
4.11. 加入新文件和新目录Adding New Files And Directories
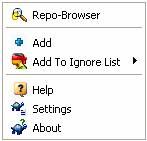
图4.11. 没有版本控制文件的菜单
如果你想把在开发过程中创建了新文件或新的目录加入到源代码控制之下,可以这样做:选中文件或目录,然后在菜单中选择Add命令。
在把文件或目录加入到控制之下后,这些文件或目录就会显示为一个added覆盖图标的样子,这就意味着你应该赶紧把你的工作副本commit一下,以便其他开发人员能够看到这些文件或目录。添加一个文件或目录并不会影响到仓库!
| Many Adds You can also use the Add command on already versioned folders. In that case, the add dialog will show you all unversioned files inside that versioned folder. This helps if you have many new files and need them to add at once. |
要把工作副本之外的文件加入进来,可以使用拖拽来搞定:
1. 选中你要添加的文件先。
2. 按下鼠标右键将文件拖拽到工作副本中的某个地方。
3. 松开鼠标右键。
4. 在跳出来的菜单中选择add files to Subversion here。这些文件马上就会被复制到工作副本中并且加入到了版本控制。
4.12. 忽略文件和目录Ignoring Files And Directories
图4.12. 没有版本控制文件的菜单
在很多项目中,有一些文件或目录是不应该被版本控制影响到的。包括那些编译器产生的*.obj, *.lst,还有一些存放可执行文件的输出目录。当提交修改时,TSVN就会把没有版本控制的文件列出来,占满了提交窗口的文件列表。当然你可以选择不显示他们,但这样可能会把一些需要添加的新加入的源代码文件漏掉。
避免这个问题的最好办法就是把这些文件加入项目的忽略列表。这样他们就不会再在提交窗口中出现了,而真正没有版本控制的源文件还是会被标记显示出来。
在没有版本控制的一个文件上单击鼠标右键,然后在TSVN的菜单中选择Ignore命令,这时会有一个子菜单出现,可以让你选择仅仅是这个文件,或者所有这个扩展名的文件。如果你最开始选中的是多个文件,那就不会有这个子菜单出现,而只能选择把这些选中的文件或目录加入忽略列表。
要把一个文件从忽略列表中去掉,必须编辑父目录的属性,把文件名从svn:ignore属性中移除。更多信息请阅读第4.9节 获取(修改)文件(目录)信息Get/Set Information About Files/Directories。
| The Global Ignore List Another way to ignore files is to add them to the global ignore list. The big difference here is that the global ignore list is a client property. It applies to all subversion projects, but on the client PC only. In general it is better to use the svn:ignore property where possible, because it can be applied to specific project areas, and it works for everyone who checks out the project. Read Section 4.21, “TortoiseSVN's Settings” for more information. |
4.13. 删除、重命名、移动Deleting, Renaming And Moving
和CVS不一样,Subversion允许对文件和目录进行改名和移动操作。因此在TortoiseSVN的子菜单中有delete和rename。
图4.13. 版本控制下文件的菜单
如果使用TSVN删除了一个文件或目录,这个文件就已经从工作副本中删除了,并被标记为删除状态。这个文件的父目录将显示为一个“deleted”覆盖图标。要恢复这个文件,只需对他的父目录进行revert操作即可。
如果要在工作副本内移动文件,可以使用鼠标来拖拽:
1. 选中要移动的文件或目录。
2. 用鼠标右键拖拽他们到工作副本中一个新的目录。
3. 松开鼠标右键。
4. 在跳出的菜单中选择move files in Subversion to here。
如果一个删除操作不是在版本控制下完成的,比如就像平常删除文件那样删除的。提交时,对话框窗口还是会显示这些删除的文件,并让你把他们从版本控制下删除。所以如果忘记使用TortoiseSVN来删除这些文件,这些都不是什么大不了的问题。
| Commit the parent folder Since renames and moves are done as a delete followed by an add you must commit the parent folder of the renamed/moved file. Only that way the deleted part of the rename/move will show up in the commit dialog. If you don't commit the removed part of the rename/move, it will stay behind in the repository and an update of your coworkers won't remove the old file. |
| Getting a deleted file or folder back If you have deleted a file or a folder and already committed that delete operation to the repository, then a normal Revert can't bring it back anymore. But the file or folder is not lost at all. If you know the revision the file or folder got deleted (if you don't, use the log dialog to find out) open the repository browser and switch to that revision. Then select the file or folder you deleted, right-click and select Copy to... as the target for that copy operation select the path to your working copy. |
4.14. 取消改变Undo Changes
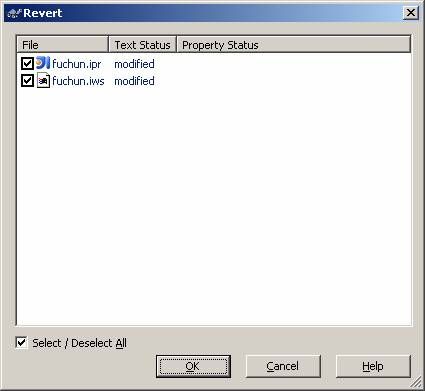
如果要取消对一个文件所做的修改,只需用鼠标右键单击该文件,选择TSVN子菜单中的revert命令,在跳出的窗口中会显示你选择的文件,这时可以再次勾选文件,然后按下OK按钮就好了。注意这里所做的取消修改只能返回到该文件上次update时的状态。
图4.14. Revert dialog
| Undoing Changes which have been Committed Revert will only undo your local changes. It does not undo any changes which have already been committed. If you want to undo all the changes which were committed in a particular revision, read Section 4.15, “Revision Log Dialog” for further information. |
4.15. 修订日志窗口Revision Log Dialog
每一次修改和提交,都应该做好日志记录。这样开发过程中就有了一个详细的记录,以后便可找出每一个修改是如何修改以及为什么这样修改的。
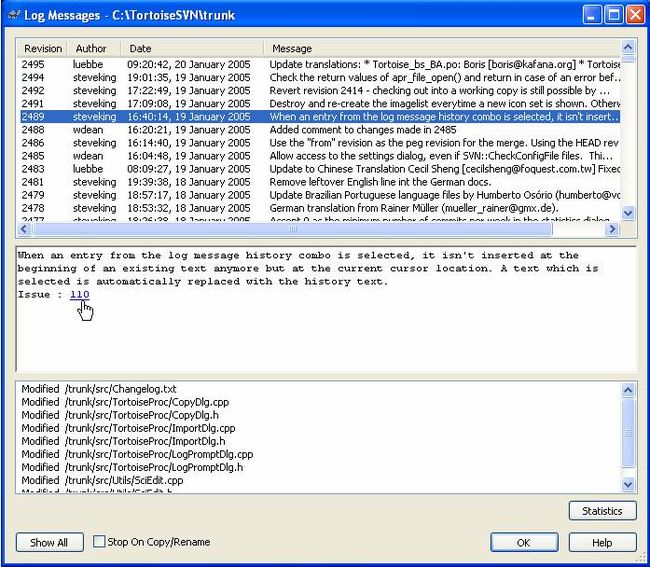
日志对话框会显示所有日志信息。显示分成3个部分:
1. 最上面部分显示的是所有被提交的版本列表。显示有日期时间、提交者、修订版本号和日志信息的前面一部分。
用蓝色显示的行表示有某些文件被复制到了这个版本。(也许是从一个分支来的)Lines shown in blue indicate that something has been copied to this development line (perhaps from a branch).
2. 中间部分显示的是选中版本的所有日志信息。
3. 底部显示的是选中版本所做修改的文件和目录列表。
还不仅仅是这些,对话框中还提供了很多的菜单命令可以使用。
4.15.1. Invoking The Log Dialog
图4.15. 日志窗口
有很多个地方可以调出这个日志窗口:
1. 从TortoiseSVN的菜单。
2. 从文件的属性页。
3. 完成update操作之后的窗口。这个窗口将只显示自上次更新以来有过的版本。
4.15.2. Getting Additional Information
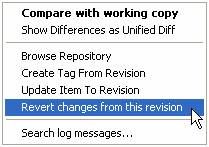
图4.16. 日志窗口顶部窗格的右键菜单
顶部窗格中的右键菜单功能如下:
1. Compare with working copy 对选中版本与本地副本进行比较。默认的比较工具是TSVN提供的TortoiseMerge。如果是某个目录的日志,就会显示有改动文件的列表,接下来可以选择单个文件进行改动查看。
2. Show Differences as Unified Diff 在一个文件里面显示所有的改动。这个操作比上面那个调用外部的比较查看器要快多了,因为TSVN只需要拿到不同,而不再需要获取所有的文件。
3. 保存选中版本为一个文件,这样就可以得到这个文件的一个老版本了。这个选项只有当你选中的版本中只有一个文件被改动时才有效。
4. Browse Repository打开仓库浏览器,检查选中的目录。这个选项只有当日志只有一个目录时才有效。
5. Create tag from Revision 从选中版本创建branch或tag。这个功能很有用的。比如当你忘记创建一个tag而已经提交了一些改动,但这些改动你又不想包含到那个版本中去时。
6. 更新工作副本到选中版本。当想把工作副本回复到以前的某个状态,这个选项是很有用的。最好是更新整个目录而不是只更新一个文件,否则你的工作副本就会不一致,而且你也将没办法提交任何改动。
7. 恢复改动到选中版本。这个操作对仓库没有一点影响,只会在本地副本中进行改动的恢复。注意,它只取消那个版本的所有改动,没有用老版本的整个文件来替换你的副本。这在要取消一个以前的改动时很有用。
8. 检索日志信息。这个功能可以在输入的日志信息和Subversion创建的动作摘要中进行查找。注意:大小写是不敏感的。
图4.17. 顶部窗格中选中2个文件时的菜单
如果你一次选中两个版本,菜单就会只剩下三个选项了:
1. 用可视化工具来比较选中的2个版本。默认的比较工具是TSVN提供的TMerge。这个功能只对文件有效,对目录没用。
2. 在一个文件中显示这2个版本的不同点。这个对文件和目录都有效。
3. 检索日志信息。和前面讲到的一样。
图4.18. 底部窗格的菜单
底部窗格菜单的作用如下:
1. 查看选中文件在那个版本中所作的改动。这个菜单只有当文件为Modified时才有效。
2. 保存选中文件的相关版本。
3. 查看选中条目的Subversion属性。
4.15.3. Getting all log messages
日志窗口一般不会显示所有的日志的:
1. 对一个大型仓库来说,显示成千上万的改动需要花太多时间。正常情况下,开发人员只关注最近的修改。默认情况,最多会显示100条日志。你也可以在Settings中修改这个值(见第4.21节,“TortoiseSVN的设置”)。
2. 当查看一个branch或者tag的日志时,只会显示创建这个特定branch的目录到根的日志。这样的好处是不会显示多余的其他无关的日志信息。
注意这只对本地副本有效。如果使用仓库浏览器,日志信息会从分支的地方继续显示更多。
如果想得到所有日志,先回到版本1,再按Get All。
4.15.4. Changing the log message and author
有时候需要修改早先输入的日志,因为各种各样的原因,比如一个拼写错误,或者要改进一些说法等等。另外还有可能需要修改提交修改的作者,比如由于忘记设置认证等等原因。
Subversion允许任意的修改日志内容或版本作者。但这个功能默认是关闭的,因为这些修改是不能取消的(这些修改没有在版本控制之下)。要让这个功能起作用,必须先设置好pre-revprop-change hook。关于如何设置的细节请查阅Subversion的Hook Scripts一节。关于如何在Windows环境如何实现hooks请阅读第3.5节“Repository Hooks”。
为服务器配置好必需的hooks之后,就可以修改每个版本的作者和日志内容了。用TSVN修改的方法是,在先按住SHIFT键,再用鼠标双击需要修改的作者或日志栏。如果没有按住SHIFT键,或没有点击在这2个栏上,那默认的双击动作(显示选中版本的区别)就会被执行了。
| Warning Because Subversion's revision properties are not versioned, making modifications to such a property (for example, the svn:log commit message property) will overwrite the previous value of that property forever. |
4.15.5. Statistical Information
按下统计按钮(Statistics)会显示一些关于修订版本的有趣信息。显示的内容包括,有多少作者在工作,他们提交了多少内容,每周的进展,等等。现在就可以知道谁在努力工作谁在偷懒了:)
注意,这个统计页面数据的范围和前一个界面里日志的范围是一样的。所以如果只是一个版本的日志,那这里的统计信息就不会有太大的意义了。
4.16. 分支/标记Branching / Tagging
版本控制的一个重要特性是能将变更隔离成独立的开发线路。这就是所谓的分支(branch)。分支常用来测试新功能,但又不会因为编译错误或BUG干扰开发主线。一旦分支稳定下来,就可以把分支合并(merge)回主线(the trunk)了。
版本控制的另一个特性是标记特殊版本(比如一个可以发布的版本),这样有利于在任何时候重新创建一个特定的build或开发环境。这就是所谓的标记(tagging)。
Subversion没有什么专门的命令来branching或者tagging,而使用cheap copies来代替。Cheap copies有点像links(译者注:就像windows系统的快捷方式),并没有真正的进行复制操作。
4.16.1. Creating a Branch or Tag
在从副本创建分支或标记前,最好先确保本地与仓库的版本一致。
如果你是按先前的推荐组织方式存放仓库的,那创建分支或标记会非常简单:
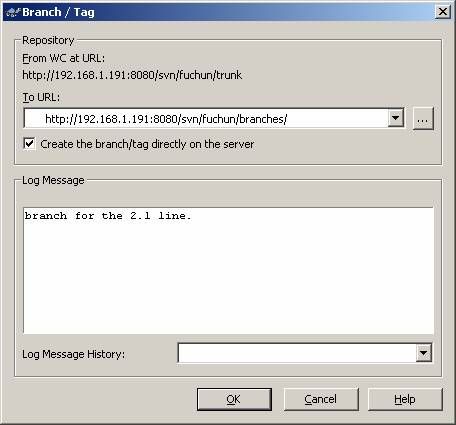
图4.19. 分支/标记
选中工作副本父目录,调出菜单,选择命令Branch/Tag。输入分支或标记的仓库路径URL。把原来输入的trunk 换成tags/tagname ,这里tagname 可能是ProjectName_v1.10.
C:/SVNRepository/trunk/ProjectName/...
C:/SVNRepository/trunk/AnotherProject/...
C:/SVNRepository/branches/ProjectName_SpecialDebugBuildBasedOn_v1.09/
C:/SVNRepository/tags/ProjectName_v1.10
按下OK钮,Subversion就在仓库中用指定的目录创建了一个cheap copy。创建分支或标记都不影响本地副本。
如果本地有没有提交的改动,TortoiseSVN会在创建标记时一起提交改动。
4.16.2. To Checkout or to Switch...
这是(不是真的)个问题。由于checkout会取出所有的数据,而switch只会传输修改的内容。Good for the network load, good for your patience. :-)
为了能够得到最新的副本进行工作,你可以:
1. 再次执行checkout。你可以任意次的取出副本到本地的任意地方。
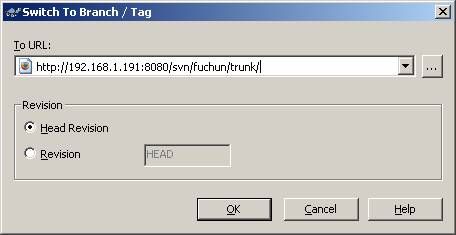
2. 转换当前副本到新创建的仓库。只需再对项目的父目录执行Switch命令。
在下一个窗口输入刚才创建的branch地址。选择Head version。点击OK。本地副本就切换到新branch或tag了。
转换就像更新一样,不会丢掉本地的任何修改,而是将未提交修改合并。如果不想这样,那就在转换(switch)之前进行提交(commit)操作,或恢复(revert)副本到某个已提交版本(一般都选head版本)。
图4.20. 转换窗口
Subversion是不明白tags与branches的不同的。下面列出几点区别:
1. 标记用于创建项目在一个特殊阶段的静态快照,通常不再用于开发,而分支是用于开发的。这就是先前推荐使用/trunk /branches /tags结构的理由。当然你也可以修改/tags/中的副本,但提交时TortoiseSVN会有警告。
2. 如果一个已经标记过的还发布了的版本,还要进行修改,正确的方法是创建一个新的分支,在新分支上做修改,再根据这个分支创建新标记。比如Version_1.0.1。
3. 如果在副本上修改并提交,则修改只体现在分支上而不是主干上。
4.17. 合并Merging
Where branches are used to maintain separate lines of development, at some stage you will want to merge the changes made on one branch back into the trunk, or vice versa.
在进行合并操作之前,理解subversion中分支与合并如何工作是蛮重要的,否则可能导致很复杂的情况出现。强烈建议各位去阅读Subversion Book的Branching and Merging这一节,那里有详细的描述和很多例子。
There are two common use cases for merging which are handled in slightly different ways, as described below.
4.17.1. Merging a Range of Revisions
This method covers the case when you have made one or more revisions to a branch (or to the trunk) and you want to port those changes across to a different branch.
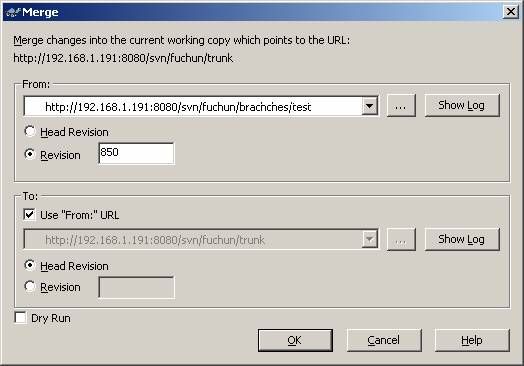
Figure 4.21. The Merge Dialog
To merge revisions you need to go to a working copy of the branch in which you want to receive the changes, often the trunk. Select Merge... from the context menu.
In the From: field enter the full folder url of the branch or tag containing the changes you want to port into your working copy. You may also click ... to browse the repository and find the desired branch.
Because you are porting a range of revisions from the same branch into your working copy, make sure the Use "From:" URL checkbox is checked.
In the From Revision field enter the initial revision number. This is the revision before the changes you want to merge. Revision numbers are auto-incremented after each commit. You want to start merging the changes before the revision number is auto-incremented. For example, if your log messages look something like this:
Rev Comments
39. Working on MyBranch
38. Working on trunk
37. Working on MyBranch
36. Create branch MyBranch
35. Working on trunk
34. Working on trunk
...
If you now want to merge the changes from MyBranch into the trunk you have to choose 36 as the From Revision. Not 37 as you might think.
The easiest way to find the revision you need is to click on Show Log, as this will list recent changes with their log comments. Select the revision you require in the Show Log dialog, then click on OK.
In the To Revision field enter the last revision number in the range you want to merge. Often this will be the HEAD revision, although it doesn't need to be - you can just want to merge a single revision.
Click OK to complete the merge.
The merge is now complete. It's a good idea to have a look at the merge and see if it's as expected. Merging is usually quite complicated. Conflicts often arise if the branch has drifted far from the trunk.
When you have tested the changes and come to commit this revision, your commit log message should always include the revision numbers which have been ported in the merge. If you want to apply another merge at a later time you will need to know what you have already merged, as you do not want to port a change more than once. Unfortunately merge information is not stored by Subversion. For more information about this, refer to Tracking Merges Manually in the Subversion Book
If you want to keep this branch up to date with the trunk, you should immediately merge changes from trunk back to the this branch. Use this method and local changes won't get in your way. Of course, you should still avoid repeated merging of trunk changes, as explained above.
If you want to see what changes will be made by a merge and see where possible conflicts may occur you can check the option Dry Run . This will force the merge command to do a merge, but not modify the working copy at all.
| Important Subversion can't merge a file with a folder and vice versa - only folders to folders and files to files. If you click on a file and open up the merge dialog, then you have to give a path to a file in that dialog. If you select a folder and bring up the dialog, then you must specify a folder url for the merge. |
4.17.2. Merging Two Different Trees
This method covers the case when you have made a feature branch as discussed in the Subversion book. All trunk changes have been ported to the feature branch, week by week, and now the feature is complete you want to merge it back into the trunk. Because you have kept the feature branch synchronized with the trunk, the latest versions of branch and trunk will be absolutely identical except for your branch changes. So in this special case, you would merge by comparing the branch with the trunk.
To merge the feature branch back into the trunk you need to go to a working copy of the trunk. Select Merge... from the context menu.
In the From: field enter the full folder url of the trunk. This may sound wrong, but remember that the trunk is the start point to which you want to add the branch changes. You may also click ... to browse the repository.
Because you are comparing two different trees, make sure the Use "From:" URL checkbox is not checked.
In the To: field enter the full folder url of the feature branch.
In both the From Revision field and the To Revision field, enter the last revision number at which the two trees were synchronized. If you are sure no-one else is making commits you can use the HEAD revision in both cases. If there is a chance that someone else may have made a commit since that synchronization, use the specific revision number to avoid losing more recent commits.
Click OK to complete the merge.
In this case you will not need the feature branch again because the new feature is now integrated into the trunk. The feature branch is redundant and can be deleted from the repository if required.
4.18. 创建和应用补丁Creating and Applying Patches
如果谁都可以随便修改,项目将没完没了,永远没法稳定下来。怎么办呢?通过“补丁patch”!将补丁送交给具有写权限的开发团队,他们先审查补丁,再决定是否提交,或者打回给作者。
补丁文件只保存有副本与基础版本的差异。
4.18.1. Creating a Patch File
First you need to make and test your changes. Then instead of using Commit... on the parent folder, you select Create Patch... This will produce a single file containing a summary of all the changes you have made since the last update from the repository. If you create a patch file, make some more changes and then create another patch, the second patch file will include both sets of changes.
Just save the file using a filename of your choice. Patch files can have any extension you like, but by convention they should use the .patch or .diff extension. You are now ready to submit your patch file.
4.18.2. Applying a Patch File
Patch files are applied to your working copy. This should be done from the same folder level as was used to create the patch. If you are not sure what this is, just look at the first line of the patch file. For example, if the first file being worked on was doc/source/english/chapter1.xml and the first line in the patchfile is Index: english/chapter1.xml then you need to apply the patch to the english folder.
In order to apply a patch file to your working copy, you need to have at least read access to the repository. The reason for this is that the merge program must reference the changes back to the revision against which they were made by the remote developer.
From the context menu for that folder, click on Apply Patch... This will bring up a file open dialog allowing you to select the patch file to apply. By default only .patch or .diff files are shown, but you can opt for "All files". Open the file and TortoiseMerge runs to merge the changes from the patch file with your working copy. A small window lists the files which have been changed. Double click on each one in turn, review the changes and save the merged files.
The remote developer's patch has now been applied to your working copy, so you need to commit to allow everyone else to access the changes from the repository.
4.19. 副本重定位Relocating a working copy
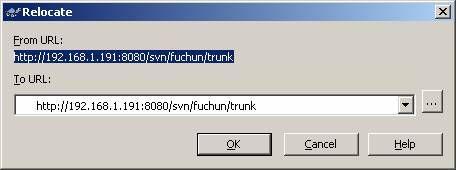
Figure 4.22. The Relocate Dialog
If your repository has for some reason changed it's location (IP/URL). Maybe you're even stuck and can't commit and you don't want to checkout your working copy again from the new location and to move all your changed data back into the new working copy, relocate is the command you are looking for. It basically does very little: it scans all "entries" files in the .svn folder and changes the URL of the entries to the new value.
| Warning Don't use the relocate command to switch your working copy to a different branch! If you do that, then you will get many unexplainable error messages while updating, committing, ... The relocate command must only be used if the URL of the server changed! |
4.20. 仓库浏览器The Repository Browser
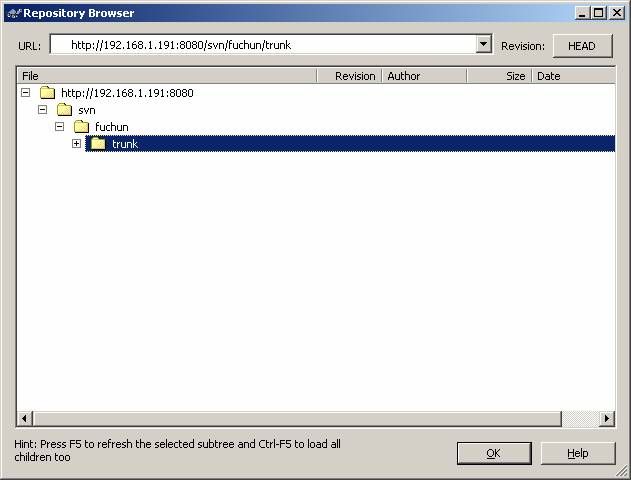
Sometimes you need to work directly on the repository, without having a working copy. That's what the Repository Browser is for. What the explorer and the icon overlays are for your working copy is the Repository Browser for the repository.
Figure 4.23. The Repository Browser
With the Repository Browser you can execute commands like copy, move, rename, ... directly on the repository.
On the top of the Repository Browser Window you can enter the URL of the repository and the revision you want to browse. Browsing an older revision is useful if you want to e.g. recover a previously deleted file. Use the Copy To... command to do that and enter the full working copy path to where you want to recover your deleted file.
4.21. TSVN的设置TortoiseSVN's Settings
To find out what the different settings are for, just leave your mouse pointer a second on the editbox/checkbox... and a helpful tooltip will popup.
4.21.1.
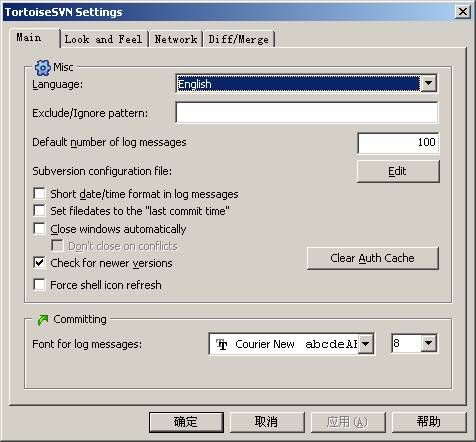
图4.24. 设置主界面
Apart from setting your preferred language, this dialog allows you to specify (almost) every setting TortoiseSVN has.
Language
Selects your user interface language. What else did you expect?
Exclude/Ignore pattern
Exclude patterns are used to prevent unversioned files from showing up e.g. in the commit dialog. Files matching the patterns are also ignored by an import. Exclude files or directories by typing in the names or extensions. Patterns are separated by spaces e.g. bin obj *.bak *.~?? *.jar *.[Tt]mp. The first two entries refer to directories, the other four to files.
Warning
If you use the subversion configuration file to set a global-ignores pattern, it will override the settings you made here. The Subversion configuration file is accessed using the Edit as described below.
This exclude pattern will affect all your projects. It is not versioned, so it will not affect other users. By contrast you can also use the versioned svn:ignore property to exclude files or directories from version control. You can set the svn:ignore property using the Add to Ignore List command. After commiting every other user will have the same svn:ignore property set for this project / directory as you. If you want to remove an ignored file from svn:ignore, you have to edit the parent folder properties. Read Section 4.12, “Ignoring Files And Directories” and Section 4.9, “Get/Set Information About Files/Directories” for more information.
Default number of log messages
Limits the number of log messages that TortoiseSVN fetches when you first select Show Log Useful for slow connections / servers. You can always Fetch All messages.
Edit...
... the subversion configuration file directly. Some settings cannot be modified directly by TortoiseSVN, and need to be set here instead. For more information about the subversion config file see the Subversion Manual . The section on Automatic Property Setting is of particular interest, and that is configured here.
Short date / time format in log messages
If the standard long messages use up too much space on your screen use the short format.
Set filedates to "last commit time"
This option tells TortoiseSVN to set the filedates to the last commit time when doing a checkout or an update. Otherwise TortoiseSVN will use the current date. If you are developing software it is generally best to use the current date because build systems normally look at the datestamps to decide which files need compiling. If you use "last commit time" and revert to an older file revision, your project may not compile as you expect it to.
Close windows automatically
TortoiseSVN will automatically close all progress dialogs when the action is finished without error.
Don't close on conflicts
Automatic window closing is suppressed if there were conflicts during an update. This option is highly recommended to avoid missing conflict reports.
Check for newer versions
If checked, TortoiseSVN will check once a week to see if an update is available
Force shell icon refresh
If checked, TortoiseSVN will refresh all the overlay icons after every operation without you having to press F5.
Warning
Explorer will refresh every visible icon, not just the status overlays. If you have a network share, or a CD-ROM or floppy showing, then explorer will go and update all the icons from their original source files, and that can be very slow, blocking the explorer process completely for many seconds.
4.21.2.
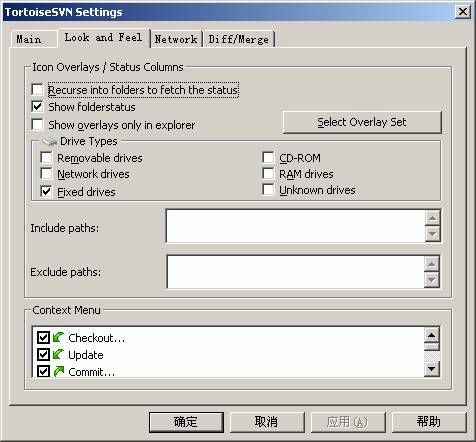
Figure 4.25. The Settings Dialog, Look and Feel Tab
This tab allows you to choose the items for which TortoiseSVN will display icon overlays. If you feel that your icon overlays are very slow (explorer is not responsive), uncheck the "Recurse into folders to fetch the status" box. You can even disable all icon overlays, but where's the fun in that?
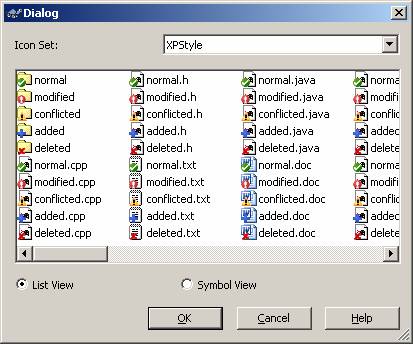
Figure 4.26. The Settings Dialog, Overlay Chooser Dialog
You can also change the overlay icon set by clicking on Select Overlay Set. Note that if you change overlay set, you have to restart your computer for the changes to take effect.
The Exclude Paths are used to tell TortoiseSVN for which paths not to show icon overlays and status columns. This is useful if you have some very big working copies containing only libraries which you won't change at all and therefore don't need the overlays. For example:
f:/development/SVN/Subversion will disable the overlays on only that specific folder. You still can see the overlays on all files and folder inside that folder.
f:/development/SVN/Subversion* will disable the overlays on all files and folders whose path starts with f:/development/SVN/Subversion. That means you won't see overlays for any files and folders below that path.
The same applies to the Include Paths. Only that for those paths the overlays are shown even if the overlays are disabled for that specific drive type.
You can also specify here which of the TortoiseSVN context menu entries will show up in the main context menu.
4.21.3.
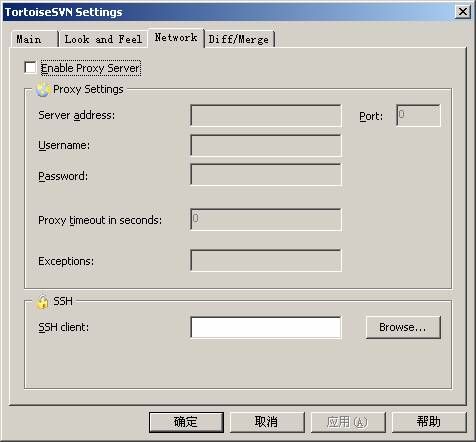
Figure 4.27. The Settings Dialog, Network Tab
Here you can configure your proxy server, if you need one to get through your company's firewall.
You can also specify which program TortoiseSVN should use to establish a secure connection to a svn+ssh repository.
4.21.4. /合并设置
Figure 4.28. The Settings Dialog, Diff/Merge Tab
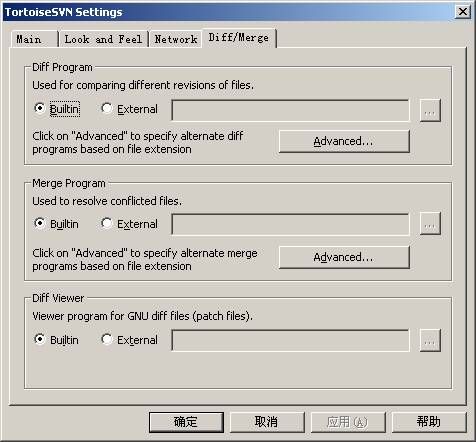
Here you can define your own diff/merge programs that TortoiseSVN should use. The basic setting is to use the builtin TortoiseMerge which is installed alongside TortoiseSVN.
Diff Program
An external diff program used for comparing different revisions of files. You can specify the following parameters to the path:
%base
The original file without your changes
%bname
The window title for the base file
%mine
Your own file, with your changes
%yname
The window title for your file
The window titles are not pure filenames. TortoiseSVN treats that as a name to display and creates the names accordingly. So e.g. if you're doing a diff from a file in revision 123 with a file in your working copy, the names will be filename : revision 123 and filename : working copy
Merge Program
An external merge program used to resolve conflicted files. You can specify the following parameters to the path. The order of the parameters depends on the merge program you use.
%base
the original file without your or the others changes
%bname
The window title for the base file
%mine
your own file, with your changes
%yname
The window title for your file
%theirs
the file as it is in the repository
%tname
The window title for the file in the repository
%merged
the conflicted file, the result of the merge operation
%mname
The window title for the merged file
Diff Viewer
A viewer program for unified-diff files (patch files). If you don't have one the builtin option is to use NotePad. No Parameters.
The original Windows NotePad program does not behave well on files which do not have standard CR-LF line-endings. Since most unified diff files have pure LF line-endings, they do not view well in NotePad. However, you can download a free NotePad replacement Notepad2 which not only displays the line-endings correctly, but also colour codes the added and removed lines.
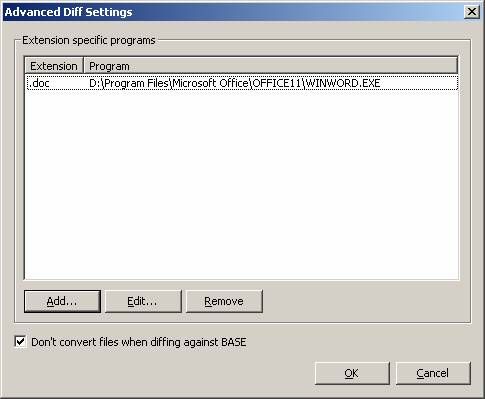
Figure 4.29. The Settings Dialog, Diff/Merge Advanced Dialog
In the advanced settings, you can define a different diff and merge program for every file extension. For instance you could associate Photoshop as the "Diff" Program for .jpg files :-)
4.22. 谁动了哪一行?Who Changed Which Line?
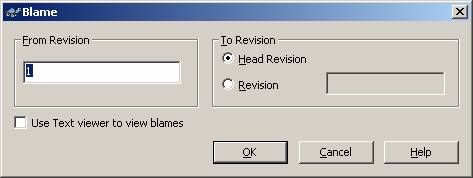
Figure 4.30. The Annotate / Blame Dialog
Sometimes you need to know not only what lines have changed, but also who exactly changed specific lines in a file. That's when the Blame... command, sometimes also referred to as annotate command comes in handy.
This command lists, for every line in a file, the author and the revision the line was changed.
If you're not interested in changes from earlier revisions you can set the revision from which the blame should start. Set this to 1, if you want the blame for every revision.
By default the blame file is viewed using TortoiseBlame, which highlights the different revisions to make it easier to read. If you wish to print or edit the blame file, select Use Text viewer to view blames
Once you press OK TortoiseSVN starts retrieving the data to create the blame file. Please note: This can take several minutes to finish, depending on how much the file has changed and of course your network connection to the repository. Once the blame process has finished the result is written into a temporary file and you can view the results.
Figure 4.31. TortoiseBlame
TortoiseBlame, which is included with TortoiseSVN, makes the blame file easier to read. When you hover the mouse over a line in the blame info column, all lines with the same revision are shown with a darker background. Lines from other revisions which were changed by the same author are shown with a light background. The colouring may not work as clearly if you have your display set to 256 colour mode.
If you left click on a line, all lines with the same revision are highlighted, and lines from other revisions by the same author are highlighted in a lighter colour. This highlighting is sticky, allowing you to move the mouse without losing the highlights. Click on that revision again to turn off highlighting.
The revision comments are shown in a hint box whenever the mouse hovers over the blame info column.
4.23. 版本路线图Revision Graphs
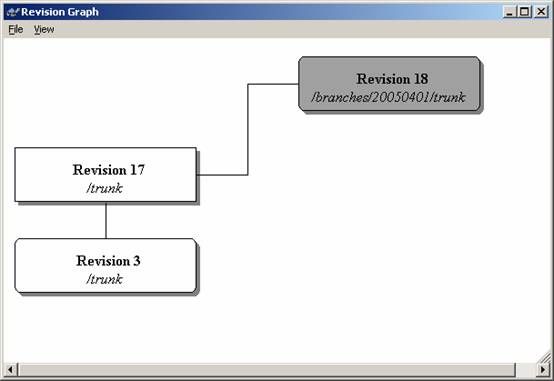
Figure 4.32. A Revision Graph
Sometimes you need to know where branches and tags were taken from the trunk, and the ideal way to view this sort of information is as a graph or tree structure. That's when you need to use Revision Graph...
This command analyses the revision history and attempts to create a tree showing the points at which copies were taken, and when branches/tags were deleted. Please note: It can take several minutes to retrieve all the data needed to create the revision graph, depending on how much the project has changed and of course your network connection to the repository.
The revision graph shows several types of node:
Added file/folder
Items which have been added, or created by copying another file/folder are shown using a rounded rectangle.
Deleted file/folder
Deleted items eg. a branch which is no longer required, are shown using an octagon (rectangle with corners cut off).
Normal file/folder
All other items are shown using a plain rectangle.
Note that the graph only shows the points at which items were added or deleted. Showing every revision of a project would generate an impossibly large graph for non-trivial cases.
The revision date, author and comments are shown in a hint box whenever the mouse hovers over a revision box.
| Warning Because subversion cannot provide all the information required, a certain amount of interpretation is required, which can sometimes give strange results. Nevertheless, the output for the trunk will generally give useful results. |
4.24. 最后Final Step
Wishlist
Even though TortoiseSVN and TortoiseMerge are free, you can support the developers by sending in patches and play an active role in the development. You can also help to cheer us up during the endless hours we spend in front of our computers.
While working on TortoiseSVN we love to listen to music. And since we spend many hours on the project we need a lot of music. Therefore we have set up some wish-lists with our favourite music CD's and DVD's: http://tortoisesvn.tigris.org/donate.html Please also have a look at the list of people who contributed to the project by sending in patches or translations.
