Android-ObservableScrollView(二)
Base相关方法
FillGap
本篇主要根据官方提供的simple结合源码理解上面相关知识,由于Activity都是根据基类构建出来的,先来了解基类构建以及涉及到的BaseActivity基类内部提供的方法。
BaseActivity提供了ActionBar的高度获取方法根据actionBar的属性actionBarSize,以及获取屏幕content内容视图的高度(get到新技能)
  protected int getActionBarSize() {//在下面提到的header视图布局的TextView会用到actionBarSize属性,个人比较喜欢用View.getMeasuredHeight()
        TypedValue typedValue = new TypedValue();
        int[] textSizeAttr = new int[]{R.attr.actionBarSize};
        int indexOfAttrTextSize = 0;
        TypedArray a = obtainStyledAttributes(typedValue.data, textSizeAttr);
        int actionBarSize = a.getDimensionPixelSize(indexOfAttrTextSize, -1);
        a.recycle();
        return actionBarSize;
    }

  protected int getScreenHeight() {
        return findViewById(android.R.id.content).getHeight();
    }
setDummyData相关方法迭代只是为视图添加适配器,setDummyDataWithHeader方法核心就两点,为动态创建的headerView配置最小高度和Clickable设置
  headerView.setLayoutParams(new AbsListView.LayoutParams(AbsListView.LayoutParams.MATCH_PARENT, headerHeight));
  // headerView最小高度
  headerView.setMinimumHeight(headerHeight);
  // 这是需要禁用头的列表选择器效果
  headerView.setClickable(true);
  setDummyDataWithHeader(listView, headerView, num);
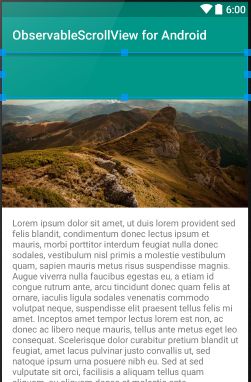
下面来看一组效果图
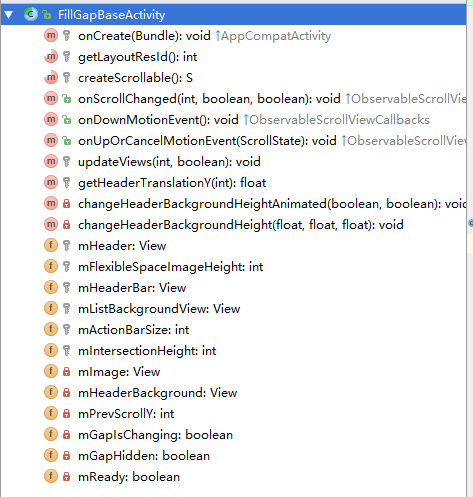
FillGap系类的Simple都继承自基类FillGapBaseActivity extends BaseActivity
public abstract class FillGapBaseActivity<S extends Scrollable> extends BaseActivity implements ObservableScrollViewCallbacks {

}
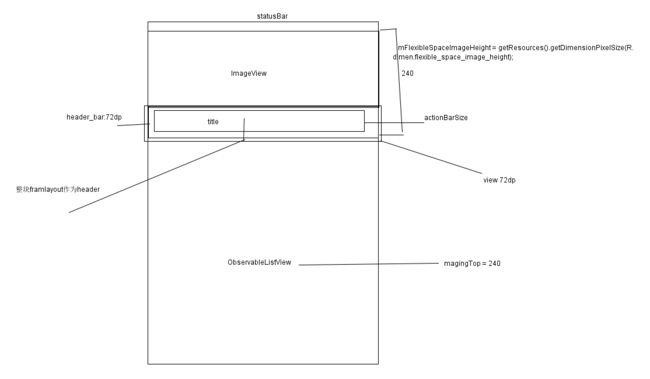
createScrollable在各自Activity实现里面的控件Observable系列自定义控件实现了Scrollable所以各自Activity直接返回即可,这里的scrollable主要用于获取currentScrollY来更新视图。onScrollChanged滑动变化监听回调后根据scrollY调用updateViews更新视图。下面通过一幅图来理解base里面的变量定义
当然上图效果是展示运行后的效果,布局布局界面却是这样的
那这到底是怎么达到效果,一跳转Activity就把header部分view显示到最下面的呢?且看Base里面的onCreate方法,调用了addOnGlobalLayoutListener,在刚进入界面会执行回调,此时scrollY默认是0,执行updateViews方法更新视图,这里FillGap2BaseActivity基于父类重构getHeaderTranslationY方法重新计算出真正的需要transtionY的值作用于header,下面是相关代码
public abstract class FillGap2BaseActivity<S extends Scrollable> extends FillGapBaseActivity<S> {
    protected float getHeaderTranslationY(int scrollY) {
        return ScrollUtils.getFloat(-scrollY + mFlexibleSpaceImageHeight - mHeaderBar.getHeight(), 0, Float.MAX_VALUE);
    }
}

//.......................................

 protected void updateViews(int scrollY, boolean animated) {
        // If it's ListView, onScrollChanged is called before ListView is laid out (onGlobalLayout).
        // This causes weird animation when onRestoreInstanceState occurred,
        // so we check if it's laid out already.
        if (!mReady) {
            return;
        }
        // 图片的transtionY的值按照scrollY的二分之一来计算,如果按照scrollY值来计算就是平推效果
        ViewHelper.setTranslationY(mImage, -scrollY / 2);

        // Translate header 变化header位置,如果是 scrollY=0,就直接吧header放到了上图位置,第一次加载时候animation为false,让人感觉不到transtion效果
        ViewHelper.setTranslationY(mHeader, getHeaderTranslationY(scrollY));

        // Show/hide gap
        final int headerHeight = mHeaderBar.getHeight();

        boolean scrollUp = mPrevScrollY < scrollY;

        if (scrollUp) {//根据滑动方向调整header视图的背景高度
            if (mFlexibleSpaceImageHeight - headerHeight - mActionBarSize <= scrollY) {
                changeHeaderBackgroundHeightAnimated(false, animated);
            }
        } else {
            if (scrollY <= mFlexibleSpaceImageHeight - headerHeight - mActionBarSize) {
                changeHeaderBackgroundHeightAnimated(true, animated);
            }
        }
        mPrevScrollY = scrollY;
    }
进过FillGap2simple相关的阅读后进行了一下实践发现并没有想象那么简单,首先遇到一个问题,调用ViewHelper.setTranstionY后原来位置还有一片空白,具体原因出在clipChildren属性,设置为false,允许子布局超出视图范围
<FrameLayout xmlns:android="http://schemas.android.com/apk/res/android"
    android:layout_width="match_parent"
    android:layout_height="match_parent"
    android:clipChildren="false">

    <ImageView
        android:id="@+id/image"
        android:layout_width="match_parent"
        android:layout_height="@dimen/flexible_space_image_height"
        android:scaleType="centerCrop"
        android:src="@drawable/example" />

   //..............................
其次呢下拉滑动,header和imageView视图的显示问题,这里需要主要ViewHelper.setTranslationY方法的调用边界控制。具体自行参考官方simple
参考资料:
http://www.cnblogs.com/over140/p/3508335.html


