MySQL-SpringBoot集成JPA实现数据读写分离
在上篇博客《MySQL-主从复制之同步主从数据》中,我们实现了读库和写库的数据同步。今天,我们继续学习SpringBoot集成JPA如何实现数据读写分离。废话不多话直接上代码。
一、配置数据源
# 数据源
spring.datasource.druid.write.url=jdbc:mysql://localhost:3380/test
spring.datasource.druid.write.username=root
spring.datasource.druid.write.password=Anbang713
spring.datasource.druid.write.driver-class-name=com.mysql.jdbc.Driver

spring.datasource.druid.read.url=jdbc:mysql://localhost:3381/test
spring.datasource.druid.read.username=root
spring.datasource.druid.read.password=Anbang713
spring.datasource.druid.read.driver-class-name=com.mysql.jdbc.Driver

# JPA
spring.jpa.database-platform=org.hibernate.dialect.MySQL5InnoDBDialect
spring.jpa.database=mysql
spring.jpa.generate-ddl=false
spring.jpa.hibernate.ddl-auto=none
spring.jpa.hibernate.naming-strategy=org.hibernate.cfg.DefaultComponentSafeNamingStrategy
spring.jpa.show-sql=false
二、数据源配置类
/**
 * 数据源配置
 *
 * @author Administrator
 *
 */
@Configuration
public class DataSourceConfig {

  public final static String WRITE_DATASOURCE_KEY = "writeDruidDataSource";
  public final static String READ_DATASOURCE_KEY = "readDruidDataSource";

  @ConfigurationProperties(prefix = "spring.datasource.druid.read")
  @Bean(name = READ_DATASOURCE_KEY)
  public DataSource readDruidDataSource() {
    return new DruidDataSource();
  }

  @ConfigurationProperties(prefix = "spring.datasource.druid.write")
  @Bean(name = WRITE_DATASOURCE_KEY)
  @Primary
  public DataSource writeDruidDataSource() {
    return new DruidDataSource();
  }

  /**
   * 注入AbstractRoutingDataSource
   *
   * @param readDruidDataSource
   * @param writeDruidDataSource
   * @return
   * @throws Exception
   */
  @Bean
  public AbstractRoutingDataSource routingDataSource(
      @Qualifier(READ_DATASOURCE_KEY) DataSource readDruidDataSource,
      @Qualifier(WRITE_DATASOURCE_KEY) DataSource writeDruidDataSource) throws Exception {
    DynamicDataSource dataSource = new DynamicDataSource();
    Map targetDataSources = new HashMap();
    targetDataSources.put(WRITE_DATASOURCE_KEY, writeDruidDataSource);
    targetDataSources.put(READ_DATASOURCE_KEY, readDruidDataSource);
    dataSource.setTargetDataSources(targetDataSources);// 配置数据源
    dataSource.setDefaultTargetDataSource(writeDruidDataSource);// 默认为主库用于写数据
    return dataSource;
  }
}
三、使用ThreadLocal使数据源与线程绑定
public class DynamicDataSourceHolder {
  // 使用ThreadLocal把数据源与当前线程绑定
  private static final ThreadLocal dataSources = new ThreadLocal();

  public static void setDataSource(String dataSourceName) {
    dataSources.set(dataSourceName);
  }

  public static String getDataSource() {
    return (String) dataSources.get();
  }

  public static void clearDataSource() {
    dataSources.remove();
  }
}
四、动态数据源配置
public class DynamicDataSource extends AbstractRoutingDataSource {

  @Override
  protected Object determineCurrentLookupKey() {
    // 可以做一个简单的负载均衡策略
    String lookupKey = DynamicDataSourceHolder.getDataSource();
    System.out.println("------------lookupKey---------" + lookupKey);
    return lookupKey;
  }
}
五、写数据源配置类
@Configuration
@EnableJpaRepositories(value = "com.study.mysql.jpa.dao",
    entityManagerFactoryRef = "writeEntityManagerFactory",
    transactionManagerRef = "writeTransactionManager")
public class WriteDataSourceConfig {

  @Autowired
  JpaProperties jpaProperties;
  @Autowired
  @Qualifier("writeDruidDataSource")
  private DataSource writeDruidDataSource;

  /**
   * 我们通过LocalContainerEntityManagerFactoryBean来获取EntityManagerFactory实例
   *
   * @return
   */
  @Bean(name = "writeEntityManagerFactoryBean")
  public LocalContainerEntityManagerFactoryBean writeEntityManagerFactoryBean(
      EntityManagerFactoryBuilder builder) {
    return builder.dataSource(writeDruidDataSource).properties(jpaProperties.getProperties())
        .packages("com.study.mysql.jpa.api") // 设置实体类所在位置
        .persistenceUnit("writePersistenceUnit").build();
  }

  /**
   * EntityManagerFactory类似于Hibernate的SessionFactory,mybatis的SqlSessionFactory
   * 总之在执行操作之前我们总要获取一个EntityManager,这就类似于Hibernate的Session,mybatis的sqlSession。
   *
   * @param builder
   * @return
   */
  @Bean(name = "writeEntityManagerFactory")
  @Primary
  public EntityManagerFactory writeEntityManagerFactory(EntityManagerFactoryBuilder builder) {
    return this.writeEntityManagerFactoryBean(builder).getObject();
  }

  /**
   * 配置事物管理器
   *
   * @return
   */
  @Bean(name = "writeTransactionManager")
  @Primary
  public PlatformTransactionManager writeTransactionManager(EntityManagerFactoryBuilder builder) {
    return new JpaTransactionManager(writeEntityManagerFactory(builder));
  }
}
六、自定义注解
@Target({
    ElementType.METHOD, ElementType.TYPE })
@Retention(RetentionPolicy.RUNTIME)
@Documented
public @interface TargetDateSource {
  String dataSource() default "";// 数据源
}
七、定义切面,实现数据源切换
@Aspect
@Component
public class DynamicDataSourceAspect {

  @Around("execution(public * com.study.mysql.jpa.core..*.*(..))")
  public Object around(ProceedingJoinPoint pjp) throws Throwable {
    MethodSignature methodSignature = (MethodSignature) pjp.getSignature();
    Method targetMethod = methodSignature.getMethod();
    if (targetMethod.isAnnotationPresent(TargetDateSource.class)) {
      String targetDataSource = targetMethod.getAnnotation(TargetDateSource.class).dataSource();
      System.out.println("----------数据源是:" + targetDataSource + "------");
      DynamicDataSourceHolder.setDataSource(targetDataSource);
    }
    // 执行方法
    Object result = pjp.proceed();
    DynamicDataSourceHolder.clearDataSource();
    return result;
  }
}
在完成上面的相关配置后,我们写个简单的学生增删改查接口做测试。至此,我们的项目结构是这样的:
当然在这里,我们有必要看一下业务层实现类的代码,通过注解@TargetDataSource注解实现读写分离。
@Service
public class StudentServiceImpl implements StudentService {

  @Autowired
  private StudentDao studentDao;

  @Override
  @TargetDateSource(dataSource = DataSourceConfig.READ_DATASOURCE_KEY)
  public List findAll() {
    return studentDao.findAll();
  }

  @Override
  @TargetDateSource(dataSource = DataSourceConfig.READ_DATASOURCE_KEY)
  public Student findById(Integer id) {
    Optional students = studentDao.findById(id);
    if (students.isPresent() && students.get() != null) {
      return students.get();
    }
    return null;
  }

  @Override
  @Transactional
  @TargetDateSource(dataSource = DataSourceConfig.WRITE_DATASOURCE_KEY)
  public Integer save(Student entity) throws Exception {
    if (entity.getId() != null) {
      Student perz = studentDao.saveAndFlush(entity);
      return perz.getId();
    }
    Student perz = studentDao.save(entity);
    return perz.getId();
  }

}
八、测试
启动SpringBoot启动类,并通过http://localhost:8080/swagger-ui.html访问我们的学生类接口。在测试之前,我们现在看下数据库的数据。可以看到我们的主从数据库数据是一样的。(MySQL5.6-3380为主数据库,用于写数据;MySQL5.6-3381为从数据库,用于读数据)
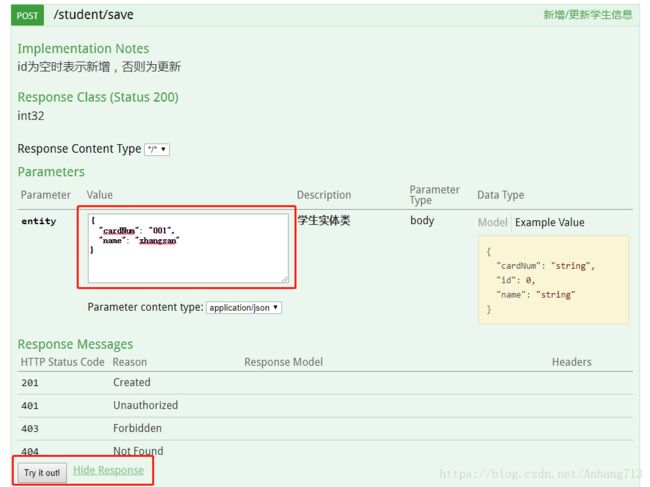
那么我们现在往数据库插入一条数据,执行save接口:
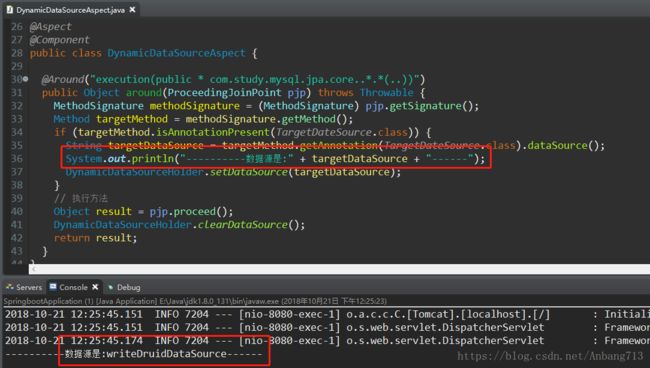
首先可以看到,在切面类中打印的日志,已经实现数据源的自动切换了。
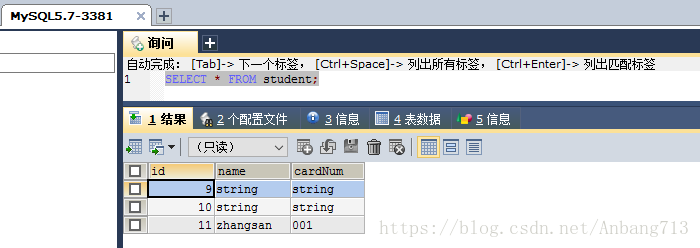
然后我们看下数据库的数据,可以看到两边的数据是一模一样的。
最后,我们测试一下读的时候是从哪个数据源读的。
可以看到,在读请求的时候,是从从数据库读的数据。至此,我们使用SpringBoot集成JPA实现读写分离的目的已经达到。
源代码地址: https://gitee.com/chengab/MySQL
参考博客:https://www.jb51.net/article/111588.htm


