elasticsearch 6.x (三) linux 集群多节点部署
大家好,我是烤鸭:
关于集群内单个节点部署,请参考上一篇文章。
elasticsearch 6.x linux部署(二) kibana x-pack 安装
环境:
linux Cent OS 7.3
elasticsearch-6.2.4
1. 下载多个es安装
每个安装步骤都是一样的。
2. 修改配置文件(重要)
一共启动了3个es。我的选择是其中一个作为主节点并且不存储数据。
2.1 主节点elasticsearch.yml:
#
cluster.name: test-master
node.name: test-node1
# 设置充当master节点,默认为true
#
node.master: true
#
# 设置不充当data节点,默认为true
#
node.data: false
network.host: 192.168.1.1(内网ip)
network.bind_host: 192.168.1.1(内网ip)

http.port: 9393    #对外访问
transport.tcp.port: 9303    #各节点通信

# --------------------------------- Discovery ----------------------------------
#
# Pass an initial list of hosts to perform discovery when new node is started:
# The default list of hosts is ["127.0.0.1", "[::1]"]
#
discovery.zen.ping.unicast.hosts: ["192.168.1.1:9303","192.168.1.1:9304","192.168.1.1:9305"]    #分别为各节点通信端口
2.2 副节点之一elasticsearch.yml:
#
cluster.name: test-master
node.name: test-node2
# 设置充当master节点,默认为true
#
node.master: false
#
# 设置不充当data节点,默认为true
#
node.data: true
network.host: 192.168.1.1(内网ip)
network.bind_host: 192.168.1.1(内网ip)


http.port: 9394    #对外访问
transport.tcp.port: 9304    #各节点通信


# --------------------------------- Discovery ----------------------------------
#
# Pass an initial list of hosts to perform discovery when new node is started:
# The default list of hosts is ["127.0.0.1", "[::1]"]
#
discovery.zen.ping.unicast.hosts: ["192.168.1.1:9303","192.168.1.1:9304","192.168.1.1:9305"]    #分别为各节点通信端口
2.2 副节点之二elasticsearch.yml:
#
cluster.name: test-master
node.name: test-node3
# 设置充当master节点,默认为true
#
node.master: false
#
# 设置不充当data节点,默认为true
#
node.data: true
network.host: 192.168.1.1(内网ip)
network.bind_host: 192.168.1.1(内网ip)


http.port: 9395    #对外访问
transport.tcp.port: 9305    #各节点通信


# --------------------------------- Discovery ----------------------------------
#
# Pass an initial list of hosts to perform discovery when new node is started:
# The default list of hosts is ["127.0.0.1", "[::1]"]
#
discovery.zen.ping.unicast.hosts: ["192.168.1.1:9303","192.168.1.1:9304","192.168.1.1:9305"]    #分别为各节点通信端口
3. kibana和x-pack安装
x-pack是需要各自独立安装的。
kinaba只需要安装一次,配置到主节点ip。
3.1 kibana.yml
server.port: 9399	#启动端口

server.host: "192.168.1.1"	#内网ip

elasticsearch.url: "http://192.168.1.1:9303"	#es主节点地址

elasticsearch.username: "elastic"	#es用户名
elasticsearch.password: "changeme"	#es密码

logging.dest: '/opt/elasticsearch/kibana/logs/kibana.log'	#日志目录
4. 启动后访问各节点如图:
4.1 启动
4.2 其中主节点截图,其他的跟这个一样,就不截图了。
4.3 启动kibana
[es@iZ8vbb4x47pk27lsr4i47rZ kibana]$ bin/kibana &
5. 访问kibana如图:
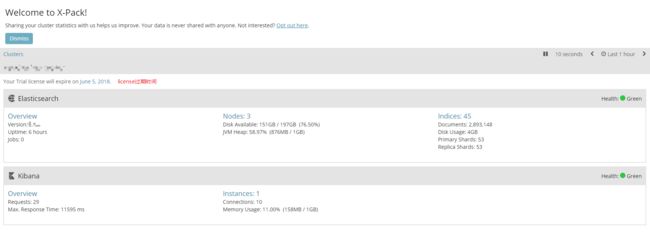
5.1 概况
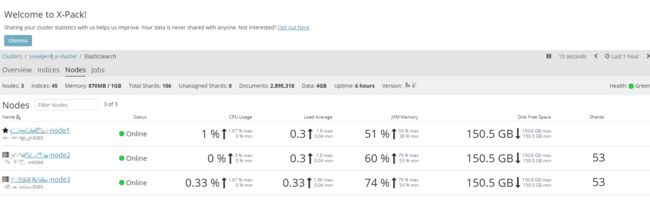
可以看出来是3个节点,版本号,license过期时间,硬盘使用,JVM内存情况等。
5.2 license过期
过期时间是一个月以后。快要过期的话,就再去注册x-pack,每次注册可以使用一年。
注册网址: https://register.elastic.co/xpack_register
5.3 各节点如图
更多关于elasticsearch 6.x内容:
1. elasticsearch 6.x 部署 windows入门(一) spingboot连接
2. elasticsearch 6.x linux部署(二) kibana x-pack 安装

