fastdfs+nginx单机版
1、fastdfs简介
FastDFS是一个开源的轻量级分布式文件系统,它对文件进行管理,功能包括:文件存储、文件同步、文件访问(文件上传、文件下载)等,解决了大容量存储和负载均衡的问题。特别适合以文件为载体的在线服务,如相册网站、视频网站等等。
FastDFS为互联网量身定制,充分考虑了冗余备份、负载均衡、线性扩容等机制,并注重高可用、高性能等指标,使用FastDFS很容易搭建一套高性能的文件服务器集群提供文件上传、下载等服务。
2、注意事项
fastdfs 5.11版本对照:Version 5.11对应的fastdfs-nginx-module的Version1.20
fastdfs 5.10版本对照:Version 5.10对应的fastdfs-nginx-module的
Version 1.19
如果版本不对应,后期安装会报错!!!
服务器最好是能够连接外网
3、环境搭建
3.1 软件包的准备
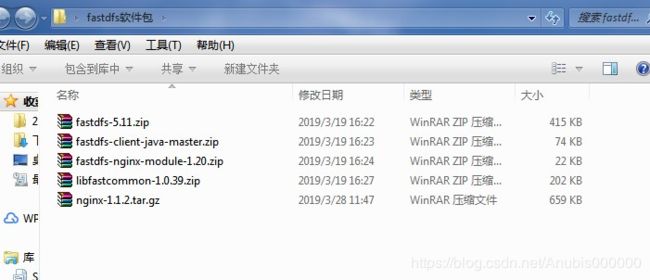
3.1.1 下面的截图是本次单机版安装所需要的补丁包
3.1.2 软件包下载
fastdfs下载: https://github.com/happyfish100/fastdfs/releases
3.1.3 fastdfs-client-java-master下载https://github.com/happyfish100/fastdfs-client-java
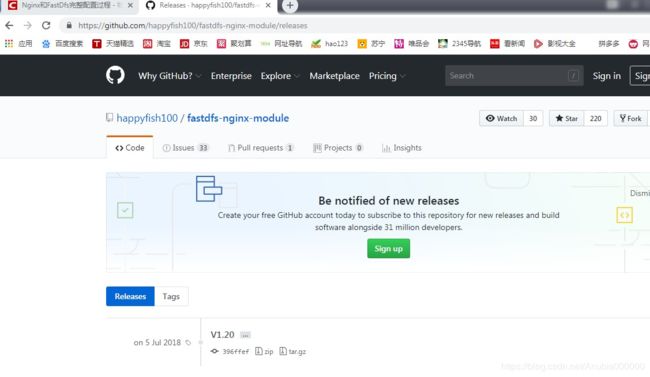
3.1.4 fastdfs-nginx-module-master下载:
https://github.com/happyfish100/fastdfs-nginx-module/releases
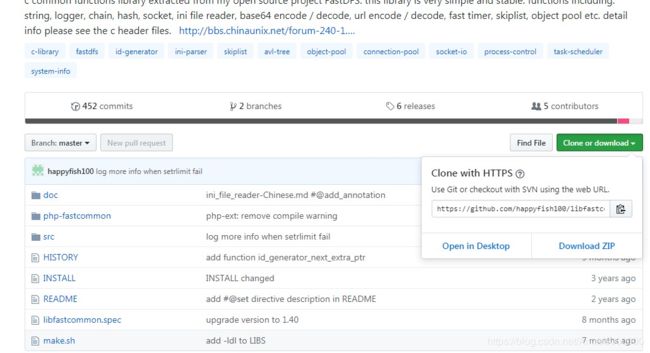
3.1.5 libfastcommon-master下载:
https://github.com/happyfish100/libfastcommon
3.1.6 nginx-1.12.0下载:http://nginx.org/download/
到此,所需要的工具已经下载完毕。
3.2 环境准备
1. 准备一台linux服务器配置为4核8G 硬盘容量为3T,系统为centos7.5的服务器
2. 在根目录下创建目录名为data的文件夹
3. 将3T的硬盘分区格式化后挂载到根目录下的data
4. 输入vim /etc/fstab 将挂载的磁盘写入
/dev/sdb /data xfs defaults 0 0
5. 输入cd /data/ 进入data目录, 输入mkdir data1 data2 data3 创建三个文件夹
6. 将软件包上传至/data/data1
3.3 安装依赖
1)输入:
yum -y install zlib zlib-devel pcre pcre-devel gcc gcc-c++ openssl openssl-devel libevent libevent-devel perl unzip net-tools wget2)等第一项安装完毕后,输入:
yum install lrzsz -y 安装rz命令
3.4 安装libfastcommon-1.0.39.zip
1)cd /data/data1进入data1文件夹使用unzip libfastcommon-1.0.39.zip 解压后输入cd libfastcommon-1.0.39/ 进入文件夹
- 输入./make.sh 和./make.sh install 执行安装
- 报错无误后执行软连接执行软链接
ln ‐s /usr/lib64/libfastcommon.so /usr/local/lib/libfastcommon.so
ln ‐s /usr/lib64/libfastcommon.so /usr/lib/libfastcommon.so
ln ‐s /usr/lib64/libfdfsclient.so /usr/local/lib/libfdfsclient.so
ln ‐s /usr/lib64/libfdfsclient.so /usr/lib/libfdfsclient.so
3.5 安装fastdfs
1)cd /data/data1进入data1文件夹使用unzip fastdfs-5.11.zip 解压后输入cd fastdfs-5.11/ 进入文件夹
- 输入./make.sh 和./make.sh install 执行安装
- 安装成功后查看文件目录 ll /etc/fdfs
进入目录cd /etc/fdfs将三分实例文件重命名
mv client.conf.sample ./client.conf
mv storage.conf.sample ./storage.conf
mv tracker.conf.sample ./tracker.conf
3.6 安装tracker
1) 创建tracker工作目录用来存放tracker的data和log(可根据个人习惯,本次我放在data2下)
[root@haoyun-2-201 ~]# cd /data/data2
[root@haoyun-2-201 data2]# mkdir fastdfs_tracker
1. 配置tracker
[root@haoyun‐2‐201 data2]# vim /etc/fdfs/tracker.conf打开后找到下面4处然后修改即可
- disabled=false #默认开启
- port=22122 #默认端口号
- base_path=/data/data2/fastdfs_tracker #刚刚创建的目录
- http.server_port=6666 #默认端口是8080
保存修改文件
2. 启动tracker命令如下
[root@haoyun‐2‐201 data2]# service fdfs_trackerd start
Starting fdfs_trackerd (via systemctl):                    [  OK  ]
[root@haoyun‐2‐201 data2]#
进入创建的tracker目录。发现目录多了data和log两个目录
[root@haoyun‐2‐201 data2]# cd /data/data2/fastdfs_tracker/
[root@haoyun‐2‐201 fastdfs_tracker]# ll
total 0
drwxr‐xr‐x 2 root root 206 Mar 29 02:01 data
drwxr‐xr‐x 2 root root  34 Mar 27 04:03 logs
[root@haoyun‐2‐201 fastdfs_tracker]#
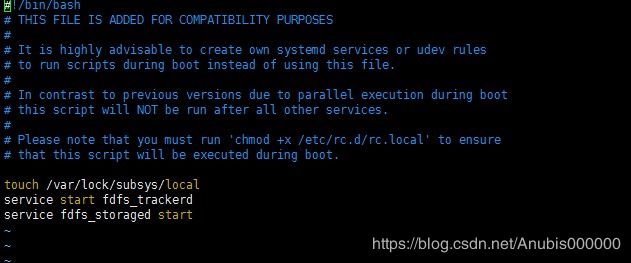
3. 加入开机启动
首先需要给执行权限
[root@haoyun‐2‐201 fastdfs_tracker]# chmod +x /etc/rc.d/rc.local
[root@haoyun‐2‐201 fastdfs_tracker]#
然后修改rc.local
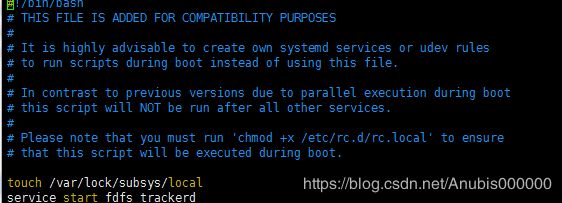
[root@haoyun-2-201 fastdfs_tracker]# vim /etc/rc.d/rc.local在配置文件最后加下最后一句话即可
保存,然后查看tracker端口的监听情况
[root@haoyun‐2‐201 fastdfs_tracker]# netstat ‐unltp|grep fdfs
tcp        0      0 0.0.0.0:22122           0.0.0.0:*               LISTEN      24695/fdfs_trackerd
到此 22122端口监听成功
3.7 安装storage
1) 创建storage的配置工作目录和存储数据目录(fastdfs_storage和fastdfs_storage_data)
[root@haoyun‐2‐201 data2]# cd /data/data2
[root@haoyun‐2‐201 data2]# mkdir fastdfs_storage  fastdfs_storage_data
[root@haoyun‐2‐201 data2]# ls
fastdfs_storage  fastdfs_storage_data  fastdfs_tracker  profile  tmp
[root@haoyun‐2‐201 data2]#
1. 修改配置文件storage.conf
[root@haoyun‐2‐201 data2]# vim /etc/fdfs/storage.conf
[root@haoyun‐2‐201 data2]#
找到如下这几处修改即可
- disabled=false
- group_name=group1 #组名,根据实际情况修改
- port=23000 #设置storage的端口号,默认是23000,同一个组的storage端口号必须一致
- base_path=/data/data2/fastdfs_storage #设置storage数据文件和日志目录
- store_path_count=1 #存储路径个数,需要和store_path个数匹配
- base_path0=/data/data2/fastdfs_storage_data #实际文件存储路径
- tracker_server=10.7.2.61:22122 #我CentOS7的ip地址
- http.server_port=8888 #设置 http 端口号
保存之后 创建软引用
ln ‐s /usr/bin/fdfs_storaged /usr/local/bin启动storage
[root@haoyun‐2‐201 data2]# service fdfs_storaged start
Starting fdfs_storaged (via systemctl):                    [  OK  ]
[root@haoyun‐2‐201 data2]#
2. 设置开机启动
修改rc.local
[root@haoyun‐2‐201 data2]# vim /etc/rc.d/rc.local
[root@haoyun‐2‐201 data2]#
在配置文件最后加下最后一句话即可
查看服务是否启动
[root@haoyun‐2‐201 data2]# netstat ‐unltp | grep fdfs
tcp        0      0 0.0.0.0:22122           0.0.0.0:*               LISTEN      24695/fdfs_trackerd
tcp        0      0 0.0.0.0:23000           0.0.0.0:*               LISTEN      28033/fdfs_storaged
[root@haoyun‐2‐201 data2]#
服务启动,到此fastdfs已经配置完成了。最后我们再确认一下,storage是否注册到了tracker中
去。
输入:
/usr/bin/fdfs_monitor /etc/fdfs/storage.conf成功后可以看到:
ip_addr = 10.7.2.61 (haoyun‐2‐201) ACTIVE 的字样
3. 修改客户端配置文件
[root@haoyun‐2‐201 data2]# vim /etc/fdfs/client.conf
[root@haoyun‐2‐201 data2]#
找到如下这几处修改即可
base_path=/data/data2/fastdfs_tracker #tracker服务器文件路径
tracker_server=10.7.2.61:22122 #tracker服务器IP地址和端口号
http.tracker_server_port=6666 # tracker 服务器的 http端口号,必须和tracker的设置对应起来
保存退出
3.8 fastdfs的nginx模块安装
1) 准备安装nginx,首先cd /data/data1/进入目录,在安装nginx之前要安装nginx所需的依赖
lib:
yum ‐y install pcre pcre‐devel yum ‐y install zlib zlib‐devel yum ‐y install openssl openssl‐devel1. 安装nginx并添加fastdfs‐nginx‐module 解压nginx,和fastdfs-nginx-module:
tar ‐zxvf nginx‐1.12.0.tar.gz unzip fastdfs‐nginx‐module‐master.zip2. 进入nginx安装目录,添加fastdfs‐nginx‐module:
./configure ‐‐prefix=/usr/local/nginx ‐‐add‐module=/data/data1/fastdfs‐nginx‐module‐1.20/src #解压后fastdfs‐nginx‐module所在的位置3. 如果没有错误信息,开始安装:
make && make install4. nginx的默认目录是/usr/local/nginx 开始 配置storage nginx,修改nginx.conf
[root@haoyun‐2‐201 src]# vim /usr/local/nginx/conf/nginx.conf修改listen 9999.然后 新增本地location
 server {
        listen       9999;
        server_name  localhost;
        #charset koi8‐r;
        #access_log  logs/host.access.log  main;
        location / {
            root   html;
            index  index.html index.htm;
        }
         location /group1/M00 {
            root /data/data2/fastdfs_storage_data/data;
            ngx_fastdfs_module;
  }
然后进入FastDFS安装时的解压过的目录,将http.conf和mime.types拷贝到/etc/fdfs目录下:
[root@haoyun‐2‐201 fastdfs‐5.11]# cd conf/
[root@haoyun‐2‐201 conf]# ls
anti‐steal.jpg  client.conf  http.conf  mime.types  storage.conf  storage_ids.conf  tracker.conf
[root@haoyun‐2‐201 conf]# cp http.conf /etc/fdfs/
[root@haoyun‐2‐201 conf]# cp mime.types /etc/fdfs/
另外还需要把fastdfs‐nginx‐module安装目录中src目录下的mod_fastdfs.conf也拷贝到/etc/fdfs目录
下:
[root@haoyun‐2‐201 conf]# cp /data/data1/fastdfs‐nginx‐module‐1.20/src/mod_fastdfs.conf /etc/fdfs/对刚刚拷贝的mod_fastdfs.conf文件进行修改 :
[root@haoyun‐2‐201 conf]# vi /etc/fdfs/mod_fastdfs.conf找到如下这几处修改即可
base_path=/data/data2/fastdfs_storage  #保存日志目录
 tracker_server=10.7.2.61:22122 #tracker服务器的IP地址以及端口号
 storage_server_port=23000 #storage服务器的端口号
 url_have_group_name = true #文件 url 中是否有 group 名
 store_path0=/data/datat2/fastdfs_storage_data   #存储路径
 group_count = 1 #设置组的个数,事实上这次只使用了group1
创建M00至storage存储目录的符号连接:
ln ‐s /data/data2/fastdfs_storage_data/data/ /data/data2/fastdfs_storage_data/data/M005. 启动nginx
[root@haoyun‐2‐201 conf]# /usr/local/nginx/sbin/nginx
ngx_http_fastdfs_set pid=31832
storage的nginx已配置成功。接下来,我们还要继续配置tracker的nginx。
3.9 配置tracker的nginx
1) 再解压一个nginx:在data1目录下创建一个nginx2 ,将原来的把原来的
nginx-1.12.0.tar.gz 复制进去解压
[root@haoyun-2-201 data1]# mkdir nginx2
[root@haoyun‐2‐201 data1]# cd nginx2
[root@haoyun‐2‐201 nginx2]# cp -r /data/data1/nginx‐1.12.0.tar.gz
/data/data1/nginx2
[root@haoyun-2-201 nginx2]# unzip nginx-1.12.0.tar.gz
1. 进入nginx安装目录,添加fastdfs‐nginx‐module :
./configure ‐‐prefix=/usr/local/nginx2 ‐‐add‐module=/data/data1/fastdfs‐nginx‐module‐1.20/src2. 编译安装
make && make install3. 修改nginx.conf
[root@haoyun‐2‐201 nginx2]# vim /usr/local/nginx2/conf/nginx.conf
 upstream fdfs_group1 {
        server 127.0.0.1:9999;
    }
    server {
        listen       9989;
        server_name  localhost;
        #charset koi8‐r;
        #access_log  logs/host.access.log  main;
        location / {
            root   html;
            index  index.html index.htm;
        }
        location /group1/M00 {
            proxy_pass http://fdfs_group1;
        }
4. 启动NGINX:
/usr/local/nginx/sbin/nginx24、测试FastDFS
1)在data3目录建一个test文件夹,然后cd /data/data3/test/进入test ,利用
rz命令上传一张图片
1. 使用命令:
/usr/bin/fdfs_upload_file /etc/fdfs/client.conf /data/data3/test/1.jpg #你上传的图片路径(linux上的)2. 成功之后会返回图片的路径:group1/M00/00/00/CgcCPVycc3eAYCb-AADQVRTQ7yM185.jpg
3. 输入:
cd /data/data2/fastdfs_storage_data/data/00/00/发现图片存在
4. 输入连接:
http://10.7.2.61:9999/group1/M00/00/00/CgcCPVycc3eAYCb-AADQVRTQ7yM185.jpg 发现能正常访问到此fastdfs+nginx模块的单机版完成
