Spring boot 和Mybatis的集成
为什么做Spring boot的例子
很多小伙伴可能在写这个东西的时候回遇到各种各样的坑。虽然我对Spring boot的理解也不是很深入 ,但是我还是想要和各位分享一下。
首先我们为什么要使用Spring boot,我感觉主要的原因就是去配置文件化,没有了麻烦xml文件,我们只需要在.properties文件中配置一下就行了,大大减少了我们前期的开发问题。
要下班了,接下来废话也不多说了,直接讲解代码,有问题我们可以私下交流,本人qq:2631752122
首先:
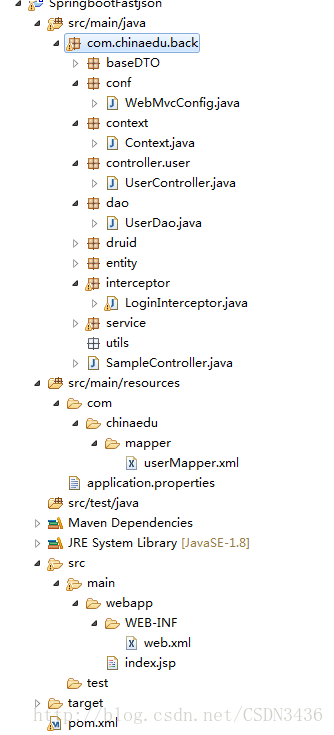
介绍一下包结构:

application.properties:
server.port=8080
logging.level.tk.mybatis=TRACE


druid.url=jdbc\:mysql://localhost:3306/job?useUnicode=true&characterEncoding=UTF-8
druid.driver-class=com.mysql.jdbc.Driver
druid.username=root
druid.password=123456
druid.initial-size=1
druid.min-idle=1
druid.max-active=20
druid.test-on-borrow=true


spring.mvc.view.prefix=/WEB-INF/
spring.mvc.view.suffix=.ftl
#spring.freemarker.cache=false
#spring.freemarker.request-context-attribute=request


mybatis.type-aliases-package=com.chinaedu.back.entity
mybatis.mapper-locations=classpath:com/chinaedu/mapper/*Mapper.xml
SimpleController:
@Controller
@EnableWebMvc
@SpringBootApplication
@ComponentScan
@MapperScan(basePackages = "com.chinaedu.back.dao")
public class SampleController {

    @RequestMapping("/in")
    public @ResponseBody Map homePahe(){
        Map map = new HashMap();

        map.put("status", true);

        return map;
    }


    public static void main(String[] args) throws Exception {
        SpringApplication.run(SampleController.class, args);
    }

}
DruidAutoConfiguration.java
package com.chinaedu.back.druid;

import com.alibaba.druid.pool.DruidDataSource;
import org.springframework.beans.factory.annotation.Autowired;
import org.springframework.boot.autoconfigure.AutoConfigureBefore;
import org.springframework.boot.autoconfigure.condition.ConditionalOnClass;
import org.springframework.boot.autoconfigure.condition.ConditionalOnProperty;
import org.springframework.boot.autoconfigure.jdbc.DataSourceAutoConfiguration;
import org.springframework.boot.context.properties.EnableConfigurationProperties;
import org.springframework.context.annotation.Bean;
import org.springframework.context.annotation.Configuration;

import javax.sql.DataSource;
import java.sql.SQLException;

/**
 * @author liuzh
 * @since 2017/2/5.
 */
@Configuration
@EnableConfigurationProperties(DruidProperties.class)
@ConditionalOnClass(DruidDataSource.class)
@ConditionalOnProperty(prefix = "druid", name = "url")
@AutoConfigureBefore(DataSourceAutoConfiguration.class)
public class DruidAutoConfiguration {

    @Autowired
    private DruidProperties properties;

    @Bean
    public DataSource dataSource() {
        DruidDataSource dataSource = new DruidDataSource();
        dataSource.setUrl(properties.getUrl());
        dataSource.setUsername(properties.getUsername());
        dataSource.setPassword(properties.getPassword());
        if (properties.getInitialSize() > 0) {
            dataSource.setInitialSize(properties.getInitialSize());
        }
        if (properties.getMinIdle() > 0) {
            dataSource.setMinIdle(properties.getMinIdle());
        }
        if (properties.getMaxActive() > 0) {
            dataSource.setMaxActive(properties.getMaxActive());
        }
        dataSource.setTestOnBorrow(properties.isTestOnBorrow());
        try {
            dataSource.init();
        } catch (SQLException e) {
            throw new RuntimeException(e);
        }
        return dataSource;
    }
}
DruidProperties.java:
package com.chinaedu.back.druid;

import org.springframework.boot.context.properties.ConfigurationProperties;

/**
 * 只提供了常用的属性,如果有需要,自己添加
 *
 * @author liuzh
 * @since 2017/2/5.
 */
@ConfigurationProperties(prefix = "druid")
public class DruidProperties {
    private String url;
    private String username;
    private String password;
    private String driverClass;

    private int     maxActive;
    private int     minIdle;
    private int     initialSize;
    private boolean testOnBorrow;

    public String getUrl() {
        return url;
    }

    public void setUrl(String url) {
        this.url = url;
    }

    public String getUsername() {
        return username;
    }

    public void setUsername(String username) {
        this.username = username;
    }

    public String getPassword() {
        return password;
    }

    public void setPassword(String password) {
        this.password = password;
    }

    public String getDriverClass() {
        return driverClass;
    }

    public void setDriverClass(String driverClass) {
        this.driverClass = driverClass;
    }

    public int getMaxActive() {
        return maxActive;
    }

    public void setMaxActive(int maxActive) {
        this.maxActive = maxActive;
    }

    public int getMinIdle() {
        return minIdle;
    }

    public void setMinIdle(int minIdle) {
        this.minIdle = minIdle;
    }

    public int getInitialSize() {
        return initialSize;
    }

    public void setInitialSize(int initialSize) {
        this.initialSize = initialSize;
    }

    public boolean isTestOnBorrow() {
        return testOnBorrow;
    }

    public void setTestOnBorrow(boolean testOnBorrow) {
        this.testOnBorrow = testOnBorrow;
    }
}
好了配完这些项目就可以跑了:
直接访问:
lcoalhost:8080
最后我在分享一下拦截器问题,并且将fastjson集成进来,至于为什么要集成fastjson而不是用springmvc内置的我就不说了, 可以去百度:
我们只需要加一个配置文件:
WebMvcConfig.java:
package com.chinaedu.back.conf;

import java.util.List;

import org.springframework.context.annotation.Configuration;
import org.springframework.http.converter.HttpMessageConverter;
import org.springframework.web.servlet.config.annotation.InterceptorRegistry;
import org.springframework.web.servlet.config.annotation.WebMvcConfigurerAdapter;

import com.alibaba.fastjson.serializer.SerializerFeature;
import com.alibaba.fastjson.support.config.FastJsonConfig;
import com.alibaba.fastjson.support.spring.FastJsonHttpMessageConverter;
import com.chinaedu.back.interceptor.LoginInterceptor;


@Configuration
public class WebMvcConfig extends WebMvcConfigurerAdapter {

    /**
     * 设置拦截器
     */
    @Override
    public void addInterceptors(InterceptorRegistry registry) {

        // 多个拦截器组成一个拦截器链
        // addPathPatterns 用于添加拦截规则              excludePathPatterns 用户排除拦截

        registry.addInterceptor(new LoginInterceptor()).addPathPatterns("/**").excludePathPatterns("/user/**");

        //registry.addInterceptor(new LoginInterceptor()).addPathPatterns("/**").excludePathPatterns("/user/**");
        super.addInterceptors(registry);
    }

    /**
     * 配置fastjson
     */
      @Override
      public void configureMessageConverters(List> converters) {
        super.configureMessageConverters(converters);
        // 初始化转换器
        FastJsonHttpMessageConverter fastConvert = new FastJsonHttpMessageConverter();
        // 初始化一个转换器配置
        FastJsonConfig fastJsonConfig = new FastJsonConfig();
        fastJsonConfig.setSerializerFeatures(SerializerFeature.PrettyFormat);
        // 将配置设置给转换器并添加到HttpMessageConverter转换器列表中
        fastConvert.setFastJsonConfig(fastJsonConfig);
        converters.add(fastConvert);
      }

}
OK了 需要代码的留下qq我一般会在下班之前给各位发过去。