MXNet官方文档教程(6):神经网络图
符号教程
除了张量计算接口NDArray,MXNet中另一个主要的对象就是Symbol,位于mxnet.symbol(缩写mxnet.sym)中。一个符号代表一个多输出的符号表达式。他们由运算符复合而成,例如简单的矩阵运算(如“+”),或者一个神经网络层(如卷积层)。一个操作符可以获得多个输入变量,并提供至少一个输出变量,并拥有内部变量。一个变量可以是空的(我们可以在之后为其赋值),也可以是一个其他符号的输出。
符号组成
基本操作符
以下的例子复合了一个简单的表达式“a+b”。我们首先使用mx.sym.Variable创建占位符a和b及其名称,然后用操作符“+”构造期望的符号。在新建时如果名字字符串没有给定,MXNet会自动为符号生产一个独一无二的名字,如c的例子所示。
import mxnet as mx
a = mx.sym.Variable('a')
b = mx.sym.Variable('b')
c = a+ b
(a, b, c)
输出
(, , )
大多数NDArray操作符可以被应用于Symbol,例如:
# elemental wise times
d= a * b
# matrix multiplication
e= mx.sym.dot(a, b)
# reshape
f= mx.sym.Reshape(d+e, shape=(1,4))
# broadcast
g= mx.sym.broadcast_to(f, shape=(2,4))
mx.viz.plot_network(symbol=g)
基本神经网络
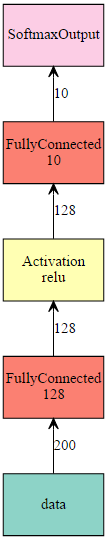
除了基本的操作符,Symbol拥有丰富的神经网络层集。以下代码构造了一个两层的全连接层,然后通过给定输入数据大小实例化该结构。
# Output may vary
net= mx.sym.Variable('data')
net= mx.sym.FullyConnected(data=net, name='fc1', num_hidden=128)
net= mx.sym.Activation(data=net, name='relu1', act_type="relu")
net= mx.sym.FullyConnected(data=net, name='fc2', num_hidden=10)
net= mx.sym.SoftmaxOutput(data=net, name='out')
mx.viz.plot_network(net, shape={'data':(100,200)})
深度网络的模块化构建
对于深度网络,例如Google Inception,当有大量的层时,一个一个地构建层会十分痛苦。对于这些网络,我们通常模块化其构建。以Google Inception为例,我们首先定义一个制造函数来将卷积层,批标准化层和Relu激活层捆绑在一起:
# Output may vary
def ConvFactory(data, num_filter, kernel, stride=(1,1), pad=(0,0), name=None, suffix=''):
conv = mx.symbol.Convolution(data=data, num_filter=num_filter, kernel=kernel, stride=stride, pad=pad, name='conv_%s%s'%(name, suffix))
bn = mx.symbol.BatchNorm(data=conv, name='bn_%s%s'%(name, suffix))
act = mx.symbol.Activation(data=bn, act_type='relu', name='relu_%s%s'%(name, suffix))
return act
prev= mx.symbol.Variable(name="Previos Output")
conv_comp= ConvFactory(data=prev, num_filter=64, kernel=(7,7), stride=(2,2))
shape= {"Previos Output" : (128,3,28,28)}
mx.viz.plot_network(symbol=conv_comp, shape=shape)
然后我们定义一个构建基于ConvFactory的Inception模型的函数:
# @@@ AUTOTEST_OUTPUT_IGNORED_CELL
def InceptionFactoryA(data, num_1x1, num_3x3red, num_3x3, num_d3x3red, num_d3x3, pool, proj, name):
# 1x1
c1x1 = ConvFactory(data=data, num_filter=num_1x1, kernel=(1,1), name=('%s_1x1'% name))
# 3x3 reduce + 3x3
c3x3r = ConvFactory(data=data, num_filter=num_3x3red, kernel=(1,1), name=('%s_3x3'% name), suffix='_reduce')
c3x3 = ConvFactory(data=c3x3r, num_filter=num_3x3, kernel=(3,3), pad=(1,1), name=('%s_3x3'% name))
# double 3x3 reduce + double 3x3
cd3x3r = ConvFactory(data=data, num_filter=num_d3x3red, kernel=(1,1), name=('%s_double_3x3'% name), suffix='_reduce')
cd3x3 = ConvFactory(data=cd3x3r, num_filter=num_d3x3, kernel=(3,3), pad=(1,1), name=('%s_double_3x3_0'% name))
cd3x3 = ConvFactory(data=cd3x3, num_filter=num_d3x3, kernel=(3,3), pad=(1,1), name=('%s_double_3x3_1'% name))
# pool + proj
pooling = mx.symbol.Pooling(data=data, kernel=(3,3), stride=(1,1), pad=(1,1), pool_type=pool, name=('%s_pool_%s_pool'% (pool, name)))
cproj = ConvFactory(data=pooling, num_filter=proj, kernel=(1,1), name=('%s_proj'% name))
# concat
concat = mx.symbol.Concat(*[c1x1, c3x3, cd3x3, cproj], name='ch_concat_%s_chconcat'% name)
return concat
prev= mx.symbol.Variable(name="Previos Output")
in3a= InceptionFactoryA(prev, 64,64,64,64,96,"avg",32, name="in3a")
mx.viz.plot_network(symbol=in3a, shape=shape)
最终我们可以通过改变多inception模型获得整个网络。
多符号组合
为了使用多损失层构建网络,我们可以使用mxnet.sym.Group来将多个符号组合在一起。如下示例将组合了两个输出层:
net = mx.sym.Variable('data')
fc1 = mx.sym.FullyConnected(data=net, name='fc1', num_hidden=128)
net = mx.sym.Activation(data=fc1, name='relu1', act_type="relu")
out1 = mx.sym.SoftmaxOutput(data=net, name='softmax')
out2 = mx.sym.LinearRegressionOutput(data=net, name='regression')
group = mx.sym.Group([out1, out2])
group.list_outputs()
输出
['softmax_output','regression_output']
与NDArray关系
如我们目前所见,在MXNet中,Symbol与NDArray都提供多维数组操作符,例如c=a+b。有时使用者会困惑到底应该使用哪一个。在此我们简短地阐明两者不同,更多细节参见:Programming Models for Deep Learning。
NDArray提供了类命令式编程的接口:其中,计算被一条语句一条语句地定值。而相比之下,Symbol更加接近于声明式编程:其中,我们首先声明计算,然后再用数据定值。
同样的例子包括正则表达式和SQL。
NDArray优点:
- 简便。
- 方便与其他语言特性(循环、分支)和库(numpy,…)配合。
- 易于逐步debug。
Symbol优点:
- 提供几乎NDArray所有的功能,例如+,*和reshape。
- 提供了大量的神经网络相关操作符,例如卷积、激活和BatchNorm。
- 提供了自动微分。
- 易于构建和操作复杂的计算,例如深度神经网络。
- 易于保存、读取和可视化。
- 后端易于优化计算和存储的使用。
符号操作
Symbol与NDArray的一大不同就是,我们首先声明计算,然后绑定数据来运行。
在此部分,我们介绍直接操作符号的函数。但注意,它们大部分都被mx.module完美地包装了起来。所以,即便跳过本节也无伤大雅。
形状接口
对于每个符号,我们可以询问其输入(或者参数)和输出。我们也可以通过给定输入大小来获得输出大小,这有易于存储空间申请。
arg_name = c.list_arguments() # get the names of the inputs
out_name = c.list_outputs() # get the names ofthe outputs
arg_shape, out_shape,_ = c.infer_shape(a=(2,3), b=(2,3))
{'input' :dict(zip(arg_name, arg_shape)),
'output' :dict(zip(out_name, out_shape))}
输出
{'input': {'a':(2L, 3L), 'b': (2L, 3L)},
'output': {'_plus0_output': (2L, 3L)}}
绑定数据与定值
我们构建的符号c声明了应该运行的计算。为了为其定值,我们需要首先用数据确定参数,也就是自由变量。我们可以使用bind方法来完成。该方法接受设备上下文和一个将自由变量名称映射到NDArray的字典作为参数,然后返回一个执行器。执行器为提供forward方法来定值和归属outputs以获取所有结果。
ex = c.bind(ctx=mx.cpu(), args={'a' : mx.nd.ones([2,3]),
'b' : mx.nd.ones([2,3])})
ex.forward()
print 'number ofoutputs =%d\nthe first output =\n%s'% (
len(ex.outputs), ex.outputs[0].asnumpy())
输出
number of outputs =1
the first output =
[[ 2. 2. 2.]
[ 2. 2. 2.]]
我们在GPU上用不同的的数据计算同一个符号:
ex_gpu = c.bind(ctx=mx.gpu(), args={'a' : mx.nd.ones([3,4], mx.gpu())*2,
'b' : mx.nd.ones([3,4], mx.gpu())*3})
ex_gpu.forward()
ex_gpu.outputs[0].asnumpy()
输出
array([[ 5., 5., 5., 5.],
[ 5., 5., 5., 5.],
[ 5., 5., 5., 5.]], dtype=float32)
保存和载入
类似于NDArray,我们可以使用pickle模块序列号Symbol或者直接使用save和load。与NDArray选择的二进制格式不同,Symbol使用可读性更强的json格式来序列化。tojson方法返回json字符串。
print(c.tojson())
c.save('symbol-c.json')
c2= mx.symbol.load('symbol-c.json')
c.tojson()== c2.tojson()
输出
{
"nodes": [
{
"op": "null",
"name": "a",
"inputs": []
},
{
"op": "null",
"name": "b",
"inputs": []
},
{
"op": "elemwise_add",
"name": "_plus0",
"inputs": [[0, 0, 0], [1, 0, 0]]
}
],
"arg_nodes": [0, 1],
"node_row_ptr": [0, 1, 2, 3],
"heads": [[2, 0, 0]],
"attrs": {"mxnet_version": ["int", 901]}
}
True
自定义符号
大部分操作符例如mx.sym.Convolution和mx.symReshape为了更好的性能使用C++实现。MXNet也支持用户用任何前端语言例如Python撰写新的操作符。这经常使开发和调试更加简便。
为了用Python实现一个操作符,我们只需要定义两个计算方法forward和backward和一些查询属性的方法,例如list_arguments和infer_shape。
NDArray是forward和backward方法默认的参数类型。因此我们通常用NDArray操作符来实现计算。当然为例展示MXNet的灵活性,我们将演示使用NumPy来实现一个softmax层的过程。即便基于NumPy的操作符只能运行于CPU且失去一些可应用于NDArray的优化,但是可以享受NumPy提供的丰富的方法功能。
我们首先建立一个mx.operator.CustomOp的子类,然后定义forward和backward。
class Softmax(mx.operator.CustomOp):
def forward(self, is_train, req, in_data, out_data, aux):
x = in_data[0].asnumpy()
y = np.exp(x- x.max(axis=1).reshape((x.shape[0],1)))
y /= y.sum(axis=1).reshape((x.shape[0],1))
self.assign(out_data[0], req[0], mx.nd.array(y))
def backward(self, req, out_grad, in_data, out_data, in_grad, aux):
l = in_data[1].asnumpy().ravel().astype(np.int)
y = out_data[0].asnumpy()
y[np.arange(l.shape[0]), l] -=1.0
self.assign(in_grad[0], req[0], mx.nd.array(y))
此处我们使用asnumpy将NDArray输入转换为numpy.ndarray。然后根据req的取值(“重写”或“加上”)使用CustomOp.assign来将结果赋回mxnet.NDArray。
之后我们创建一个mx.operator.CustomOpProp的子类来查询属性。
# register this operator into MXNet by name "softmax"
@mx.operator.register("softmax")
class SoftmaxProp(mx.operator.CustomOpProp):
def __init__(self):
# softmax is a loss layer so we don’t need gradient input
# from layers above.
super(SoftmaxProp,self).__init__(need_top_grad=False)
def list_arguments(self):
return ['data','label']
def list_outputs(self):
return ['output']
def infer_shape(self, in_shape):
data_shape = in_shape[0]
label_shape = (in_shape[0][0],)
output_shape = in_shape[0]
return [data_shape, label_shape], [output_shape], []
def create_operator(self, ctx, shapes, dtypes):
return Softmax()
最后,我们使用mx.sym.Custom和注册名称来使用这个操作符。
net= mx.symbol.Custom(data=prev_input, op_type='softmax')
高级用法
类型转换
MXNet默认使用32位float类型。有时我们为了更好的正确率—性能权衡,想要使用低精度的数据类型。例如,英伟达Tesla Pascal GPUs(如P100)使用16位浮点的性能提升,以及GTX Pascal GPUs(如GTX1080)使用8位整型的速度更快。
我们可以使用mx.sym.Cast操作符转换数据类型。
a= mx.sym.Variable('data')
b= mx.sym.Cast(data=a, dtype='float16')
arg, out, _ = b.infer_type(data='float32')
print({'input':arg,'output':out})
c= mx.sym.Cast(data=a, dtype='uint8')
arg, out, _ = c.infer_type(data='int32')
print({'input':arg,'output':out})
输出
{'input': [], 'output': []}
{'input': [], 'output': []}
变量共享
有时我们想要共享多个不同符号中的内容。这可以直接通过用同一个数组绑定这些符号来实现。
a= mx.sym.Variable('a')
b= mx.sym.Variable('b')
c= mx.sym.Variable('c')
d= a + b * c
data= mx.nd.ones((2,3))*2
ex= d.bind(ctx=mx.cpu(), args={'a':data,'b':data,'c':data})
ex.forward()
ex.outputs[0].asnumpy()
输出
array([[ 6., 6., 6.],
[ 6., 6., 6.]], dtype=float32)