AOP应用——事务管理
相信大家对Spring的事务管理并不陌生,再推荐一篇AOP切入点表达式的文章,我把重点放在AOP实现上。在项目开发过程中通常用Hibernate或MyBatis(iBatis)作为持久层,因此Demo基于Spring+MyBatis实现转账业务。时间很宝贵,先上代码。
spring-mybatis.xml
<beans
        xmlns="http://www.springframework.org/schema/beans"
        xmlns:xsi="http://www.w3.org/2001/XMLSchema-instance"
        xmlns:context="http://www.springframework.org/schema/context"
        xmlns:tx="http://www.springframework.org/schema/tx" xmlns:aop="http://www.springframework.org/schema/aop"
        xsi:schemaLocation="http://www.springframework.org/schema/beans
        http://www.springframework.org/schema/beans/spring-beans.xsd http://www.springframework.org/schema/context http://www.springframework.org/schema/context/spring-context.xsd http://www.springframework.org/schema/tx http://www.springframework.org/schema/tx/spring-tx.xsd http://www.springframework.org/schema/aop http://www.springframework.org/schema/aop/spring-aop.xsd">


    <context:component-scan base-package="db.mybatis" name-generator="extend.CustomBeanNameGenerator">
        <context:include-filter type="aspectj" expression="db.mybatis.service..*"/>
    context:component-scan>
    <context:property-placeholder location="jdbc.properties"/>
    <bean id="dataSource" class="com.mchange.v2.c3p0.ComboPooledDataSource">
        <property name="user" value="${jdbc.username}"/>
        <property name="password" value="${jdbc.password}"/>
        <property name="jdbcUrl" value="${jdbc.url}"/>
    bean>

    <bean class="org.mybatis.spring.SqlSessionFactoryBean" id="sqlSessionFactory">
        <property name="dataSource" ref="dataSource"/>
        <property name="mapperLocations" value="classpath:db/mybatis/mappers/**/*.xml"/>
    bean>
    <bean id="sqlSessionTemplate" class="org.mybatis.spring.SqlSessionTemplate">
        <constructor-arg ref="sqlSessionFactory"/>
    bean>

    <bean class="org.mybatis.spring.mapper.MapperScannerConfigurer">
        <property name="basePackage" value="db.mybatis.dao"/>
        <property name="sqlSessionTemplateBeanName" value="sqlSessionTemplate"/>
    bean>

    <bean id="dbTransactionManager" class="org.springframework.jdbc.datasource.DataSourceTransactionManager">
        <constructor-arg name="dataSource" ref="dataSource"/>
    bean>

    <aop:config proxy-target-class="true">
        <aop:advisor advice-ref="transactionInterceptor" pointcut="execution(* db.mybatis.service..*Impl.*(..))"/>
    aop:config>

    <tx:advice id="transactionInterceptor" transaction-manager="dbTransactionManager">
        <tx:attributes>
            <tx:method name="add*" propagation="REQUIRED"/>
            <tx:method name="insert*" propagation="REQUIRED"/>
            <tx:method name="save*" propagation="REQUIRED"/>
            <tx:method name="update*" propagation="REQUIRED"/>
            <tx:method name="modify*" propagation="REQUIRED"/>
            <tx:method name="edit*" propagation="REQUIRED"/>
            <tx:method name="delete*" propagation="REQUIRED"/>
            <tx:method name="remove*" propagation="REQUIRED"/>
            <tx:method name="get*" read-only="true" propagation="SUPPORTS"/>
            <tx:method name="find*" read-only="true" propagation="SUPPORTS"/>
            <tx:method name="load*" read-only="true" propagation="SUPPORTS"/>
            <tx:method name="search*" read-only="true" propagation="SUPPORTS"/>
            <tx:method name="*" propagation="SUPPORTS"/>
        tx:attributes>
    tx:advice>
beans>
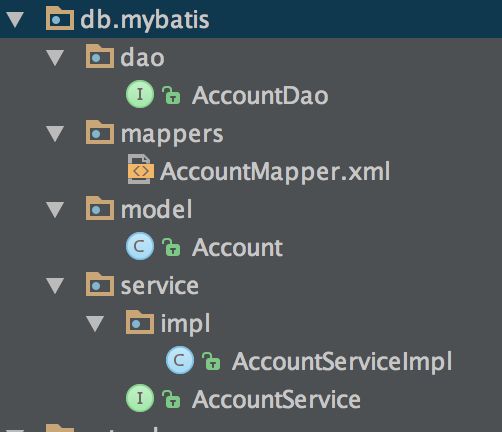
项目目录结构如下

这一部分要完成的任务就是上面那些了,我们开始动手吧。
1、开发所需jar包
建议用maven或Gradle(eclipse暂不支持)管理。如果用maven管理,只要添加以下依赖。
<dependency>
            <groupId>org.apache.commonsgroupId>
            <artifactId>commons-lang3artifactId>
            <version>3.4version>
        dependency>
        <dependency>
            <groupId>log4jgroupId>
            <artifactId>log4jartifactId>
            <version>1.2.17version>
        dependency>
                     <dependency>
            <groupId>junitgroupId>
            <artifactId>junitartifactId>
            <version>4.12version>
            <scope>testscope>
        dependency>


        <dependency>
            <groupId>mysqlgroupId>
            <artifactId>mysql-connector-javaartifactId>
            <version>5.1.6version>
        dependency>

        <dependency>
            <groupId>org.springframeworkgroupId>
            <artifactId>spring-contextartifactId>
            <version>4.2.1.RELEASEversion>
        dependency>
        <dependency>
            <groupId>org.springframeworkgroupId>
            <artifactId>spring-coreartifactId>
            <version>4.2.1.RELEASEversion>
        dependency>
        <dependency>
            <groupId>org.springframeworkgroupId>
            <artifactId>spring-beansartifactId>
            <version>4.2.1.RELEASEversion>
        dependency>
        <dependency>
            <groupId>org.springframeworkgroupId>
            <artifactId>spring-expressionartifactId>
            <version>4.2.1.RELEASEversion>
        dependency>
        <dependency>
            <groupId>org.springframeworkgroupId>
            <artifactId>spring-jdbcartifactId>
            <version>4.2.1.RELEASEversion>
        dependency>
        <dependency>
            <groupId>org.springframeworkgroupId>
            <artifactId>spring-txartifactId>
            <version>4.2.0.RELEASEversion>
        dependency>
        <dependency>
            <groupId>org.springframeworkgroupId>
            <artifactId>spring-testartifactId>
            <version>4.2.1.RELEASEversion>
        dependency>
        <dependency>
            <groupId>org.springframeworkgroupId>
            <artifactId>spring-aopartifactId>
            <version>4.2.1.RELEASEversion>
        dependency>
        <dependency>
            <groupId>org.springframeworkgroupId>
            <artifactId>spring-aspectsartifactId>
            <version>4.2.1.RELEASEversion>
        dependency>


        <dependency>
            <groupId>c3p0groupId>
            <artifactId>c3p0artifactId>
            <version>0.9.1.2version>
        dependency>
2、配置spring-mybatis.xml
配置完之后和最开始放上去是一样的,这里主要对一些配置做说明:
(1)
默认情况下IOC容器是根据类名来命名的,不同模块相似的功能很多类名是一样的,这时候beanid不唯一,项目不能正常启动。
配置的类代码如下:
 public class CustomBeanNameGenerator implements BeanNameGenerator {
    @Override
    public String generateBeanName(BeanDefinition definition, BeanDefinitionRegistry registry) {
        return definition.getBeanClassName().replaceAll("\\.", "").replace("Impl","");
    }
}
(2)
其type类型有五种,建议使用aspejct和regex。这样你不需要在每个类加类似@Service这样的注解;在不同的上下文中扫描目录明确。
(3)
推荐一篇文章,请点击
3、开始开发
dao层的xml和接口
<mapper namespace="db.mybatis.dao.AccountDao">
    <resultMap id="BaseResultMap" type="db.mybatis.model.Account">
        <id column="id" property="id"/>
        <result column="user" property="user"/>
        <result column="money" property="money"/>
    resultMap>
    <select id="getRecords" resultMap="BaseResultMap">
    SELECT id,user,money FROM account
    select>

    <select id="getMoneyByUser" resultType="double">
        SELECT money FROM account where user = #{user}
    select>

    <update id="updateMoneyByUser">
        update account set money=${money}  where user = #{user}
    update>
mapper>
public interface AccountDao {
List getRecords();
double getMoneyByUser(String user);
int updateMoneyByUser(@Param("money")double money,@Param("user")String user);
} service的接口和实现类
public interface AccountService {
    /**
     * 查询所有的人员记录
     * @return
     */
    List getRecords();
    /**
     * 转账
     * @param user1 转钱的人
     * @param user2 收钱的人
     * @param money 转出去的钱
     * @return
     */
    int transAccount(String user1,String user2,double money);
}
public class AccountServiceImpl implements AccountService {
@Resource
private AccountDao accountDao;
@Override
public List getRecords() {
return accountDao.getRecords();
}
@Override
public int transAccount(String user1, String user2, double money) {
int result = 0;
double money1 = accountDao.getMoneyByUser(user1);
if (money1 > money) {
result += accountDao.updateMoneyByUser(money1 - money, user1);
double money2 = accountDao.getMoneyByUser(user2);
result += accountDao.updateMoneyByUser(money2 + money, user2);
} else {
System.out.println(user1 + "的余额不足");
}
return result;
}
} 测试类
public class UnitTestBase {
    private ClassPathXmlApplicationContext context;

    private String springXmlPath;

    public UnitTestBase(String springXmlPath) {
        this.springXmlPath = springXmlPath;
    }

    @Before
    public void before() {
        if (StringUtils.isEmpty(springXmlPath)) {
            springXmlPath = "classpath:applicationContext.xml";
        }
        try {
            context = new ClassPathXmlApplicationContext(springXmlPath.split("[,\\s]+]"));
            context.start();
        } catch (BeansException e) {
            e.printStackTrace();
        }
    }

    @After
    public void after() {
        if (context != null)
            context.destroy();
    }

    protected  T getBean(String beanId) {
        try {
            return (T) context.getBean(beanId);
        } catch (BeansException e) {
            e.printStackTrace();
            return null;
        }
    }

    protected  T getBean(Class clazz) {
        try {
            return context.getBean(clazz);
        } catch (BeansException e) {
            e.printStackTrace();
            return null;
        }
    }
}
public class TestDB extends UnitTestBase {
public TestDB() {
super("classpath*:spring-mybatis.xml");
}
@Test
public void testDB() throws Exception {
AccountService accountService = getBean("dbmybatisserviceimplAccountService");
System.out.println("转账前:");
List records = accountService.getRecords();
printCollection(records);
int transCount = accountService.transAccount("张三", "李四", 200);
System.out.println("转账后:");
records = accountService.getRecords();
printCollection(records);
System.out.println("更新记录总数:" + transCount);
}
private void printCollection(Collection collection) {
Iterator iterator = collection.iterator();
while (iterator.hasNext()) {
System.out.println(iterator.next().toString());
}
}
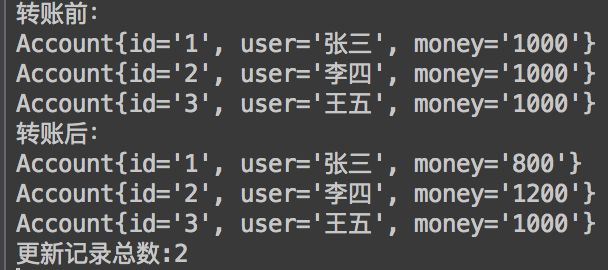
} 第一次执行结果如下:

现在将AccountServiceImpl中transAccount方法改为
 @Override
    public int transAccount(String user1, String user2, double money) {
        int result = 0;
            double money1 = accountDao.getMoneyByUser(user1);
            if (money1 > money) {
                result += accountDao.updateMoneyByUser(money1 - money, user1);
                result += 1 / 0;
                double money2 = accountDao.getMoneyByUser(user2);
                result += accountDao.updateMoneyByUser(money2 + money, user2);
            } else {
                System.out.println(user1 + "的余额不足");
            }
        return result;
    }
再把测试方法改为
AccountService accountService = getBean(AccountService.class);
        System.out.println("转账前:");
        List records = accountService.getRecords();
        printCollection(records);
        int transCount = 0;
        try {
            transCount = accountService.transAccount("张三", "李四", 200);
        } catch (Exception e) {
            System.out.println("转账失败:"+e.getClass().getName()+"    "+e.getCause());
        }
        System.out.println("转账后:");
        records = accountService.getRecords();
        printCollection(records);
        System.out.println("更新记录总数:" + transCount);
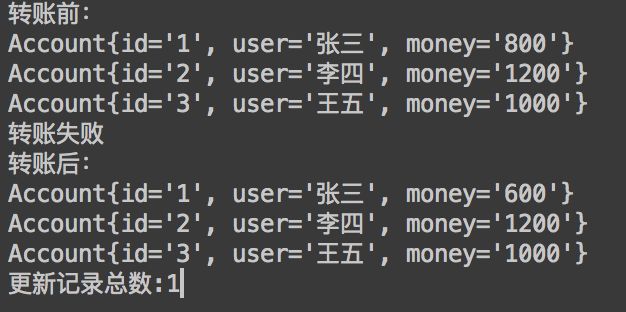
再测试下我们的程序,结果如下:

这时候张三转出去了200,但李四没收到200
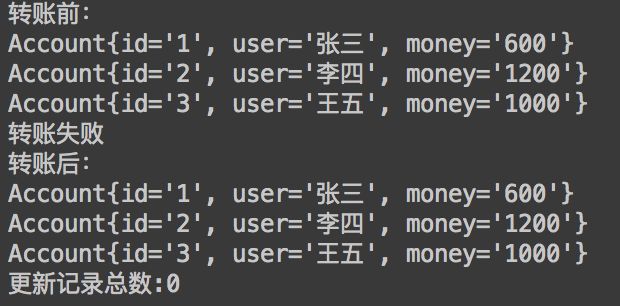
我们在spring-mybatis.xml配置文件中
再测试下我们的程序,结果如下:

AOP通过配置XML在事务管理的应用到此结束。
4、事务管理注解实现
在spring-mybatis.xml文件中添加标签
说明:
注解跟AOP配置文件实现可共存,也可只使用一个;
建议只使用一个,而且使用注解,因为在开发过程中aspectj配置很容易无效,而注解的代理模式(默认模式)不会出现这个问题。关于这个问题请阅读,我测试只用一个文件还是遇到了这样的问题。