Raspberry Pi: Installing TightVNC
Installing TightVNC on the Raspberry Pi
Sometimes connecting a keyboard, mouse, and monitor to Raspberry Pi is really inconvenient. But what’s the alternative if you want to interact directly with your Raspberry Pi’s GUI? PuTTY is an excellent SSH client, but the command shell is no substitute. WinSCP is an excellent SFTP client, but again, no substitute for a fully-functional GUI. The answer to this predicament? TightVNC, by GlavSoft LLC.
Background
According to TightVNC Software’s website, ‘TightVNC is a free remote control software package. With TightVNC, you can see the desktop of a remote machine and control it with your local mouse and keyboard, just like you would do it sitting in the front of that computer.‘
What is VNC? According to Wikipedia, ‘Virtual Network Computing (VNC) is a graphical desktop sharing system that uses the RFB protocol (remote framebuffer) to remotely control another computer. It transmits the keyboard and mouse events from one computer to another, relaying the graphical screen updates back in the other direction, over a network.‘
If you are a Windows user, you are no doubt familiar with Microsoft’s Remote Desktop Connection (RDC). GlavSoft’s TightVNC and Microsoft’s RDC are almost identical in terms of functionality.
Installation
TightVNC has two parts, the client and the server. The TightVNC Server software is installed on the Raspberry Pi (RaspPi). The RaspPi acts as the TightVNC Server. The client software, the TightVNC Java Viewer, is installed on a client laptop or desktop computer.
I used PuTTY from my Windows 8 laptop to perform the following installation and configuration. I successfully performed this process on a RaspPi Model B, with copies of both Raspbian “wheezy” and Soft-float Debian “wheezy”.
TightVNC Server
To install the TightVNC Server software, run the following commands from the RaspPi. The first command is are optional, but usually recommended before installing new software.
sudo apt-get update && sudo apt-get upgrade
sudo apt-get install tightvncserver
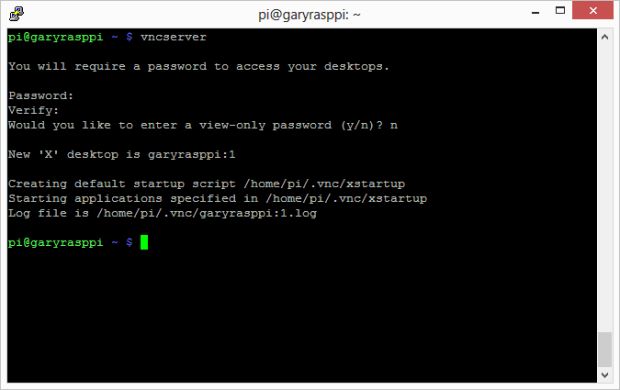
To test the success of the TightVNC Server installation, enter vncserver in the command shell. The first time you run this command, you will be asked to set a VNC password for the current user (‘pi’). The password can be different than the system password used by this user. After inputting a password, you should see output similar to the below screen grab. This indicates that TightVNC is running.
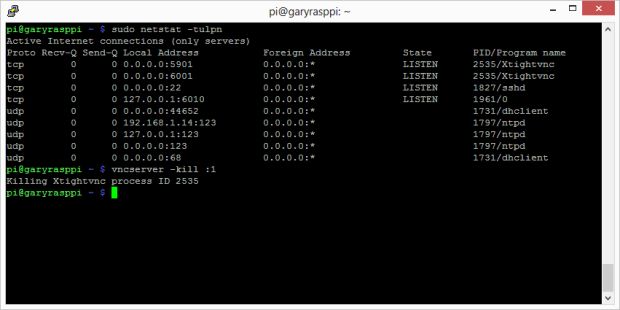
By default, TightVNC runs on a port 5901. To verify TightVNC is running on 5901, enter the command sudo netstat -tulpn. You should see output similar to the screen grab below. Note the entry for TightVNC on port 5901. Stop TightVNC by entering the vncserver -kill :1 command.
You may have noticed TightVNC was also running on port 6001. This is actually used by the X Window System, aka ‘X11′. A discussion of X11 is out of scope for this post, but more info can be found here.
Automatic Startup
For TightVNC Server to start automatically when we boot up our RaspPi, we need to create an init script and add it to the default runlevels. I had a lot of problems with this part until I found this post, with detailed instructions on how to perform these steps.
Start by entering the following command to create the init script:
sudo nano /etc/init.d/tightvncserver
Copy and paste the init script from the above post, into this file. Change the user from ‘pi’ to your user if it is different than ‘pi’. Save and close the file.
#!/bin/sh
### BEGIN INIT INFO
# Provides:          tightvncserver
# Required-Start:    $local_fs
# Required-Stop:     $local_fs
# Default-Start:     2 3 4 5
# Default-Stop:      0 1 6
# Short-Description: Start/stop tightvncserver
### END INIT INFO

# More details see:
# http://www.penguintutor.com/linux/tightvnc

### Customize this entry
# Set the USER variable to the name of the user to start tightvncserver under
export USER='pi'
### End customization required

eval cd ~$USER

case "$1" in
  start)
    su $USER -c '/usr/bin/tightvncserver :1'
    echo "Starting TightVNC server for $USER "
    ;;
  stop)
    pkill Xtightvnc
    echo "Tightvncserver stopped"
    ;;
  *)
    echo "Usage: /etc/init.d/tightvncserver {start|stop}"
    exit 1
    ;;
esac
exit 0
Next, execute these two commands to add the script to the default runlevels:
sudo chmod 755 /etc/init.d/tightvncserver
sudo update-rc.d tightvncserver defaults
To complete the TightVNC Server installation, restart the RaspPi.
TightVNC Java Viewer
According to the website, TightVNC Java Viewer is a fully functional remote control client written entirely in Java. It can work on any computer where Java is installed. It requires Java SE version 1.6 or any later version. That can be Windows or Mac OS, Linux or Solaris — it does not make any difference. And it can work in your browser as well. On the client computer, download and unzip the TightVNC Java Viewer. At the time of this post, the current TightVNC Java Viewer version was 2.6.2.
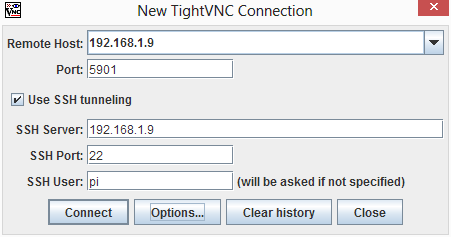
Once the installation is complete, double-click on the ‘tightvnc-jviewer.jar’ file. Running the Java jar file will bring up the ‘New TightVNC Connection’ window, as seen in the example below. Input the RaspPi’s IP address or hostname, and the default TightVNC port of 5901. The use of SSH tunneling is optional with the TightVNC Viewer. If you are concerned about security, use SSH.
Clicking the ‘Connect’ button, you are presented with a window to input the user’s VNC password.
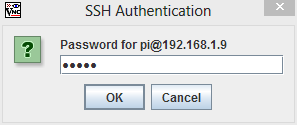
Optionally, if using SSH, the user’s SSH password is required. Again, the same user can have different SSH and VNC passwords, as mine does.
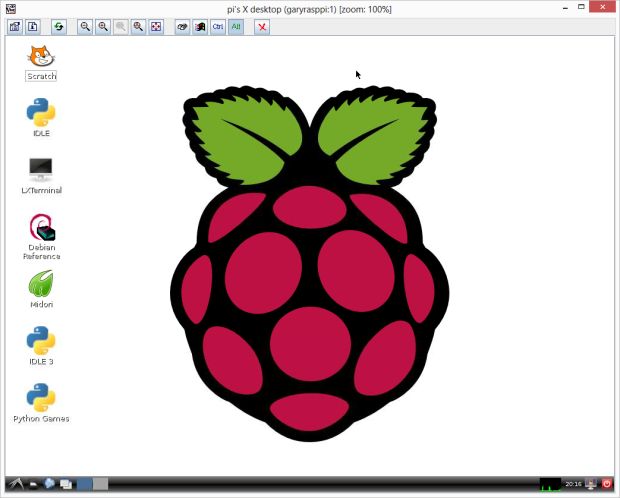
If everything was installed and configured correctly, you should be presented with a TightVNC window displaying the RaspPi’s desktop. Note the TightVNC toolbar along the top edge of the window. The ‘Ctrl’ and ‘Alt’ buttons are especially useful to send either of these two key inputs to the RaspPi on a Windows client. Using the ‘Set Options’ button, you can change the quality of TightVNC’s remote display. Note these changes this can affect performance.
Congratulations, no more connecting a keyboard, mouse, and monitor to you RaspPi to access the GUI. I suggest reading the documentation on the TightVNC website, as well as the ‘README.txt’ file, included with the TightVNC Java Viewer. There is a lot more to TightVNC than I have covered in this brief introductory post, especially in the README.txt file. -gs
Reference
From: https://programmaticponderings.wordpress.com/2012/12/26/installing-tightvnc-on-the-raspberry-pi/
