SpringBoot - 整合MyBatis配置版(XML)并开启事务
接上一篇SpringBoot整合MyBatis注解版示例,这里简要学习MyBatis配置版如何使用。
项目中数据源、pojo、mapper等和上篇博客中一致。
【1】MyBatis的相关配置
有三个地方:MyBatis的全局配置文件,与mapper关联的sql xml配置文件以及在application.yml引入MyBatis的配置文件。
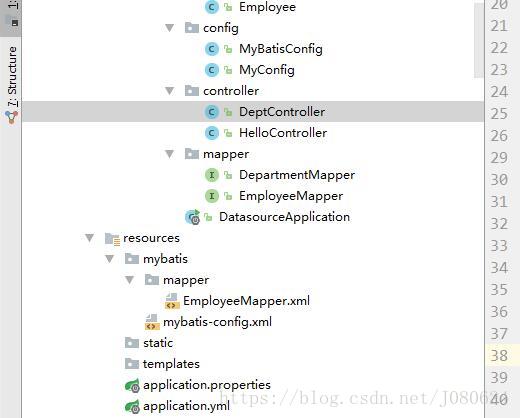
① 项目结构如下图:
② MyBatis的全局配置文件:mybatis-config.xml
- 根据需要自定义配置
③ 与mapper类相关联的SQL配置文件
- 这里以EmployeeMapper.xml示例
INSERT INTO employee(lastName,email,gender,d_id) VALUES (#{lastName},#{email},#{gender},#{dId})
④ 在application.yml中对MyBatis进行配置
这个可以说是最重要的!
mybatis:
  config-location: classpath:mybatis/mybatis-config.xml
  mapper-locations: classpath:mybatis/mapper/*.xml
这里说明一下mapper-locations中的配置:
classpath:/xxx 和 classpath:xxx是一样的 。
.
classpath:xxx 和 classpath*:xxx是不一样的,前者表示引入一个,后者表示引入多个。
.
而且classpath不仅包含class路径,还包括jar文件中(class路径)进行查找。
.
classpath:mapper/**/.xml:查找类路径下mapper包下面所有子包中的所有xml。
【2】编写Controller进行测试
测试方法如下:
	@GetMapping("/emp/{id}")
    public Employee getEmp(@PathVariable("id") Integer id){
        return employeeMapper.getEmpById(id);
    }
测试结果如下:
【3】SpringBoot中对事务的支持
spring Boot 使用事务非常简单,首先在主程序上面使用注解 @EnableTransactionManagement开启事务支持后,然后在访问数据库的Service方法上添加注解 @Transactional 便可。
@SpringBootApplication
@MapperScan({"com.XX.mapper","com.XX.dao"})
@EnableJms //ActiveMQ
@EnableCaching // redis-cache
@EnableTransactionManagement
@ServletComponentScan
public class HhProvinceApplication {

	public static void main(String[] args) {
		SpringApplication.run(HhProvinceApplication.class, args);
	}
}
关于事务管理器,不管是JPA还是JDBC等都实现自接口 PlatformTransactionManager 。如果你添加的是 spring-boot-starter-jdbc 依赖,框架会默认注入 DataSourceTransactionManager 实例。如果你添加的是 spring-boot-starter-data-jpa 依赖,框架会默认注入 JpaTransactionManager 实例。
你可以在启动类中添加如下方法,Debug测试,就能知道自动注入的是 PlatformTransactionManager 接口的哪个实现类。
@Bean
 public Object testBean(PlatformTransactionManager platformTransactionManager) {
     System.out.println(">>>>>>>>>>" + platformTransactionManager.getClass().getName());
     return new Object();
 }
由于mybatis-spring-boot-starter依赖了spring-boot-starter-jdbc,SpringBoot将会默认为我们注入DataSourceTransactionManager 。
Spring中事务支持默认是数据库产品的事务实现,如这里使用的MySQL。
【4】SpringBoot2.0与MySQL8
在SpringBoot2.0等更高版本时,如果MySQL驱动使用的是8版本,那么可能会出现如下异常:
java.sql.SQLException: The server time zone value ‘Öйú±ê׼ʱ¼ä’ is unrecognized
并且还可能提示你驱动需要更换为如下:
com.mysql.cj.jdbc.Driver
此时只需要更改为如下则可:
spring.datasource.url=jdbc:mysql://localhost:3306/test?serverTimezone=GMT%2B8
spring.datasource.username=root
spring.datasource.password=123456
详细讲解参考博文:一文读懂Spring事务与MySQL事务和锁。


