数据绑定库Data Binding的使用
2016年9月23补充
AS2.2版本 只需要开启
dataBinding {
enabled true
}
就可以使用了 内部已经支持
一.介绍
最近写项目发现一个特别好用的数据绑定框架,最主要的还是Android官方推出的-Data Binding Library。本人一向是有google推荐的就不会考虑去github上找其他框架。数据绑定框架让我们不再findViewById,烦人代码也增加的代码的耦合性,现在我们就应该和findViewById说再见了。也许很多人用了一些注解框架也不用,但是他需要写注解啊,还是一样的多,还不如我在xml文件用插件生成所有带id控件的代码块。Data Binding在官方文档说会提高解析xml文件的速度,看代码是程序猿之间沟通的唯一真理,我们一起来看看这个Data Binding是怎么使用的
二.环境搭建
在开始使用新东西之前,我们一般都要先开始配环境,就和刚刚开始学java之前陪JDK环境差不多。不过这里我们对你的Android Studio有一定的要求,版本必须是1.3+,使用ec的朋友就只好说sorry了,1.3版本一下的哥们也赶紧升升级吧。
新建一个project,添加依赖,有一部分哥们习惯就去module下去添加了,所以我这里强调一下是在project`
classpath "com.android.databinding:dataBinder:1.0-rc1"新建module,并且在build.gradle文件中添加
apply plugin: 'com.android.application'
apply plugin: 'com.android.databinding'最后一步,在build.gradle的android{}标签里面开启数据绑定服务
 dataBinding {
        enabled true
    }
三.尝试
我就直接上代码了
主界面布局文件:
<layout xmlns:android="http://schemas.android.com/apk/res/android">

    <data>

        <variable
            name="user"
            type="com.jiahuaandroid.androiddatabinding.User" />
    data>

    <LinearLayout
        android:layout_width="match_parent"
        android:layout_height="match_parent"
        android:orientation="vertical">

        <TextView
            android:layout_width="match_parent"
            android:layout_height="wrap_content"
            android:gravity="center_horizontal"
            android:padding="5dp"
            android:text="@{user.title}" />

        <FrameLayout
            android:id="@+id/main_fl"
            android:layout_width="match_parent"
            android:layout_height="match_parent" />
    LinearLayout>
layout>
可以看到我们的xml文件比之前多了两个标签,使用Data Binding,我们需要在最外层嵌套一层layout标签和data标签,其中layout标签是用来识别Data Binding的,data标签可以在其中定义变量进行使用,具体看我的activity是怎么写的,关注一下的xml文件中textview的text属性。下面直接贴出对应的activity代码
package com.jiahuaandroid.androiddatabinding;

import android.databinding.DataBindingUtil;
import android.os.Bundle;
import android.support.v7.app.AppCompatActivity;

import com.jiahuaandroid.androiddatabinding.databinding.ActivityMainBinding;

public class MainActivity extends AppCompatActivity {

    private ActivityMainBinding binding;

    @Override
    protected void onCreate(Bundle savedInstanceState) {
        super.onCreate(savedInstanceState);
        //代替setcontentview并且进行findviewbyid操作
        binding = DataBindingUtil.setContentView(this, R.layout.activity_main);
        //创建对象在布局文件中使用,对应标签内的变量
        User user = new User("DataBinding Test");
        //设置对象,对应标签内的变量
        binding.setUser(user);
        getSupportFragmentManager().beginTransaction().replace(R.id.main_fl,new TestFragment()).commit();
    }
}
user实体类的代码
package com.jiahuaandroid.androiddatabinding;

/**
 * Created by jhhuang on 2016/5/11.
 * QQ:781913268
 * 作用:测试实体类
 */
public class User {
    public final String title;
    public User(String title) {
        this.title = title;
    }

    public String getTitle() {
        return this.title;
    }
}
这上面就是Data Binding在activity中的布局,为了简单,我将Data Binding拿布局中的控件放在了TestFragment中,因为Data Binding加载布局在activity和fragment中是两种不同的方式,废话不多说,接着上代码
TestFragment的xml文件
<layout xmlns:android="http://schemas.android.com/apk/res/android">

    <data>
        <variable
            name="button"
            type="com.jiahuaandroid.androiddatabinding.Item"/>
    data>

    <LinearLayout
        android:layout_width="match_parent"
        android:layout_height="match_parent"
        android:orientation="vertical">

        <LinearLayout
            android:layout_width="match_parent"
            android:layout_height="wrap_content"
            android:orientation="horizontal">

            <Button
                android:id="@+id/re_ll"
                android:layout_width="0dp"
                android:layout_height="wrap_content"
                android:layout_weight="1"
                android:text="@{button.type}"/>

            <Button
                android:layout_width="0dp"
                android:layout_height="wrap_content"
                android:layout_weight="1"
                />

            <Button
                android:id="@+id/re_gl"
                android:layout_width="0dp"
                android:layout_height="wrap_content"
                android:layout_weight="1"
                android:text="@{button.location}"/>

        LinearLayout>


        <android.support.v7.widget.RecyclerView
            android:id="@+id/frag_recycler"
            android:layout_width="match_parent"
            android:layout_height="match_parent" />

    LinearLayout>

layout>
TestFragment这么写
package com.jiahuaandroid.androiddatabinding;
import android.databinding.DataBindingUtil;
import android.os.Bundle;
import android.support.annotation.Nullable;
import android.support.v4.app.Fragment;
import android.support.v7.widget.GridLayoutManager;
import android.support.v7.widget.LinearLayoutManager;
import android.view.LayoutInflater;
import android.view.View;
import android.view.ViewGroup;
import com.jiahuaandroid.androiddatabinding.databinding.FragmentTestBinding;
import java.util.ArrayList;
/**
* Created by jhhuang on 2016/5/11.
* QQ:781913268
* 作用:测试databinding在fragment的使用
*/
public class TestFragment extends Fragment {
private FragmentTestBinding binding;
private ArrayList- data;
private TestAdapter adapter;
/**
* 线性布局管理器
*/
private LinearLayoutManager llmanager;
/**
* gridview的布局管理器
*/
private GridLayoutManager glmanager;
@Nullable
@Override
public View onCreateView(LayoutInflater inflater, ViewGroup container, Bundle savedInstanceState) {
//获取bind对象,进行findviewbyid操作,通过binding.getRoot()获取视图
binding = DataBindingUtil.inflate(inflater, R.layout.fragment_test, container, false);
Item botton = new Item("listview","gridview");
binding.setButton(botton);
return binding.getRoot();
}
@Override
public void onActivityCreated(@Nullable Bundle savedInstanceState) {
init();
initListener();
super.onActivityCreated(savedInstanceState);
}
private void initListener() {
//获取xml文件中带id的控件并设置点击事件
binding.reGl.setOnClickListener(new View.OnClickListener() {
@Override
public void onClick(View v) {
//切换recyclerview的布局管理器
binding.fragRecycler.setLayoutManager(glmanager);
adapter.notifyDataSetChanged();
}
});
binding.reLl.setOnClickListener(new View.OnClickListener() {
@Override
public void onClick(View v) {
binding.fragRecycler.setLayoutManager(llmanager);
adapter.notifyDataSetChanged();
}
});
}
private void init() {
data = new ArrayList<>();
llmanager = new LinearLayoutManager(getActivity());
glmanager = new GridLayoutManager(getActivity(), 2);
binding.fragRecycler.setLayoutManager(llmanager);
adapter = new TestAdapter(data);
binding.fragRecycler.setAdapter(adapter);
//初始化recyclerview的数据
initData();
adapter.notifyDataSetChanged();
}
private void initData() {
data.add(new Item("0", "左"));
data.add(new Item("2", "右"));
data.add(new Item("0", "左"));
data.add(new Item("1", "中"));
data.add(new Item("1", "中"));
data.add(new Item("2", "右"));
data.add(new Item("1", "中"));
data.add(new Item("2", "右"));
data.add(new Item("0", "左"));
data.add(new Item("1", "中"));
data.add(new Item("2", "右"));
data.add(new Item("0", "左"));
data.add(new Item("1", "中"));
data.add(new Item("2", "右"));
}
}
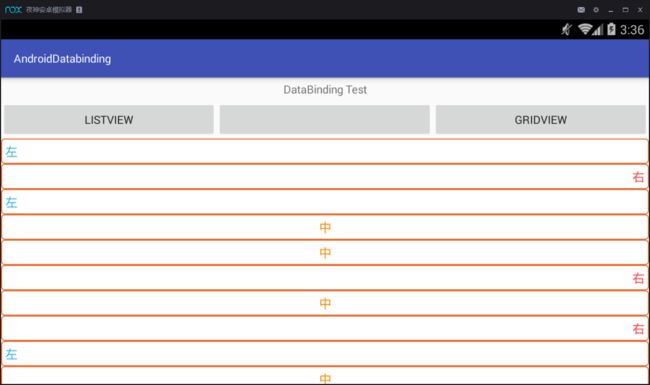
上上效果图

Data Binding的基本使用就算结束了,其实也就配置了一下环境和代替了一下findViewById,其实Data Binding可以做的事情还有更多,让我们的代码更加简洁,也让我们更加专注于代码的逻辑问题。
想了解更多可以看下面
https://segmentfault.com/a/1190000002876984
上面代码的demo在我的github上,请多多关照
https://github.com/jiahuahuang/AndroidDatabinding