NavigationView如此风骚的控件
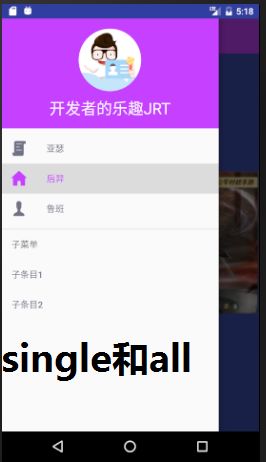
以前我们做一个仿qq侧滑菜单的效果用的最多的是slidingmenu这个第三方库,我们也可以自己继承ViewGroup手动写。今天我为大家介绍在6.0以后Google在design包中提供一个NavigationView,NavigationView是用来展示一个侧滑菜单的列表的,要实现侧滑还是要用到support.v4中的DrawerLayout。两者配合效果确实很赞!
效果展示
<RelativeLayout
    android:layout_width="match_parent"
    android:layout_height="match_parent"
    xmlns:app="http://schemas.android.com/apk/res-auto"
    xmlns:tools="http://schemas.android.com/tools"
    tools:context="com.itoutiao.news.navigationviewtest.MainActivity"
    xmlns:android="http://schemas.android.com/apk/res/android">
    <android.support.v4.widget.DrawerLayout
        android:id="@+id/drawerlayout"
        android:layout_width="match_parent"
        android:layout_height="match_parent"
    >

        <LinearLayout
            android:layout_width="match_parent"
            android:layout_height="match_parent"
            android:orientation="vertical"
            android:background="@color/colorPrimary"
            >
             <android.support.v7.widget.Toolbar
                 android:id="@+id/toolbar"
                 android:layout_width="match_parent"
                 android:layout_height="?attr/actionBarSize"
                 android:background="@color/color_theme"
                 >
             android.support.v7.widget.Toolbar>
             <ImageView
                 android:layout_width="match_parent"
                 android:layout_height="match_parent"
                 android:src="@drawable/bg"
                 />
        LinearLayout>

        <android.support.design.widget.NavigationView
            android:id="@+id/nv_view"
            android:layout_width="match_parent"
            android:layout_height="match_parent"
            android:layout_gravity="left"
            app:headerLayout="@layout/header_layout"
            app:menu="@menu/nv_menu"
            />

    android.support.v4.widget.DrawerLayout>

RelativeLayout>
参数说明
header_layout.xml布局如下:

<LinearLayout xmlns:android="http://schemas.android.com/apk/res/android"
    android:orientation="vertical"
    android:layout_width="match_parent"
    android:layout_height="match_parent"
    android:gravity="center"
    android:background="@color/color_theme"
    >
    <ImageView
        android:layout_width="100dp"
        android:layout_height="100dp"
        android:src="@drawable/ic_authentication"
        android:layout_marginTop="16dp"
        />
    <TextView
        android:id="@+id/tv_head"
        android:layout_width="wrap_content"
        android:layout_height="wrap_content"
        android:text="开发者的乐趣JRT"
        android:textSize="25sp"
        android:textColor="@color/color_txt"
        android:layout_marginTop="10dp"
        android:layout_marginBottom="16dp"
        />
LinearLayout>
<menu xmlns:android="http://schemas.android.com/apk/res/android">

    <group
        android:id="@+id/nv_group"
        android:checkableBehavior="single">
        <item
            android:id="@+id/it_yase"
            android:checked="true"
            android:icon="@drawable/ic_project_pressed"
            android:title="亚瑟" />
        <item
            android:id="@+id/it_houyi"
            android:icon="@drawable/ic_home_pre"
            android:title="后羿" />
        <item
            android:id="@+id/it_luban"
            android:icon="@drawable/ic_mycenter_pressed"
            android:title="鲁班" />

    group>
    <item
        android:icon="@drawable/ic_authentication"
        android:title="子菜单">
        <menu>
            <item
                android:id="@+id/sb_item1"
                android:title="子条目1" />
            <item
                android:id="@+id/sb_item2"
                android:title="子条目2" />
        menu>
    item>
menu>
注意:子菜单的icon设置是不显示的,只能显示文字
- 通过 android:checked=”true”这个属性设置默认第一条是选中的。
具体选中事件还是要在java代码中注册;
 //给NavigationView设置条目点击事件
        mNvView.setNavigationItemSelectedListener(new NavigationView.OnNavigationItemSelectedListener() {
            @Override
            public boolean onNavigationItemSelected(@NonNull MenuItem item) {
                //设置条目选中状态
                item.setChecked(true);
                //关闭侧滑菜单
                mDrawerlayout.closeDrawers();
                return true;
            }
});java代码中动态变化
- 将DrawerLayout和Toolbar关联使用
/将DrawerLayout和Toolbar关联使用 显示出三条横线的icon
        ActionBarDrawerToggle toggle=new ActionBarDrawerToggle(mContext,mDrawerlayout,mToolbar,0,0);
        //开启异步
        toggle.syncState();
        //监听toggle的状态,控制菜单的显示于隐藏
mDrawerlayout.addDrawerListener(toggle);- 菜单的Item的选中状态颜色的变化
 //一个存放颜色的数组
        int[] colors = new int[] { ContextCompat.getColor(this, R.color.icon_pre),
                        ContextCompat.getColor(this,R.color.icon_nor)};
        //选择状态的二维数组
        int[][] states = new int[2][];
        states[0] = new int[] { android.R.attr.state_checked};
        states[1] = new int[] {};//表示正常状态
        ColorStateList tintList = new ColorStateList(states, colors);
        //设置item的icon选中的状态
        mNvView.setItemIconTintList(tintList);
        //设置item的文本选中的颜色状态
        mNvView.setItemTextColor(tintList);
因为在开发中,一个app的主题色是一致的,点击前后的状态值不一样,这里就涉及到了ImageView的tint属性,动态渲染icon的颜色,具体的可以看我的这篇博客:Android代码实现状态选择器
如修改后的结果:

3. 动态修改headerLayout
看到有个论坛上有人问道如何获取到headerLayout中的View,我就自己研究了一下,代码如下:
 View headerView = mNvView.getHeaderView(0);
        TextView mTvHead = (TextView) headerView.findViewById(R.id.tv_head);
        mTvHead.setText("王者荣耀");
就这个getHeaderView(0)方法可以取出头布局,然后headerView.findViewById();取出具体的view进行操作。
如下图:

最后把java源码贴出来
/**
 * 描述:NavigationView的使用
 * 开发者:开发者的乐趣JRT
 * 创建时间:2017-3-11 23:29
 * CSDN地址:http://blog.csdn.net/Jiang_Rong_Tao/article
 * E-mail:[email protected]
 **/
public class MainActivity extends AppCompatActivity {

    @InjectView(R.id.nv_view)
    NavigationView mNvView;
    @InjectView(R.id.drawerlayout)
    DrawerLayout mDrawerlayout;
    @InjectView(R.id.toolbar)
    Toolbar mToolbar;
    private MainActivity mContext;

    @Override
    protected void onCreate(Bundle savedInstanceState) {
        super.onCreate(savedInstanceState);
        setContentView(R.layout.activity_main);
        mContext =this;
        ButterKnife.inject(mContext);
        init();
    }

    private void init() {
        mToolbar.setTitle("开发者的乐趣JRT");
        initItemStates();
        //给NavigationView设置条目点击事件
        setNavigationItemSelected();
        //控制侧滑菜单和toolbar的状态
        changeDrawerLayoutAndToolbarStates();
        //修改头布局的文字或者图片
        editHeaderTitle();
    }

    private void setNavigationItemSelected() {
        //给NavigationView设置条目点击事件
        mNvView.setNavigationItemSelectedListener(new NavigationView.OnNavigationItemSelectedListener() {
            @Override
            public boolean onNavigationItemSelected(@NonNull MenuItem item) {
                //设置条目选中状态
                item.setChecked(true);
                //关闭侧滑菜单
                mDrawerlayout.closeDrawers();
                return false;
            }
        });
    }

    private void changeDrawerLayoutAndToolbarStates() {
        //将DrawerLayout和Toolbar关联使用 显示出三条横线的icon
        ActionBarDrawerToggle toggle=new ActionBarDrawerToggle(mContext,mDrawerlayout,mToolbar,0,0);
        //开启异步
        toggle.syncState();
        //监听toggle的状态,控制菜单的显示于隐藏
        mDrawerlayout.addDrawerListener(toggle);
    }

    /**
     * 修改头布局
     */
    private void editHeaderTitle() {
        View headerView = mNvView.getHeaderView(0);
        TextView mTvHead = (TextView) headerView.findViewById(R.id.tv_head);
        mTvHead.setText("王者荣耀");
    }

    /**
     * 初始化菜单的Item的选中状态
     */
    private void initItemStates() {
        //一个存放颜色的数组
        int[] colors = new int[] { ContextCompat.getColor(this, R.color.icon_pre),
                        ContextCompat.getColor(this,R.color.icon_nor)};
        //选择状态的二维数组
        int[][] states = new int[2][];
        states[0] = new int[] { android.R.attr.state_checked};
        states[1] = new int[] {};//表示正常状态
        //设置item的icon选中的状态
        ColorStateList tintList = new ColorStateList(states, colors);
        mNvView.setItemIconTintList(tintList);
        //设置item的文本选中的颜色状态
        mNvView.setItemTextColor(tintList);
    }
}
总结
Android Design Support Library中提供了很多好用的控件,值得我们去探索和学习,做出有Google官方提出的有Matrial Design设计风格的APP.
github:源码下载


