微信小程序——人脸识别功能
最近学习了关于微信小程序中的人脸识别功能,收获颇多。
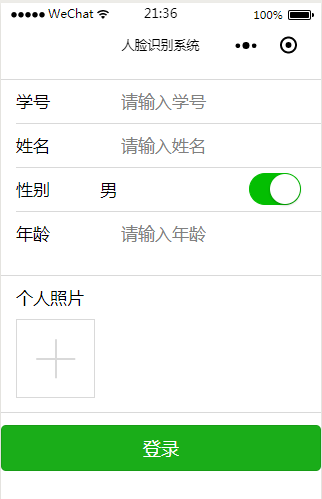
首先我们看一下页面:
这是前台页面的代码,都是些微信小程序中的控件,也用到了Weui的样式。
当然,功能是通过JS代码实现的,接下来看一下JS代码:
//index.js
//获取应用实例

Page({
  data: {
    // motto: 'Hello World',
    // userInfo: {},
    // hasUserInfo: false,
    // canIUse: wx.canIUse('button.open-type.getUserInfo')
    sex:'男',
    imageList:[]
  },
  switch1Change:function(e){
    console.log(e);
    if(e.detail.value){
      this.setData({sex:'男'})
    }else{
      this.setData({sex:'女'})
    }
  },
  // 选择图片或者拍照
  chooseImage: function () {
    var that=this
    wx.chooseImage({
      count: 1, // 默认9
      sizeType: ['original', 'compressed'], // 可以指定是原图还是压缩图,默认二者都有
      sourceType: ['album', 'camera'], // 可以指定来源是相册还是相机,默认二者都有
      success: function (res) {
        console.log(res);
        // 返回选定照片的本地文件路径列表,tempFilePath可以作为img标签的src属性显示图片
        // var tempFilePaths = res.tempFilePaths
        that.setData({
          imageList: res.tempFilePaths
        })
      }
    })
  },
  // 预览图片
  previewImage:function(e){
    var current = e.target.dataset.src
    wx.previewImage({
      current: current, // 当前显示图片的http链接
      urls: this.data.imageList // 需要预览的图片http链接列表
    })
  },
  // 上传图片
  upload:function(){
    wx.uploadFile({
      url: 'http://yk363890296.hk01.bdysite.com/server/index.php/home/index/upload', //仅为示例,非真实的接口地址
      filePath: this.data.imageList[0],
      name: 'file',
      formData: {
        'user': 'test'
      },
      success: function (res) {
        var data = res.data
        console.log(data);
        var json = JSON.parse(res.data);
        wx.showToast({
          title: json.msg,
          icon:'none',
          duration:3000
        })

      }
    })
  },
  // 提交数据
  formSubmit:function(e){
    console.log(e);
    wx.request({
      url: 'http://yk363890296.hk01.bdysite.com/server/index.php/home/index/index',
      data: e.detail.value,
      method: 'POST',
      header: {
        'content-type': 'application/x-www-form-urlencoded'
      },
      success:(res)=>{
        console.log(res);
        if(res.error){
          wx.showToast({
            title: res.data.msg,
            icon: 'none',
            duration: 3000
          })
        }else{
          wx.showToast({
            title: '添加成功',
            icon: 'none',
            duration: 3000
          })

          this.upload();
        }
      }

    })
  },

  //事件处理函数
  // bindViewTap: function() {
  //   wx.navigateTo({
  //     url: '../logs/logs'
  //   })
  // },
  onLoad: function () {
    // if (app.globalData.userInfo) {
    //   this.setData({
    //     userInfo: app.globalData.userInfo,
    //     hasUserInfo: true
    //   })
    // } else if (this.data.canIUse){
    //   // 由于 getUserInfo 是网络请求,可能会在 Page.onLoad 之后才返回
    //   // 所以此处加入 callback 以防止这种情况
    //   app.userInfoReadyCallback = res => {
    //     this.setData({
    //       userInfo: res.userInfo,
    //       hasUserInfo: true
    //     })
    //   }
    // } else {
    //   // 在没有 open-type=getUserInfo 版本的兼容处理
    //   wx.getUserInfo({
    //     success: res => {
    //       app.globalData.userInfo = res.userInfo
    //       this.setData({
    //         userInfo: res.userInfo,
    //         hasUserInfo: true
    //       })
    //     }
    //   })
    // }
  },
  // getUserInfo: function(e) {
  //   console.log(e)
  //   app.globalData.userInfo = e.detail.userInfo
  //   this.setData({
  //     userInfo: e.detail.userInfo,
  //     hasUserInfo: true
  //   })
  // }
})
以上代码就是实现个人信息提交到数据库功能的代码以及上传照片到服务器的功能。
总之,难度还不是很大,只不过我们还没有做到更深层次的功能,当然也感谢同学以及老师对于我的帮助。