PyQt4 学习笔记7之控件II
PyQt4 控件II
点击此处查看原文。
在本文中,我们继续前一节的内容,谈谈PyQt4中的控件。本节主要包括图像控件(QtGui.QPixmap)、行编辑控件(QtGui.QLineEdit)、拆分控件(QtGui.QSplitter)、组合框控件(QtGui.QComboBox)。
1 图像控件
QtGui.QPixmap控件是处理图像控件中的一个,它为在屏幕上显示图片进行了优化。在下面的示例代码中,我们采用QtGui.QPixmap控件在窗口上显示图片。
#!/usr/bin/python
# -*- coding: utf-8 -*-

import sys
from PyQt4 import QtGui, QtCore

class Example(QtGui.QWidget):

    def __init__(self):
        super(Example, self).__init__()

        self.initUI()

    def initUI(self):

        hbox = QtGui.QHBoxLayout(self)
        # 创建图片控件,使用图片的文件名作为参数
        pixmap = QtGui.QPixmap('pixmap.jpg')

        # 将图片控件放入标签控件中
        lbl = QtGui.QLabel(self)
        lbl.setPixmap(pixmap)

        hbox.addWidget(lbl)
        self.setLayout(hbox)

        self.move(300, 200)
        self.setWindowTitle('Pixmap')
        self.show()

def main():

    app = QtGui.QApplication(sys.argv)
    ex = Example()
    sys.exit(app.exec_())


if __name__ == '__main__':
    main()
在上述示例中,我们在窗口上显示了一幅图片,如下图所示(修改了原文中的图片)。
2 行编辑控件
QtGui.QLineEdit控件允许输入或编辑一行文本。对于该控件,可以使用撤销(undo)和重做(redo)、剪切(cut)和粘贴(paste)、拖放(drag & drop)等功能。
#!/usr/bin/python
# -*- coding: utf-8 -*-

import sys
from PyQt4 import QtGui, QtCore

class Example(QtGui.QWidget):

    def __init__(self):
        super(Example, self).__init__()

        self.initUI()

    def initUI(self):

        # 创建文本标签控件及行输入框控件
        self.lbl = QtGui.QLabel(self)
        qle = QtGui.QLineEdit(self)

        qle.move(60, 100)
        self.lbl.move(60, 40)

        # 当行输入框控件中的文本发生变化时,调用onChanged()方法
        qle.textChanged[str].connect(self.onChanged)

        self.setGeometry(300, 300, 280, 170)
        self.setWindowTitle('LineEdit')
        self.show()

    def onChanged(self, text):
        # 显示文本内容,并根据文本长度调整标签控件的大小
        self.lbl.setText(text)
        self.lbl.adjustSize()

def main():

    app = QtGui.QApplication(sys.argv)
    ex = Example()
    sys.exit(app.exec_())


if __name__ == '__main__':
    main()
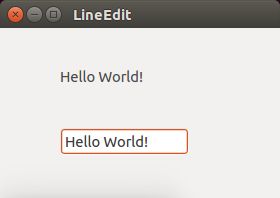
在上述示例中,应用程序在主窗口上创建了一个行编辑输入框以及一个文本标签控件。当在行编辑输入框中输入文本时,文本标签控件会立即将文本内容显示出来。
3 拆分器控件
QtGui.QSplitter控件允许用户通过拖放子控件的边界来调整子控件的大小。在下面的示例程序中,我们采用两个拆分器来管理三个框架控件(QtGui.QFrame)。
#!/usr/bin/python
# -*- coding: utf-8 -*-

import sys
from PyQt4 import QtGui, QtCore

class Example(QtGui.QWidget):

    def __init__(self):
        super(Example, self).__init__()

        self.initUI()

    def initUI(self):

        hbox = QtGui.QHBoxLayout(self)
        topleft = QtGui.QFrame(self)
        topleft.setFrameShape(QtGui.QFrame.StyledPanel)

        topright = QtGui.QFrame(self)
        topright.setFrameShape(QtGui.QFrame.StyledPanel)

        bottom = QtGui.QFrame(self)
        bottom.setFrameShape(QtGui.QFrame.StyledPanel)

        # 创建一个拆分器并将两个框架加入其中
        splitter1 = QtGui.QSplitter(QtCore.Qt.Horizontal)
        splitter1.addWidget(topleft)
        splitter1.addWidget(topright)

        # 将前一个拆分器加入到当前创建的拆分器中
        splitter2 = QtGui.QSplitter(QtCore.Qt.Vertical)
        splitter2.addWidget(splitter1)
        splitter2.addWidget(bottom)

        hbox.addWidget(splitter2)
        self.setLayout(hbox)
        QtGui.QApplication.setStyle(QtGui.QStyleFactory.create('cleanlooks'))

        self.setGeometry(300, 300, 300, 200)
        self.setWindowTitle('QtGui.QSplitter')
        self.show()

def main():

    app = QtGui.QApplication(sys.argv)
    ex = Example()
    sys.exit(app.exec_())


if __name__ == '__main__':
    main()
如下图所示,我们创建了三个框架和两个拆分器。
4 组合框控件
QtGui.QComboBox控件允许用户在选项列表中选择条目。
#!/usr/bin/python
# -*- coding: utf-8 -*-

import sys
from PyQt4 import QtGui, QtCore

class Example(QtGui.QWidget):

    def __init__(self):
        super(Example, self).__init__()

        self.initUI()
    def initUI(self):

        self.lbl = QtGui.QLabel('Ubuntu', self)
        self.lbl.move(50, 150)

        # 创建组合框并添加5个候选项
        combo = QtGui.QComboBox(self)
        combo.addItem('Ubuntu')
        combo.addItem('Mandriva')
        combo.addItem('Fedora')
        combo.addItem('Red Hat')
        combo.addItem('Gentoo')

        combo.move(50, 50)

        # 当选择条目时,调用onActivate()方法
        combo.activated[str].connect(self.onActivate)

        self.setGeometry(300, 300, 300, 200)
        self.setWindowTitle('ComboBox')
        self.show()

    def onActivate(self, text):
        # 显示文本内容,并根据文本长度调整标签控件的大小
        self.lbl.setText(text)
        self.lbl.adjustSize()

def main():

    app = QtGui.QApplication(sys.argv)
    ex = Example()
    sys.exit(app.exec_())


if __name__ == '__main__':
    main()
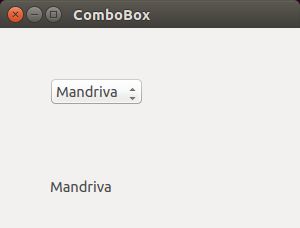
在上述的示例程序中,我们创建了一个组合框控件以及一个文本标签控件,该组合框包含五个可选项。文本标签控件用于显示组合框中选中的条目。


