Android普通截屏(包括状态栏内容)
从 Android 5.0(API 21) 起,开放了截屏录屏的API,使用到的类有MediaProjectionManager、MediaProjection、VirtualDisplay、ImageReader。
普通截屏大致步骤
① 获取屏幕的长宽高以及densityDpi等,并初始化ImageReader的实例[ 注意获取长宽高的时机 ]
ImageReader imageReader = ImageReader.newInstance(width, height, PixelFormat.RGBA_8888, 2);
② 获取MediaProjectionManager的实例
MediaProjectionManager manager = (MediaProjectionManager) getSystemService(Context.MEDIA_PROJECTION_SERVICE);
③ 获取截屏的Intent
Intent intent = manager.createScreenCaptureIntent();④ 启动截屏页面[ MediaProjectionPermissionActivity ]
startActivityForResult(intent, 200);⑤ 在onActivityResult方法中获取MediaProjection实例
    protected void onActivityResult(int requestCode, int resultCode, Intent data) {
        if (resultCode == RESULT_OK && requestCode == 200) {
           MediaProjection projection = manager.getMediaProjection(RESULT_OK, data);
        }
} protected void onActivityResult(int requestCode, int resultCode, Intent data) {
if (resultCode == RESULT_OK && requestCode == 200) {
MediaProjection projection = manager.getMediaProjection(RESULT_OK, data);
VirtualDisplay display = projection.createVirtualDisplay("ScreenShot",
width, height, dpi, DisplayManager.VIRTUAL_DISPLAY_FLAG_AUTO_MIRROR,
imageReader.getSurface(), null, null);
}
} Image image = imageReader.acquireLatestImage();
int width = image.getWidth();
int height = image.getHeight();
Image.Plane[] planes = image.getPlanes();
ByteBuffer buffer = planes[0].getBuffer();
int pixelStride = planes[0].getPixelStride();
int rowStride = planes[0].getRowStride();
int rowPadding = rowStride - pixelStride * width;
Bitmap bitmap = Bitmap.createBitmap(width + rowPadding / pixelStride,
height, Bitmap.Config.ARGB_8888);
bitmap.copyPixelsFromBuffer(buffer);
bitmap = Bitmap.createBitmap(bitmap, 0, 0, width, height);
image.close();完整示例
我要做的工作是,在Activity创建时就截取屏幕,所以在onCreate方法中就需要获取屏幕的一些相关参数,这里我使用了如何合理地获取屏幕的宽高中的第二种方法,采用handler.postDelayed(Runnable r, long delayMillis) 方法。
import android.content.Context;
import android.content.Intent;
import android.graphics.Bitmap;
import android.graphics.PixelFormat;
import android.hardware.display.DisplayManager;
import android.hardware.display.VirtualDisplay;
import android.media.Image;
import android.media.ImageReader;
import android.media.projection.MediaProjection;
import android.media.projection.MediaProjectionManager;
import android.os.Bundle;
import android.os.Handler;
import android.util.DisplayMetrics;
import android.view.Display;

import com.katherine.du.everydaystudy.BaseActivity;
import com.katherine.du.everydaystudy.R;

import java.nio.ByteBuffer;

public class MediaProjectionActivity extends BaseActivity {

    private MediaProjectionManager manager;
    private int height;
    private int width;
    private int dpi;
    private ImageReader imageReader;
    private VirtualDisplay display;
    private MediaProjection projection;
    static Handler handler = new Handler();

    @Override
    protected void onCreate(Bundle savedInstanceState) {
        super.onCreate(savedInstanceState);
        setContentView(R.layout.activity_empty);
        handler.postDelayed(new Runnable() {
            @Override
            public void run() {
                //获取屏幕的宽高和DPI
                Display display = getWindowManager().getDefaultDisplay();
                DisplayMetrics metrics = new DisplayMetrics();
                display.getMetrics(metrics);
                width = metrics.widthPixels;
                height = metrics.heightPixels;
                dpi = metrics.densityDpi;
                //初始化ImageReader实例
                imageReader = ImageReader.newInstance(width, height, PixelFormat.RGBA_8888, 2);
                //获取MediaProjectionManager实例
                manager = (MediaProjectionManager) getSystemService(Context.MEDIA_PROJECTION_SERVICE);
                //启动截屏Activity【com.android.systemui.media.MediaProjectionPermissionActivity】
                startActivityForResult(manager.createScreenCaptureIntent(), 200);
            }
        }, 1000);
    }

    @Override
    protected void onActivityResult(int requestCode, int resultCode, Intent data) {
        if (resultCode == RESULT_OK && requestCode == 200) {
            //获取MediaProjection实例
            projection = manager.getMediaProjection(RESULT_OK, data);
            //获取虚拟显示器VirtualDisplay的实例
            display = projection.createVirtualDisplay("ScreenShot",
                    width, height, dpi,
                    DisplayManager.VIRTUAL_DISPLAY_FLAG_AUTO_MIRROR,
                    imageReader.getSurface(),
                    null, null);
            //获取截图
            handler.postDelayed(new Runnable() {
                @Override
                public void run() {
                    //bitmap即为所得
                    Bitmap bitmap = takeScreenShot();
                }
            }, 1000);
        }
    }

    private Bitmap takeScreenShot() {
        Bitmap bitmap = null;
        try {
            Image image = imageReader.acquireLatestImage();
            int width = image.getWidth();
            int height = image.getHeight();
            Image.Plane[] planes = image.getPlanes();
            ByteBuffer buffer = planes[0].getBuffer();
            int pixelStride = planes[0].getPixelStride();
            int rowStride = planes[0].getRowStride();
            int rowPadding = rowStride - pixelStride * width;
            bitmap = Bitmap.createBitmap(width + rowPadding / pixelStride,
                    height, Bitmap.Config.ARGB_8888);
            bitmap.copyPixelsFromBuffer(buffer);
            bitmap = Bitmap.createBitmap(bitmap, 0, 0, width, height);
            image.close();
        } catch (Exception e) {
            e.printStackTrace();
        } finally {
            if (imageReader != null) {
                imageReader.close();
            }
            if (projection != null) {
                projection.stop();
            }
            if (display != null) {
                display.release();//释放
            }
        }
        return bitmap;
    }
}
MediaProjectionManager解读
获取实例的方法,两种:
Instances of this class must be obtained using Context.getSystemService(Class) with the argumentMediaProjectionManager.class
or Context.getSystemService(String) with the argumentContext.MEDIA_PROJECTION_SERVICE.
成员方法,两个:
Intent createScreenCaptureIntent()Returns an Intent that must passed to startActivityForResult() in order to start screen capture. The activity will prompt the user whether to allow screen capture. The result of this activity should be passed to getMediaProjection.
这个方法会返回一个Intent。通过startActivityForResulet() 启动这个intent来开始捕捉屏幕。这个Intent相关的Activity会提示用户是否允许截取屏幕。如果允许的话,这个Activity会返回结果给getMediaProjection作为参数。
MediaProjection getMediaProjection (int resultCode, Intent resultData)Retrieve the MediaProjection obtained from a succesful screen capture request. Will be null if the result from the startActivityForResult() is anything other than RESULT_OK.
上面那个方法提到,截屏成功后会返回一个intent作为结果,即这里的resultData。但如果resultCode不是RESULT_OK的话,此方法将返回null。
实现流程解读
我们来看一下这个流程,先从这个createScreenCaptureIntent()方法说起,看一下这个方法源码的实现:
    public Intent createScreenCaptureIntent() {
        Intent i = new Intent();
        i.setClassName("com.android.systemui",
                "com.android.systemui.media.MediaProjectionPermissionActivity");
        return i;
}接着我们使用了startActivityForResulet() 启动这个intent,我们来看看MediaProjectionPermissionActivity.java类
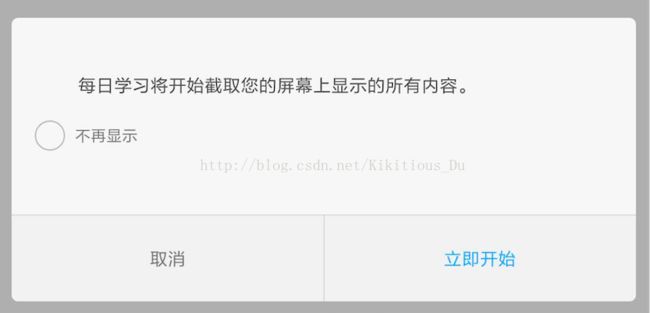
当我们首次跳转到这个Activity时,会弹出一个弹窗询问你是否允许截屏,界面如下所示:
我们来看看源码是怎样的,MediaProjectionPermissionActivity中的onCreate方法:
    public void onCreate(Bundle icicle) {
        super.onCreate(icicle);
        ......
        try {
            if (mService.hasProjectionPermission(mUid, mPackageName)) {
                setResult(RESULT_OK, getMediaProjectionIntent(mUid, mPackageName,
                        false /*permanentGrant*/));
                finish();
                return;
            }
        } catch (RemoteException e) {
            Log.e(TAG, "Error checking projection permissions", e);
            finish();
            return;
        }
        ......
        mDialog = new AlertDialog.Builder(this)
                .setIcon(aInfo.loadIcon(packageManager))
                .setMessage(message)
                .setPositiveButton(R.string.media_projection_action_text, this)
                .setNegativeButton(android.R.string.cancel, this)
                .setView(R.layout.remember_permission_checkbox)
                .setOnCancelListener(this)
                .create();
        ......
        mDialog.show();//弹出询问框
} @Override
public void onClick(DialogInterface dialog, int which) {
try {
if (which == AlertDialog.BUTTON_POSITIVE) {
setResult(RESULT_OK, getMediaProjectionIntent(mUid, mPackageName, mPermanentGrant));
}
} catch (RemoteException e) {
......
} finally {
......
}
}
private Intent getMediaProjectionIntent(int uid, String packageName, boolean permanentGrant)
throws RemoteException {
IMediaProjection projection = mService.createProjection(uid, packageName,
MediaProjectionManager.TYPE_SCREEN_CAPTURE, permanentGrant);
Intent intent = new Intent();
intent.putExtra(MediaProjectionManager.EXTRA_MEDIA_PROJECTION, projection.asBinder());
return intent;
}而getMediaProjectionIntent方法,就返回了上面讲到的getMediaProjection方法所需要的Intent。
询问框里还有一个不再显示的CheckBox,我们看一下它的点击事件:
    @Override
    public void onCheckedChanged(CompoundButton buttonView, boolean isChecked) {
        mPermanentGrant = isChecked;
} if (mService.hasProjectionPermission(mUid, mPackageName)) {
setResult(RESULT_OK, getMediaProjectionIntent(mUid, mPackageName, false /*permanentGrant*/));
finish();
return;
}接着就是获取MediaProjection实例啦,通过getMediaProjection方法,看看实现:
    public MediaProjection getMediaProjection(int resultCode, @NonNull Intent resultData) {
        if (resultCode != Activity.RESULT_OK || resultData == null) {
            return null;
        }
        IBinder projection = resultData.getIBinderExtra(EXTRA_MEDIA_PROJECTION);
        if (projection == null) {
            return null;
        }
        return new MediaProjection(mContext, IMediaProjection.Stub.asInterface(projection));
}然后就是获取虚拟显示器,我们来看一下MediaProjection.java中的createVirtualDisplay方法:
    public VirtualDisplay createVirtualDisplay(@NonNull String name,
            int width, int height, int dpi, int flags, @Nullable Surface surface,
            @Nullable VirtualDisplay.Callback callback, @Nullable Handler handler) {
        DisplayManager dm = (DisplayManager) mContext.getSystemService(Context.DISPLAY_SERVICE);
        return dm.createVirtualDisplay(
                    this, name, width, height, dpi, surface, flags, callback, handler);
}需要注意的是:这个方法将虚拟显示器的内容渲染到应用提供的Surface上,当虚拟显示器不再使用时,应该调用released方法将其释放。
接下来就该获取截图了,前面最开始的时候我们初始化了ImageReader的实例:
imageReader = ImageReader.newInstance(width, height, PixelFormat.RGBA_8888, 2);使用ImageReader的acquireLatestImage方法从ImageReader的队列里获取最新的图片并删掉旧的图片。
    public Image acquireLatestImage() {
        Image image = acquireNextImage();
        if (image == null) {
            return null;
        }
        try {
            for (;;) {
                Image next = acquireNextImageNoThrowISE();
                if (next == null) {
                    Image result = image;
                    image = null;
                    return result;
                }
                image.close();
                image = next;
            }
        } finally {
            if (image != null) {
                image.close();
            }
        }
    }
这里要注意的是,使用handler.postDelayed(Runnable r, long delayMillis)进行获取,否则image很可能是null[原因暂不详]。
最后就是image转Bitmap了:
    Image image = imageReader.acquireLatestImage();
    int width = image.getWidth();
    int height = image.getHeight();
    Image.Plane[] planes = image.getPlanes();
    ByteBuffer buffer = planes[0].getBuffer();
    int pixelStride = planes[0].getPixelStride();
    int rowStride = planes[0].getRowStride();
    int rowPadding = rowStride - pixelStride * width;
    bitmap = Bitmap.createBitmap(width + rowPadding / pixelStride,
            height, Bitmap.Config.ARGB_8888);
    bitmap.copyPixelsFromBuffer(buffer);
    bitmap = Bitmap.createBitmap(bitmap, 0, 0, width, height);
    image.close();
差不多就到这里辣=====
效果:
对啦,个人公众号开通啦,哈哈,纯属娱乐~~~


