Java基础-HashMap源码分析
HashMap是我们工作中经常用到的key->value键值对数据结构,但是你可曾详细了解过他的内部实现?
类图:刚复习完类图,马上温习一下,看一下HashMap的类家族
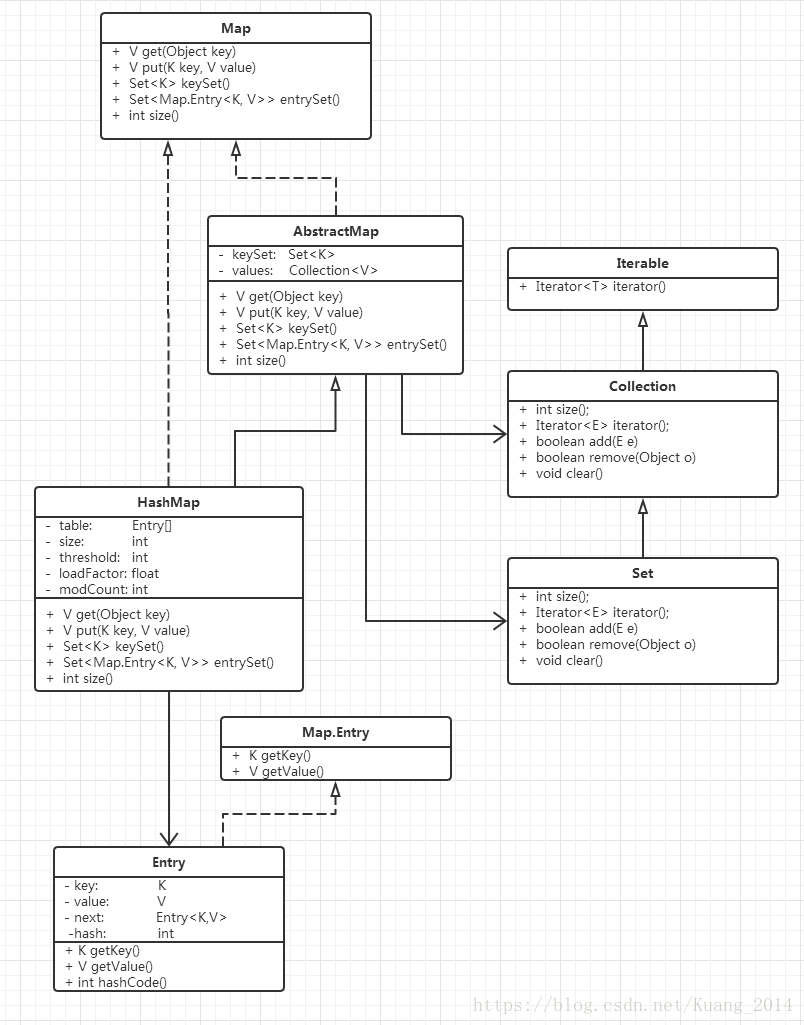
先有一个整体的结构把握,ps:这个类图已经是我第三版的杰作了,哈哈
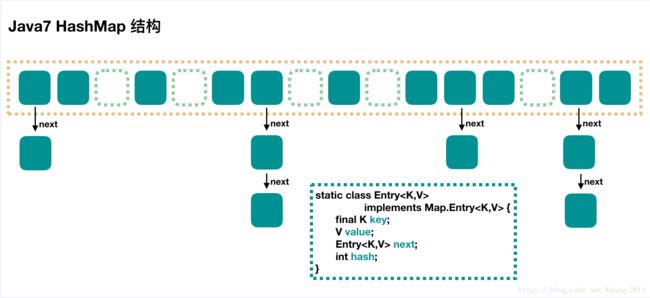
从上图,我们能够理解,hashMap的存储结构其实就是一个entry数组,由于entry的特殊设计,entry的属性包含了一个entry,这样就让entry具有了链表的属性;
属性解释:
Entry[] table; table根据需要调整。长度必须是2的幂int size; Map中包含的键值映射的数量
int threshold; 下一个大小调整大小的值(capacity * load factor)
float loadFactor; 哈希表的加载因子。
int modCount; HashMap的结构修改次数
方法讲解:
构造方法:
    public HashMap() {
        this.loadFactor = 0.75f;
        threshold = (int)(16 * 0.75f);
        table = new Entry[16];
        init();
    }
从构造方法里面,我们能发现初始化数组长度为16,init方法没有内容;
public V put(K key, V value);
    public V put(K key, V value) {
        if (key == null)
            return putForNullKey(value);
        int hash = hash(key.hashCode());
        int i = indexFor(hash, table.length);
	//这里检测如果该索引出已经有数据了,那么就遍历链表查看是否有该key的数据,如果有就覆盖返回
        for (Entry e = table[i]; e != null; e = e.next) {
            Object k;
            if (e.hash == hash && ((k = e.key) == key || key.equals(k))) {
                V oldValue = e.value;
                e.value = value;
                e.recordAccess(this);
                return oldValue;
            }
        }
        modCount++;
	//添加数据到链表
        addEntry(hash, key, value, i);
        return null;
    }
    void addEntry(int hash, K key, V value, int bucketIndex) {
	Entry e = table[bucketIndex];
        //这里new一个entry,把原来值放到next属性去
        table[bucketIndex] = new Entry(hash, key, value, e);
	//注意threshold初始化是12,16*0.75,意思是每次容量达到索引3/4的时候会扩容
        if (size++ >= threshold)
            resize(2 * table.length);
    }
    void resize(int newCapacity) {
        Entry[] oldTable = table;
        int oldCapacity = oldTable.length;
        if (oldCapacity == MAXIMUM_CAPACITY) {
            threshold = Integer.MAX_VALUE;
            return;
        }
	//新建一个entry数组,长度为新长度
        Entry[] newTable = new Entry[newCapacity];
	//复制原来的数据到新的数组
        transfer(newTable);
        table = newTable;
	//重新设置下次扩容的条件
        threshold = (int)(newCapacity * loadFactor);
    }
    //这里面实现很正常,稍微看一下应该能明白
     void transfer(Entry[] newTable) {
        Entry[] src = table;
        int newCapacity = newTable.length;
        for (int j = 0; j < src.length; j++) {
            Entry e = src[j];
            if (e != null) {
                src[j] = null;
                do {
                    Entry next = e.next;
                    int i = indexFor(e.hash, newCapacity);
                    e.next = newTable[i];
                    newTable[i] = e;
                    e = next;
                } while (e != null);
            }
        }
    }
public V get(Object key)
public V get(Object key) {
        if (key == null)
            return getForNullKey();
        int hash = hash(key.hashCode());
        for (Entry e = table[indexFor(hash, table.length)];
             e != null;
             e = e.next) {
            Object k;
            if (e.hash == hash && ((k = e.key) == key || key.equals(k)))
                return e.value;
        }
        return null;
} public Set
下面先演示一下我们平时调用entrySet的常规用法
	public static void main(String[] args) {
		Map map = new HashMap();
		for (int i = 0; i < 20; i++) {
			map.put(i, i);
		}
		Iterator> it = map.entrySet().iterator();
		Entry entry = null;
		while (it.hasNext()) {
			entry = it.next();
			System.out.println(entry.getKey());
			System.out.println(entry.getKey());
			//删除
			it.remove();
		}
	}
虽然平时这样用,那么你理解其中的原理吗?边看边说
    public Set> entrySet() {
	return entrySet0();
    }
    private Set> entrySet0() {
	//看到这里我们应该就已经知道其实我们平时调用entrySet的时候是会保存起来
        Set> es = entrySet;
        return es != null ? es : (entrySet = new EntrySet());
    }
    private final class EntrySet extends AbstractSet> {
	//这个方法是我们常用的,看他的实现,是new了一个,所以拿到iterator对象随便搞
        public Iterator> iterator() {
            return newEntryIterator();
        }
    }
	Iterator> newEntryIterator()   {
        return new EntryIterator();
    }
    //注意这里是一个类
    private final class EntryIterator extends HashIterator> {
        public Map.Entry next() {
            return nextEntry();
        }
    }
    final Entry nextEntry() {
        if (modCount != expectedModCount)
            throw new ConcurrentModificationException();
            Entry e = next;
            if (e == null)
                throw new NoSuchElementException();
            if ((next = e.next) == null) {
                Entry[] t = table;
                while (index < t.length && (next = t[index++]) == null);
            }
	    //知道记录这个用来干嘛吗?请看remove方法
	current = e;
        return e;
    }
    //哈哈,从这里是不是已经理解我们平时使用entryset为啥可以调用remove方法了
    public void remove() {
        if (current == null)
                throw new IllegalStateException();
            if (modCount != expectedModCount)
                throw new ConcurrentModificationException();
            Object k = current.key;
            current = null;
            HashMap.this.removeEntryForKey(k);
            expectedModCount = modCount;
    }
看完entrySet再来看keySet,你会恍然大悟,其实keySet就是调用了entrySet的方法,只是next方法被重写了,所以计算量还是达到了entrySet这么多,怎么样,不相信吧,自己去看一下。
看完hashMap,再把Set和List看完,之后再来研究一下ConcurrentHashMap。