- 理解Gunicorn:Python WSGI服务器的基石
范范0825
ipythonlinux运维
理解Gunicorn:PythonWSGI服务器的基石介绍Gunicorn,全称GreenUnicorn,是一个为PythonWSGI(WebServerGatewayInterface)应用设计的高效、轻量级HTTP服务器。作为PythonWeb应用部署的常用工具,Gunicorn以其高性能和易用性著称。本文将介绍Gunicorn的基本概念、安装和配置,帮助初学者快速上手。1.什么是Gunico
- Long类型前后端数据不一致
igotyback
前端
响应给前端的数据浏览器控制台中response中看到的Long类型的数据是正常的到前端数据不一致前后端数据类型不匹配是一个常见问题,尤其是当后端使用Java的Long类型(64位)与前端JavaScript的Number类型(最大安全整数为2^53-1,即16位)进行数据交互时,很容易出现精度丢失的问题。这是因为JavaScript中的Number类型无法安全地表示超过16位的整数。为了解决这个问
- LocalDateTime 转 String
igotyback
java开发语言
importjava.time.LocalDateTime;importjava.time.format.DateTimeFormatter;publicclassMain{publicstaticvoidmain(String[]args){//获取当前时间LocalDateTimenow=LocalDateTime.now();//定义日期格式化器DateTimeFormatterformat
- Linux下QT开发的动态库界面弹出操作(SDL2)
13jjyao
QT类qt开发语言sdl2linux
需求:操作系统为linux,开发框架为qt,做成需带界面的qt动态库,调用方为java等非qt程序难点:调用方为java等非qt程序,也就是说调用方肯定不带QApplication::exec(),缺少了这个,QTimer等事件和QT创建的窗口将不能弹出(包括opencv也是不能弹出);这与qt调用本身qt库是有本质的区别的思路:1.调用方缺QApplication::exec(),那么我们在接口
- Google earth studio 简介
陟彼高冈yu
旅游
GoogleEarthStudio是一个基于Web的动画工具,专为创作使用GoogleEarth数据的动画和视频而设计。它利用了GoogleEarth强大的三维地图和卫星影像数据库,使用户能够轻松地创建逼真的地球动画、航拍视频和动态地图可视化。网址为https://www.google.com/earth/studio/。GoogleEarthStudio是一个基于Web的动画工具,专为创作使用G
- PHP环境搭建详细教程
好看资源平台
前端php
PHP是一个流行的服务器端脚本语言,广泛用于Web开发。为了使PHP能够在本地或服务器上运行,我们需要搭建一个合适的PHP环境。本教程将结合最新资料,介绍在不同操作系统上搭建PHP开发环境的多种方法,包括Windows、macOS和Linux系统的安装步骤,以及本地和Docker环境的配置。1.PHP环境搭建概述PHP环境的搭建主要分为以下几类:集成开发环境:例如XAMPP、WAMP、MAMP,这
- DIV+CSS+JavaScript技术制作网页(旅游主题网页设计与制作)云南大理
STU学生网页设计
网页设计期末网页作业html静态网页html5期末大作业网页设计web大作业
️精彩专栏推荐作者主页:【进入主页—获取更多源码】web前端期末大作业:【HTML5网页期末作业(1000套)】程序员有趣的告白方式:【HTML七夕情人节表白网页制作(110套)】文章目录二、网站介绍三、网站效果▶️1.视频演示2.图片演示四、网站代码HTML结构代码CSS样式代码五、更多源码二、网站介绍网站布局方面:计划采用目前主流的、能兼容各大主流浏览器、显示效果稳定的浮动网页布局结构。网站程
- 【华为OD机试真题2023B卷 JAVA&JS】We Are A Team
若博豆
java算法华为javascript
华为OD2023(B卷)机试题库全覆盖,刷题指南点这里WeAreATeam时间限制:1秒|内存限制:32768K|语言限制:不限题目描述:总共有n个人在机房,每个人有一个标号(1<=标号<=n),他们分成了多个团队,需要你根据收到的m条消息判定指定的两个人是否在一个团队中,具体的:1、消息构成为:abc,整数a、b分别代
- 关于城市旅游的HTML网页设计——(旅游风景云南 5页)HTML+CSS+JavaScript
二挡起步
web前端期末大作业javascripthtmlcss旅游风景
⛵源码获取文末联系✈Web前端开发技术描述网页设计题材,DIV+CSS布局制作,HTML+CSS网页设计期末课程大作业|游景点介绍|旅游风景区|家乡介绍|等网站的设计与制作|HTML期末大学生网页设计作业,Web大学生网页HTML:结构CSS:样式在操作方面上运用了html5和css3,采用了div+css结构、表单、超链接、浮动、绝对定位、相对定位、字体样式、引用视频等基础知识JavaScrip
- HTML网页设计制作大作业(div+css) 云南我的家乡旅游景点 带文字滚动
二挡起步
web前端期末大作业web设计网页规划与设计htmlcssjavascriptdreamweaver前端
Web前端开发技术描述网页设计题材,DIV+CSS布局制作,HTML+CSS网页设计期末课程大作业游景点介绍|旅游风景区|家乡介绍|等网站的设计与制作HTML期末大学生网页设计作业HTML:结构CSS:样式在操作方面上运用了html5和css3,采用了div+css结构、表单、超链接、浮动、绝对定位、相对定位、字体样式、引用视频等基础知识JavaScript:做与用户的交互行为文章目录前端学习路线
- git - Webhook让部署自动化
大猪大猪
我们现在有一个需求,将项目打包上传到gitlab或者github后,程序能自动部署,不用手动地去服务器中进行项目更新并运行,如何做到?这里我们可以使用gitlab与github的挂钩,挂钩的原理就是,每当我们有请求到gitlab与github服务器时,这时他俩会根据我们配置的挂钩地扯进行访问,webhook挂钩程序会一直监听着某个端口请求,一但收到他们发过来的请求,这时就知道用户有请求提交了,这时
- webpack图片等资源的处理
dmengmeng
需要的loaderfile-loader(让我们可以引入这些资源文件)url-loader(其实是file-loader的二次封装)img-loader(处理图片所需要的)在没有使用任何处理图片的loader之前,比如说css中用到了背景图片,那么最后打包会报错的,因为他没办法处理图片。其实你只想能够使用图片的话。只加一个file-loader就可以,打开网页能准确看到图片。{test:/\.(p
- node.js学习
小猿L
node.jsnode.js学习vim
node.js学习实操及笔记温故node.js,node.js学习实操过程及笔记~node.js学习视频node.js官网node.js中文网实操笔记githubcsdn笔记为什么学node.js可以让别人访问我们编写的网页为后续的框架学习打下基础,三大框架vuereactangular离不开node.jsnode.js是什么官网:node.js是一个开源的、跨平台的运行JavaScript的运行
- Java 重写(Override)与重载(Overload)
叨唧唧的
Java重写(Override)与重载(Overload)重写(Override)重写是子类对父类的允许访问的方法的实现过程进行重新编写,返回值和形参都不能改变。即外壳不变,核心重写!重写的好处在于子类可以根据需要,定义特定于自己的行为。也就是说子类能够根据需要实现父类的方法。重写方法不能抛出新的检查异常或者比被重写方法申明更加宽泛的异常。例如:父类的一个方法申明了一个检查异常IOExceptio
- 简单了解 JVM
记得开心一点啊
jvm
目录♫什么是JVM♫JVM的运行流程♫JVM运行时数据区♪虚拟机栈♪本地方法栈♪堆♪程序计数器♪方法区/元数据区♫类加载的过程♫双亲委派模型♫垃圾回收机制♫什么是JVMJVM是JavaVirtualMachine的简称,意为Java虚拟机。虚拟机是指通过软件模拟的具有完整硬件功能的、运行在一个完全隔离的环境中的完整计算机系统(如:JVM、VMwave、VirtualBox)。JVM和其他两个虚拟机
- 1分钟解决 -bash: mvn: command not found,在Centos 7中安装Maven
Energet!c
开发语言
1分钟解决-bash:mvn:commandnotfound,在Centos7中安装Maven检查Java环境1下载Maven2解压Maven3配置环境变量4验证安装5常见问题与注意事项6总结检查Java环境Maven依赖Java环境,请确保系统已经安装了Java并配置了环境变量。可以通过以下命令检查:java-version如果未安装,请先安装Java。1下载Maven从官网下载:前往Apach
- 「豆包Marscode体验官」 | 云端 IDE 启动 & Rust 体验
张风捷特烈
iderust开发语言后端
theme:cyanosis我正在参加「豆包MarsCode初体验」征文活动MarsCode可以看作一个运行在服务端的远程VSCode开发环境。对于我这种想要学习体验某些语言,但不想在电脑里装环境的人来说非常友好。本文就来介绍一下在MarsCode里,我的体验rust开发体验。一、MarsCode是什么它的本质是:提供代码助手和云端IDE服务的web网站,可通过下面的链接访问https://www
- Java企业面试题3
马龙强_
java
1.break和continue的作用(智*图)break:用于完全退出一个循环(如for,while)或一个switch语句。当在循环体内遇到break语句时,程序会立即跳出当前循环体,继续执行循环之后的代码。continue:用于跳过当前循环体中剩余的部分,并开始下一次循环。如果是在for循环中使用continue,则会直接进行条件判断以决定是否执行下一轮循环。2.if分支语句和switch分
- JVM、JRE和 JDK:理解Java开发的三大核心组件
Y雨何时停T
Javajava
Java是一门跨平台的编程语言,它的成功离不开背后强大的运行环境与开发工具的支持。在Java的生态中,JVM(Java虚拟机)、JRE(Java运行时环境)和JDK(Java开发工具包)是三个至关重要的核心组件。本文将探讨JVM、JDK和JRE的区别,帮助你更好地理解Java的运行机制。1.JVM:Java虚拟机(JavaVirtualMachine)什么是JVM?JVM,即Java虚拟机,是Ja
- Java面试题精选:消息队列(二)
芒果不是芒
Java面试题精选javakafka
一、Kafka的特性1.消息持久化:消息存储在磁盘,所以消息不会丢失2.高吞吐量:可以轻松实现单机百万级别的并发3.扩展性:扩展性强,还是动态扩展4.多客户端支持:支持多种语言(Java、C、C++、GO、)5.KafkaStreams(一个天生的流处理):在双十一或者销售大屏就会用到这种流处理。使用KafkaStreams可以快速的把销售额统计出来6.安全机制:Kafka进行生产或者消费的时候会
- 白骑士的Java教学基础篇 2.5 控制流语句
白骑士所长
Java教学java开发语言
欢迎继续学习Java编程的基础篇!在前面的章节中,我们了解了Java的变量、数据类型和运算符。接下来,我们将探讨Java中的控制流语句。控制流语句用于控制程序的执行顺序,使我们能够根据特定条件执行不同的代码块,或重复执行某段代码。这是编写复杂程序的基础。通过学习这一节内容,你将掌握如何使用条件语句和循环语句来编写更加灵活和高效的代码。条件语句条件语句用于根据条件的真假来执行不同的代码块。if语句‘
- python语法——三目运算符
HappyRocking
pythonpython三目运算符
在java中,有三目运算符,如:intc=(a>b)?a:b表示c取两者中的较大值。但是在python,不能直接这样使用,估计是因为冒号在python有分行的关键作用。那么在python中,如何实现类似功能呢?可以使用ifelse语句,也是一行可以完成,格式为:aifbelsec表示如果b为True,则表达式等于a,否则等于c。如:c=(aif(a>b)elseb)同样是完成了取最大值的功能。
- ArrayList 源码解析
程序猿进阶
Java基础ArrayListListjava面试性能优化架构设计idea
ArrayList是Java集合框架中的一个动态数组实现,提供了可变大小的数组功能。它继承自AbstractList并实现了List接口,是顺序容器,即元素存放的数据与放进去的顺序相同,允许放入null元素,底层通过数组实现。除该类未实现同步外,其余跟Vector大致相同。每个ArrayList都有一个容量capacity,表示底层数组的实际大小,容器内存储元素的个数不能多于当前容量。当向容器中添
- Python神器!WEB自动化测试集成工具 DrissionPage
亚丁号
python开发语言
一、前言用requests做数据采集面对要登录的网站时,要分析数据包、JS源码,构造复杂的请求,往往还要应付验证码、JS混淆、签名参数等反爬手段,门槛较高。若数据是由JS计算生成的,还须重现计算过程,体验不好,开发效率不高。使用浏览器,可以很大程度上绕过这些坑,但浏览器运行效率不高。因此,这个库设计初衷,是将它们合而为一,能够在不同须要时切换相应模式,并提供一种人性化的使用方法,提高开发和运行效率
- Java爬虫框架(一)--架构设计
狼图腾-狼之传说
java框架java任务html解析器存储电子商务
一、架构图那里搜网络爬虫框架主要针对电子商务网站进行数据爬取,分析,存储,索引。爬虫:爬虫负责爬取,解析,处理电子商务网站的网页的内容数据库:存储商品信息索引:商品的全文搜索索引Task队列:需要爬取的网页列表Visited表:已经爬取过的网页列表爬虫监控平台:web平台可以启动,停止爬虫,管理爬虫,task队列,visited表。二、爬虫1.流程1)Scheduler启动爬虫器,TaskMast
- Java:爬虫框架
dingcho
Javajava爬虫
一、ApacheNutch2【参考地址】Nutch是一个开源Java实现的搜索引擎。它提供了我们运行自己的搜索引擎所需的全部工具。包括全文搜索和Web爬虫。Nutch致力于让每个人能很容易,同时花费很少就可以配置世界一流的Web搜索引擎.为了完成这一宏伟的目标,Nutch必须能够做到:每个月取几十亿网页为这些网页维护一个索引对索引文件进行每秒上千次的搜索提供高质量的搜索结果简单来说Nutch支持分
- MongoDB知识概括
GeorgeLin98
持久层mongodb
MongoDB知识概括MongoDB相关概念单机部署基本常用命令索引-IndexSpirngDataMongoDB集成副本集分片集群安全认证MongoDB相关概念业务应用场景:传统的关系型数据库(如MySQL),在数据操作的“三高”需求以及应对Web2.0的网站需求面前,显得力不从心。解释:“三高”需求:①Highperformance-对数据库高并发读写的需求。②HugeStorage-对海量数
- python怎么将png转为tif_png转tif
weixin_39977276
发国外的文章要求图片是tif,cmyk色彩空间的。大小尺寸还有要求。比如网上大神多,找到了一段代码,感谢!https://www.jianshu.com/p/ec2af4311f56https://github.com/KevinZc007/image2Tifimportjava.awt.image.BufferedImage;importjava.io.File;importjava.io.Fi
- JavaScript 中,深拷贝(Deep Copy)和浅拷贝(Shallow Copy)
跳房子的前端
前端面试javascript开发语言ecmascript
在JavaScript中,深拷贝(DeepCopy)和浅拷贝(ShallowCopy)是用于复制对象或数组的两种不同方法。了解它们的区别和应用场景对于避免潜在的bugs和高效地处理数据非常重要。以下是对深拷贝和浅拷贝的详细解释,包括它们的概念、用途、优缺点以及实现方式。1.浅拷贝(ShallowCopy)概念定义:浅拷贝是指创建一个新的对象或数组,其中包含了原对象或数组的基本数据类型的值和对引用数
- JAVA·一个简单的登录窗口
MortalTom
java开发语言学习
文章目录概要整体架构流程技术名词解释技术细节资源概要JavaSwing是Java基础类库的一部分,主要用于开发图形用户界面(GUI)程序整体架构流程新建项目,导入sql.jar包(链接放在了文末),编译项目并运行技术名词解释一、特点丰富的组件提供了多种可视化组件,如按钮(JButton)、文本框(JTextField)、标签(JLabel)、下拉列表(JComboBox)等,可以满足不同的界面设计
- PHP,安卓,UI,java,linux视频教程合集
cocos2d-x小菜
javaUIlinuxPHPandroid
╔-----------------------------------╗┆
- zookeeper admin 笔记
braveCS
zookeeper
Required Software
1) JDK>=1.6
2)推荐使用ensemble的ZooKeeper(至少3台),并run on separate machines
3)在Yahoo!,zk配置在特定的RHEL boxes里,2个cpu,2G内存,80G硬盘
数据和日志目录
1)数据目录里的文件是zk节点的持久化备份,包括快照和事务日
- Spring配置多个连接池
easterfly
spring
项目中需要同时连接多个数据库的时候,如何才能在需要用到哪个数据库就连接哪个数据库呢?
Spring中有关于dataSource的配置:
<bean id="dataSource" class="com.mchange.v2.c3p0.ComboPooledDataSource"
&nb
- Mysql
171815164
mysql
例如,你想myuser使用mypassword从任何主机连接到mysql服务器的话。
GRANT ALL PRIVILEGES ON *.* TO 'myuser'@'%'IDENTIFIED BY 'mypassword' WI
TH GRANT OPTION;
如果你想允许用户myuser从ip为192.168.1.6的主机连接到mysql服务器,并使用mypassword作
- CommonDAO(公共/基础DAO)
g21121
DAO
好久没有更新博客了,最近一段时间工作比较忙,所以请见谅,无论你是爱看呢还是爱看呢还是爱看呢,总之或许对你有些帮助。
DAO(Data Access Object)是一个数据访问(顾名思义就是与数据库打交道)接口,DAO一般在业
- 直言有讳
永夜-极光
感悟随笔
1.转载地址:http://blog.csdn.net/jasonblog/article/details/10813313
精华:
“直言有讳”是阿里巴巴提倡的一种观念,而我在此之前并没有很深刻的认识。为什么呢?就好比是读书时候做阅读理解,我喜欢我自己的解读,并不喜欢老师给的意思。在这里也是。我自己坚持的原则是互相尊重,我觉得阿里巴巴很多价值观其实是基本的做人
- 安装CentOS 7 和Win 7后,Win7 引导丢失
随便小屋
centos
一般安装双系统的顺序是先装Win7,然后在安装CentOS,这样CentOS可以引导WIN 7启动。但安装CentOS7后,却找不到Win7 的引导,稍微修改一点东西即可。
一、首先具有root 的权限。
即进入Terminal后输入命令su,然后输入密码即可
二、利用vim编辑器打开/boot/grub2/grub.cfg文件进行修改
v
- Oracle备份与恢复案例
aijuans
oracle
Oracle备份与恢复案例
一. 理解什么是数据库恢复当我们使用一个数据库时,总希望数据库的内容是可靠的、正确的,但由于计算机系统的故障(硬件故障、软件故障、网络故障、进程故障和系统故障)影响数据库系统的操作,影响数据库中数据的正确性,甚至破坏数据库,使数据库中全部或部分数据丢失。因此当发生上述故障后,希望能重构这个完整的数据库,该处理称为数据库恢复。恢复过程大致可以分为复原(Restore)与
- JavaEE开源快速开发平台G4Studio v5.0发布
無為子
我非常高兴地宣布,今天我们最新的JavaEE开源快速开发平台G4Studio_V5.0版本已经正式发布。
访问G4Studio网站
http://www.g4it.org
2013-04-06 发布G4Studio_V5.0版本
功能新增
(1). 新增了调用Oracle存储过程返回游标,并将游标映射为Java List集合对象的标
- Oracle显示根据高考分数模拟录取
百合不是茶
PL/SQL编程oracle例子模拟高考录取学习交流
题目要求:
1,创建student表和result表
2,pl/sql对学生的成绩数据进行处理
3,处理的逻辑是根据每门专业课的最低分线和总分的最低分数线自动的将录取和落选
1,创建student表,和result表
学生信息表;
create table student(
student_id number primary key,--学生id
- 优秀的领导与差劲的领导
bijian1013
领导管理团队
责任
优秀的领导:优秀的领导总是对他所负责的项目担负起责任。如果项目不幸失败了,那么他知道该受责备的人是他自己,并且敢于承认错误。
差劲的领导:差劲的领导觉得这不是他的问题,因此他会想方设法证明是他的团队不行,或是将责任归咎于团队中他不喜欢的那几个成员身上。
努力工作
优秀的领导:团队领导应该是团队成员的榜样。至少,他应该与团队中的其他成员一样努力工作。这仅仅因为他
- js函数在浏览器下的兼容
Bill_chen
jquery浏览器IEDWRext
做前端开发的工程师,少不了要用FF进行测试,纯js函数在不同浏览器下,名称也可能不同。对于IE6和FF,取得下一结点的函数就不尽相同:
IE6:node.nextSibling,对于FF是不能识别的;
FF:node.nextElementSibling,对于IE是不能识别的;
兼容解决方式:var Div = node.nextSibl
- 【JVM四】老年代垃圾回收:吞吐量垃圾收集器(Throughput GC)
bit1129
垃圾回收
吞吐量与用户线程暂停时间
衡量垃圾回收算法优劣的指标有两个:
吞吐量越高,则算法越好
暂停时间越短,则算法越好
首先说明吞吐量和暂停时间的含义。
垃圾回收时,JVM会启动几个特定的GC线程来完成垃圾回收的任务,这些GC线程与应用的用户线程产生竞争关系,共同竞争处理器资源以及CPU的执行时间。GC线程不会对用户带来的任何价值,因此,好的GC应该占
- J2EE监听器和过滤器基础
白糖_
J2EE
Servlet程序由Servlet,Filter和Listener组成,其中监听器用来监听Servlet容器上下文。
监听器通常分三类:基于Servlet上下文的ServletContex监听,基于会话的HttpSession监听和基于请求的ServletRequest监听。
ServletContex监听器
ServletContex又叫application
- 博弈AngularJS讲义(16) - 提供者
boyitech
jsAngularJSapiAngularProvider
Angular框架提供了强大的依赖注入机制,这一切都是有注入器(injector)完成. 注入器会自动实例化服务组件和符合Angular API规则的特殊对象,例如控制器,指令,过滤器动画等。
那注入器怎么知道如何去创建这些特殊的对象呢? Angular提供了5种方式让注入器创建对象,其中最基础的方式就是提供者(provider), 其余四种方式(Value, Fac
- java-写一函数f(a,b),它带有两个字符串参数并返回一串字符,该字符串只包含在两个串中都有的并按照在a中的顺序。
bylijinnan
java
public class CommonSubSequence {
/**
* 题目:写一函数f(a,b),它带有两个字符串参数并返回一串字符,该字符串只包含在两个串中都有的并按照在a中的顺序。
* 写一个版本算法复杂度O(N^2)和一个O(N) 。
*
* O(N^2):对于a中的每个字符,遍历b中的每个字符,如果相同,则拷贝到新字符串中。
* O(
- sqlserver 2000 无法验证产品密钥
Chen.H
sqlwindowsSQL ServerMicrosoft
在 Service Pack 4 (SP 4), 是运行 Microsoft Windows Server 2003、 Microsoft Windows Storage Server 2003 或 Microsoft Windows 2000 服务器上您尝试安装 Microsoft SQL Server 2000 通过卷许可协议 (VLA) 媒体。 这样做, 收到以下错误信息CD KEY的 SQ
- [新概念武器]气象战争
comsci
气象战争的发动者必须是拥有发射深空航天器能力的国家或者组织....
原因如下:
地球上的气候变化和大气层中的云层涡旋场有密切的关系,而维持一个在大气层某个层次
- oracle 中 rollup、cube、grouping 使用详解
daizj
oraclegroupingrollupcube
oracle 中 rollup、cube、grouping 使用详解 -- 使用oracle 样例表演示 转自namesliu
-- 使用oracle 的样列库,演示 rollup, cube, grouping 的用法与使用场景
--- ROLLUP , 为了理解分组的成员数量,我增加了 分组的计数 COUNT(SAL)
- 技术资料汇总分享
Dead_knight
技术资料汇总 分享
本人汇总的技术资料,分享出来,希望对大家有用。
http://pan.baidu.com/s/1jGr56uE
资料主要包含:
Workflow->工作流相关理论、框架(OSWorkflow、JBPM、Activiti、fireflow...)
Security->java安全相关资料(SSL、SSO、SpringSecurity、Shiro、JAAS...)
Ser
- 初一下学期难记忆单词背诵第一课
dcj3sjt126com
englishword
could 能够
minute 分钟
Tuesday 星期二
February 二月
eighteenth 第十八
listen 听
careful 小心的,仔细的
short 短的
heavy 重的
empty 空的
certainly 当然
carry 携带;搬运
tape 磁带
basket 蓝子
bottle 瓶
juice 汁,果汁
head 头;头部
- 截取视图的图片, 然后分享出去
dcj3sjt126com
OSObjective-C
OS 7 has a new method that allows you to draw a view hierarchy into the current graphics context. This can be used to get an UIImage very fast.
I implemented a category method on UIView to get the vi
- MySql重置密码
fanxiaolong
MySql重置密码
方法一:
在my.ini的[mysqld]字段加入:
skip-grant-tables
重启mysql服务,这时的mysql不需要密码即可登录数据库
然后进入mysql
mysql>use mysql;
mysql>更新 user set password=password('新密码') WHERE User='root';
mysq
- Ehcache(03)——Ehcache中储存缓存的方式
234390216
ehcacheMemoryStoreDiskStore存储驱除策略
Ehcache中储存缓存的方式
目录
1 堆内存(MemoryStore)
1.1 指定可用内存
1.2 驱除策略
1.3 元素过期
2 &nbs
- spring mvc中的@propertysource
jackyrong
spring mvc
在spring mvc中,在配置文件中的东西,可以在java代码中通过注解进行读取了:
@PropertySource 在spring 3.1中开始引入
比如有配置文件
config.properties
mongodb.url=1.2.3.4
mongodb.db=hello
则代码中
@PropertySource(&
- 重学单例模式
lanqiu17
单例Singleton模式
最近在重新学习设计模式,感觉对模式理解更加深刻。觉得有必要记下来。
第一个学的就是单例模式,单例模式估计是最好理解的模式了。它的作用就是防止外部创建实例,保证只有一个实例。
单例模式的常用实现方式有两种,就人们熟知的饱汉式与饥汉式,具体就不多说了。这里说下其他的实现方式
静态内部类方式:
package test.pattern.singleton.statics;
publ
- .NET开源核心运行时,且行且珍惜
netcome
java.net开源
背景
2014年11月12日,ASP.NET之父、微软云计算与企业级产品工程部执行副总裁Scott Guthrie,在Connect全球开发者在线会议上宣布,微软将开源全部.NET核心运行时,并将.NET 扩展为可在 Linux 和 Mac OS 平台上运行。.NET核心运行时将基于MIT开源许可协议发布,其中将包括执行.NET代码所需的一切项目——CLR、JIT编译器、垃圾收集器(GC)和核心
- 使用oscahe缓存技术减少与数据库的频繁交互
Everyday都不同
Web高并发oscahe缓存
此前一直不知道缓存的具体实现,只知道是把数据存储在内存中,以便下次直接从内存中读取。对于缓存的使用也没有概念,觉得缓存技术是一个比较”神秘陌生“的领域。但最近要用到缓存技术,发现还是很有必要一探究竟的。
缓存技术使用背景:一般来说,对于web项目,如果我们要什么数据直接jdbc查库好了,但是在遇到高并发的情形下,不可能每一次都是去查数据库,因为这样在高并发的情形下显得不太合理——
- Spring+Mybatis 手动控制事务
toknowme
mybatis
@Override
public boolean testDelete(String jobCode) throws Exception {
boolean flag = false;
&nbs
- 菜鸟级的android程序员面试时候需要掌握的知识点
xp9802
android
熟悉Android开发架构和API调用
掌握APP适应不同型号手机屏幕开发技巧
熟悉Android下的数据存储
熟练Android Debug Bridge Tool
熟练Eclipse/ADT及相关工具
熟悉Android框架原理及Activity生命周期
熟练进行Android UI布局
熟练使用SQLite数据库;
熟悉Android下网络通信机制,S
 /search 接口的请求方式是 POST ,请求体类似于
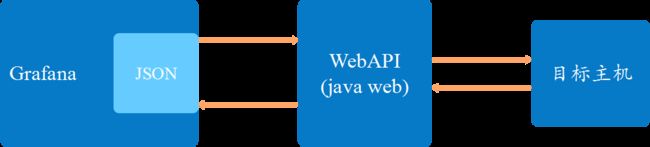 我们的主要工作在于上图中的第二个模块和第三个模块: