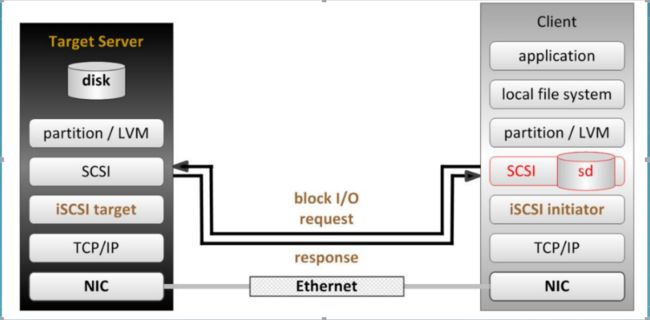
ISCSI———— 远程块存储
ISCSI共享出去的是硬盘 其他共享出的是文件系统
该协议可以用TCP/IP对SCSI指令进行封装,使得这些指令能够通过基于P网络进行传输,从而实现SCSI 和TCP/IP协议的连接。对于局域网环境中的用户来说,采用该标准只需要不多的投资就可以方便、快捷地对信息和数据进行交互式传输及管理。
一.安装服务
*)服务端
(1)服务端分出一个可供共享的硬盘分区

![]()
partprobe ##同步分区表
(2)安装服务
*)yum install targetcli -y

*)systemctl start target
现在我们还没有共享任何设备
(3)配置出共享的硬盘分区
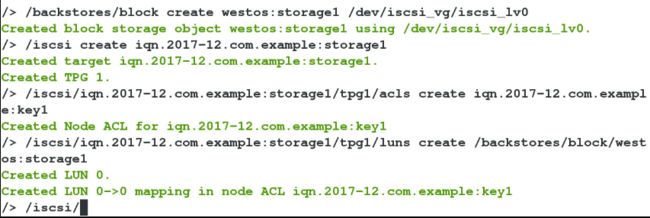
/> /backstores/block create zl:storage1 /dev/vdb1  ##给你的硬盘起一个在targetcli中访问的新名字(服务端自己看)
Created block storage object zl:storage1 using /dev/vdb1.
/> /iscsi create iqn.2017-12.com.example:storage1   ##给你的共享硬盘其一个名字(客户端看)
Created target iqn.2017-12.com.example:storage1.
/> /iscsi/iqn.2017-12.com.example:storage1/tpg1/acls create iqn.2017-12.com.example:zlkey    ##给你的设备加一个key 有key的用户可以访问
Created Node ACL for iqn.2017-12.com.example:zlkey
/> /iscsi/iqn.2017-12.com.example:storage1/tpg1/luns create /backstores/block/zl:storage1   ##创建链接  客户访问/iscsi/iqn.2017-12.com.example:storage1/tpg1/luns 实际上是访问/backstores/block/zl:storage1
Created LUN 0.
Created LUN 0->0 mapping in node ACL iqn.2017-12.com.example:zlkey
/> iscsi/iqn.2017-12.com.example:storage1/tpg1/portals create 172.25.254.210  ##开启一个服务的端口
Using default IP port 3260  ##端口为3260
Created network portal 172.25.254.210:3260.
/> exit
Global pref auto_save_on_exit=true
Last 10 configs saved in /etc/target/backup.
Configuration saved to /etc/target/saveconfig.json

*)[root@server nfs]# firewall-cmd --permanent --add-port=3260/tcp ##火墙策略添加端口
*)[root@server nfs]# firewall-cmd --reload ##重新加载火墙策略
(4)删除共享的设备
/> clearconfig confirm=true       ##确认删除设备
All configuration cleared
/> ls                                                                                      ##没有共享设备了
o- / ..................................................................... [...]
  o- backstores .......................................................... [...]
  | o- block .............................................. [Storage Objects: 0]
  | o- fileio ............................................. [Storage Objects: 0]
  | o- pscsi .............................................. [Storage Objects: 0]
  | o- ramdisk ............................................ [Storage Objects: 0]
  o- iscsi ........................................................ [Targets: 0]
  o- loopback ..................................................... [Targets: 0]
/>
二.客户端的使用
*)客户端
1.安装服务
[root@client nfs]# yum install iscsi-initiator-utils -y  ##安装软件
[root@client nfs]# systemctl start iscsi  ##开启服务
[root@client nfs]# vim /etc/iscsi/initiatorname.iscsi  ##编辑key文件
InitiatorName=iqn.2017-12.com.example:zlkey
[root@client nfs]# systemctl restart iscsi ##重启服务

2.发现服务端的设备
[root@client nfs]# iscsiadm -m discovery -t st -p 172.25.254.210 ##发现210主机下的共享设备 -m动作 -t类型 -p ip地址
172.25.254.210:3260,1 iqn.2017-12.com.example:storage1
[root@client nfs]# iscsiadm -m node -T iqn.2017-12.com.example:storage1 -p 172.25.254.210 -l ##开启设备节点
Logging in to [iface: default, target: iqn.2017-12.com.example:storage1, portal: 172.25.254.210,3260] (multiple)
Login to [iface: default, target: iqn.2017-12.com.example:storage1, portal: 172.25.254.210,3260] successful.

3.挂载并使用设备
[root@client nfs]# fdisk -l ##发现设备
Disk /dev/sda: 5368 MB, 5368709120 bytes, 10485760 sectors ##共享设备可用了
Units = sectors of 1 * 512 = 512 bytes
Sector size (logical/physical): 512 bytes / 512 bytes
I/O size (minimum/optimal): 512 bytes / 4194304 bytes
[root@client nfs]# fdisk /dev/sda ##分区
[root@client nfs]# partprobe ##同步分区表
[root@client nfs]# mkfs.xfs /dev/sda1
[root@client nfs]# mount /dev/sda1 /mnt ##挂载


注:此时在/mnt下创建的东西 实际创建在了服务端的/dev/vdb1中 但服务端看不了没有文件系统
4.开机自动挂载
[root@client nfs]# vim /etc/fstab ##编辑配置文件 实现开机自动挂载
![]()
5.删除设备*)不删除文件记录 仅删除设备[root@client ~]# umount /mnt ##卸载设备[root@client ~]# yum install tree.x86_64 ##安装tree[root@client ~]# tree /var/lib/iscsi/ ##用tree查看其文件
*)彻底删除设备及文件[root@client ~]# iscsiadm -m node -T iqn.2017-12.com.example:storage1 -p 172.25.254.210 -u[root@client ~]# iscsiadm -m node -T iqn.2017-12.com.example:storage1 -p 172.25.254.210 -o delete[root@client ~]# tree /var/lib/iscsi/[root@client ~]# systemctl restart iscsi[root@client ~]# fdisk -l
三.扩大共享硬盘的容量
*)服务端1.制作lvm硬盘空间

2.配置targetcli
[root@server nfs]# targetcli
/> /backstores/block create zl:storage1 /dev/iscsi_vg/iscsi_lv0
Created block storage object zl:storage1 using /dev/iscsi_vg/iscsi_lv0.
/> /iscsi create iqn.2017-12.com.example:storage1
Created target iqn.2017-12.com.example:storage1.
Created TPG 1.
/> /iscsi/iqn.2017-12.com.example:storage1/tpg1/acls create iqn.2017-12.com.example:zlkey1
/> /iscsi/iqn.2017-12.com.example:storage1/tpg1/luns create /backstores/block/zl/> /iscsi/iqn.2017-12./> /iscsi/iqn.2017-12.com.example:storage1/tpg1/luns create /backstores/block/zl:storage1
Created LUN 0.
/> /iscsi/iqn.2017-12.com.example:storage1/tpg1/portals create 172.25.254.210
Using default IP port 3260
Created network portal 172.25.254.210:3260.
*)客户端
1.更改key
[root@client ~]# vim /etc/iscsi/initiatorname.iscsi
InitiatorName=iqn.2017-12.com.example:zlkey1
[root@client ~]# systemctl restart iscsi

2.发现设备
[root@client ~]# iscsiadm -m discovery -t st -p 172.25.254.210
172.25.254.210:3260,1 iqn.2017-12.com.example:storage1
[root@client ~]#  iscsiadm -m node -T iqn.2017-12.com.example:storage1 -p 172.25.254.210 -l
Logging in to [iface: default, target: iqn.2017-12.com.example:storage1, portal: 172.25.254.210,3260] (multiple)
Login to [iface: default, target: iqn.2017-12.com.example:storage1, portal: 172.25.254.210,3260] successful.
[root@client ~]# fdisk -l
Disk /dev/sda: 1069 MB, 1069547520 bytes, 2088960 sectors
Units = sectors of 1 * 512 = 512 bytes
Sector size (logical/physical): 512 bytes / 512 bytes
I/O size (minimum/optimal): 512 bytes / 4194304 bytes

3.扩大设备
*)服务端
[root@server nfs]# fdisk /dev/vdb
-n -p -1 - -1G -t -8e -wq
[root@server nfs]# partprobe
[root@server nfs]# pvcreate /dev/vdb2
  Physical volume "/dev/vdb2" successfully created
[root@server nfs]# vgextend iscsi_vg /dev/vdb2
  Volume group "iscsi_vg" successfully extended
[root@server nfs]# lvextend -L 1500M /dev/iscsi_vg/iscsi_lv0
  Extending logical volume iscsi_lv0 to 1.46 GiB
  Logical volume iscsi_lv0 successfully resized
[root@server nfs]# lvs
  LV        VG       Attr       LSize Pool Origin Data%  Move Log Cpy%Sync Convert
  iscsi_lv0 iscsi_vg -wi-ao---- 1.46g

*)客户端
[root@client ~]#  iscsiadm -m node -T iqn.2017-12.com.example:storage1 -p 172.25.254.210 -u
[root@client ~]#  iscsiadm -m node -T iqn.2017-12.com.example:storage1 -p 172.25.254.210 -l
[root@client ~]# fdisk -l
Disk /dev/sda: 1572 MB, 1572864000 bytes, 3072000 sectors
Units = sectors of 1 * 512 = 512 bytes
Sector size (logical/physical): 512 bytes / 512 bytes
I/O size (minimum/optimal): 512 bytes / 4194304 bytes
