最近在配置.net mvc4项目使用ueditor编辑器,在配置过程中遇见了好几个问题,以此来记录解决办法。
首先去这里下载
然后重名一下下载的文件夹为ueditor(想自己起名字也可以,不过配置文件就要改成一样的了,这里为了避免麻烦,就跟配置文件里的名字保持一致了)
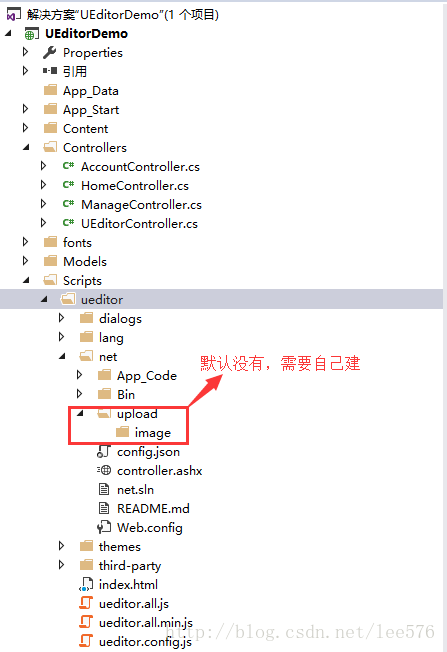
然后根据自己需要放到项目中,我是这么放的
上面建的文件夹也是跟配置文件保持一致,并不是非要照着这么做,这里只是跟配置文件保持一致,可以根据自己需要修改配置文件,自己想怎么建都行,看看配置文件就明白了
config.json
/* 前后端通信相关的配置,注释只允许使用多行方式 */
{
 /* 上传图片配置项 */
 "imageActionName": "uploadimage", /* 执行上传图片的action名称 */
 "imageFieldName": "upfile", /* 提交的图片表单名称 */
 "imageMaxSize": 2048000, /* 上传大小限制,单位B */
 "imageAllowFiles": [".png", ".jpg", ".jpeg", ".gif", ".bmp"], /* 上传图片格式显示 */
 "imageCompressEnable": true, /* 是否压缩图片,默认是true */
 "imageCompressBorder": 1600, /* 图片压缩最长边限制 */
 "imageInsertAlign": "none", /* 插入的图片浮动方式 */
 "imageUrlPrefix": "Scripts/ueditor/net/", /* 图片访问路径前缀 */
 "imagePathFormat": "upload/image/{yyyy}{mm}{dd}/{time}{rand:6}", /* 上传保存路径,可以自定义保存路径和文件名格式 */
    /* {filename} 会替换成原文件名,配置这项需要注意中文乱码问题 */
    /* {rand:6} 会替换成随机数,后面的数字是随机数的位数 */
    /* {time} 会替换成时间戳 */
    /* {yyyy} 会替换成四位年份 */
    /* {yy} 会替换成两位年份 */
    /* {mm} 会替换成两位月份 */
    /* {dd} 会替换成两位日期 */
    /* {hh} 会替换成两位小时 */
    /* {ii} 会替换成两位分钟 */
    /* {ss} 会替换成两位秒 */
    /* 非法字符 \ : * ? " < > | */
    /* 具请体看线上文档: fex.baidu.com/ueditor/#use-format_upload_filename */

 /* 涂鸦图片上传配置项 */
 "scrawlActionName": "uploadscrawl", /* 执行上传涂鸦的action名称 */
 "scrawlFieldName": "upfile", /* 提交的图片表单名称 */
 "scrawlPathFormat": "upload/image/{yyyy}{mm}{dd}/{time}{rand:6}", /* 上传保存路径,可以自定义保存路径和文件名格式 */
 "scrawlMaxSize": 2048000, /* 上传大小限制,单位B */
 "scrawlUrlPrefix": "/ueditor/net/", /* 图片访问路径前缀 */
 "scrawlInsertAlign": "none",

 /* 截图工具上传 */
 "snapscreenActionName": "uploadimage", /* 执行上传截图的action名称 */
 "snapscreenPathFormat": "upload/image/{yyyy}{mm}{dd}/{time}{rand:6}", /* 上传保存路径,可以自定义保存路径和文件名格式 */
 "snapscreenUrlPrefix": "/ueditor/net/", /* 图片访问路径前缀 */
 "snapscreenInsertAlign": "none", /* 插入的图片浮动方式 */

 /* 抓取远程图片配置 */
 "catcherLocalDomain": ["127.0.0.1", "localhost", "img.baidu.com"],
 "catcherActionName": "catchimage", /* 执行抓取远程图片的action名称 */
 "catcherFieldName": "source", /* 提交的图片列表表单名称 */
 "catcherPathFormat": "upload/image/{yyyy}{mm}{dd}/{time}{rand:6}", /* 上传保存路径,可以自定义保存路径和文件名格式 */
 "catcherUrlPrefix": "/ueditor/net/", /* 图片访问路径前缀 */
 "catcherMaxSize": 2048000, /* 上传大小限制,单位B */
 "catcherAllowFiles": [".png", ".jpg", ".jpeg", ".gif", ".bmp"], /* 抓取图片格式显示 */

 /* 上传视频配置 */
 "videoActionName": "uploadvideo", /* 执行上传视频的action名称 */
 "videoFieldName": "upfile", /* 提交的视频表单名称 */
 "videoPathFormat": "upload/video/{yyyy}{mm}{dd}/{time}{rand:6}", /* 上传保存路径,可以自定义保存路径和文件名格式 */
 "videoUrlPrefix": "/ueditor/net/", /* 视频访问路径前缀 */
 "videoMaxSize": 102400000, /* 上传大小限制,单位B,默认100MB */
 "videoAllowFiles": [
 ".flv", ".swf", ".mkv", ".avi", ".rm", ".rmvb", ".mpeg", ".mpg",
 ".ogg", ".ogv", ".mov", ".wmv", ".mp4", ".webm", ".mp3", ".wav", ".mid"], /* 上传视频格式显示 */

 /* 上传文件配置 */
 "fileActionName": "uploadfile", /* controller里,执行上传视频的action名称 */
 "fileFieldName": "upfile", /* 提交的文件表单名称 */
 "filePathFormat": "upload/file/{yyyy}{mm}{dd}/{time}{rand:6}", /* 上传保存路径,可以自定义保存路径和文件名格式 */
 "fileUrlPrefix": "/ueditor/net/", /* 文件访问路径前缀 */
 "fileMaxSize": 51200000, /* 上传大小限制,单位B,默认50MB */
 "fileAllowFiles": [
 ".png", ".jpg", ".jpeg", ".gif", ".bmp",
 ".flv", ".swf", ".mkv", ".avi", ".rm", ".rmvb", ".mpeg", ".mpg",
 ".ogg", ".ogv", ".mov", ".wmv", ".mp4", ".webm", ".mp3", ".wav", ".mid",
 ".rar", ".zip", ".tar", ".gz", ".7z", ".bz2", ".cab", ".iso",
 ".doc", ".docx", ".xls", ".xlsx", ".ppt", ".pptx", ".pdf", ".txt", ".md", ".xml"
 ], /* 上传文件格式显示 */

 /* 列出指定目录下的图片 */
 "imageManagerActionName": "listimage", /* 执行图片管理的action名称 */
 "imageManagerListPath": "upload/image", /* 指定要列出图片的目录 */
 "imageManagerListSize": 20, /* 每次列出文件数量 */
 "imageManagerUrlPrefix": "/ueditor/net/", /* 图片访问路径前缀 */
 "imageManagerInsertAlign": "none", /* 插入的图片浮动方式 */
 "imageManagerAllowFiles": [".png", ".jpg", ".jpeg", ".gif", ".bmp"], /* 列出的文件类型 */

 /* 列出指定目录下的文件 */
 "fileManagerActionName": "listfile", /* 执行文件管理的action名称 */
 "fileManagerListPath": "upload/file", /* 指定要列出文件的目录 */
 "fileManagerUrlPrefix": "/ueditor/net/", /* 文件访问路径前缀 */
 "fileManagerListSize": 20, /* 每次列出文件数量 */
 "fileManagerAllowFiles": [
 ".png", ".jpg", ".jpeg", ".gif", ".bmp",
 ".flv", ".swf", ".mkv", ".avi", ".rm", ".rmvb", ".mpeg", ".mpg",
 ".ogg", ".ogv", ".mov", ".wmv", ".mp4", ".webm", ".mp3", ".wav", ".mid",
 ".rar", ".zip", ".tar", ".gz", ".7z", ".bz2", ".cab", ".iso",
 ".doc", ".docx", ".xls", ".xlsx", ".ppt", ".pptx", ".pdf", ".txt", ".md", ".xml"
 ] /* 列出的文件类型 */

}
如果要自定义,下面的配置项必须改
"imageUrlPrefix": "Scripts/ueditor/net/", /* 图片访问路径前缀 */
"imagePathFormat": "upload/image/{yyyy}{mm}{dd}/{time}{rand:6}", /* 上传保存路径,可以自定义保存路径和文件名格式 */
 "fileUrlPrefix": "/ueditor/net/", /* 文件访问路径前缀 */
配置文件 ueditor.config.js 下面的
window.UEDITOR_HOME_URL 可以不指定也可以指定,不指定的话,那就在MVC视图里面指定,如下所示
...... ......
总之就是下面几个步骤
1.下载UEditor插件,把文件夹放在项目根目录下,改名,省事的话就跟配置文件保持一致。
2.建立一个Controller, Action方法加上 [ValidateInput(false)]
 public class UEditorController : Controller
 {
 [ValidateInput(false)]
 // GET: UEditor
 public ActionResult Index(FormCollection fc)
 {
 }
 }
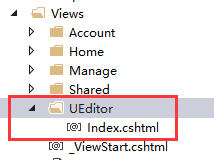
3.建立视图,视图名称跟Controller的Action方法名称一致
@{
ViewBag.Title = "UEditorDemo";
}
@using (Html.BeginForm("Index", "UEditor", FormMethod.Post))
{
}
4.修改Controller如下
 public ActionResult Index(FormCollection fc)
 {
  var content = fc["editor"];
  return View();
 }
5.首页弹出UEditor的页面用来测试,修改App_Start文件夹下的RouteConfig
 public class RouteConfig
 {
 public static void RegisterRoutes(RouteCollection routes)
 {
  routes.IgnoreRoute("{resource}.axd/{*pathInfo}");

  routes.MapRoute(
  name: "Default",
  url: "{controller}/{action}/{id}",
  //defaults: new { controller = "Home", action = "Index", id = UrlParameter.Optional }
  defaults: new { controller = "UEditor", action = "Index", id = UrlParameter.Optional }
  );
 }
 }
6.默认我们并不需要UEditor工具栏上的所有按钮,需要屏蔽一些,这个时候需要修改ueditor.config.js
 , toolbars: [[
  //'fullscreen', 'source', '|', 'undo', 'redo', '|',
  //'bold', 'italic', 'underline', 'fontborder', 'strikethrough', 'superscript', 'subscript', 'removeformat', 'formatmatch', 'autotypeset', 'blockquote', 'pasteplain', '|', 'forecolor', 'backcolor', 'insertorderedlist', 'insertunorderedlist', 'selectall', 'cleardoc', '|',
  //'rowspacingtop', 'rowspacingbottom', 'lineheight', '|',
  //'customstyle', 'paragraph', 'fontfamily', 'fontsize', '|',
  //'directionalityltr', 'directionalityrtl', 'indent', '|',
  //'justifyleft', 'justifycenter', 'justifyright', 'justifyjustify', '|', 'touppercase', 'tolowercase', '|',
  //'link', 'unlink', 'anchor', '|', 'imagenone', 'imageleft', 'imageright', 'imagecenter', '|',
  //'simpleupload', 'insertimage', 'emotion', 'scrawl', 'insertvideo', 'music', 'attachment', 'map', 'gmap', 'insertframe', 'insertcode', 'webapp', 'pagebreak', 'template', 'background', '|',
  //'horizontal', 'date', 'time', 'spechars', 'snapscreen', 'wordimage', '|',
  //'inserttable', 'deletetable', 'insertparagraphbeforetable', 'insertrow', 'deleterow', 'insertcol', 'deletecol', 'mergecells', 'mergeright', 'mergedown', 'splittocells', 'splittorows', 'splittocols', 'charts', '|',
  //'print', 'preview', 'searchreplace', 'drafts', 'help'

  'undo', 'redo', '|',
  'bold', 'forecolor', 'removeformat', 'autotypeset', 'pasteplain', '|', '|',
  'justifyleft', 'justifycenter', 'justifyright', 'justifyjustify', '|',
  'link', 'unlink', '|',
  'simpleupload', 'insertimage', '|',
  'wordimage', '|',
  'inserttable', 'insertrow', 'deleterow', 'insertcol', 'deletecol', 'mergecells', 'splittocells'
 ]]
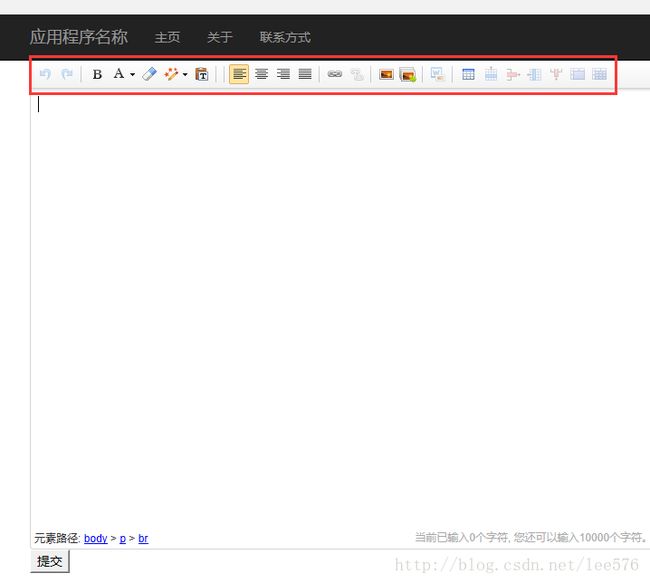
如上,我把原始的工具栏配置项注释掉了,运行一下出现如下效果
已经少了不少平常用不上的按钮,好了大功告成~!
总结
以上就是这篇文章的全部内容了,希望本文的内容对大家学习或者使用Asp.net能带来一定的帮助,如果有疑问大家可以留言交流。


